
Quick Answer: My 7-Point Beam Spread & Optical Distance Protocol
Choosing the right beam angle is all about matching the shape of the light to the shape of the object you are illuminating, not just making a yard "bright." If you do not balance the degree of the spread with how far away the light sits, you will end up with a chaotic mess of dark pockets and blinding hot spots across your property.
Whenever I pull out a layout grid to sketch a landscape lighting plan or swap out optical lenses for a home, I control the light shapes using these seven core field rules:
- 1. Pinpointing Tall Features (10°–25° Narrow Spots): When I want to shoot light straight up a flag pole, a columns framework, or the skinny trunk of a palm or birch tree, I pull out a tight 10 to 25-degree spot to keep the beam punchy and contained.
- 2. Framing Medium Trees & Paths (25°–40° Balanced Spreads): For general landscape work—like lighting up a Japanese Maple or casting a safe, overlapping pool of light along a garden walkway—I rely on a versatile 25 to 40-degree medium flood.
- 3. Washing Stonework and Walls (40°–60° Wide Floods): To highlight the texture of a stone fireplace or a wide front brick facade without creating harsh hot spots, I pull the fixture back a few feet and drop in a wide 40 to 60-degree lens.
- 4. Covering Open Spaces (60°+ Ultra-Wide Floods): When the job requires blanket safety illumination over a broad backyard patio, a multi-car driveway, or thick, low ground covers, I use an ultra-wide flood spread over 60 degrees.
- 5. Adjusting for Multi-Story Distance: The farther light has to travel, the wider it naturally spreads and the weaker it gets; I use tighter, higher-lumen spots for second-story peaks to keep the focus from dissolving into the night sky.
- 6. Tucking Fixtures to Hide Glare: To make sure your guests see the beautiful glow rather than a bare bulb, I angle the light housings away from main sightlines and shroud them behind low bushes or rock features.
- 7. Testing Your Layout With Swappable Lenses: I always recommend using modern fixtures that let you pop off the front face and slide in different drop-in lenses; this lets you tweak your layout on the fly as your garden grows.
⚠️ CRITICAL PERFORMANCE RISK: Using an incorrect beam angle throws light completely outside your target zone, washing out your yard's textures and creating terrible glare issues for anyone looking out the windows. Neglecting these physical angle shapes triggers three distinct visual placement errors that I trace out step-by-step inside our spacing blueprints below.
Don't guess at your bulb specs or order random fixture multipacks blindly. Use my step-by-step angle calculators, tree uplighting distance charts, and exact wall-washing layouts detailed further down this page to build a perfectly balanced look.
How to Choose the Right Beam Angle (Step-by-Step)
| Step | What to Decide | Best Choice |
|---|---|---|
| 1 | What are you lighting? | Tree, path, wall, or area |
| 2 | Do you want focus or coverage? | Focus = narrow, Coverage = wide |
| 3 | How large is the target? | Larger target = wider beam |
| 4 | How far is the fixture? | Further distance = wider spread needed |
| 5 | Test and adjust | Aim and refine after install |
Narrow vs Wide Beam Decision Guide
| Situation | Use Narrow Beam? | Use Wide Beam? |
|---|---|---|
| Highlight a tree | Yes | No |
| Light a pathway | No | Yes |
| Wash a wall | No | Yes |
| Create a focal point | Yes | No |
| Cover large area | No | Yes |
Start Here: What Are You Trying to Light?
- Trees or focal points → use narrow beams
- Walkways → use medium spread
- Walls or large beds → use wide beams
- Security or large areas → use flood beams
Choosing the beam based on the target gives better results than choosing based on fixture type alone.
Most people do not choose the wrong outdoor fixture because they ignored style. They choose the wrong fixture because they ignored optics. Beam spread controls how tight or wide the light lands, how bright it appears on the target, how much spill reaches the surrounding area, and how many fixtures it may take to finish the job well.
That is why this guide matters. It helps you stop guessing and start matching the beam to the purpose. When you understand beam spread, choosing the correct beam angle becomes easier. This guide focuses on helping you match the beam to the target before you move into full layout planning.
Simple Beam Selection Rules
- Use narrow beams when you want strong focus
- Use medium beams for balanced accent lighting
- Use wide beams for soft, even coverage
- Avoid using one beam type for everything
What Is Beam Spread?
Beam spread is the width of the light pattern as it leaves the fixture. It is usually measured in degrees. The smaller the degree, the narrower and more focused the light. The larger the degree, the wider and softer the coverage.
Think of it this way: beam spread is not only about how wide the light looks. It also changes how intense that light feels on the target. When the same amount of light is concentrated into a tighter beam, the result usually appears brighter and more dramatic. When that light is spread across a wider area, the intensity drops, but the coverage improves.
That is why beam angle is one of the key reasons two outdoor fixtures with similar lumen output can produce completely different visual results.
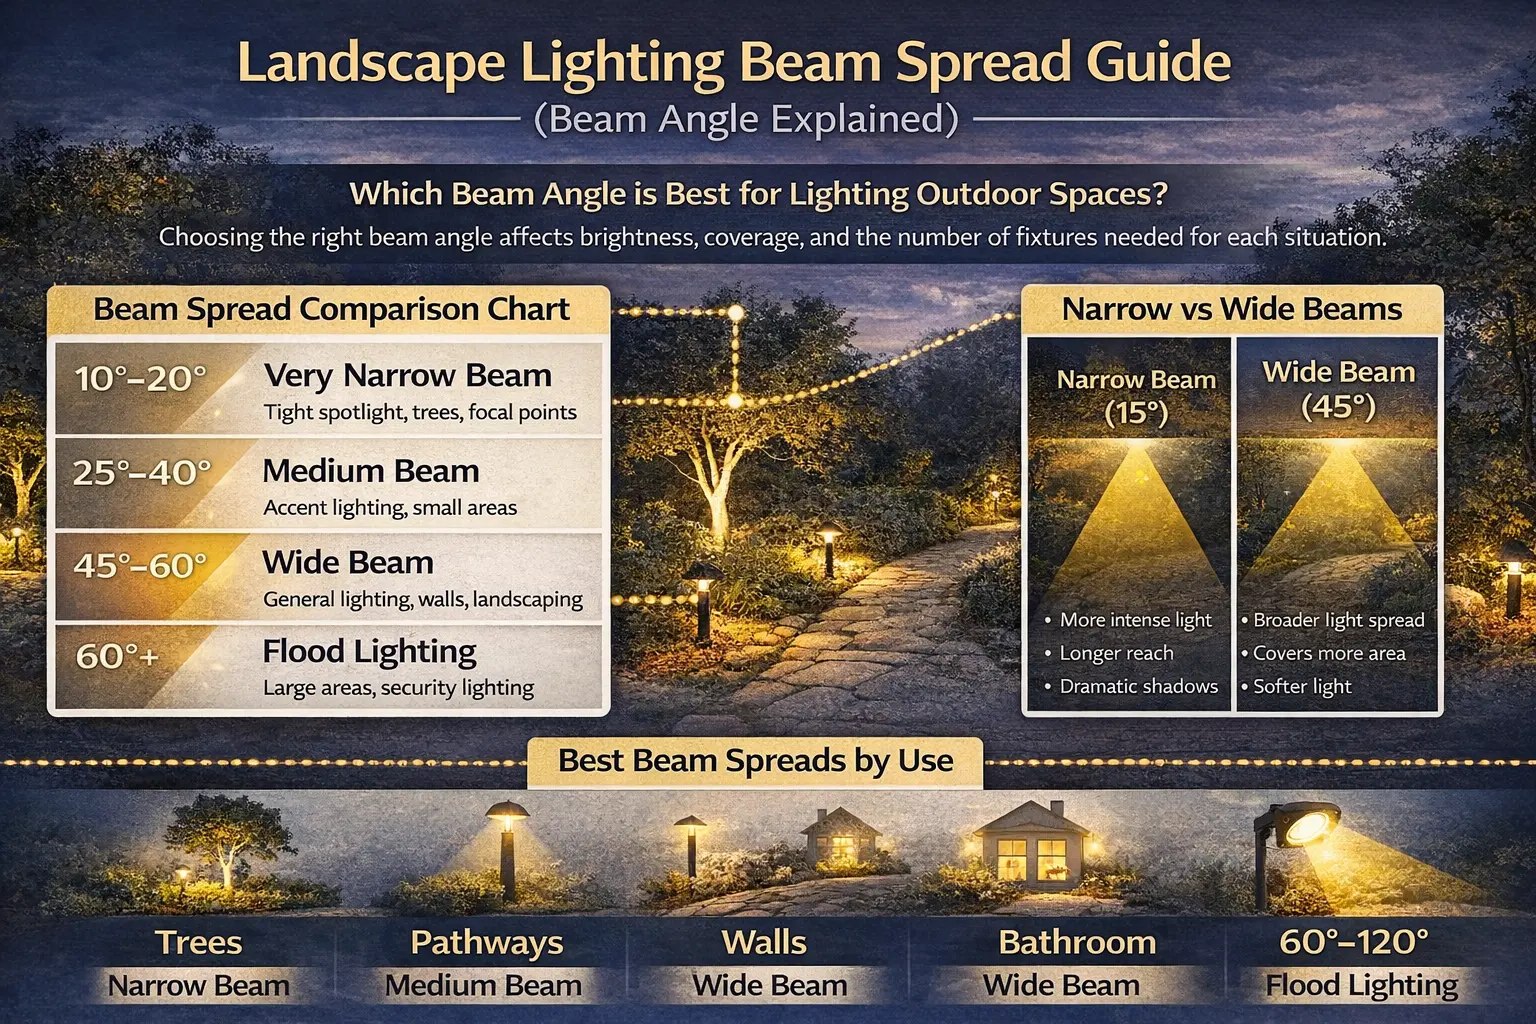
Beam Spread Comparison Chart
Very Narrow Beam
Tight spotlight effect. Best for strong focal points, tall trees, narrow columns, and dramatic accents where you want light concentrated into a smaller area.
Medium Beam
Balanced accent beam. Good for smaller trees, shrubs, garden features, and controlled architectural emphasis where you want coverage without losing focus.
Wide Beam
Broader wash effect. Works well for walls, planting beds, larger shrubs, and areas where you want a softer, more even spread across a wider target.
Flood Beam
Large-area coverage. Often better for broader illumination, larger wall washes, expansive zones, or security-oriented lighting rather than tight focal emphasis.
Narrow vs Wide Beams
A narrow beam is usually the better choice when you want a dramatic focal effect. It keeps the light tighter, brighter, and more directional. That is why narrow beams often work best on trees, columns, statues, and smaller features that need a clear visual emphasis.
A wide beam is usually the better choice when you want broader coverage or a softer wash. It spreads the light more evenly across a wall, garden bed, or larger planting area and is often better when you do not want one hot spot dominating the scene.
The mistake many homeowners make is assuming narrow means better because it looks stronger, or assuming wide means better because it covers more. The truth is that both are useful. The right choice depends on the target, the viewing distance, and the role of the fixture in the overall layout.
Choosing the correct beam spread is only one part of the layout. You can see how beam angles fit into full layout planning explains how to combine beam angles with spacing and placement.
Best Beam Angles by Use
Trees
Narrow beams are often best because they create strong vertical emphasis and keep the light more controlled on the trunk and canopy.
Pathways
Medium beam coverage is often more practical because the goal is usable guidance rather than a tight spotlight effect.
Walls
Wide beams usually work better because they wash a larger surface more evenly and reduce harsh hot spots.
Security Areas
Flood beams often make more sense where the priority is broader visibility and coverage instead of decorative focal emphasis.
Real outdoor lighting plans often use more than one beam type. One yard may need narrow uplights on trees, medium beams on selected features, and wider beams on walls or larger planting zones.
Understanding beam spread becomes much easier when you see how it is used in actual lighting designs. These outdoor lighting ideas and examples show how different beam angles create specific visual effects.
How Beam Spread Changes Coverage
Beam spread directly affects how many fixtures you may need and how far apart they can be placed. A wider beam can cover more area, which often means fewer fixtures are needed. A narrower beam covers less area, which often means you need more fixtures to avoid dark gaps.
That is why beam spread is not just a technical optics topic. It is also a planning and budget topic. A beam that is too narrow for the target may force you to add more fixtures. A beam that is too wide may reduce fixture count but ruin the visual effect by flattening everything into one broad wash.
Beam spread also affects how many fixtures you need, which directly impacts your budget. This landscape lighting cost guide explains how fixture count influences total cost.
Beam Spread, Coverage, and Fixture Count
| Beam Type | Coverage | Perceived Brightness on Target | Typical Fixture Count Effect |
|---|---|---|---|
| Narrow beam | Tighter coverage | Usually stronger and more dramatic | Often more fixtures needed for broader layouts |
| Medium beam | Balanced coverage | Moderate intensity | Often a good compromise for accents |
| Wide beam | Broader coverage | Softer on the target | Often fewer fixtures needed for broader areas |
| Flood beam | Largest coverage | Least concentrated | Good for broad areas, but easier to over-wash a scene |
Common Beam Spread Mistakes
Using Too Wide a Beam
This often makes the scene look washed out. The object loses definition because too much light is spilling into the surrounding area. Trees lose drama, walls lose texture, and beds can start to look flat.
Using Too Narrow a Beam
This often makes the lighting look spotty. The focal point may be bright, but the surrounding scene can feel underlit or disconnected. In some cases the beam is so tight that the fixture looks stronger than the target itself.
Ignoring the Purpose of the Area
A decorative tree, a pathway, a retaining wall, and a security zone usually should not all use the same beam strategy. The lighting purpose should control the beam choice.
If your lighting looks uneven or overly bright in certain areas, beam spread may be the issue. This lighting troubleshooting guide helps diagnose and fix these problems.
Why the Wrong Beam Angle Ruins a Lighting Design
- Too wide → everything looks flat and washed out
- Too narrow → scene looks spotty and uneven
- Wrong beam → requires more fixtures to fix gaps
Beam angle is one of the fastest ways to improve or ruin a lighting layout. Small changes create big visual differences.
How This Connects to Your System
Beam spread does not work in isolation. It interacts with fixture brightness, transformer capacity, wire runs, voltage stability, and physical placement. A good beam choice can still perform poorly if the system is underpowered, poorly aimed, or badly spaced.
Understanding how beam spread interacts with your lighting system can help you get better results. This landscape lighting system guide explains how all components work together.
Choosing the Right Fixture
Beam spread is often shaped by the fixture itself. Optics, lens design, reflector style, and LED control all influence how the beam behaves once the fixture is installed. That means fixture type matters just as much as the beam number on paper.
If your current fixtures do not provide the beam control you need, upgrading may be the best option. This replacement guide for Portfolio landscape lighting shows modern options with better beam performance.
Landscape Lighting Beam Spread FAQ
What beam angle is best for landscape lighting?
It depends on what you are lighting. Narrow beams are usually better for tight focal points and taller features, while wider beams are often better for walls, planting beds, and broader coverage.
What is a narrow beam vs wide beam?
A narrow beam concentrates light into a smaller area for a stronger, more dramatic look. A wide beam spreads light over a larger area for softer coverage.
What beam spread should I use for trees?
Many trees look best with a narrower beam because it creates a stronger vertical emphasis and keeps the light more focused where you want it.
What beam spread is best for pathways?
Pathways often work better with medium coverage or optics designed for guidance and usability rather than very tight, dramatic spotlighting.
Does beam spread affect brightness?
Yes. A narrower beam usually appears brighter on the target because the light is concentrated into a smaller area. A wider beam softens the intensity by spreading the light further.