
Most outdoor lighting looks disappointing for one of three reasons: too many fixtures, poor spacing, or no real layering. Many homeowners place lights wherever there is an empty spot, but good outdoor lighting starts with a plan for the whole property first and a fixture second.
This page is designed to help you slow that process down and plan the yard in a way that feels professional. Instead of guessing, you will build a system that gives each area a job and each fixture a purpose.
If you want to see how outdoor lighting fits into a complete lighting system for your home, you can explore our main lighting guide hub. It brings together indoor lighting plans, landscape lighting systems, troubleshooting help, installation guidance, and replacement parts so you can design a lighting setup that works as one connected system instead of separate pieces.
Outdoor Lighting Planning Help Center
These supporting pages go deeper into layout, wiring, transformer sizing, spacing, troubleshooting, and low voltage design so you can turn a concept into a workable installation plan.
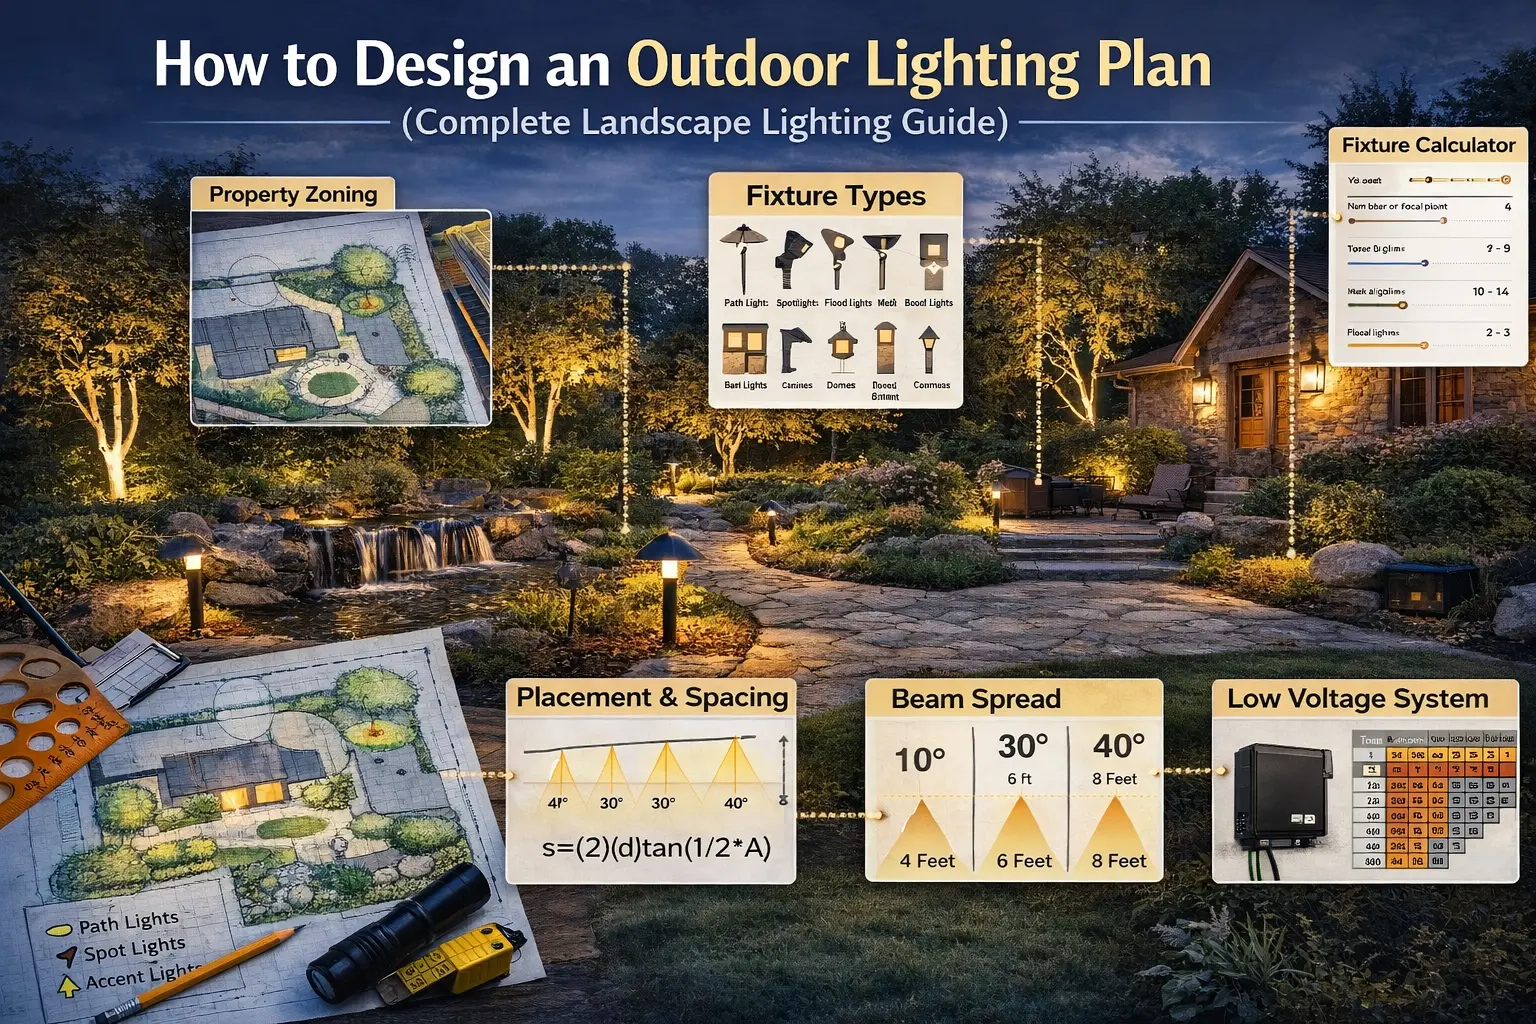
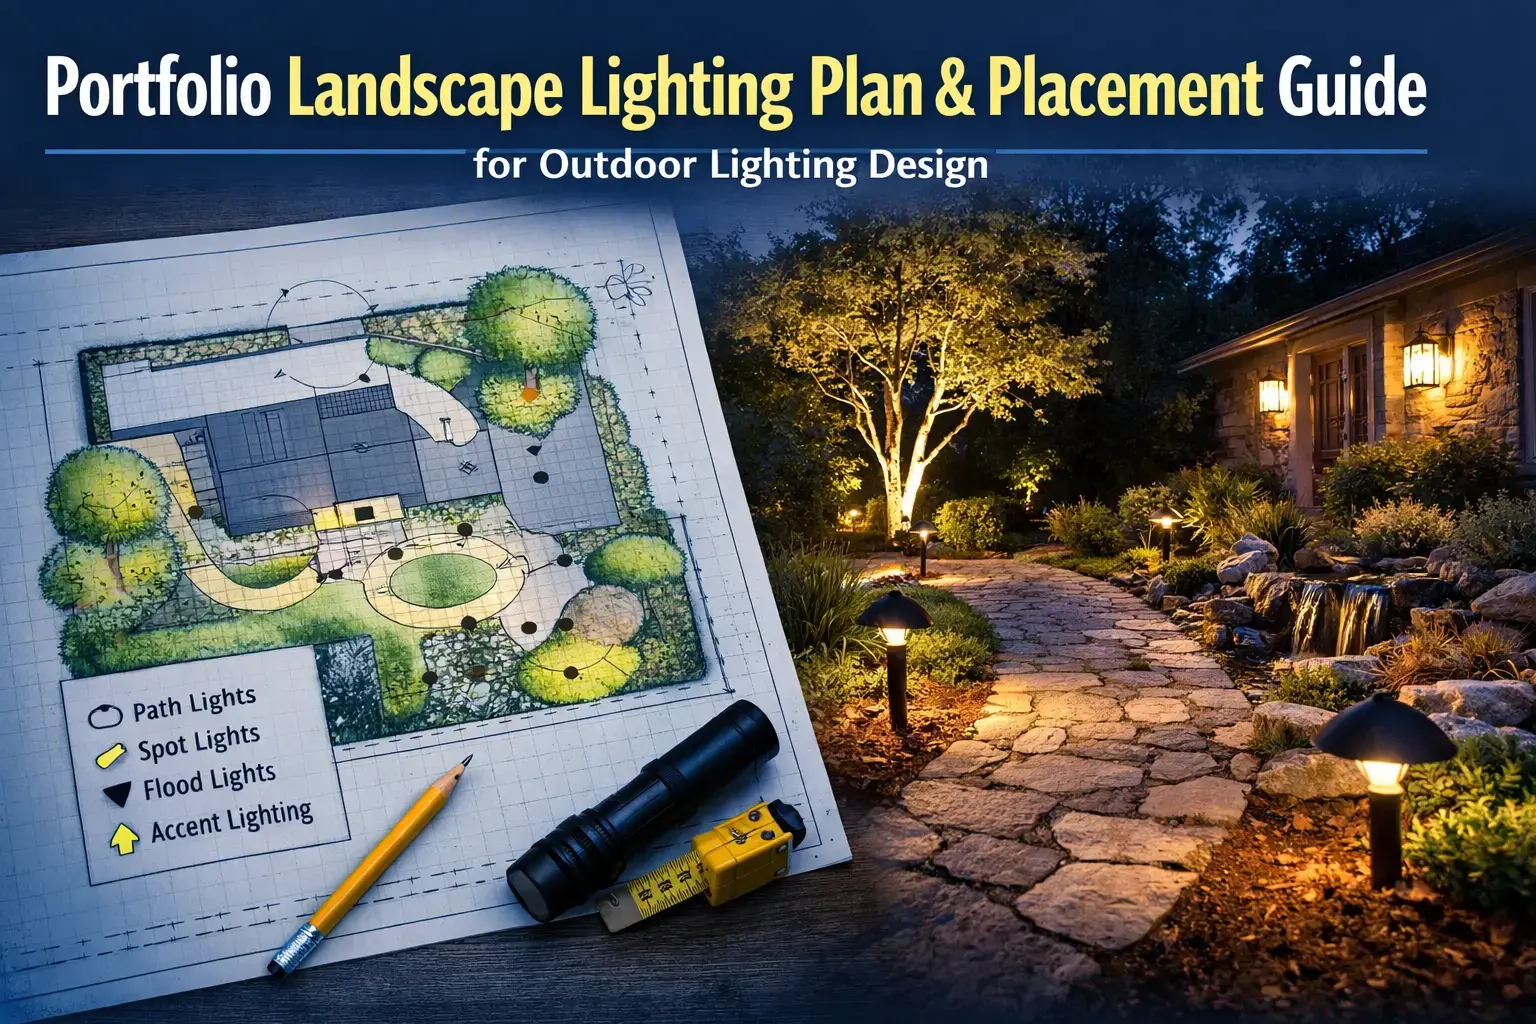
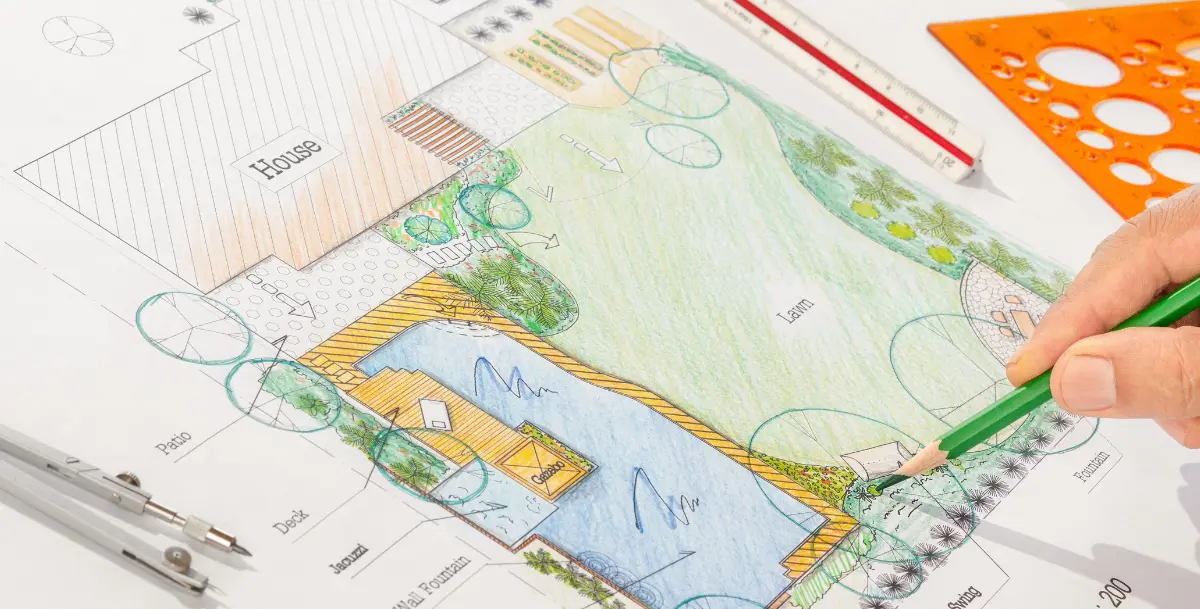
Outdoor Lighting Planning Visuals
Before you start selecting fixtures, it helps to see what a full property plan can look like. These visual references reinforce why outdoor lighting should be designed as a whole system instead of handled one corner at a time. They also connect naturally to the broader Portfolio lighting guide, plan and placement page and your main landscape lighting layout design page.
Step 1: Understand How Outdoor Lighting Works
Outdoor lighting usually works in layers too, but the outdoor version of layering is slightly different from indoor lighting. Outdoors, you are often balancing guidance, safety, visibility, atmosphere, and selective emphasis all at once. That means every fixture should have a job.
Ambient Outdoor Lighting
Ambient outdoor lighting is the broad background light level that helps the property feel usable and navigable at night. Wall lights, some deck lights, entry fixtures, and selected general yard lighting can all contribute to that layer.
Task and Safety Lighting
This layer helps people do something safely. Path lights, stair lighting, driveway edge lighting, gate lighting, and entry-area lighting usually fit here. Their job is not decoration first. Their job is to help people move confidently.
Accent Lighting
Accent lighting highlights what you want people to notice. It may be a tree, a textured wall, a column, a planting bed, or a focal landscape element. Good accent lighting creates depth and contrast. Bad accent lighting just adds glare.
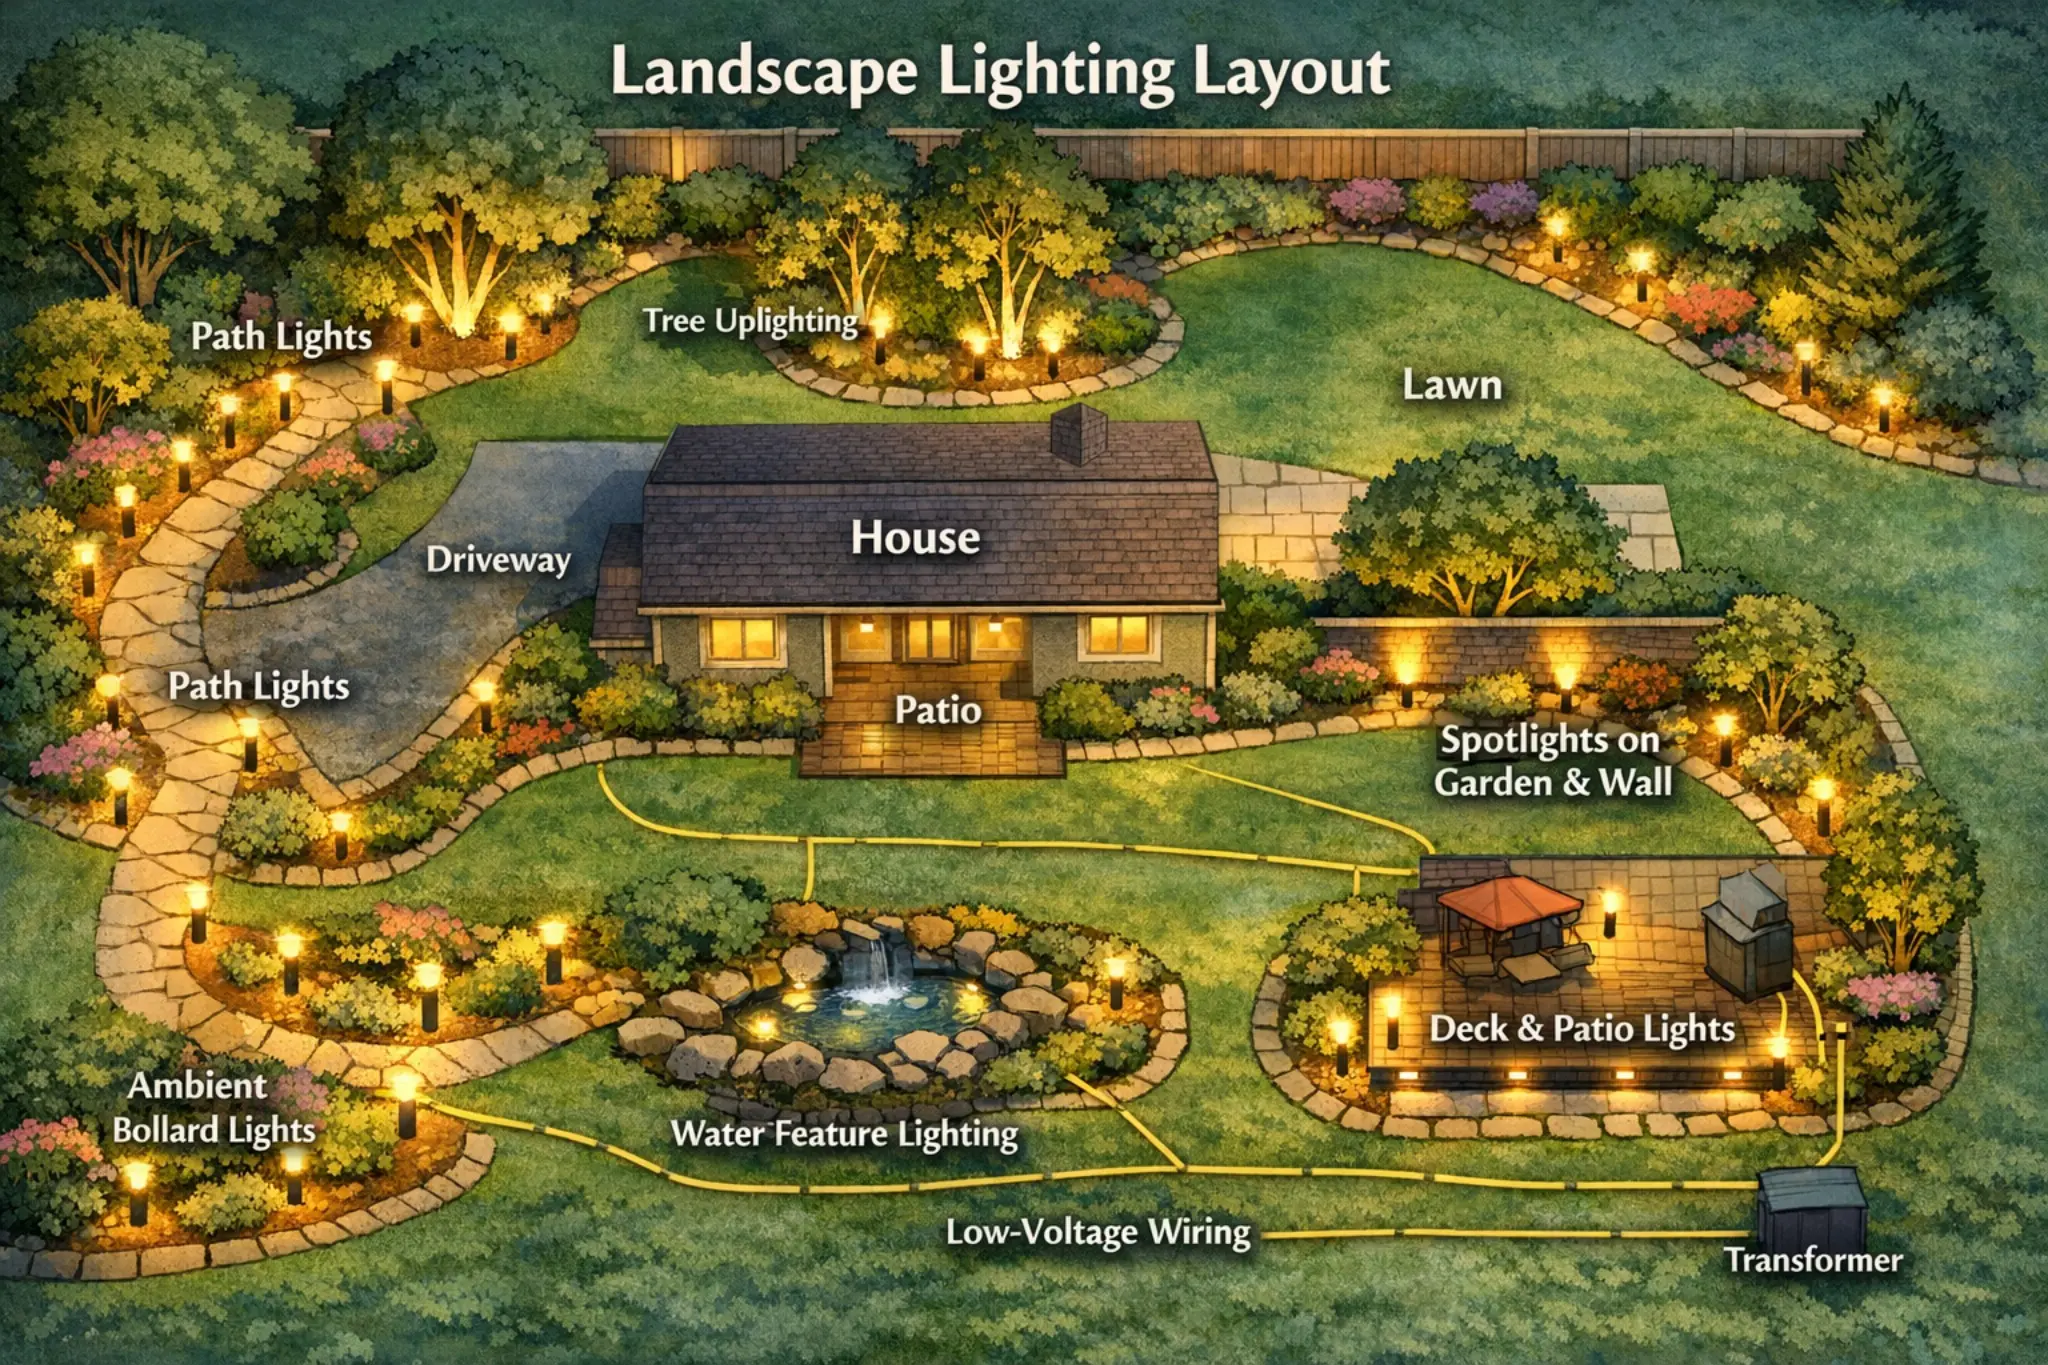
Step 2: Break Your Property Into Outdoor Lighting Zones
One of the easiest ways to make outdoor lighting simpler is to stop seeing the yard as one big space. Instead, break it into zones. That lets you decide what each part of the property needs most and prevents the common mistake of placing the same fixture type everywhere.
The front yard is usually about curb appeal, orientation, and welcoming visibility. It is often the first area people see, so lighting should feel clean and intentional rather than aggressive.
The backyard is often more about usability, comfort, entertaining, and atmosphere. This area usually benefits from layers and selective comfort lighting.
Paths, side yards, walkways, and transitions should be planned for safe movement first. They need enough light to guide, not so much light that they look like a runway.
Front doors, gates, steps, and threshold areas need focused visibility. These are functional zones that also influence how inviting the home feels at night.
Once you understand zones, your outdoor lighting plan becomes much easier to manage. This also works well with the broader Portfolio Landscape Lighting hub and the more technical Portfolio Low Voltage Lighting hub because both support outdoor planning from a different angle.
Interactive Diagram: Toggle Outdoor Lighting Zones
Use this property diagram to think through how zones connect. Turn different zones on and off to help visualize how a lighting plan can be organized before you ever start placing fixtures.
How to use this
Start by deciding which zone has the highest priority. That is often the front walk, entry, or main entertaining area.
Then decide what each zone needs most: guidance, visual emphasis, atmosphere, or usable light.
Finally, choose fixture types based on the job of the zone rather than defaulting to one fixture everywhere.
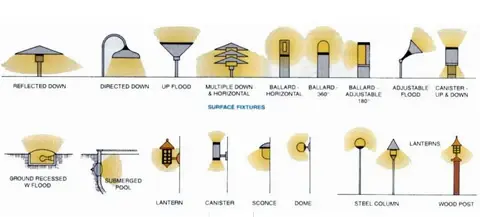
Step 3: Choose the Right Outdoor Fixture Types
Outdoor lighting plans improve quickly when you match the fixture to the job. Path lights, spotlights, flood lights, deck lights, and wall lights are not interchangeable. Each has a different role, and using the wrong one can make the yard feel uneven or overdone.
Fixture Comparison Chart
Path Lights
Best for walkways, borders, and guiding movement.
Use when: the goal is safe navigation and gentle edge definition.
Spotlights
Best for trees, columns, walls, and focal features.
Use when: you want controlled emphasis on one feature.
Flood Lights
Best for wider coverage and broader illumination.
Use when: a larger zone needs broader light, not a narrow beam.
Wall Lights
Best for entries, doors, garages, and vertical surfaces.
Use when: the wall itself is part of the lighting plan.
Deck and Step Lights
Best for transitions, steps, railings, and seating areas.
Use when: safety and comfort are both important.
Accent Lights
Best for planting beds, sculpture, and selective detail.
Use when: subtle emphasis matters more than general brightness.
If you want to go deeper into layout decisions after choosing fixture types, review this landscape lighting layout design guide. It helps connect fixture choice to where the light should actually go.
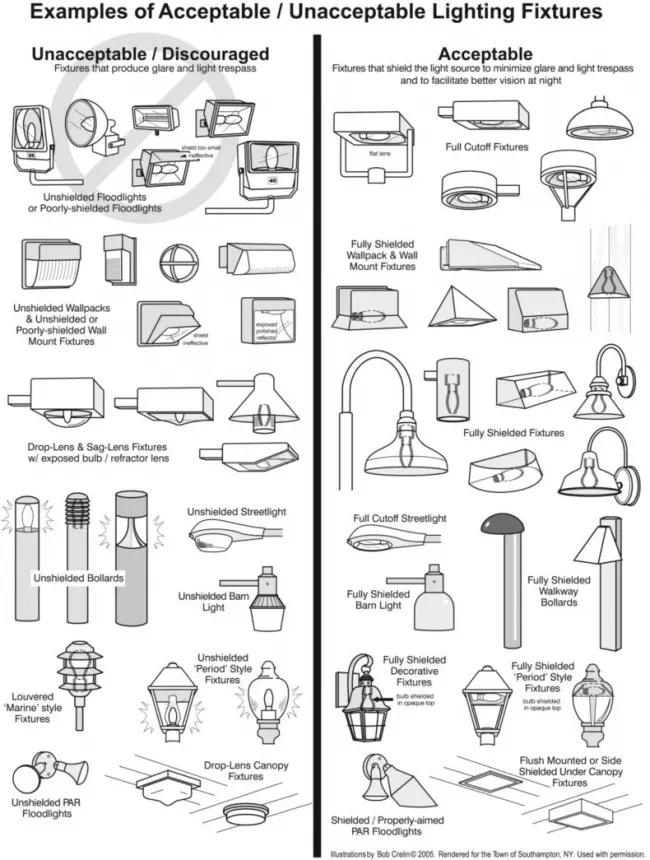
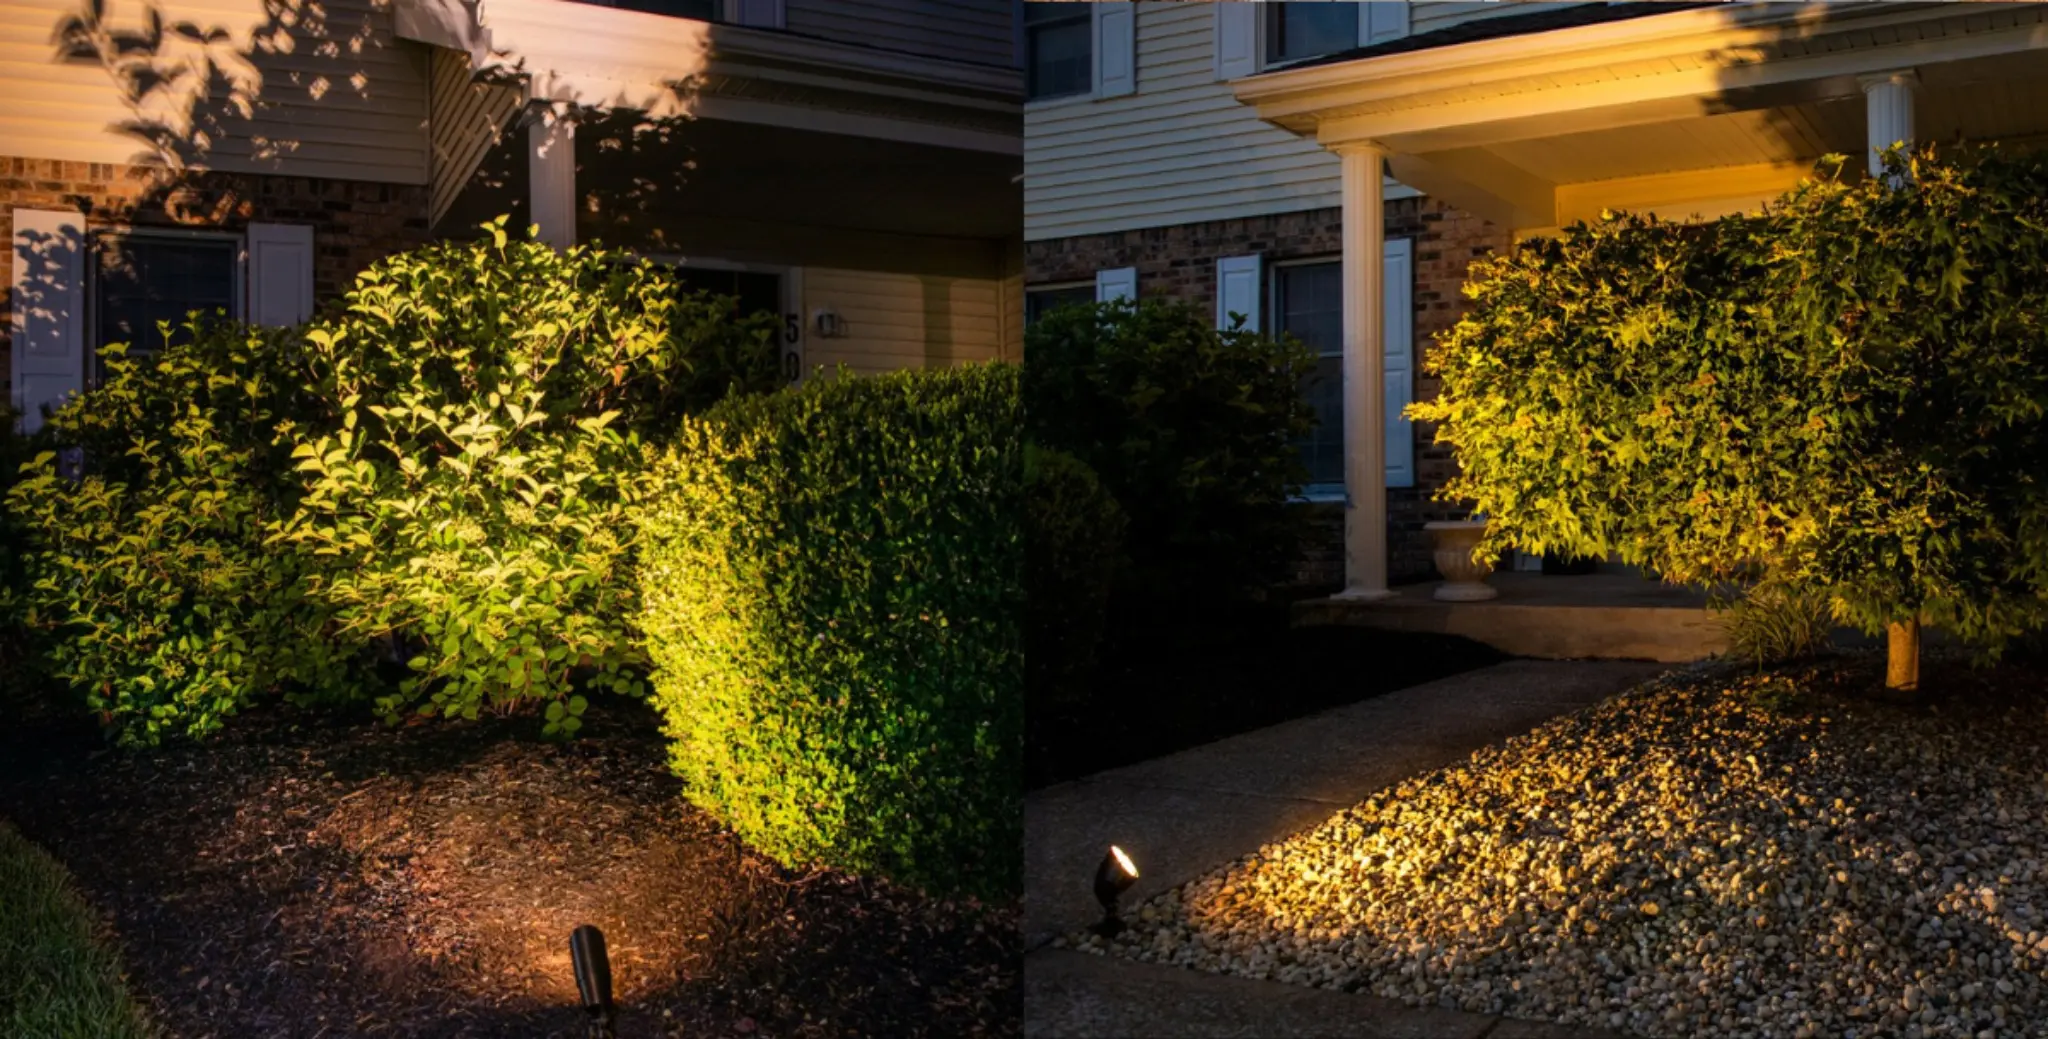
Outdoor Fixture Types and Shielding Examples
These visuals help translate fixture categories into real outdoor applications. They also help explain why shielding matters. The shape of the fixture affects glare, comfort, beam control, and how “clean” the yard looks at night.
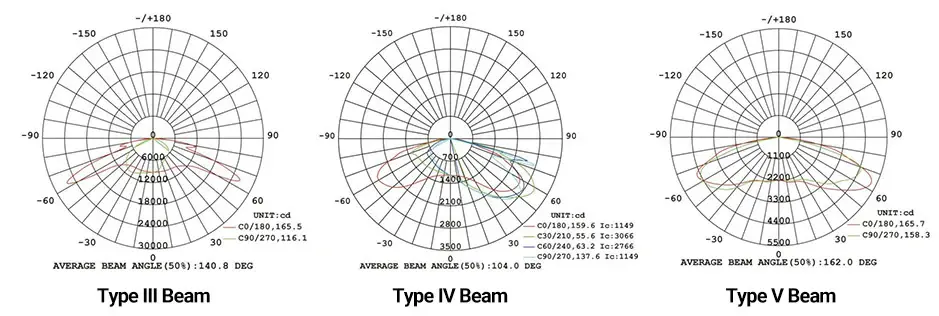
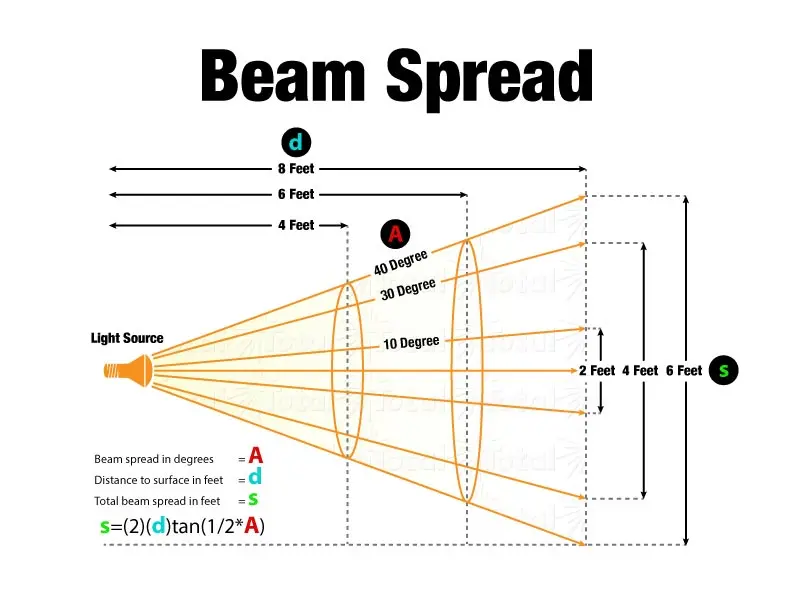
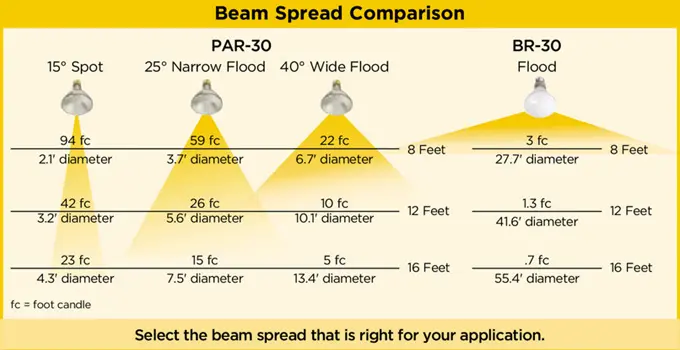
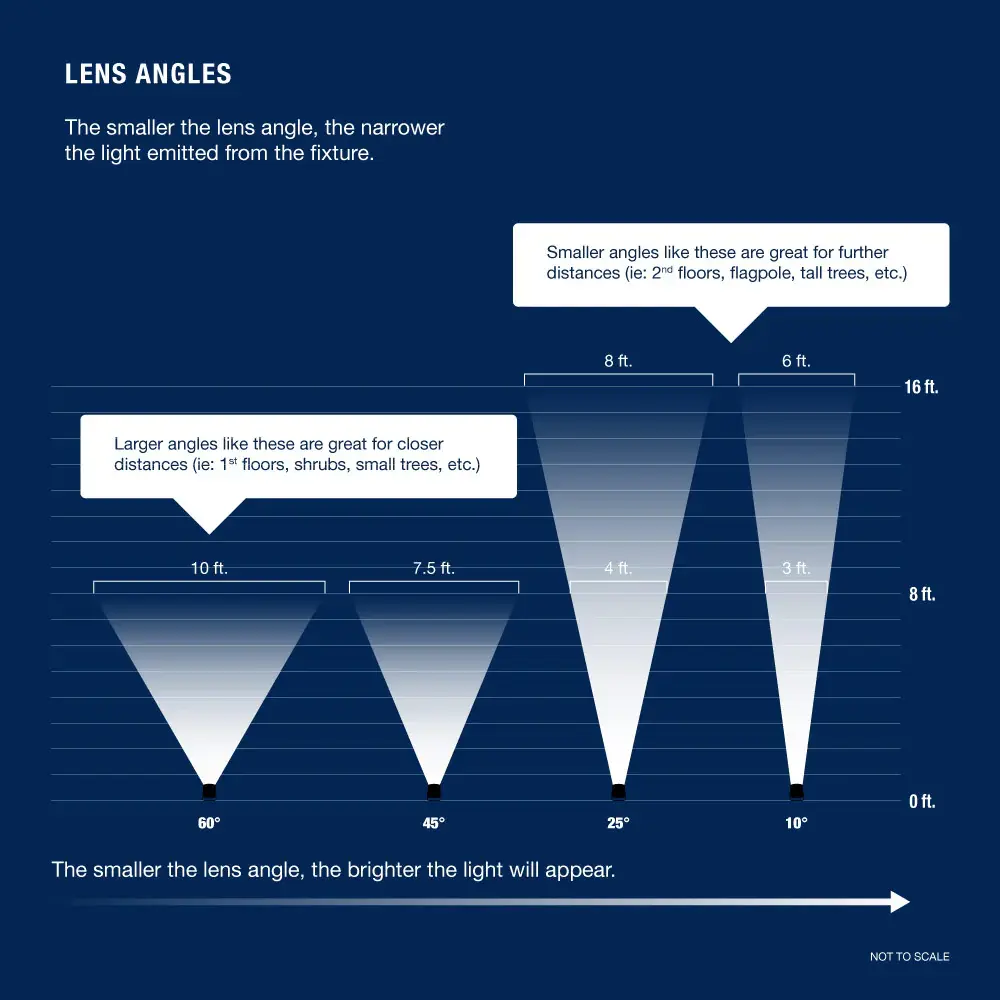
Step 4: Beam Spread, Lens Angles, and Coverage Matter More Than Most Homeowners Realize
Outdoor lighting does not just depend on fixture type. It also depends on beam spread, lens angle, mounting distance, and throw. A spotlight with the wrong beam can miss the object you want to highlight. A flood fixture with too wide a spread can flatten a planting bed or make the whole area feel washed out.
This is also why pages like landscape lighting layout design, landscape lighting spacing, and Portfolio low voltage lighting work so well together. Layout, distance, and fixture optics all influence the final result.
Beam Spread and Lens Angle Visual Guides
 >
>

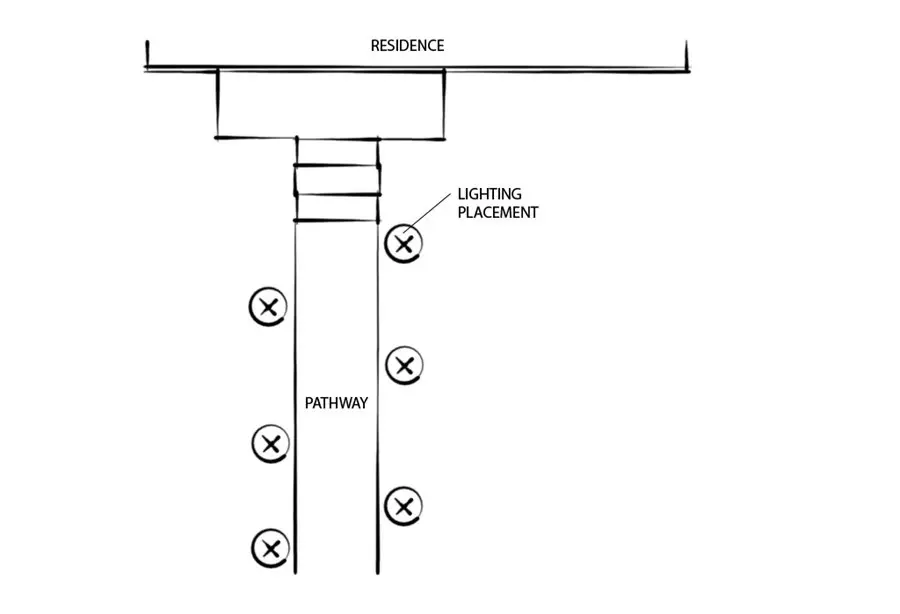
Step 5: Placement and Spacing Separate a Professional Plan From a Poor One
Placement is what separates a professional-looking lighting system from one that feels uneven or overly bright. For deeper spacing strategies, review this landscape lighting layout design guide.
Path lights should usually create a rhythm, not a straight airport-runway effect. Spotlights need the right distance from the object being lit. Flood lights should not flatten everything with one wash of brightness. Wall and entry lights need enough height and position to be useful without creating glare.
Path Light Spacing
The goal is usually balanced pools of light rather than uniform brightness across every inch of the walkway. A dedicated landscape lighting spacing page can help you think more precisely about distance and rhythm.
Spotlight Distance and Angles
Spotlights work best when distance and beam angle are both considered together. Too close can create harsh hot spots. Too far can weaken the focal effect.
Wall and Entry Placement
Entry and wall fixtures need to support visibility, safety, and architectural balance. Good placement here affects both appearance and actual usability.
Placement and Path Lighting Examples
Interactive Spacing Chart
Use this tool to estimate a starting spacing range based on fixture type and the effect you want. This is not a perfect engineering rule, but it is a practical planning guide that helps you avoid common spacing mistakes.
Suggested starting spacing / distance: 6 to 8 feet
Why this works: This gives path lights a gentle rhythm without making the walkway look like a runway.
Planning reminder: Always adjust for fixture brightness, beam spread, and what the yard actually looks like at night.
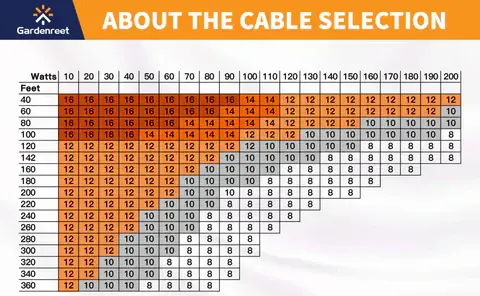
Step 6: Understand the Low Voltage System Before You Install Anything
Most outdoor lighting systems rely on low voltage transformers and wiring layouts. If you are new to how these systems work, this landscape lighting system guide breaks down the full setup.
A typical system includes a transformer, cable, connectors, fixtures, and a layout that has to distribute power consistently across the yard. That may sound simple, but a lot of outdoor lighting performance problems start here. A good-looking plan still fails if the wiring layout is weak or the transformer is undersized.
To keep building the technical side of the plan, use How to Wire Landscape Lighting, Landscape Lighting Transformer Guide, and Landscape Lighting Voltage Drop as supporting pages. Those three pages work especially well once you move from design to installation.
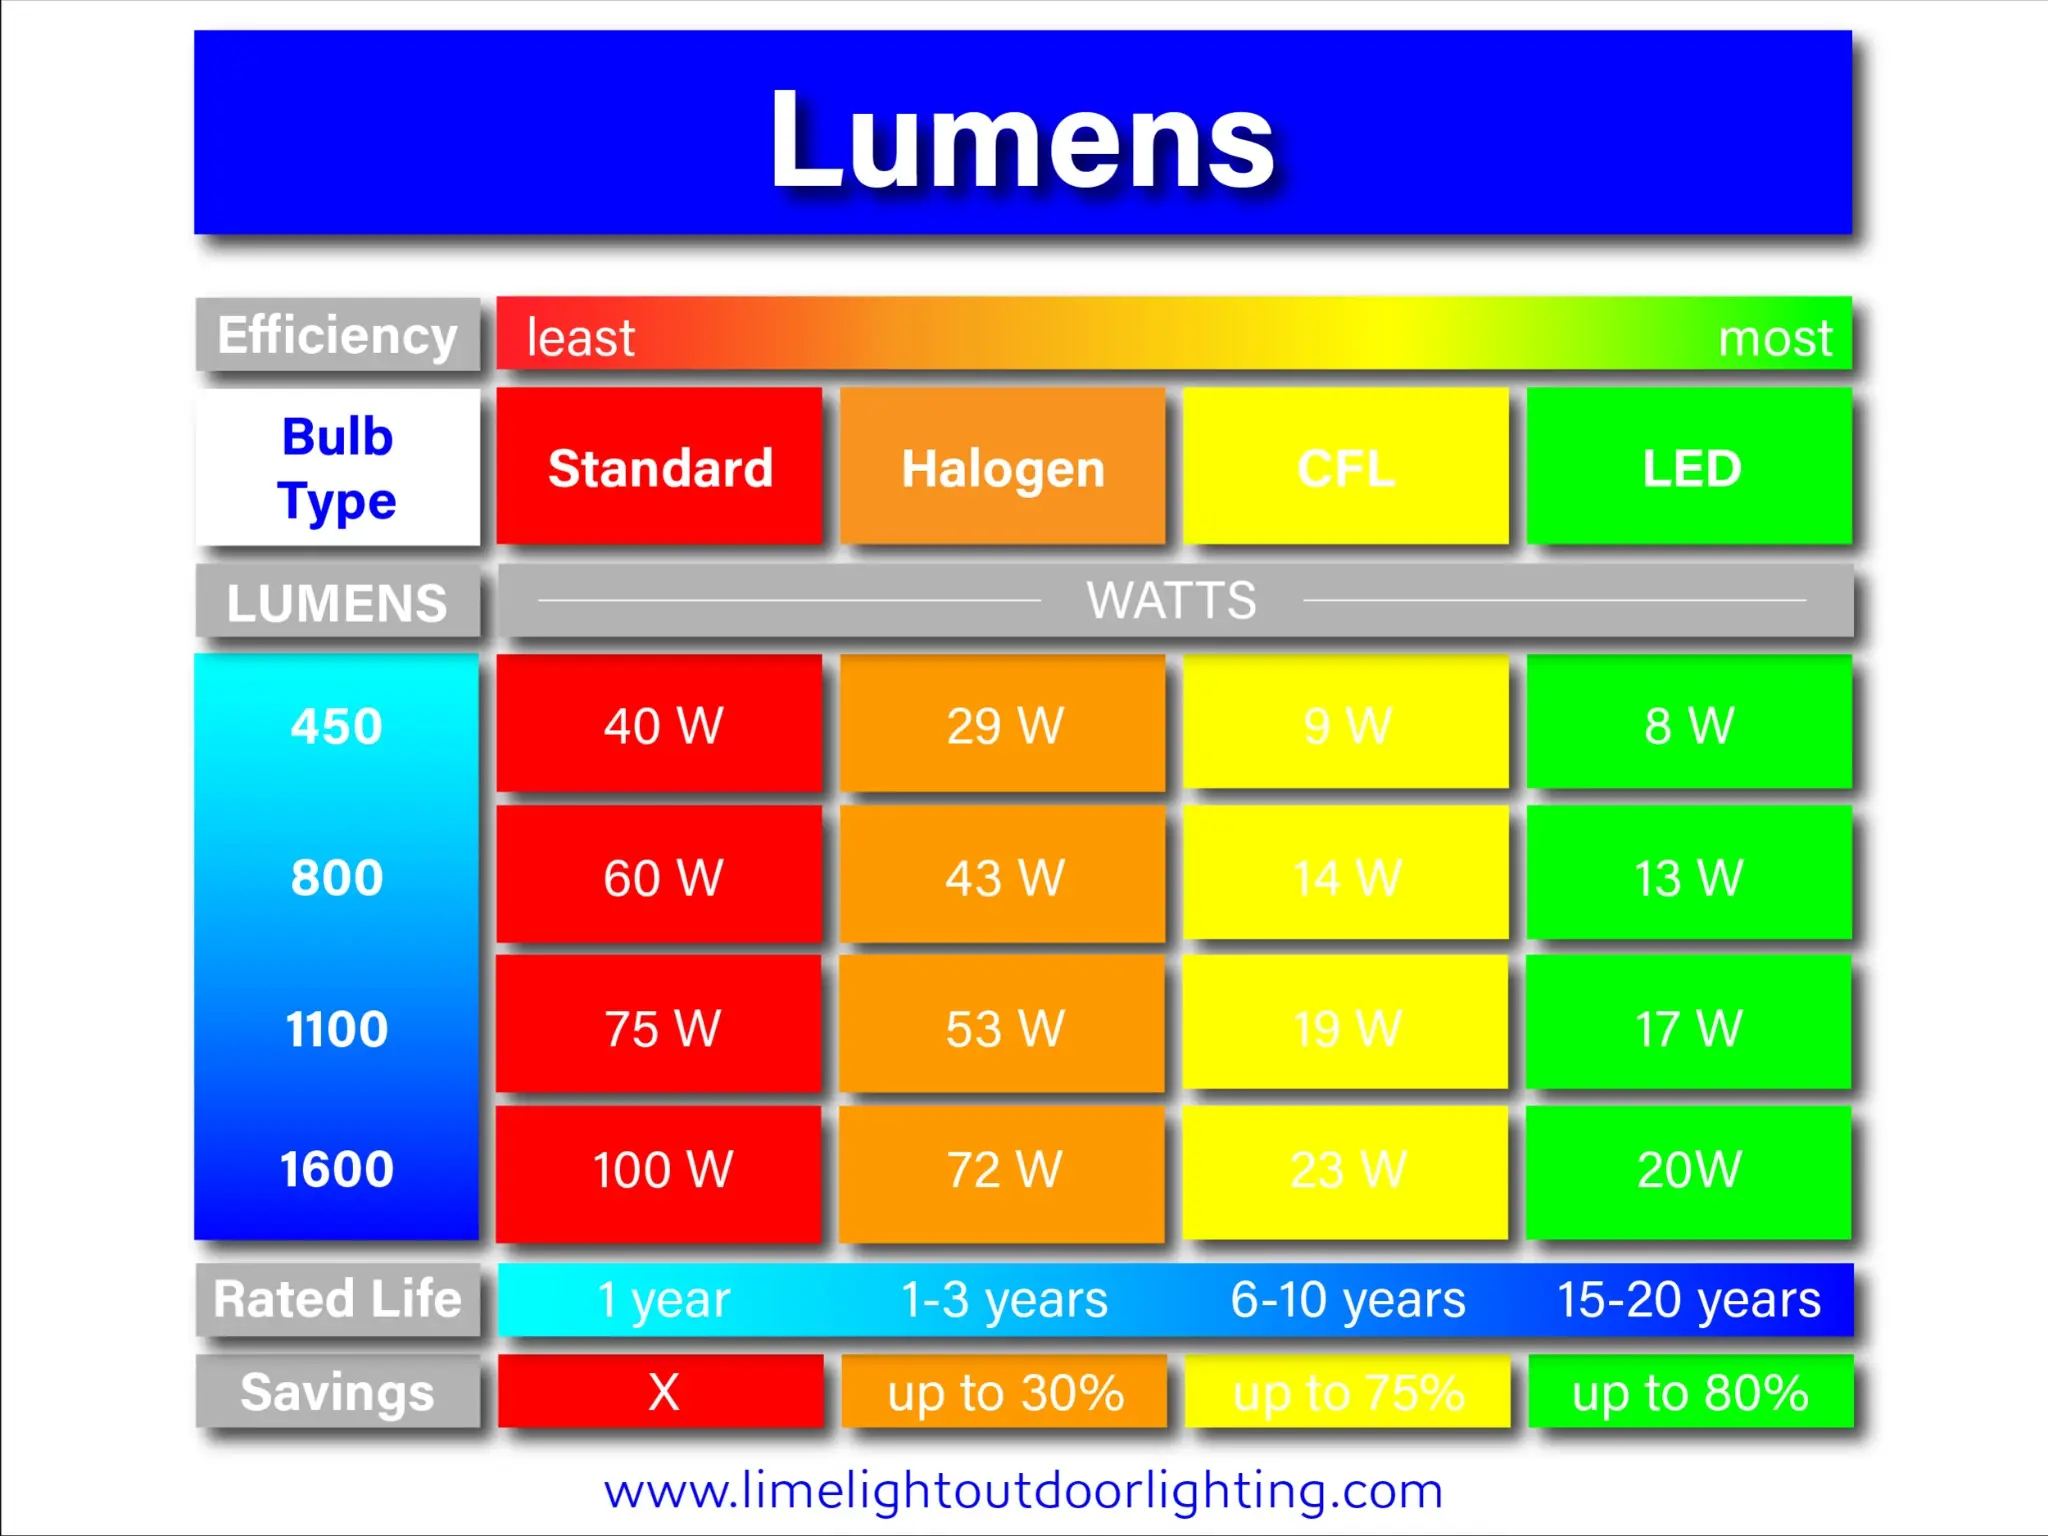
Low Voltage Cable and Brightness Planning Charts
Outdoor Lighting Planning Calculator
One of the most common questions is how many lights you actually need outdoors. The answer depends on yard size, focal points, and how the space is used. This planning calculator helps estimate fixture count so your lighting feels balanced instead of overcrowded or too dark.
Estimated fixture range: 6 to 9 fixtures
Suggested mix: Use path lights or wall lights for guidance, then add a few accent fixtures only where the yard needs emphasis.
Planning note: Start with fewer fixtures than you think. Outdoor plans usually look better when key features are chosen carefully.
Step 7: Front Yard and Backyard Lighting Should Not Be Planned the Same Way
A front yard usually needs more orientation, entry clarity, curb appeal, and visual order. A backyard usually needs more comfort, entertaining support, seating-area usability, and layered atmosphere. That difference matters because the same fixture mix usually does not work equally well in both places.
Front Yard Strategy
Prioritize the walk, entry, key architectural lines, and a few focal landscape features. This is often where lighting installation guidance and Portfolio Landscape Lighting become practical support resources because front-yard planning often moves quickly from design into real placement.
Backyard Strategy
Focus on how people use the space at night. Seating, patio edges, transitions, steps, deck areas, and selective planting or wall emphasis usually matter more than broad brightness. Backyard plans often succeed when comfort is prioritized over coverage.
Step 8: Avoid the Most Common Outdoor Lighting Mistakes
Many outdoor lighting problems come from simple mistakes like poor spacing, incorrect fixture choice, or lack of planning. Review these lighting troubleshooting tips to avoid common issues.
Another excellent supporting page here is Landscape Lighting Mistakes, because many bad outdoor layouts come from design errors long before they become product problems.
Too Many Fixtures
Adding more fixtures does not automatically create a better plan. It often just creates clutter and glare.
Bad Spacing
Even good fixtures can look wrong when they are spaced poorly. This shows up fast with path lights and accent lighting.
No Layering
If every outdoor light is trying to do the same job, the yard usually ends up feeling flat instead of designed.
Step 9: Plan Installation Before You Buy Too Many Fixtures
Before installing anything, it is important to understand how wiring and layout will affect your final result. This lighting installation guide helps you plan correctly from the start.
Outdoor installation goes more smoothly when the transformer location, main cable routes, branches, and fixture groups are thought through before you start pushing stakes into the ground. That is also where support pages like Portfolio Lighting Troubleshooting and Portfolio Lighting Parts and Accessories become useful later if repairs or upgrades are needed.
Outdoor Lighting Planning Summary by Area
| Outdoor Area | Main Goal | Best Starting Fixtures | Planning Priority |
|---|---|---|---|
| Front walk and entry | Safety, orientation, curb appeal | Path lights, wall lights, selective accents | Visibility first, atmosphere second |
| Front yard beds and façade | Structure and visual emphasis | Spotlights, accent lights | Choose only a few key focal features |
| Backyard seating area | Comfort and usability | Deck lights, wall lights, soft accents | Layer for comfort, not harsh brightness |
| Paths and side yards | Guidance and movement | Path lights, low-level guidance lights | Rhythm matters more than brightness |
| Stairs and transitions | Safe footing and visibility | Step lights, deck lights, wall lights | Prioritize clear step definition |
Outdoor Lighting Plan FAQ
How far apart should landscape lights be?
It depends on the fixture type, beam spread, and the area being lit. Path lights usually need a visual rhythm, while accent lights depend more on object size and distance.
How many outdoor lights do I need?
The right number depends on yard size, focal points, walkways, entries, and brightness. A good plan balances visibility and contrast instead of simply increasing fixture count.
What type of lighting is best for yards?
Most yards benefit from a mix of path lights, spotlights, wall lights, and selective accent lighting. The exact mix depends on whether the goal is safety, curb appeal, entertaining, or structure.
Should I use spotlights or floodlights?
Spotlights are usually better for focused emphasis, while floodlights are better for wider coverage. Many good plans use both, but each should be placed deliberately.
What voltage system should I use for outdoor lighting?
Many residential systems use low voltage because it is flexible and easier to expand. Even then, transformer sizing, cable routes, and voltage drop still matter.