
How Do You Light Outdoor Stairs Properly? (Quick Answer)
Outdoor stair lighting should highlight each step clearly without glare. The best setups use low, controlled light placed on risers, side walls, or under caps, spaced evenly to avoid shadows and dark spots.
- Best placement: risers or side walls
- Spacing: every step or every 2–3 steps
- Goal: clear visibility without harsh brightness
Outdoor Stair Lighting Problem Guide
| Problem | Cause | Fix |
|---|---|---|
| Steps hard to see | Poor fixture spacing or placement | Add fixtures or reposition existing lights for more even coverage. |
| Glare on stairs | Fixture is too exposed or aimed incorrectly | Adjust the aiming angle or install a shielded fixture. |
| Lights too dim | Voltage drop or an undersized transformer | Check wire size, cable length, transformer capacity, and system load. |
| Uneven brightness | Inconsistent fixture spacing or beam overlap | Rebalance fixture placement for more uniform illumination. |
| Lights not working | Wiring, connector, or power issue | Inspect wiring and connections, then follow the troubleshooting guide. |
Most stair lighting issues come from layout mistakes—not fixture quality.
Start Here: Fix Your Stair Lighting Fast
- Steps too dark → improve spacing
- Too bright or glare → adjust placement
- Dim lights → check voltage and wiring
- Not working → troubleshoot system
Always fix placement first before replacing fixtures.
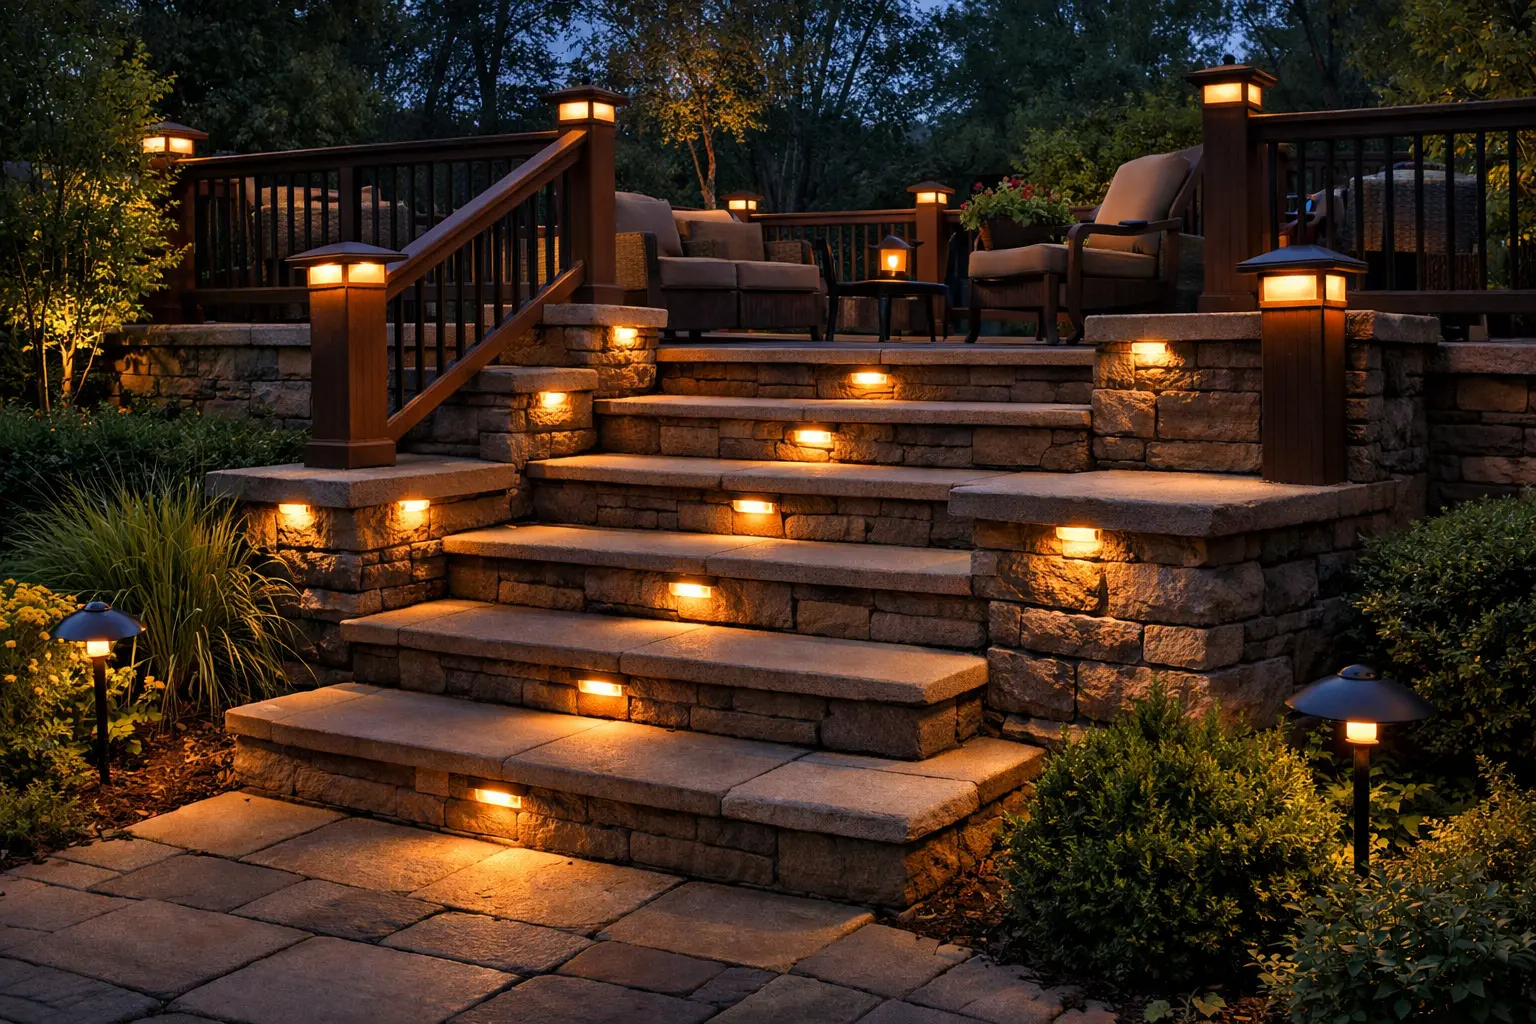
Stair lighting is one of the most practical outdoor lighting upgrades because it improves both safety and appearance immediately. It helps define every step, reduces the chance of missed footing, and gives stairs a cleaner nighttime look whether the setting is a deck, patio, retaining wall, or front entry.
The most important decisions usually come down to placement, spacing, fixture type, brightness, and wiring. Once those are handled correctly, outdoor stair lighting tends to feel effortless instead of distracting.
Traditional stair lights can work well, but many newer designs use hidden LED strips under each step edge. This hardscape step lighting guide shows how to create a continuous glow line for better visibility and a more modern look.
For broader aging-in-place guidance beyond stairs alone, visit the Senior Safety Lighting Guide for low-glare path layouts, contrast visibility strategies, wet-surface glare control and safer nighttime walking design for older adults.
Outdoor Stair Lighting Help Center
Stairs are one of the highest-risk areas for poor outdoor lighting. The landscape lighting fall-risk liability guide explains why step visibility, glare control, and reliable fixtures matter for safer properties.
If you are planning or upgrading step lighting, these guides help you connect safety, layout, wiring, transformer setup, and troubleshooting into one complete outdoor plan.
Why Outdoor Stair Lighting Matters
Outdoor stairs are one of the easiest places for lighting problems to become safety problems. A dark tread, a harsh shadow, or a bright fixture pointed at the wrong angle can make stairs harder to read at night. Good stair lighting improves visibility so each step is easier to judge, and it also helps the staircase feel more secure and more inviting.
Before installing stair lighting, it helps to understand how a complete lighting layout works together. If you are planning a full system, start with this guide: Portfolio Lighting Guide, Plan and Placement, which walks through light positioning, balance, and coverage across your outdoor space.
Lighting also needs to be usable, not just bright. On stairs, glare is often just as bad as darkness because it can flatten step edges and make depth harder to read. That is why controlled light output and careful fixture positioning matter so much.
Stair lighting is one area where delayed response can become a real safety problem. See our edge vs cloud lighting guide to understand why local processing is often the better fit for fast, reliable outdoor lighting response.
Best Types of Outdoor Stair Lights
Different stair designs call for different fixture types. The right choice depends on the material of the stairs, the style of the surrounding space, how visible you want the fixture to be, and whether the project is new construction or a retrofit.
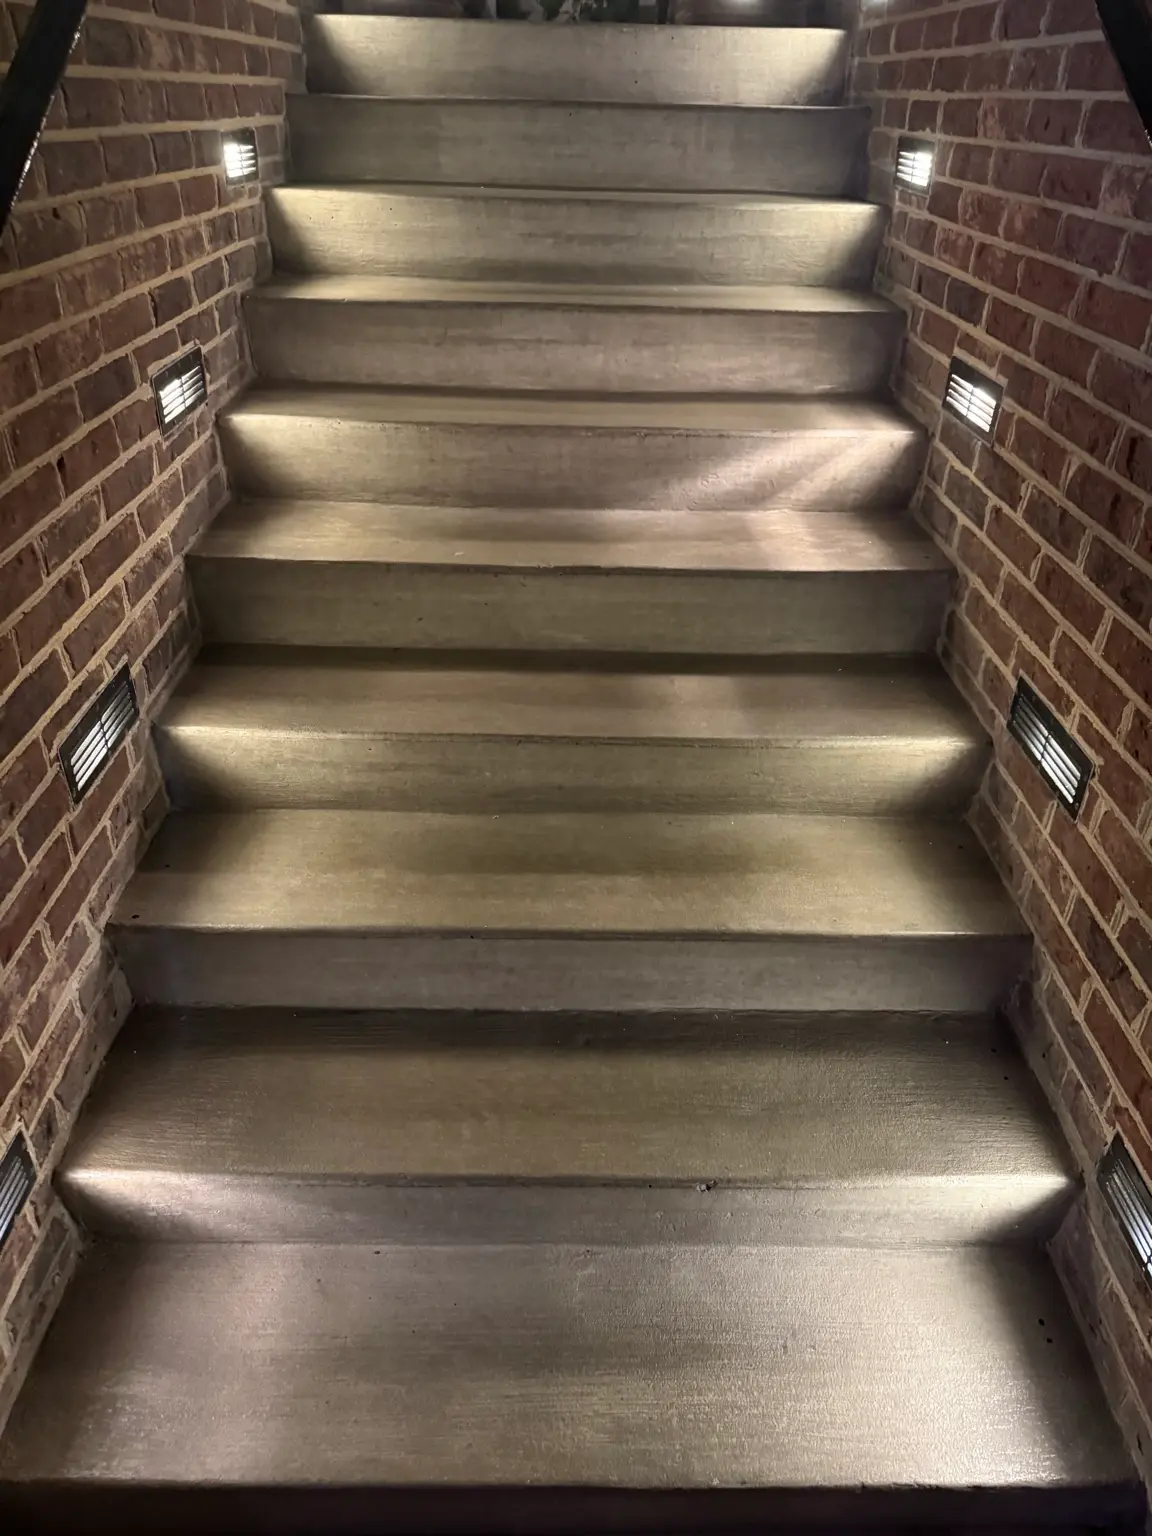
Recessed Step Lights
Recessed step lights are a popular choice when homeowners want a clean, built-in look. They are often installed into risers, side walls, or retaining wall faces and work well when the goal is low-profile illumination with minimal visible hardware.
Riser Lights
Riser-mounted lights direct light downward across the tread, which can work very well for safety. This is often one of the most practical options because it defines the front edge of the step without blasting the eyes of someone climbing upward.
Side Wall Lights
Side-mounted fixtures are common when stairs are bordered by walls, posts, or retaining structures. They can provide balanced side illumination, though placement has to be planned carefully so one side does not become noticeably brighter than the other.
Under-Cap or Under-Rail Lights
These are useful on deck stairs and staircases with railings or caps that can hide the fixture source. They often create an elegant wash of light and can look more subtle than exposed fixtures.
Deck Step Lights
On wood or composite deck stairs, compact step fixtures are often the easiest way to combine safety and design. They can define each step clearly without overpowering the rest of the deck area.
Riser Lighting vs Side Lighting
| Lighting Approach | Best Use | Main Advantage | Main Watchout |
|---|---|---|---|
| Riser lighting | Deck stairs, entry steps, patio stairs | Defines each tread clearly | Poor aiming can create glare if the fixture is too exposed |
| Side wall lighting | Retaining wall stairs, enclosed stairs | Keeps fixtures off the walking surface | Uneven placement can create side shadows |
| Under-cap lighting | Decks, modern stairs, capped walls | Subtle fixture visibility with clean lines | May not provide enough light alone on wider stairs |
| Recessed step lights | New builds or polished retrofits | Built-in look and controlled output | Usually requires more planning during installation |
Where to Place Outdoor Stair Lights
Placement is everything when lighting stairs. If lights are too far apart or positioned incorrectly, you can create shadows and unsafe walking conditions. For a deeper breakdown of spacing and layout, see Landscape Lighting Spacing, which explains how to distribute light for safe and even coverage.
Riser vs Tread Placement
In most cases, the riser is the better location because it lets the fixture throw light down onto the walking surface. Tread-mounted lighting is usually less desirable unless it is specifically designed for that purpose, because walking surfaces take more wear and moisture exposure.
Side vs Center Placement
Side placement can work well when stairs are bordered by walls or structural posts. Center placement is sometimes used in wide staircases, but it has to be done carefully so the beam does not create overly bright focal points that distract from step edges.
Avoiding Shadows and Glare
The goal is to reveal the shape of the stairs, not to spotlight individual fixtures. A fixture that is too exposed can create glare, while a fixture that is aimed poorly can leave the back half of the tread too dark. Controlled beam direction is what makes step lighting feel useful instead of ornamental.
Outdoor Stair Lighting Spacing Rules
Stair lighting spacing depends on step count, stair width, fixture brightness, and the beam pattern of the light itself. On some staircases, every step may need illumination. On others, lighting every second or third step can work well as long as the result remains consistent and easy to read.
Spacing directly affects both safety and appearance. If you want a more structured approach to layout design, review Landscape Lighting Layout Design to see how balanced lighting systems are planned across stairs, pathways, and focal areas.
In general, smaller and softer fixtures often need closer spacing, while wider beam fixtures may allow larger gaps. The best-looking stair lighting usually creates a steady rhythm instead of alternating between bright spots and dark pockets.
How to Wire Outdoor Stair Lighting
Most outdoor stair lighting systems run on low voltage wiring connected to a transformer. If you are installing lights yourself, follow this guide on How to Wire Landscape Lighting to help ensure safe connections and long-term reliability.
Low Voltage Basics
Low voltage systems are a strong fit for outdoor stair lighting because they are flexible, practical, and easy to integrate with other landscape fixtures. They are especially useful when stairs are part of a larger lighting layout that includes paths, walls, or planting beds.
Wiring Routes
Plan the route before installation begins. It is much easier to choose clean wiring paths, protect cable runs, and group fixtures logically before the staircase is fully finished or the fixtures are permanently mounted.
Daisy Chain Layouts
Some stair lighting layouts use daisy chain style wiring, especially on shorter runs. That can work well, but it becomes more important to watch fixture count and run length as the system grows.
Voltage Drop on Stair Lighting Runs
If your stair lights appear dim or uneven, voltage drop is often the cause, especially on longer runs. Learn how to diagnose and fix this issue in the Landscape Lighting Voltage Drop Guide.
This matters even more on long staircases, stairs far from the transformer, or systems where step lights are combined with other fixtures on the same line. The farthest lights on the run may become visibly weaker if the system is not planned carefully.
Voltage drop is one of the most overlooked reasons homeowners think they have bad fixtures when the real problem is system design.
Common Outdoor Stair Lighting Mistakes
Many stair lighting problems come from simple installation mistakes like poor spacing, incorrect fixture placement, or overloaded circuits. Avoid these issues by reviewing Landscape Lighting Mistakes before starting your project.
Too Much Brightness
Brighter does not always mean safer. Too much light can flatten step edges and make the staircase uncomfortable to use.
Bad Fixture Location
A good fixture in the wrong location still produces a bad result. Placement controls usability just as much as the light itself.
Ignoring the Rest of the Space
Stairs rarely exist alone. A landing, walkway, or adjacent wall can affect how the staircase looks and how the lighting should be balanced.
Troubleshooting Stair Lights That Do Not Work
If your stair lighting system stops working, the issue is often related to wiring, connections, or transformer problems. Use the Portfolio Lighting Troubleshooting Guide to diagnose and fix the problem step by step.
Common symptoms include lights not turning on at all, partial outages where only part of the staircase is lit, and flickering that comes and goes. Each of those symptoms can point to a different kind of issue, so it helps to narrow the problem before replacing components.
Moisture intrusion, loose connectors, transformer problems, and worn fixtures are all common outdoor causes.
Outdoor stair lighting has a safety purpose, so the power source cannot be unreliable. A stair-light transformer plugged into a weather-damaged receptacle may leave the steps dark exactly when rain, ice, or poor visibility make the lighting most important. Before installing or troubleshooting stair lights, use the outdoor lighting receptacle code checklist to confirm the outlet, cover, GFCI protection, and plug connection are not the hidden failure point.
Choosing the Right Transformer for Stair Lighting
Your transformer controls the entire lighting system, including stair lights. Choosing the right size helps maintain consistent brightness and reduces the chance of overload. See the Landscape Lighting Transformer Guide to better match transformer capacity to your layout.
This is especially important when stair lights are part of a larger low voltage system. A transformer that is already close to capacity may struggle once additional step lights are added.
When to Replace Outdoor Stair Lighting Fixtures
If your stair lights are outdated, damaged, or no longer performing well, it may be time for a replacement. You can explore compatible parts and upgrade options in Portfolio Lighting Parts and Accessories.
Replacement often makes sense when fixtures have visible weather damage, cracked lenses, corroded mounting parts, failing connectors, or poor output that no longer matches the rest of the system. In other situations, replacing only the failed component may be enough.
Step Lighting Should Show the Tread, Not Blind the Walker
Outdoor stair lighting is one of the most important safety upgrades around a home. The goal is not to flood the stairs with light. The goal is to show each tread, edge, and landing clearly without creating glare at eye level.
Recessed step lights and side-wall lights work well because they place light low on the stairs where it is needed most.
Outdoor Stair Lighting FAQ
How bright should outdoor stair lights be?
Stair lighting should be bright enough to clearly show the shape of the steps without creating glare. Most outdoor stairs look and function better with soft, controlled light than with intense output.
How far apart should stair lights be?
The right spacing depends on the fixture pattern, stair width, and how much light reaches each tread. Some layouts need lighting on every step, while others work well with every second or third step.
Can you install stair lights without wiring?
You can use solar or battery-powered options in some cases, but wired low voltage systems are usually more reliable for long-term performance and consistent brightness.
Are stair lights required by code?
Local code requirements vary, so it is important to check the rules in your area. Even where specific fixtures are not mandated, safe visibility on stairs is strongly recommended.
Why are my stair lights dim?
Dim stair lights often point to voltage drop, an undersized or overloaded transformer, loose connections, or failing fixtures somewhere along the run.