
Quick Answer: How Do You Wire Landscape Lighting?
To wire landscape lighting, connect a low voltage cable from the transformer to your light fixtures, grouping lights into balanced runs instead of one long line. Most systems use 12V or 14V cable and connect fixtures using outdoor-rated connectors along the cable path.
The key is planning your layout first, keeping runs short, and testing the system before burying the wire to avoid dim lights and voltage drop problems.
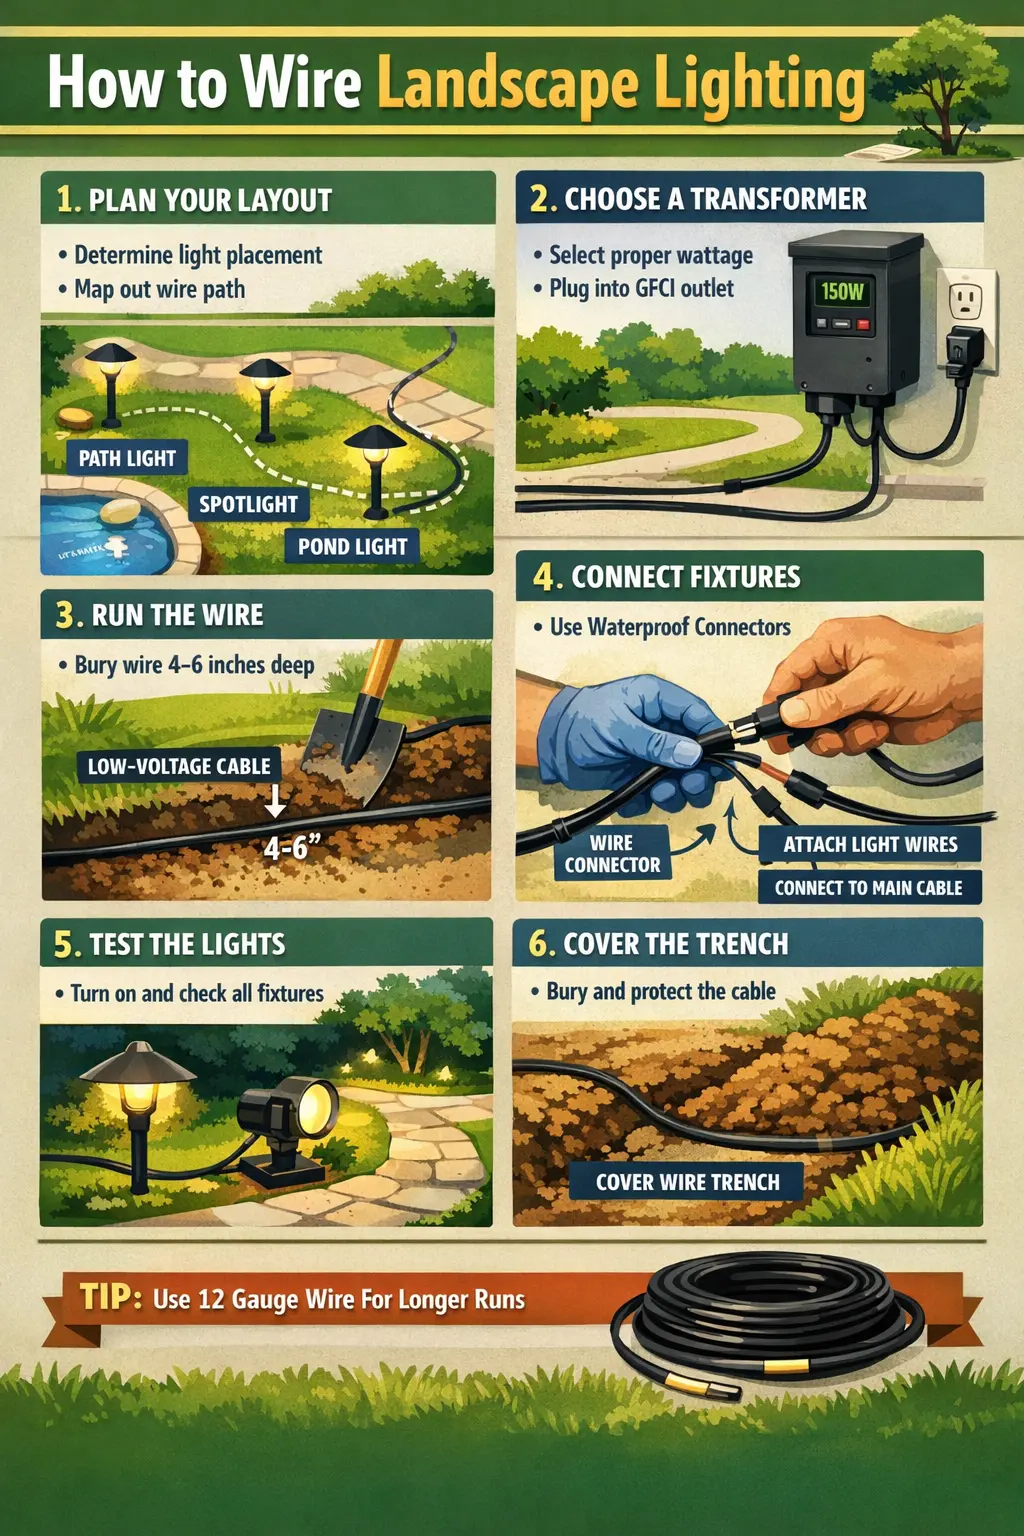
1. Install transformer
2. Lay out cable path
3. Connect fixtures
4. Test system
5. Bury cable
Small yard → single run OK
Medium yard → split runs
Large yard → multiple zones
Long runs → avoid voltage drop
If your system is not working correctly, follow the troubleshooting guide.
If your lights are uneven or dim, review voltage drop issues before adjusting your wiring layout.
Best Landscape Lighting Wiring Layout by Yard Type
Small Front Walk
A single short run is usually enough for a few path lights near the transformer.
Medium Front Yard
A split run or T-layout usually gives better balance than one long cable path.
Large Yard With Multiple Lighting Areas
Multiple runs or separate zones usually work better for brightness, maintenance, and future expansion.
Long Driveway or Extended Path
Plan for voltage drop early and avoid forcing all fixtures onto one long daisy-chain run.
How to Wire Landscape Lighting Step by Step
Once the layout is planned, wiring the system becomes much more manageable. The goal is not just to make the lights turn on. The goal is to create a wiring setup that stays reliable through weather, seasonal use, and future additions.
1. Mount and prepare the transformer
Install the transformer in a practical location near a reliable power source. It should be easy to reach for timer changes, seasonal adjustments, and troubleshooting. If you are still comparing transformer options, our Landscape Lighting Transformer Guide explains how transformer size, features, and placement affect the rest of the system.
2. Lay out the cable path before making any cuts
Unroll the landscape lighting cable along the planned route before burying it or trimming anything. This gives you a chance to see if the layout feels efficient, whether one run is getting too long, or whether a fixture would be better moved a few feet to create a cleaner routing plan. It is much easier to fix the layout at this stage than after every connection is already made.
3. Keep fixture groups logical
Group fixtures by area and function whenever possible. Path lights near the front walk should usually stay on one logical run, while backyard accent lights or deck lights may work better on a separate run. This kind of organization makes future troubleshooting faster because you already know which section of the yard belongs to each cable path.
4. Make clean, secure fixture connections
Every connection point matters. Loose connections, poor splices, or rushed fixture taps are some of the most common reasons outdoor lighting works for a while and then starts failing. Take the time to seat each connection correctly and protect it from moisture as much as the fixture design allows. A wiring system is only as strong as its weakest connection point.
If you need to splice or extend outdoor lighting wire, use a proper weather-rated enclosure and follow our outdoor lighting junction box requirements.
5. Test before burying
Turn the system on before you finish the install. Walk the entire run. Check for uneven brightness, dark fixtures, or lights that seem weaker at the far end. If the lights do not look balanced while the wire is still exposed, they definitely will not improve once everything is buried and forgotten.
6. Bury the cable neatly and shallowly
After testing, tuck or bury the cable cleanly so it is protected without making future access impossible. A neat install is not just about appearance. It makes seasonal maintenance, fixture replacement, and troubleshooting much easier later.
Which Wiring Layout Should You Use?
- Use a single run for small simple installations with short cable distance
- Use a T-layout when two nearby lighting areas branch from one point
- Use a hub layout when even brightness matters more
- Use multiple runs for larger yards and mixed fixture zones
What to Plan Before You Wire Landscape Lighting
The biggest wiring mistakes usually happen before any wire is even laid. It is tempting to buy a transformer, grab a spool of cable, and start connecting path lights one by one, but that approach often creates dim fixtures, overloaded runs, and a layout that is hard to service later. A much better approach is to map the system first.
Start with the transformer location. In most low voltage landscape lighting systems, that point becomes the hub for everything else. The farther the fixtures sit from the transformer, the more careful you need to be with cable length, wire size, and the number of lights on each run. That is one reason transformer placement and wiring should always be planned together rather than separately.
It also helps to decide what each zone is supposed to do. Path lights along a front walk, spotlights on trees, deck lights near seating, and accent lights around a patio all place different demands on the wiring layout. Some yards do best with one clean run. Others are better served by splitting fixtures into separate runs so the lighting stays more balanced.
Wiring landscape lighting becomes much easier once you understand the overall system layout. If you want a visual overview before starting installation, review the low voltage landscape lighting system diagram to see how the transformer, wiring runs, and fixtures connect throughout the yard.
Wiring landscape lighting is easier to understand when you see how it fits into the entire system. Our Complete Landscape Lighting Guide explains how layout planning, fixture spacing, transformers, voltage drop, and low voltage wiring all work together in a properly designed outdoor lighting system.
Before planning cable runs and connections, it helps to understand how a landscape lighting system is designed to operate. Our landscape lighting basics guide explains how transformers, wires, fixtures, and timers work together in a low-voltage setup, which makes the wiring process easier to follow and troubleshoot.
If your lights appear dim or uneven, voltage drop is often the cause. Use this landscape lighting voltage drop guide to diagnose and fix the issue properly.
Before finalizing the wiring layout, it helps to estimate how the run will perform under load. The Landscape Lighting Voltage Drop Calculator can help you check whether distance, wire size, and fixture wattage are likely to create dimness at the far end.
Basic Landscape Lighting Wiring Layouts
There is more than one way to wire low voltage landscape lighting, and the best layout depends on the size of the yard, the number of fixtures, and how evenly you want power distributed across the system. In smaller installations, a simple run can work well. In larger systems, a more balanced design usually performs better and helps reduce voltage drop.
Good wiring layout is the first step toward better brightness balance, but newer control technology can take correction much further. Read AI transformer voltage load balancing to see how AI-managed transformers can respond to long-run dimming, load imbalance, and real-time zone demand more intelligently.
Proper wiring layout is essential, but power consistency is just as important. Our solar hybrid lighting optimization guide explains how combining solar and transformer power improves performance across the entire system.
If you are routing wire underground, use our landscape lighting wire burial depth code guide to confirm the correct depth before trenching.
| Layout Type | How It Works | Best Use |
|---|---|---|
| Single run | One cable leaves the transformer and feeds fixtures in sequence | Small simple paths or short runs with limited fixtures |
| T method | Main cable runs out and splits toward two directions | Yards with two nearby zones branching from one point |
| Hub method | Fixtures or small groups connect from a central hub point | Balanced lighting where more even output matters |
| Multiple runs | Separate cable runs leave the transformer for different lighting areas | Larger yards and mixed lighting applications |
| Loop style planning | Run planning is designed to share load more evenly across sections | Longer layouts where brightness consistency is important |
Before You Bury the Landscape Lighting Cable
- All fixtures turn on
- Brightness looks even across the run
- No loose connections
- Transformer location feels practical
- Cable path is neat and protected
- Future expansion points are still possible
Why Good Wiring Matters So Much in Low Voltage Landscape Lighting
A lot of homeowners focus heavily on fixtures and transformer wattage, but wiring is where the system either comes together or starts to struggle. Good landscape lighting wiring helps maintain more even brightness from the first fixture to the last, gives the timer a more dependable system to control, and reduces the odds of mysterious failures later.
Wiring also affects expandability. If the first version of the system is installed with no structure, adding a few more path lights next season can become a mess. But when the cable routes are organized and the runs are balanced, growing the system later feels much more manageable. That is one reason a thoughtful low voltage landscape lighting plan almost always outperforms a rushed install, even when both systems use similar hardware.
If you are deciding between wire sizes or trying to understand how cable choice affects performance, our Landscape Lighting Cable Guide is a good next read. It pairs closely with this page because cable selection and wiring layout really go hand in hand.
Outdoor stair lights are often tied into the same low-voltage system as path and accent lights, but they need careful placement and consistent output for safety. For step-specific planning ideas, visit the outdoor stair lighting guide to see how stair fixtures should be positioned and connected within a complete system.
For safety requirements like burial depth, GFCI protection, and code-conscious installation practices, see landscape lighting electrical code and safety guide before completing your wiring.
Daisy Chain Landscape Lighting Wiring Diagram
A daisy-chain wiring layout is one of the most common ways to wire a low-voltage landscape lighting system. In this setup, the cable leaves the transformer and runs from one fixture to the next in a single continuous path. It is simple to understand, simple to install, and works well on smaller lighting layouts where the total wire distance and fixture load stay reasonable.

Diagram: Daisy-chain wiring layout for a low-voltage landscape lighting system. In this setup, power leaves the transformer and runs from one fixture to the next along a single cable line. This simple wiring method is common for smaller landscape lighting installations but can increase voltage drop on longer runs if too many fixtures are connected.
Wiring a landscape lighting system correctly is about more than making the lights turn on. The wiring layout affects voltage drop, fixture brightness, future troubleshooting, and how evenly the entire system performs at night. If you are seeing dim fixtures or inconsistent light output, review our landscape lighting voltage drop guide. If you want to compare a basic wiring run with a split layout, our Portfolio lighting wiring diagram shows another practical option. After wiring is planned, fixture placement matters too, so our landscape lighting spacing guide can help you avoid over-lighting or dark gaps. For larger systems, our low voltage landscape lighting zones guide explains how separating runs can make wiring cleaner and improve performance.
This diagram shows a basic daisy-chain layout with a transformer feeding several fixtures along one cable run. The biggest benefit of this method is simplicity. The main drawback is that fixtures at the far end of the run may receive less voltage, especially if the cable is too long or the system carries too much wattage. That makes this layout a good choice for short runs, smaller front walkways, and compact path lighting installations.
When to use a daisy-chain wiring layout
This wiring method is best for smaller systems where the fixtures are grouped closely together and the total load is modest. It is especially common with path lights, short bed lighting runs, or a small group of accent lights near the transformer. If the run becomes too long, the layout can create brightness differences between the first and last fixtures.
How to avoid problems with daisy-chain wiring
To get better performance from a daisy-chain setup, keep the run shorter, use thicker cable when needed, and avoid loading too many fixtures onto one line. It also helps to plan the transformer location carefully so the wire path stays efficient instead of looping around the property. If your layout is larger, you may want to use separate zones or a split wiring pattern instead.
For more help, see our landscape lighting layout guide, landscape lighting voltage drop guide, and low voltage landscape lighting zones guide.
Common Landscape Lighting Wiring Mistakes
Most wiring problems follow familiar patterns. A section of the yard goes dim, one fixture stops working, the timer seems inconsistent, or the farthest lights never look as strong as the ones near the transformer. In many cases, the issue traces back to the original wiring plan.
| Mistake | What Happens | Better Approach |
|---|---|---|
| Run is too long | Distant fixtures become dim or uneven | Shorten the run or split the system into multiple runs |
| Too many fixtures on one line | Power delivery becomes less balanced | Distribute fixtures across better planned runs |
| Poor connections | Lights flicker, fail, or work intermittently | Use secure, well-seated outdoor-rated connections |
| No layout plan | Messy routing and harder troubleshooting | Map the full system before installation |
| Ignoring voltage drop | Farthest fixtures underperform | Review cable length, transformer placement, and run balance |
When Wiring Problems Are Really Voltage Drop Problems
Many people think they have a bad fixture or weak transformer when the real problem is voltage drop. That usually shows up when the lights closest to the transformer look good but the lights farther away seem weaker, dimmer, or less consistent. In other words, the system is wired, but it is not wired in a way that delivers power evenly.
Voltage drop becomes more likely when runs are long, too many fixtures are stacked on one line, or cable planning was treated as an afterthought. It is one of the most common reasons outdoor lighting looks disappointing even though everything technically turns on.
If that sounds familiar, read our Landscape Lighting Voltage Drop Explained guide next. It connects directly to wiring layout and helps you see why transformer placement, run length, and cable strategy matter so much in low voltage landscape lighting.
If you're working with a multi-tap transformer, wiring is slightly different than standard setups. This Portfolio 200W multi-tap transformer wiring guide explains how to connect the COM terminal and choose the correct voltage tap for your system.
Once your wiring layout is complete, the next step is setting the correct transformer output. Use the voltage tap calculator to choose the right tap based on your wire run and fixture load.
Wiring, Timers, and Layout Design All Work Together
A strong wiring setup does not exist in isolation. It works together with the transformer, timer settings, and the physical layout of the yard. If the timer is correct but the wiring is weak, the system still will not look right. If the transformer is large enough but the layout is unbalanced, the lights can still appear uneven.
That is why wiring should be viewed as part of the full low voltage system. A clean layout design often improves wiring performance before the first cable is even connected. Likewise, a properly set timer adds convenience without putting extra strain on a poorly planned installation.
- place the transformer where runs can stay practical
- group fixtures by area rather than by random proximity
- avoid overloading one side of the yard with one long cable run
- test the system before final burial
- leave room for future lighting expansion
If you are still refining the yard plan, our Landscape Lighting Layout Design Guide can help you think through spacing and fixture balance. If your main concern is automation, our Landscape Lighting Timer Setup Guide is the best follow-up.
Wiring a landscape lighting system correctly is about more than making the lights turn on. The wiring layout affects voltage drop, fixture brightness, future troubleshooting, and how evenly the entire system performs at night. If you are seeing dim fixtures or inconsistent light output, review our landscape lighting voltage drop guide. If you want to compare a basic wiring run with a split layout, our Portfolio lighting wiring diagram shows another practical option. After wiring is planned, fixture placement matters too, so our landscape lighting spacing guide can help you avoid over-lighting or dark gaps. For larger systems, our low voltage landscape lighting zones guide explains how separating runs can make wiring cleaner and improve performance.
How to Wire Landscape Lighting FAQ
What kind of wire is used for landscape lighting?
Most low voltage landscape lighting systems use outdoor-rated low voltage cable designed to connect the transformer to fixtures throughout the yard.
Can I put all my landscape lights on one wire run?
Sometimes, but it depends on the distance and number of fixtures. In many yards, splitting the system into multiple runs creates better performance and fewer voltage drop issues.
Why are the lights at the end of my run dim?
That usually points to voltage drop, a run that is too long, or a layout that places too much load on one cable path.
Should I test landscape lighting before burying the wire?
Yes. It is much easier to correct weak connections, poor routing, or dim fixture runs before the cable is buried.
Final Thoughts on Wiring Landscape Lighting
The best landscape lighting systems usually do not look complicated from the outside, but underneath that clean evening glow is a wiring plan that was thought through carefully. Good low voltage landscape lighting wiring keeps the system more balanced, helps protect against common performance issues, and makes it much easier to service or expand the setup later.
If you take the time to plan the transformer location, organize the cable runs, build solid connections, and watch for voltage drop, you will usually end up with a much better result than someone who simply links fixtures together and hopes for the best. In outdoor lighting, neat wiring is not just a technical detail. It is one of the main reasons the yard looks better night after night.
More Low Voltage Landscape Lighting Guides
Landscape Lighting Transformer Guide
Learn how transformer sizing, power planning, and control features affect wiring performance and system reliability.
Read the guideLandscape Lighting Voltage Drop Explained
Understand why distant fixtures get dim and how cable distance and wiring layout affect outdoor lighting output.
Read the guideLandscape Lighting Timer Setup Guide
Set up timer controls the right way and avoid scheduling mistakes that make outdoor lighting less dependable.
Read the guideLandscape Lighting Cable Guide
Compare cable basics, wiring considerations, and planning ideas that help create stronger low voltage runs.
Read the guideLandscape Lighting Layout Design Guide
Plan better fixture spacing and smarter wiring zones for a cleaner yard layout and more even nighttime results.
Read the guideLandscape Lighting Troubleshooting Guide
Diagnose common low voltage lighting issues including dead sections, loose connections, dim runs, and inconsistent power.
Read the guideThis guide explains how to wire landscape lighting, including cable layout, transformer connections, and how to avoid common problems like voltage drop and uneven lighting.
Recommended for You: