
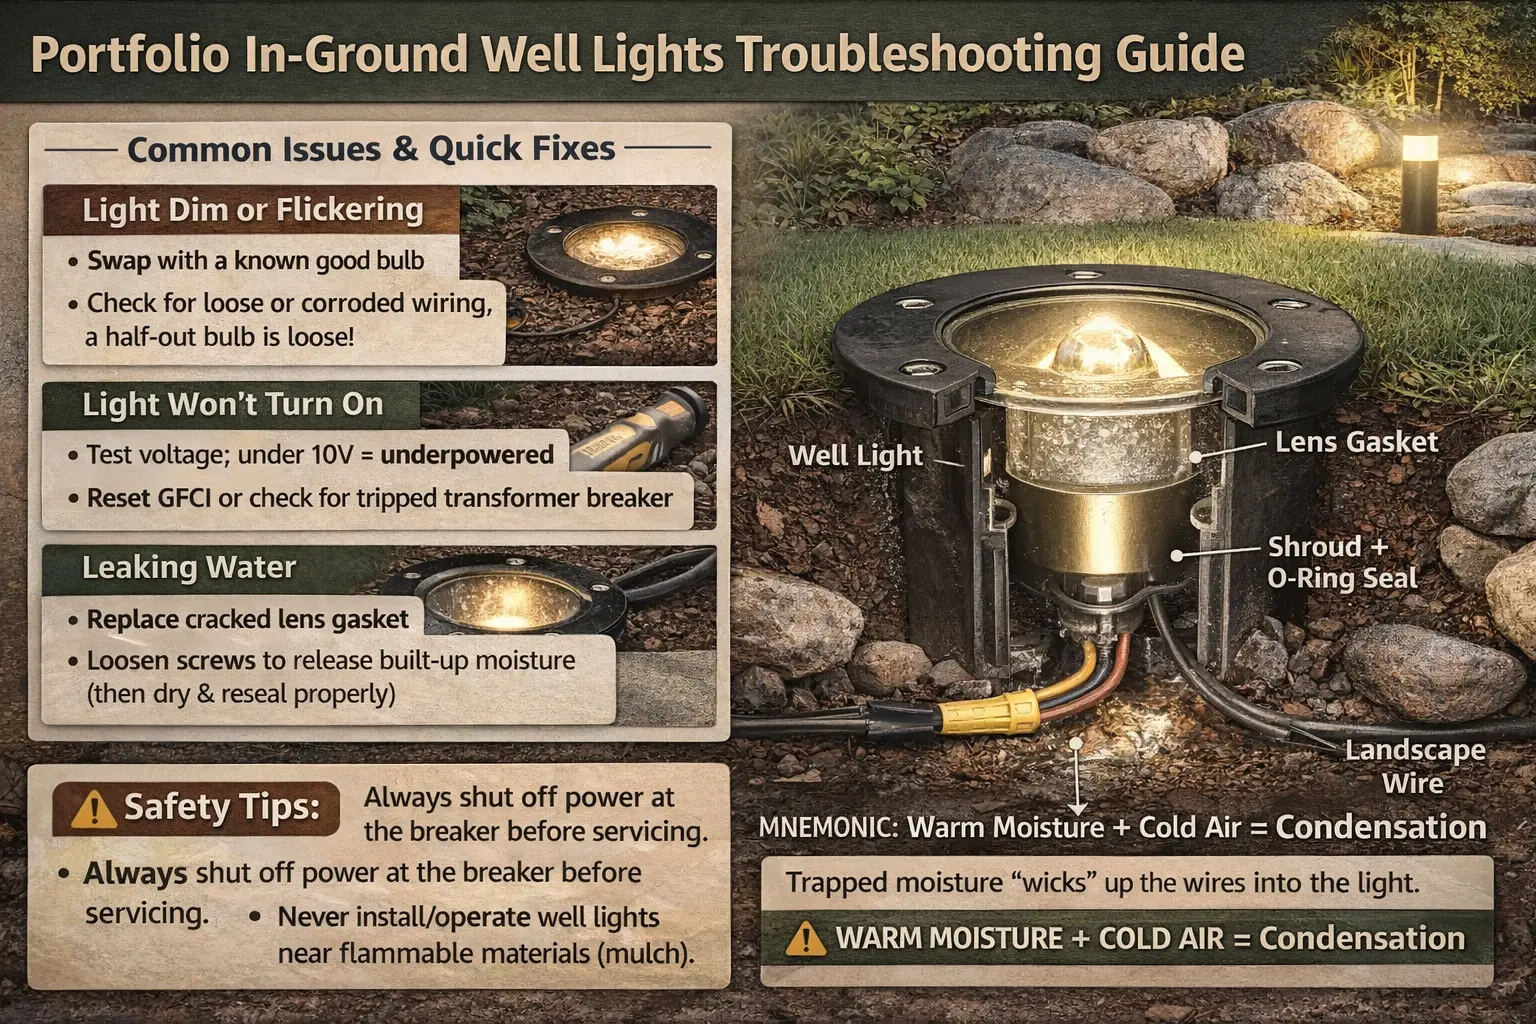
Why Are My Portfolio Well Lights Not Working? (Quick Answer)
Portfolio well lights fail primarily due to Hydrostatic Suction (moisture pulled through seals during cooling cycles) or Drainage Pit Saturation. While a burned-out MR16 bulb is common, consistent failure after rain indicates a collapse of the subsurface drainage base or a compromised lens gasket.
Well Light Problem Diagnosis Guide
| Symptom | Subsurface Culprit | Specialist Repair |
|---|---|---|
| Fogged or steamy lens | Hydrostatic suction pulling moisture past the gasket during cooling cycles | Dry the interior completely, inspect the lens gasket, and apply silicone dielectric grease to the seal before reinstalling. |
| Fixture sinking or tilted | Soil compaction or failed drainage base under the well light housing | Re-level the housing with 3/4-inch angular gravel, not pea gravel, so the fixture has a stable base that resists settling. |
| Dim or yellowish output | Terminal oxidation or blackened copper inside the low-voltage lead wire | Cut back about 2 inches of lead wire and re-strip until you reach clean, untarnished copper before reconnecting. |
| Rapid LED failure | Mulch insulation trapping heat over the lens and housing | Clear mulch and debris, then keep the lens at least 1 inch above grade so heat can dissipate around the fixture. |
| Intermittent failure during wind or rain | Piercing connector failure or moisture inside a “vampire” clip | Replace snap-on piercing clips with gel-filled direct-burial wire nuts or waterproof low-voltage connectors. |
Most well light failures are caused by moisture or connection problems—not the entire system.
Start Here: Fix Your Well Lights Fast
- One light out → check bulb and fixture
- Multiple lights out → check transformer
- Flickering → inspect wiring
- After rain → check for water damage
Always diagnose the system before replacing parts.
Well lights are one of the most useful landscape fixtures for uplighting, but they are also one of the most vulnerable. When a path light fails, the issue is often easy to spot. When a well light fails, the cause may be hidden underground inside the housing, drainage area, or cable connection.
That is why a good troubleshooting process matters. Instead of guessing, you want to move from the transformer to the cable to the fixture so you can pinpoint whether the real problem is power, wiring, water intrusion, or the light itself.
Quick Troubleshooting Table
Use this quick table to match the symptom you see with the most likely cause and the best first repair step.
| Problem | Likely Cause | Quick Fix |
|---|---|---|
| Well light not turning on | Burned-out bulb | Replace the bulb with a compatible bulb |
| All well lights off | Transformer problem | Reset, test, or inspect the transformer |
| Light flickering | Loose wire connector | Tighten or replace the wiring connection |
| Light filled with water | Damaged lens seal | Replace the seal or the fixture |
| Some well lights work, others do not | Damaged cable or fixture branch | Inspect the affected cable run and fixture connections |
| Lights trip after rain | Moisture intrusion or short circuit | Dry the fixture and inspect connectors and cable |
What Are Portfolio Well Lights?
Portfolio well lights are recessed in-ground landscape fixtures installed flush with the ground or slightly below grade. They are commonly used to aim light upward at trees, columns, exterior walls, landscaping accents, and architectural details. Instead of sitting above ground like path lights or spotlights, the fixture is housed below the surface with only the lens area visible.
These fixtures often include:
- protective in-ground housing
- sealed lens assemblies
- drainage support or gravel base beneath the fixture
- low-voltage wiring connections
Well lights can look excellent because they create clean uplighting without a visible above-ground fixture. But their underground location is also the reason they are more vulnerable to water, debris, soil pressure, and hidden wiring problems.
Most Common Problems With Portfolio Well Lights
In-ground fixtures usually fail for a short list of common reasons. If you understand those first, troubleshooting gets much easier.
Water Inside the Fixture
Water intrusion is one of the most common problems with well lights. This can happen when seals fail, drainage becomes blocked, or shifting soil changes how water moves around the housing. Once water gets inside the fixture, it can damage the bulb, corrode the socket, or create flickering and intermittent failure.
This is also why well lights often fail after heavy rain even if they seemed fine during dry weather.
Repeated moisture problems in well lights often point to the wrong enclosure rating or failed sealing system. The well light IP rating comparison guide explains how different fixture protection levels handle rain, irrigation spray, pooling water, and underground exposure.
Burned-Out Bulbs
Older Portfolio well lights often use replaceable MR16 bulbs, and those eventually burn out. If one well light stops working while the rest of the system stays on, the bulb is one of the easiest first things to check. For compatible replacement help, see Portfolio MR16 LED replacement bulbs.
Loose Wiring Connectors
Low-voltage connectors can loosen or corrode over time because of soil movement, temperature changes, moisture, or earlier repair work. A poor connection may cause flickering, intermittent power loss, or complete failure. For related cable guidance, use landscape lighting cable guide.
Transformer Problems
If the transformer is not working correctly, all lights on the connected run may shut off. Transformer issues can include overload, timer problems, internal failure, or a system short. Start with Portfolio lighting transformer troubleshooting if the problem affects multiple fixtures at once.
In-ground well lights create difficult thermal conditions for LEDs because airflow is limited around the fixture body. The well light LED lifespan guide explains how heat buildup affects lumen depreciation and premature driver aging.
How to Troubleshoot Portfolio Well Lights
The best troubleshooting path is to move from the power source toward the fixture. That helps you avoid digging into one light when the real problem is farther upstream.
Step 1: Check the Transformer
Confirm the transformer has power and is functioning correctly. Check for reset buttons, breaker trips, timer settings, or obvious signs of overload. If the transformer is off or not sending power, the well light itself may not be the problem. Related help: Portfolio transformer not powering lights.
Step 2: Inspect Wiring Connections
Check the low-voltage connector where the well light ties into the main cable. Look for corrosion, loose wires, damaged insulation, or moisture. Because well lights are often near soil and mulch, connectors in this area can deteriorate faster than you might expect.
Step 3: Test the Bulb
Replace the existing bulb with a known good compatible bulb to rule out simple bulb failure. If the light comes back on, the issue was likely the lamp rather than the fixture body or the wiring.
Step 4: Check for Water Damage
Remove the cover or lens area and inspect the inside of the fixture for moisture, standing water, corrosion, or debris. Dry the fixture completely and inspect the seal. If the housing continues to take on water, the long-term fix may be replacing the seal or the whole fixture.
Step 5: Inspect the Cable Path
If the bulb and fixture look fine, inspect the cable path for cuts, crushed sections, or short-circuit conditions. This is especially important if landscaping, edging, or digging happened recently. Related help: Portfolio landscape lights short circuit and Portfolio lighting wiring diagram.
In-ground well lights often exaggerate voltage-drop problems because enclosed LED drivers become unstable at lower voltage levels. The well light voltage-drop behavior guide explains how long wire runs affect LED brightness, flicker, and thermal stress.
In-ground well lights are especially likely to trigger GFCI trips when water collects inside the housing or connector pit. The well light GFCI tripping guide explains how moisture inside buried fixtures can shut down the circuit.
Why Well Lights Fail More Often Than Other Fixtures
Well lights sit underground, and that environment is harder on fixtures than many homeowners realize. A path light or spotlight has more air around it and is easier to inspect visually. A well light sits in a part of the yard where water runoff, compacted soil, buried wiring, and lawn equipment all work against it.
Well lights are exposed to:
- water runoff collecting in low areas
- soil pressure and settling around the housing
- mulch, dirt, and debris buildup over the lens area
- cable damage from shovels, edging, or planting work
- temperature changes that affect seals and connectors
The “Vampire Clip” Corrosion Trap
Most Portfolio well lights use piercing connectors or snap-on low-voltage clips. In a dry path-light location, these connectors may last for years. In the high-moisture environment around a well-light pit, the tiny piercing points can act like a straw, pulling water into the copper strands through capillary action.
If the wire looks black, green, or powdery inside the insulation, the copper has oxidized. Tightening the old connector usually will not solve the problem because the corrosion is already inside the conductor.
For a deeper connector repair path, use the low-voltage wire connectors landscape lighting guide.
Why LED Retrofits Die in Well Lights
Well lights are closed systems with very little airflow. That is fine for some lower-output lamps, but it becomes a problem when a high-wattage LED MR16 retrofit is installed inside a sealed in-ground housing.
The LED chip may be efficient, but the driver electronics still create heat. When that heat has nowhere to go, the internal driver can overheat, flicker, shut down, or enter a repeating strobe pattern as it thermally protects itself.
If your well light works for a few minutes and then flickers, strobes, or shuts off, the issue may be thermal shutdown rather than a bad transformer. Compare the lamp choice with the Portfolio MR16 LED replacement bulbs guide before replacing the entire fixture.
That is why regular inspection matters more with well lights than with many other landscape lighting types. These fixtures may look clean from above while hiding moisture or wiring issues below grade.
Preventing Well Light Failures
Preventive maintenance can dramatically extend the life of well lights, especially in wetter yards or areas with frequent landscaping work.
- install proper drainage below the fixture housing
- use waterproof connectors at wiring connections
- avoid damaging buried cables during digging or edging
- check seals, lenses, and housing condition periodically
- remove debris that can trap moisture around the top of the fixture
- inspect fixtures after storms or irrigation changes
Many well light problems are not sudden. They build slowly from recurring moisture exposure or connection breakdown. Catching those issues early is one of the easiest ways to avoid a bigger repair later.
Final Thoughts on Portfolio Well Lights Troubleshooting
Portfolio well lights can create excellent landscape uplighting, but their underground location means they need a little more attention than above-ground fixtures. When they fail, the most common causes are burned-out bulbs, moisture inside the fixture, loose connectors, damaged cable, or transformer problems.
The fastest way to solve the problem is to work methodically. Check the transformer first when multiple fixtures are out. Check the bulb, connector, and housing first when only one well light is failing. That process helps you get to the real cause faster and keeps you from replacing parts you do not actually need.
Portfolio Well Lights Troubleshooting FAQ
Why is my well light not turning on?
This is usually caused by a burned-out bulb, loose wiring connector, water damage inside the fixture, or a transformer issue.
Can water damage well lights?
Yes. Water intrusion is one of the most common causes of failure in in-ground well lights because it can damage the bulb, socket, and internal wiring.
How do I replace a well light bulb?
Most fixtures allow you to remove the top cover or lens assembly so you can reach the bulb socket and install a compatible replacement bulb.
Do well lights use low-voltage wiring?
Most residential landscape well lights use low-voltage wiring powered by a transformer.
Can a damaged cable cause well lights to stop working?
Yes. If the landscape lighting cable is cut, shorted, or otherwise damaged, the connected well lights may stop working or behave intermittently.
Why do well lights fail more often than other fixtures?
Because they sit underground, well lights face more water exposure, drainage issues, soil pressure, and hidden wiring stress than many other landscape fixtures.