
Quick Answer: How Do You Replace Missing Portfolio Mounting Hardware?
Start with the box spacing, then match the bracket type, threaded nipple length, and decorative hardware. In many cases, the crossbar is universal, but the canopy fit depends on how far the nipple projects and whether the finials or cap nuts match the fixture stem and finish.
- Standard wall and ceiling fixtures often use a universal crossbar
- Most fixture mounting screws are 8-32 where the bracket meets the box
- The canopy usually tightens over a 1/8-IP threaded nipple assembly
- Large chandeliers and angled installations may need a swivel or heavy-duty bracket
- If the original finish matters, match the visible hardware before final install
This page works as the missing-hardware companion to Portfolio lighting installation and instructions and the broader Portfolio lighting parts and accessories hub.
Most Common Missing Hardware on Portfolio Fixtures
The parts most often missing are the universal crossbar, 1/8-IP threaded nipple, canopy screws, cap nuts or finials, and sometimes the hidden hickey inside the hanging assembly.
If the bracket holes line up but the canopy still will not sit correctly, the problem is usually the nipple length, decorative hardware, or missing internal coupling piece rather than the fixture body itself.
Logic Summary: Solve the Incomplete Box Problem in the Right Order
- Confirm whether the junction box is standard and properly supported.
- Identify the missing part by name before buying anything.
- Choose universal hardware first where possible.
- Dry-fit the canopy and nipple before wiring.
- Upgrade the support method if the fixture is heavy.
Logic Summary Table: What to Check First
| If This Is Missing | Check This First | Most Likely Fix |
|---|---|---|
| Crossbar or strap | Junction box spacing | Install a universal fixture crossbar that matches the junction box. |
| Canopy will not sit flush | Nipple projection and canopy depth | Adjust the 1/8-IP nipple length so the canopy seats properly. |
| Box screws missing | Fixture box thread size | Test 8-32 screws first, then verify whether an older or heavy-duty box uses a different thread. |
| Fixture is heavy or the ceiling is sloped | Box rating and bracket type | Use a heavy-duty support bracket or a swivel mounting method designed for the installation. |
| Hardware looks wrong after installation | Finish and decorative nut style | Match the visible hardware finish and decorative nuts before completing the installation. |
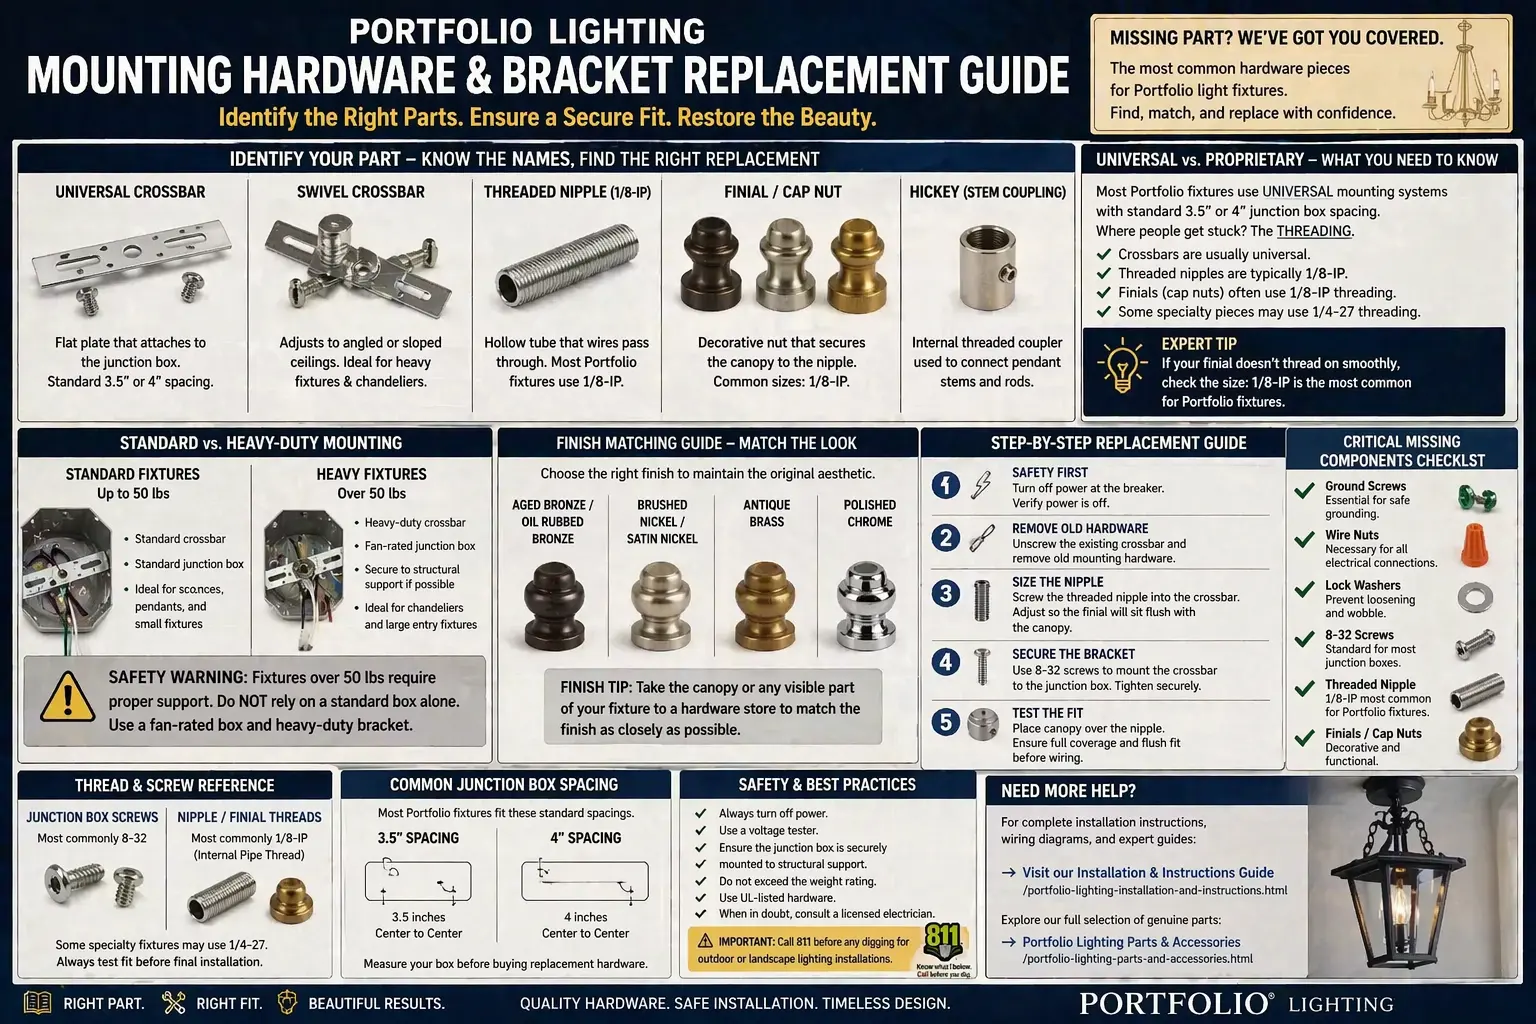
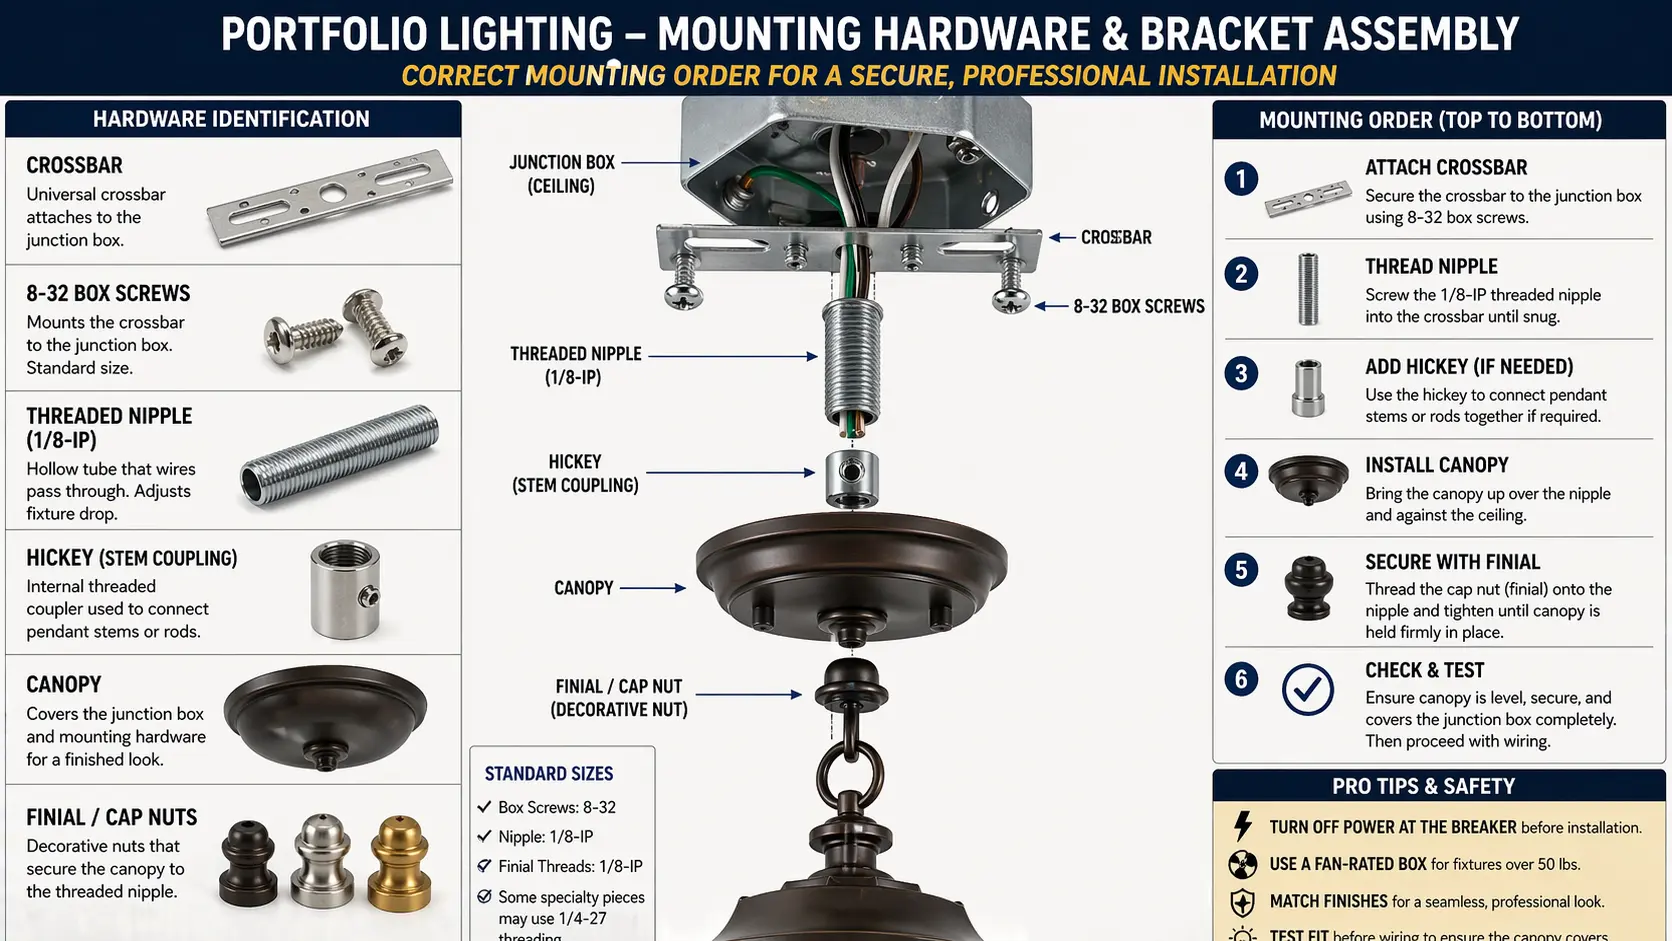
Identify Your Part: What Each Portfolio Mounting Hardware Piece Actually Does
Most homeowners land here because they have the light fixture body but not the bag of small metal parts that originally came in the box. This quick reference table helps you identify the part before you order the wrong replacement.
| Part Name | What It Does | Why It Goes Missing | Best Use Case |
|---|---|---|---|
| Universal Crossbar | Flat metal plate that attaches the fixture to the junction box | Often lost during repainting, remodeling, or when moving fixtures | Most wall sconces, flush-mount fixtures, and standard ceiling lights |
| Swivel Crossbar | Bracket that allows the fixture stem or canopy to align on sloped or angled ceilings | Commonly removed when relocating a chandelier | Foyer chandeliers and sloped-ceiling installations |
| Threaded Nipple (1/8-IP) | Hollow threaded tube that carries fixture wires and sets canopy depth | Frequently discarded with old brackets or cut too short | Pendant, semi-flush, and canopy-mounted fixtures |
| Finials or Cap Nuts | Decorative nuts that secure the canopy to the ceiling or wall | Easy to misplace because they are small and finish-specific | Fixtures where appearance is as important as structural support |
| Hickey | Internal threaded coupling used in stem-mounted pendants and some chandeliers | Usually hidden inside the stem assembly, so it is easily overlooked | Pendant stems and multi-part hanging hardware assemblies |
If the fixture body is intact but the mounting stack is incomplete, also compare replacement options under Portfolio lighting replacement hardware and Portfolio lighting parts and accessories.
What a Hickey Actually Is
A hickey is a small threaded coupling used inside some pendant and chandelier mounting assemblies. It usually connects the stem-mounted hardware stack and helps join the bracket, nipple, or threaded rod assembly in the correct order.
Best next step: If your fixture stem, nipple, and canopy hardware still do not align, check whether the original hickey or coupling piece is missing from the hardware stack.
Diagram: Crossbar, Nipple, Hickey, and Canopy Stack
A simple diagram here showing how the crossbar, box screws, threaded nipple, hickey, canopy, and cap nuts go together in the correct order.
Universal vs. Proprietary: What Usually Fits and What Usually Causes Problems
Many Portfolio wall lights, flush mounts, pendants, and ceiling lights can use a universal fixture crossbar because they mount to a standard round or octagon box. That is why the phrase "missing mounting bracket" often sounds worse than it is.
What is usually universal
The bracket-to-box side is often the most standardized part of the install. Standard fixture straps commonly align to typical box spacing, and the mounting screws that fasten the strap to the box are usually 8-32. If your fixture canopy is not unusually deep or sloped, a basic universal crossbar often solves the first half of the problem.
What is more likely to be proprietary
The visible and fit-sensitive parts cause most headaches: nipple length, stem couplings, canopy depth, decorative finials, and finish-matched cap nuts. This is where users discover that "universal" does not mean every visible piece will look correct.
If you are trying to determine whether your fixture body belongs to a broader product line, start with Portfolio lighting model number lookup. If you are simply trying to find the right small parts, go deeper with where to buy Portfolio lighting replacement parts.
Heavy-Duty vs. Standard Mounting Hardware
A simple wall sconce and a large foyer chandelier do not belong on the same bracket strategy. Standard crossbars work for many common fixtures, but they are not a substitute for proper structural support when the fixture is heavy.
Standard mounting
Wall sconces, light pendants, and many flush-mount fixtures can often use a standard universal crossbar if the junction box is secure, the fixture weight is within the box rating, and the canopy sits correctly over the opening.
Heavy-duty or angled installations
Large chandeliers, multi-arm foyer fixtures, and sloped-ceiling installs may require a swivel crossbar, a heavier support bracket, or a properly rated box designed for greater loads. Do not assume that because a bracket physically lines up, it is the correct support method.
If your main problem is not the bracket but the overall fixture setup, compare the broader install pages Portfolio lighting installation and instructions, Portfolio light fixture not grounded, and Portfolio lighting troubleshooting.
Finish Matching: Make the Replacement Hardware Look Right
Portfolio fixtures often use visible cap nuts, exposed screws, stem collars, and canopy accents that are easy to overlook until the replacement hardware arrives in the wrong color. If the fixture is in a foyer, dining room, or bath, this visual mismatch stands out immediately.
Aged Bronze / Oil Rubbed Bronze
Best for darker traditional fixtures where exposed cap nuts and stem hardware are part of the design.
Brushed Nickel / Satin Nickel
Common on cleaner, more modern Portfolio fixtures where mismatched hardware is easy to spot.
Antique Brass
Useful for warmer, heritage-style fixtures that need the hardware to look intentional rather than generic.
Why matching matters
The visible hardware is often the final detail that makes a replacement look original rather than patched together.
If your fixture also needs visual parts beyond the bracket stack, compare Portfolio lighting replacement shades, Portfolio lighting replacement glass, and Portfolio lighting replacement parts.
How to Replace Portfolio Mounting Hardware and Brackets
Use this order if your fixture is complete enough to test-fit but cannot be hung because the mounting hardware is missing, incomplete, or mismatched.
Step 1: Turn off power at the breaker
Shut off the circuit and verify the fixture box is not energized before you touch the old strap, canopy screws, or wires.
Step 2: Remove the old or mismatched hardware
Take down any leftover crossbar, bent strap, or nipple assembly that does not match the fixture. Clean up the hardware stack so you can measure from scratch.
Step 3: Size the threaded nipple
Thread the nipple through the strap or hickey assembly and dry-fit the canopy. The goal is a canopy that sits flush without leaving too much thread exposed or bottoming out before it tightens.
Step 4: Secure the bracket to the junction box
Use the correct 8-32 fixture screws to fasten the crossbar or strap to the box. If the box is stripped, loose, or damaged, stop and correct that issue before hanging the fixture.
Step 5: Test the canopy fit before final wiring
Make sure the canopy covers the box opening cleanly and the decorative hardware sits straight. This is the best time to catch an incorrect nipple length or wrong cap-nut style.
Critical Missing Components Checklist
Many "replacement bracket kits" still leave installers stuck because the tiny missing parts were not included. Use this checklist before you assume the new kit is complete.
| Small Part | Why It Matters | What Happens If It Is Missing |
|---|---|---|
| Ground screw | Creates the equipment grounding bond at the box or strap | The install may be unsafe or incomplete |
| Wire nuts | Secure conductor splices during the final install | You cannot safely finish the electrical connection |
| Lock washers | Help prevent loosening and wobble over time | The fixture can shift or feel unstable later |
| Cap nuts or finials | Hold the canopy and visible trim in place | The fixture may hang loosely or look unfinished |
| Correct nipple length | Controls the canopy depth and closure | The canopy will not sit flush against the ceiling or wall |
Bracket screws must match more than the hole diameter. A #10-24 screw can resemble a #10-32 screw, and a metric M6 fastener can begin entering a similar inch-threaded hole before damaging the remaining thread peaks. Length, head style, washer stack, thread pitch, and hole depth also determine whether the fixture clamps securely without contacting internal wiring. The landscape lighting screw and mounting-thread guide provides a field method for separating UNC, UNF, metric, pipe-size, and fixture-specific hardware before a replacement screw is installed.
For related parts beyond the bracket stack, browse Portfolio lighting replacement hardware, Portfolio lighting replacement diffusers, and Portfolio lighting bulb replacement if your project turns into a fuller fixture refresh.
Before You Buy Replacement Hardware
- Measure the box screw spacing
- Check whether the box screws are 8-32 or another size
- Measure the canopy depth before choosing a nipple length
- Confirm whether the fixture needs a swivel or heavy-duty bracket
- Match visible finish before ordering cap nuts or finials
When This Is a Hardware Problem vs. When It Is a Bigger Fixture Problem
Not every hard-to-hang fixture needs a rare proprietary bracket. Sometimes the fixture is missing only the visible mounting stack, and sometimes the deeper issue is a damaged box, a stripped support point, or a fixture family that is easier to replace than rebuild.
- Bracket missing but canopy fits standard box → likely a hardware-only repair
- Canopy too shallow or stem stack mismatched → measure nipple and hickey assembly carefully
- Fixture body damaged too → compare full replacement paths before investing more in hardware
If the fixture is older or incomplete beyond the bracket set, compare Portfolio lighting compatibility guide, discontinued Portfolio lighting, and replacement for Portfolio landscape lighting for broader replacement logic across the brand.
Portfolio Lighting Mounting Hardware FAQ
Can I use a universal mounting bracket for a Portfolio light?
Yes, many Portfolio fixtures use standard ceiling or wall box spacing, so a universal crossbar often works. The real fit problems usually come from nipple projection, canopy depth, or missing decorative hardware.
What size are the screws for a Portfolio ceiling bracket?
Most standard fixture crossbars attach to the junction box with 8-32 screws. The decorative hardware commonly works with a 1/8-IP nipple assembly, but you should still test fit the canopy before final install.
What is a hickey in a light fixture?
A hickey is a small internal threaded coupling used in some pendant and chandelier stem assemblies. It helps join parts of the hanging stack and can be one of the easiest pieces to overlook when a fixture is moved.
Can I hang a heavy Portfolio chandelier on a standard crossbar?
Not automatically. Large fixtures need a properly rated box and support method. If the fixture is heavy, verify the box rating and do not rely on a basic universal strap just because the holes line up.
Final Thoughts on Portfolio Mounting Hardware and Bracket Replacement
Portfolio lighting mounting hardware replacement is really about solving fit, support, and finish at the same time. The bracket may be universal, but the install only feels complete when the nipple depth is right, the canopy sits flush, the visible hardware matches, and the box is rated for the fixture load.
If you treat the project like a full hardware stack instead of a single missing screw, you avoid the most common reason people get stuck halfway through a light installation.
Why Mounting Hardware Matters in Portfolio Repairs
Broken mounting hardware is one of the most overlooked causes of recurring Portfolio Lighting failures. Leaning fixtures, stripped stems, unstable brackets and cracked mounting bases can place stress on wire leads and low-voltage connectors long before the actual lighting component fails.
The 016107 WHCM432R8 repair guide explains how damaged lens retention systems can also weaken overall fixture stability, while the 0311569 kit replacement guide demonstrates how fixture kits often hide multiple hardware variations under a single retail model number.
Hardware stress becomes even more visible in aging outdoor systems. The 17945-000 shade guide focuses heavily on diffuser support and mounting pressure points, while the 230132-145P replacement guide explains how damaged stakes and unstable wire routing can create intermittent low-voltage faults.
Additional fixture-support troubleshooting appears throughout the FY09-003 0048184 manual guide, 18907-000 repair guide, 25966-3 manual guide and 2851294 replacement guide, where broken stakes, housing stress and environmental movement are connected directly to real-world lighting failures.
Portfolio Lighting Mounting Hardware, Crossbars, Finials, and Bracket Fit Help
This page is designed for the high-intent repair problem where the light fixture exists but the small mounting parts are missing, mismatched, or incomplete. It focuses on the hardware names, the support logic, and the fit details that actually determine whether the fixture can be safely hung.
If your fixture family is hard to identify, use Portfolio lighting model number lookup before ordering parts. Matching the fixture line often makes it much easier to choose the correct visible hardware and avoid buying duplicate universal kits that still do not solve the problem.