
Most homes are not poorly lit because the owner picked the wrong fixture. They are poorly lit because the plan stopped at the fixture. Real lighting design is not just about what hangs from the ceiling. It is about layers, light distribution, room purpose, glare control, and how one room flows into the next.
That is why this page is built as a room-by-room teaching guide. You are not just choosing lights. You are building a system that needs to feel comfortable in the morning, practical during tasks, and inviting at night.
If you are planning lighting for your entire home and want a clear starting point, it helps to step back and understand how all of the pieces fit together. This guide walks you through each room in detail, but you can also explore the complete system, troubleshooting help, and fixture options on our Portfolio Lighting home page. It brings together indoor lighting layouts, outdoor and landscape lighting strategies, installation tips, and replacement parts so you can build a lighting plan that works as a complete system instead of isolated rooms.
Room-by-Room Lighting Help Center
Use these related pages to go deeper into specific fixture categories, room layouts, and supporting lighting topics while you build your full indoor plan.
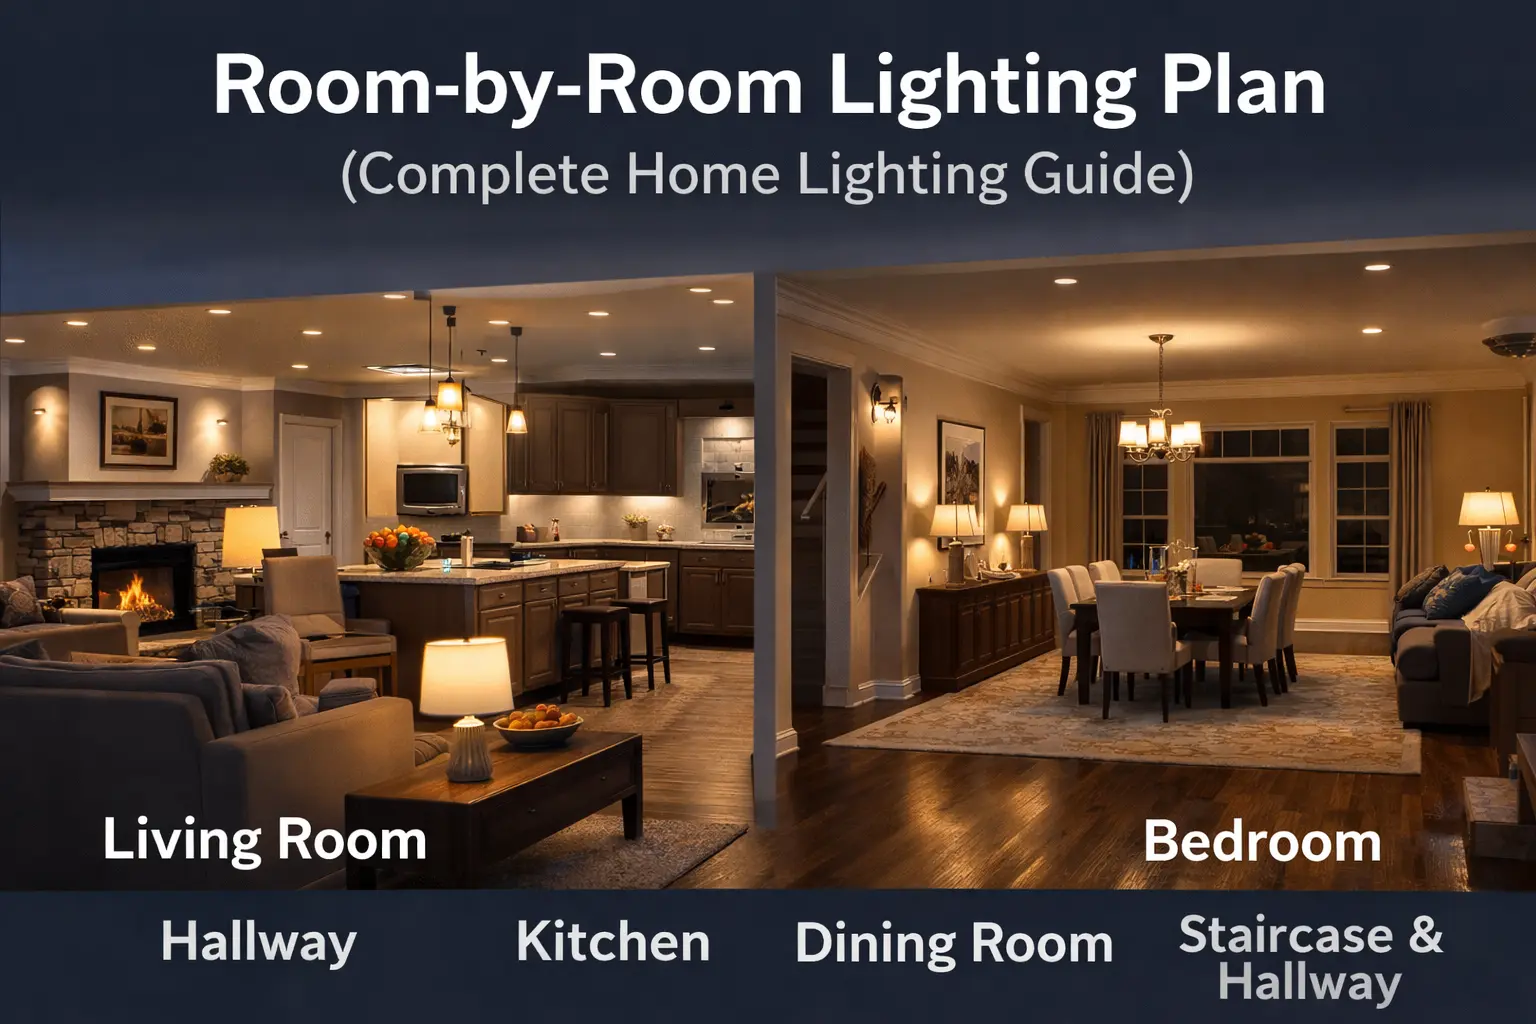
Whole-Home Visual Plan Example
Before you plan room by room, it helps to see what a full-house layout can look like. These diagrams help you visualize how lighting planning moves from a general floor plan into room-specific fixture choices. This also reinforces why the Portfolio Indoor Lighting hub and the main Lighting Guide work so well as supporting resources while you design each room.

Step 1: Understand How Lighting Actually Works
The first step in designing a better home lighting plan is understanding that lighting usually works in three layers: ambient, task, and accent. Once you understand those three layers, every room starts to make more sense.
Ambient Lighting
Ambient lighting is the general light level of the room. It is what lets you move around comfortably and see the overall space. Recessed lights, ceiling fixtures, flush mounts, and some chandeliers often contribute to the ambient layer.
Task Lighting
Task lighting is focused lighting for a job. In a kitchen, it may be under-cabinet lighting above the countertop. In a bedroom, it may be a reading light. In a bathroom, it may be vanity lighting at the mirror. Task lighting is the layer that often separates a nice-looking room from a truly functional one.
Accent Lighting
Accent lighting adds depth, emphasis, and visual interest. It can highlight a wall texture, shelving, artwork, architectural detail, or a favored corner of the room. Accent lighting is often what makes a room feel finished rather than flat.
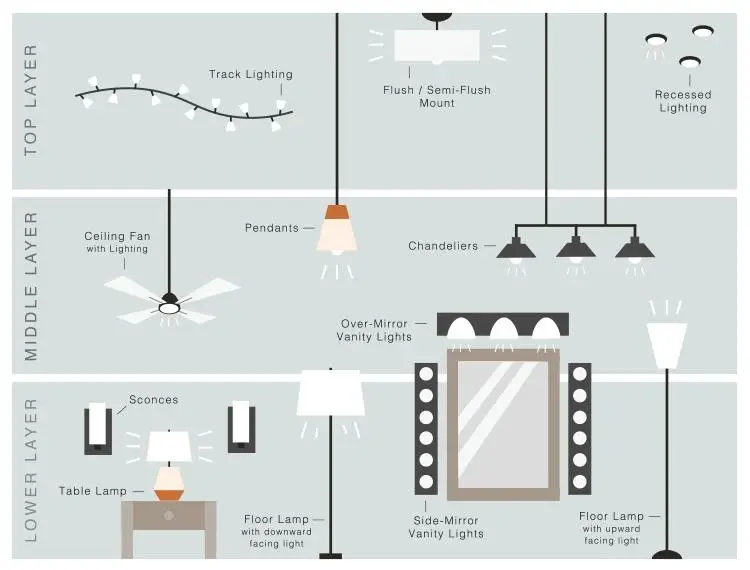
Diagram: The Three Main Lighting Layers
These visuals make the concept much easier to understand. They show why layered planning usually outperforms a one-fixture solution and why the right fixture type should be chosen for the job instead of by habit. This is also why room categories such as Portfolio Ceiling Lighting, Portfolio Sconces Lighting, and Portfolio Floor Lamps should often work together instead of being treated as separate ideas.
Step 2: Build a Whole-Home Lighting Strategy Before You Go Room by Room
Before planning each individual room, it helps to understand how lighting works across your entire home. This complete lighting guide explains how indoor, outdoor, and landscape lighting systems connect into one cohesive design.
That whole-home view matters because rooms do not exist in isolation. A bright kitchen that opens into a dim living room can feel awkward. A warm, inviting bedroom next to a harsh hallway can make the transition feel abrupt. When you think about the full house first, you can plan for flow, consistency, and comfort instead of solving each room separately.
A strong whole-home plan usually includes a consistent lighting temperature strategy, a balanced use of ambient and task lighting, and enough flexibility to make rooms work at different times of day.
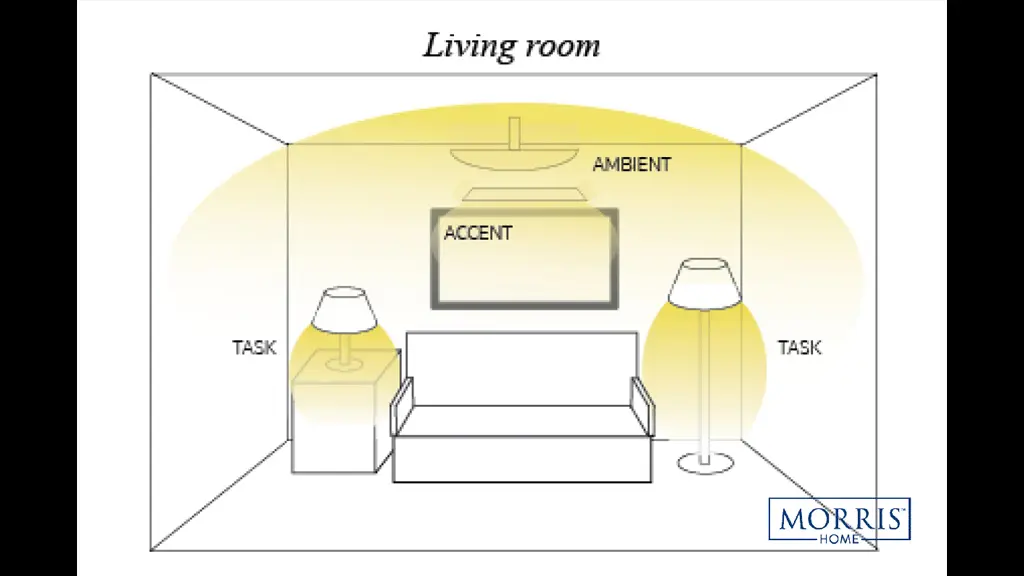
Interactive Diagram: See How Ambient, Task, and Accent Lighting Work Together
One of the biggest reasons homeowners struggle with lighting plans is that they cannot picture what the layers are supposed to do. Use the buttons below to toggle each layer on and off. This simple room diagram shows why a room usually feels incomplete when one layer is missing.
What each layer solves
Ambient: Stops the room from feeling dark or uneven overall.
Task: Solves real-use problems like reading, food prep, grooming, or desk work.
Accent: Keeps the room from feeling flat and helps highlight what matters visually.
Interactive Tool: Estimate How Many Lights a Room May Need
One of the most common questions homeowners have is how many lights they actually need in each room. The answer depends on room size, ceiling height, and how the space is used. This lighting calculator helps you estimate the number of fixtures needed to achieve balanced, comfortable lighting without over-lighting or creating dark areas.
Estimated ambient fixture count: 6
Recommended lighting focus: Layer ambient lighting with task lighting in seating and activity areas.
Suggested support layers: Add lamps or sconces for task use and accent depth.
Spacing note: Keep light distribution even, but respond to furniture and room purpose rather than forcing a perfect grid.
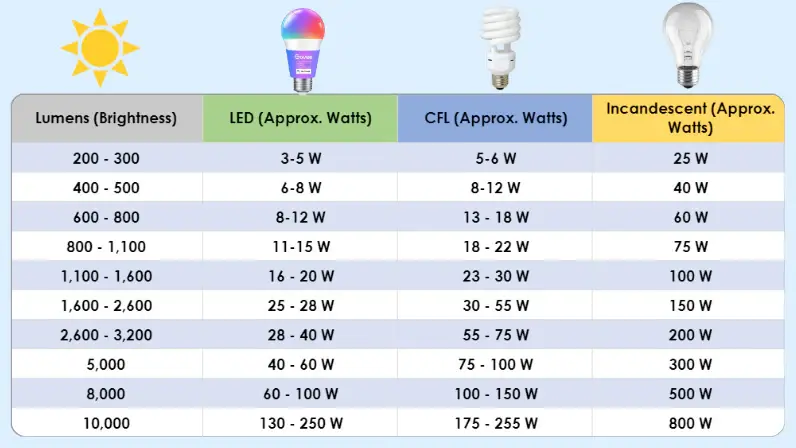
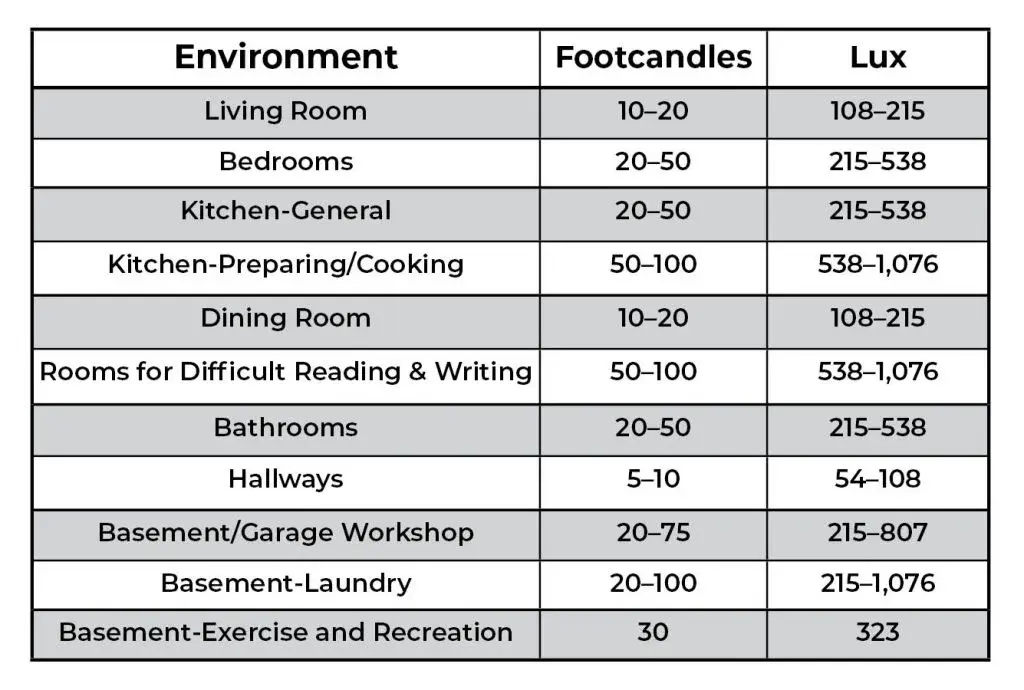
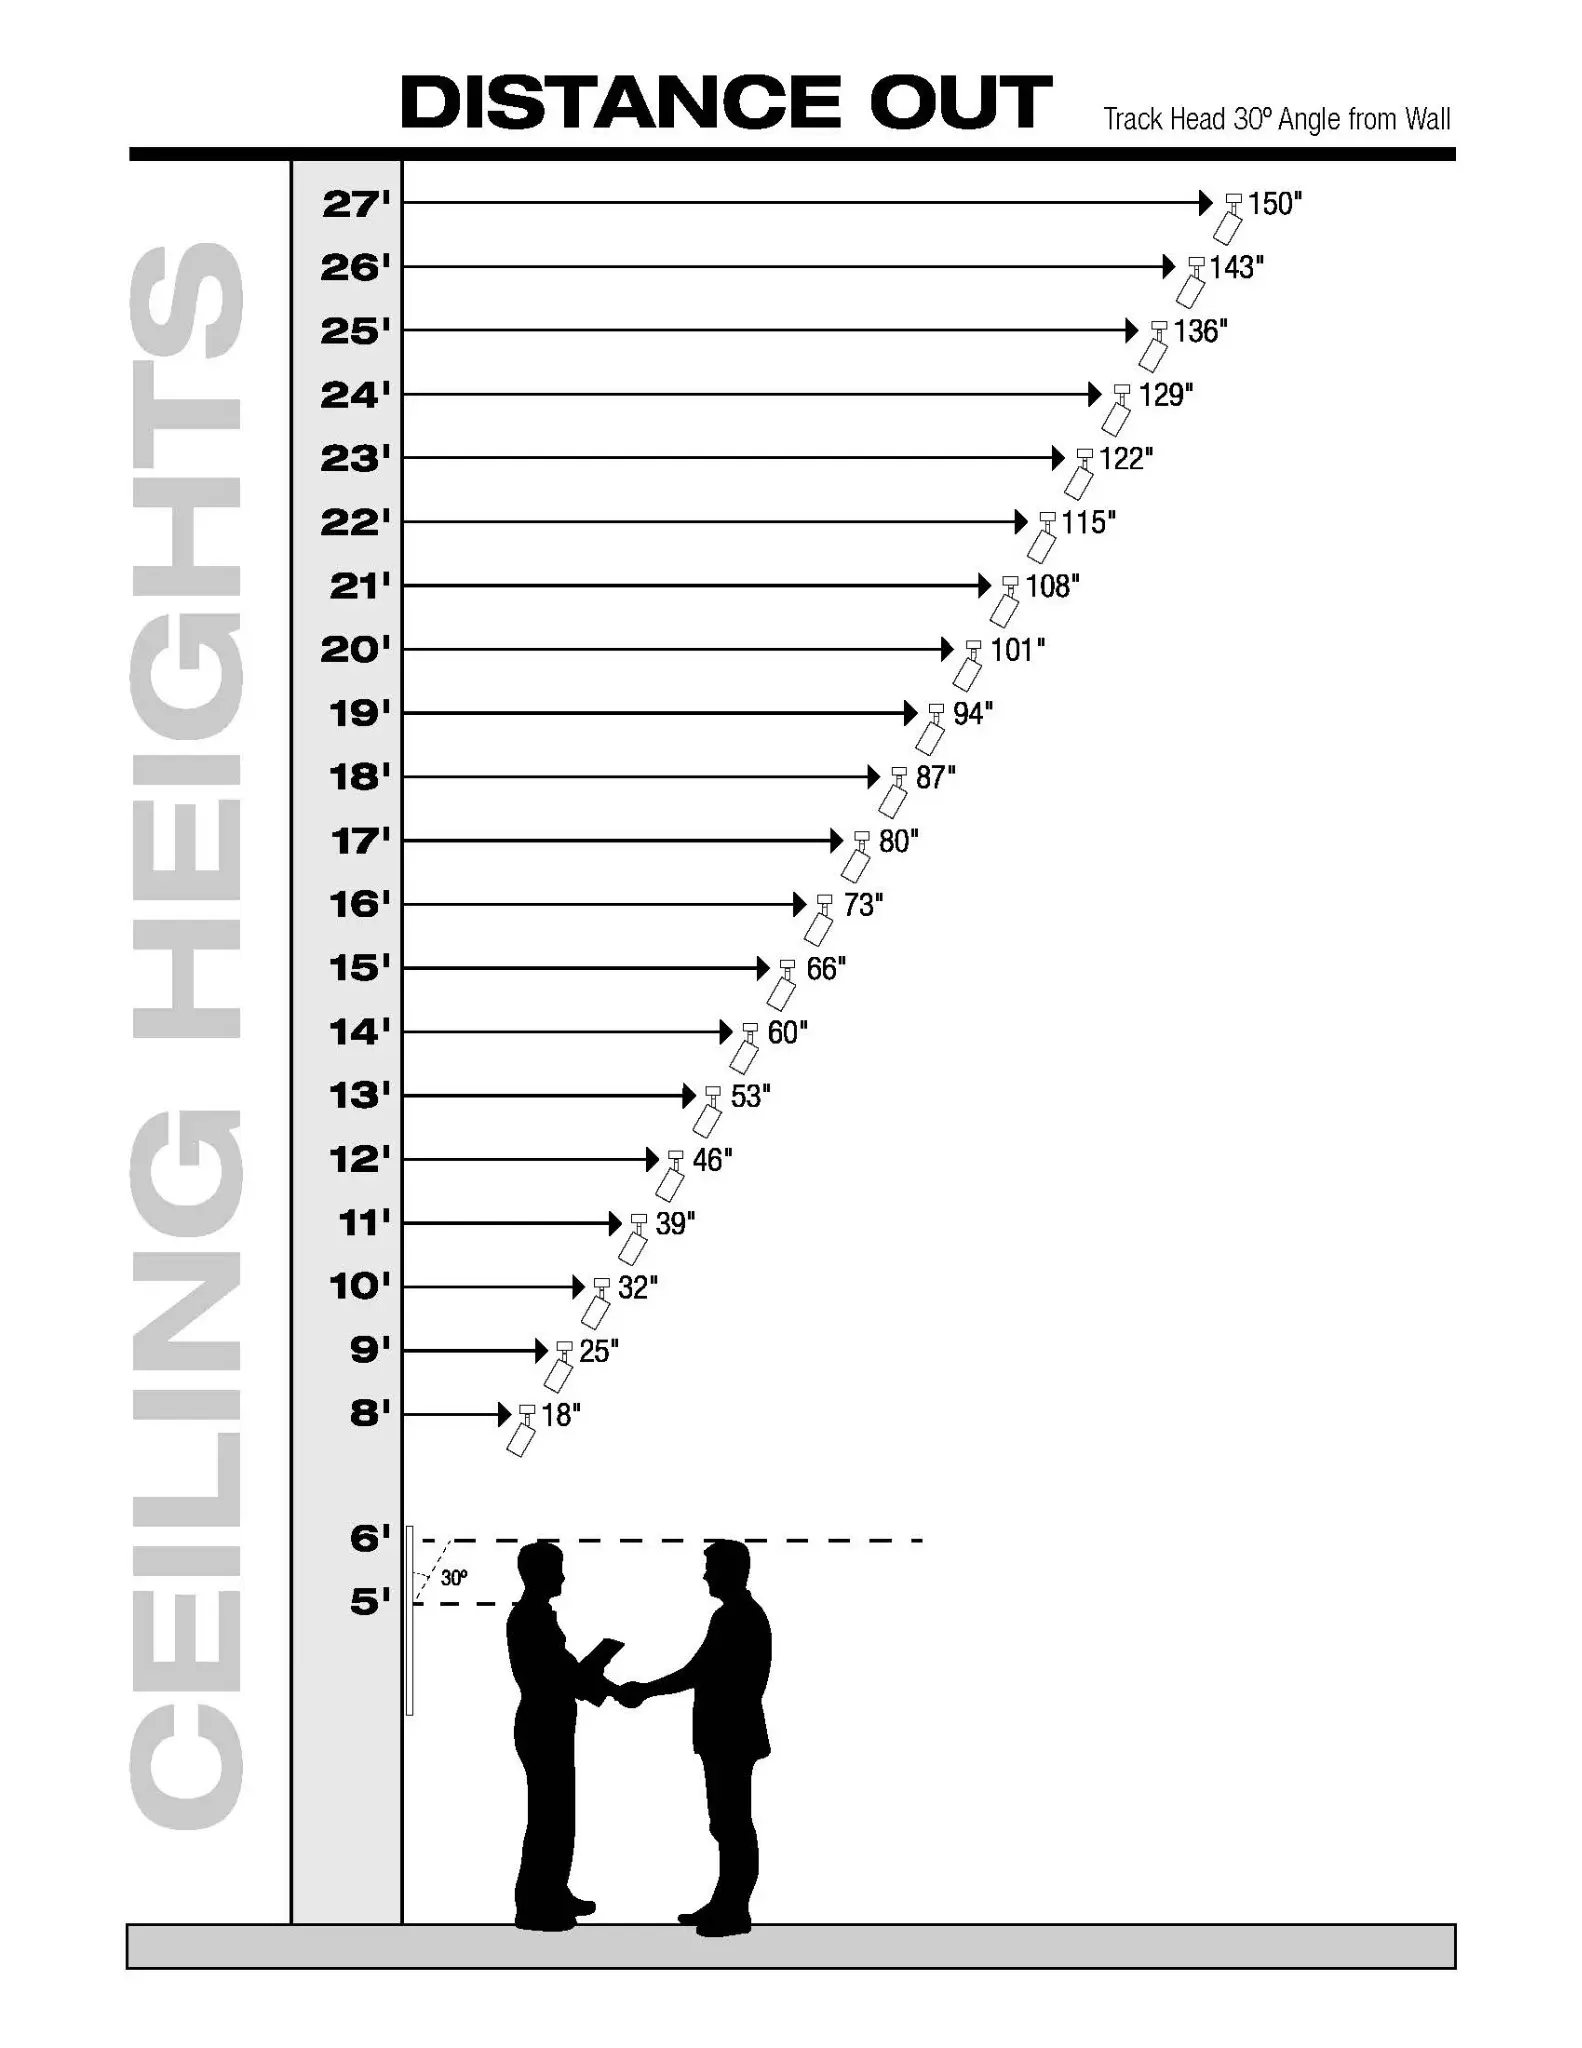
Helpful Charts for Brightness, Room Targets, and Ceiling Planning
These charts help translate room planning into brightness and spacing decisions. They work especially well when you are comparing general room targets, lumens, and how ceiling height affects placement. If you are building your indoor hub strategy, these visuals also support pages like Indoor Lighting Layout Guide and help reinforce why fixture spacing should be based on room use rather than guesswork.
Best Lighting Focus by Room
| Room | Primary Lighting Need | Most Important Layer | Typical Fixture Types |
|---|---|---|---|
| Living room | Comfort, flexibility, atmosphere | Ambient + accent | Recessed lights, lamps, sconces, ceiling fixtures |
| Kitchen | Task visibility and clean coverage | Task + ambient | Recessed lights, pendants, under-cabinet lighting |
| Bedroom | Softness and controllable lighting | Ambient + task | Lamps, sconces, ceiling fixtures, recessed lights |
| Bathroom | Mirror clarity and even face lighting | Task + ambient | Vanity lights, ceiling lights, recessed lights |
| Dining room | Centered illumination and mood | Ambient + accent | Chandeliers, pendants, sconces, dimmers |
| Hallways and stairs | Safe visibility and continuity | Ambient | Ceiling lights, recessed lights, wall lights |
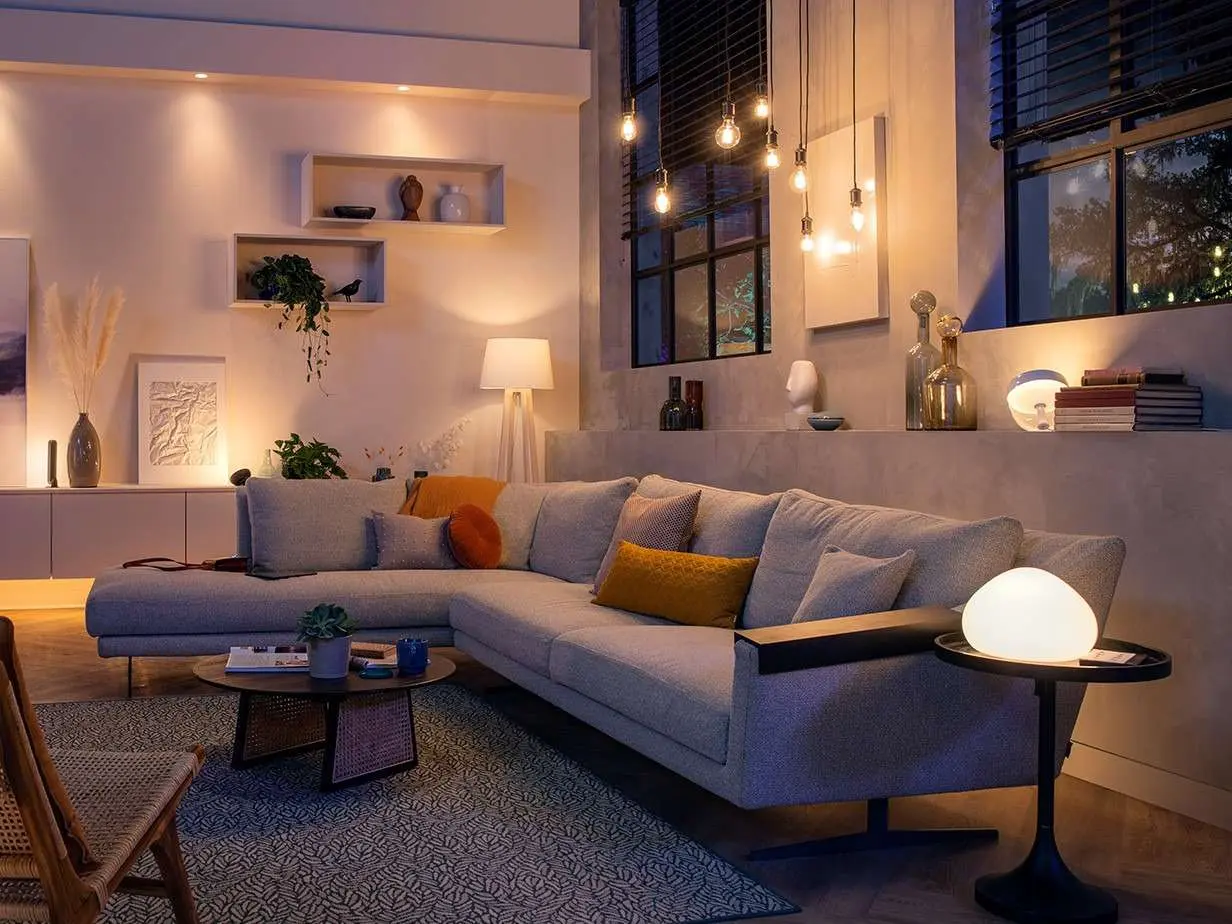
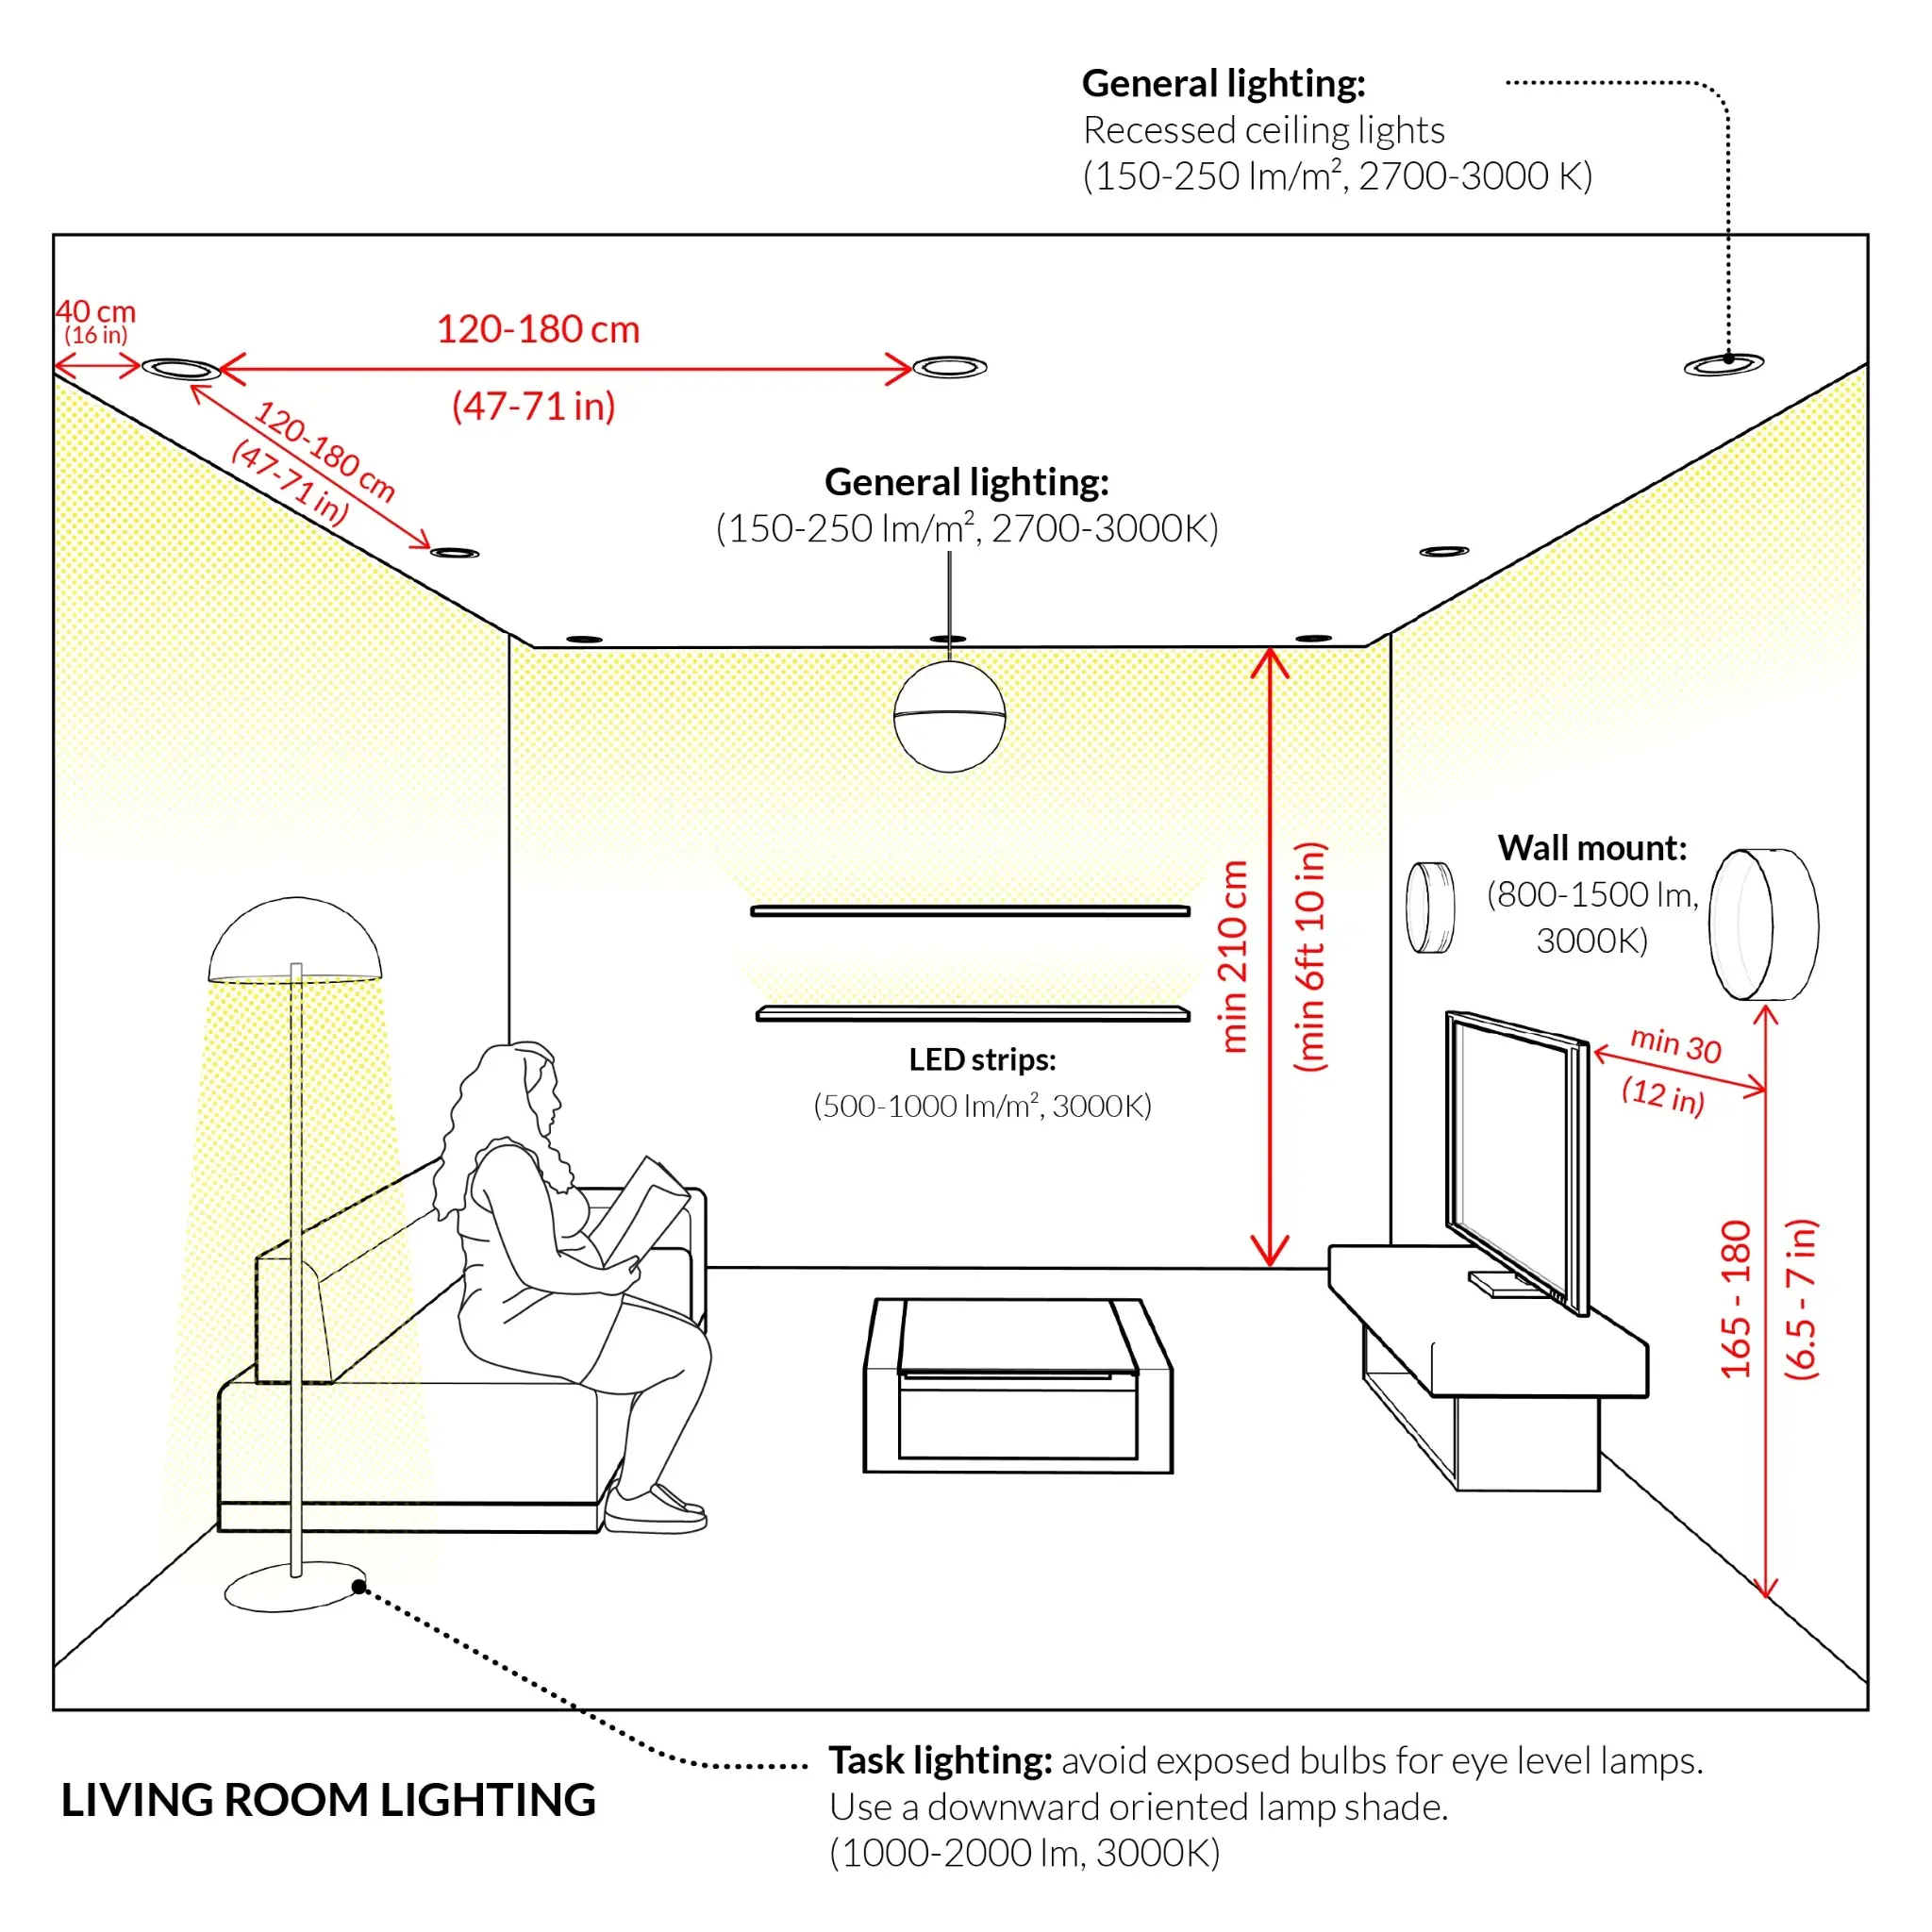
Step 3: Plan the Living Room Lighting Layout
The living room is one of the best examples of why layered lighting matters. This room usually hosts several activities: relaxing, reading, entertaining, watching television, conversation, and general movement. A single overhead light rarely handles all of that well.
A strong living room plan often starts with ambient lighting from recessed lights, ceiling fixtures, or a central decorative fixture. From there, task lighting is added where people actually sit and read, and accent lighting is used to keep the room from feeling flat at night.
If you want a broader look at layout rules for indoor spaces, the indoor lighting layout guide is a strong companion page because it helps connect room-level lighting decisions to fixture positioning and balance.
Living Room Placement Rules
Avoid putting all of the light in the center of the ceiling and assuming the room is solved. Think about seating areas, reading zones, television glare, and whether the corners of the room feel visually dead at night. The best living rooms tend to have more than one source of light at different heights.
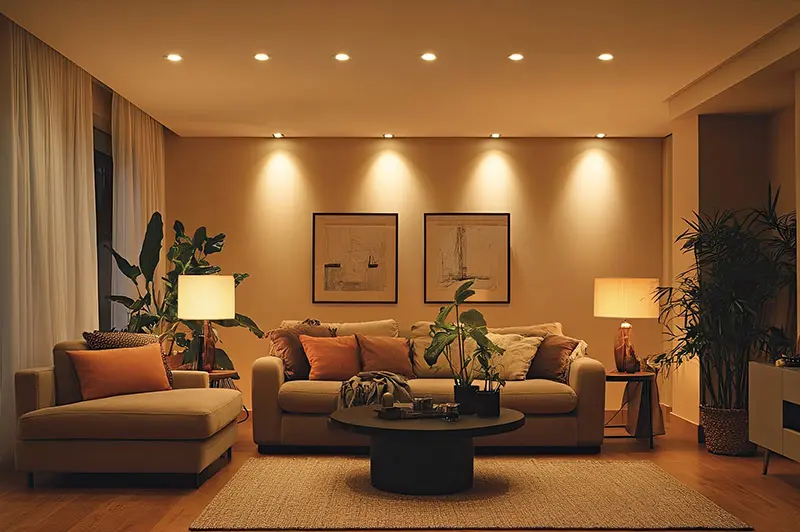
Living Room Visual Examples and Planning Diagrams
Living rooms are where homeowners most often notice the difference between a layered plan and a flat one. These visuals show how atmosphere, task lighting, accent lighting, and spacing all affect comfort. They also reinforce why categories like Portfolio Floor Lamps, Portfolio Sconces Lighting, and Portfolio Ceiling Lighting often work best together.
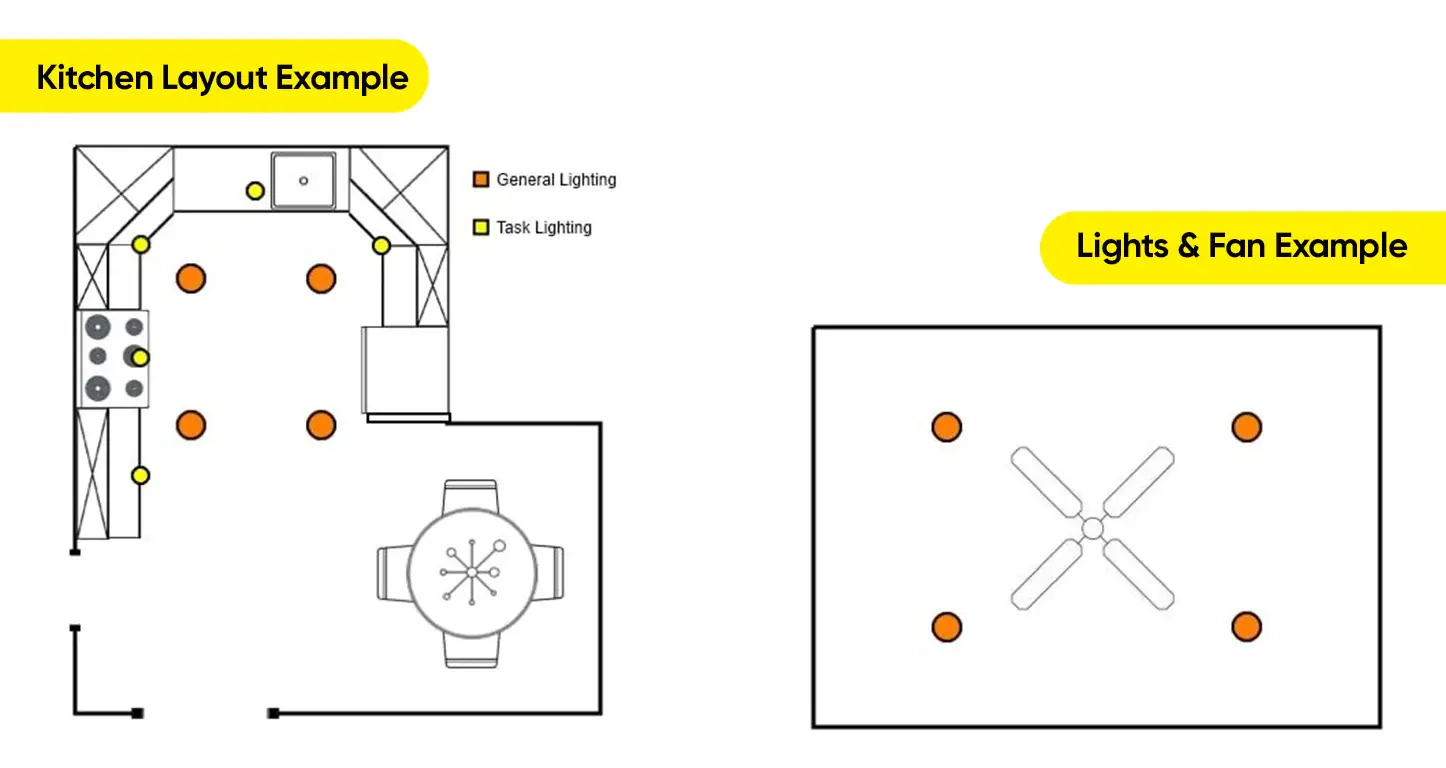
Step 4: Plan the Kitchen Lighting Layout
The kitchen is usually the room where lighting mistakes become obvious fastest because so much work happens there. You chop, clean, read labels, prep food, move around with hot surfaces, and often use the room at both bright daytime and dim evening hours. That means kitchen lighting needs to be functional first and attractive second, without ignoring either one.
Kitchen lighting requires precise placement for both safety and functionality. For a deeper breakdown of layouts, see this kitchen lighting layout guide to understand spacing, fixture types, and task lighting placement.
The kitchen also benefits heavily from layered lighting. Recessed or ceiling lighting can provide overall coverage, but the real performance upgrade usually comes from task lighting over work zones and under-cabinet lighting that removes shadows from countertops.
Kitchen Fixtures That Usually Matter Most
For many kitchens, the most important supporting pages are Portfolio Under Cabinet Lighting, Portfolio Pendant Lighting, and Portfolio Recessed Lighting. Those categories often work together in a strong kitchen plan.
Kitchen Lighting Questions to Answer
Where are the main prep areas? Is there an island that needs centered or repeated fixtures? Are upper cabinets creating counter shadows? Is the room open to another area that requires visual continuity? A strong kitchen plan answers those questions before fixtures are selected.
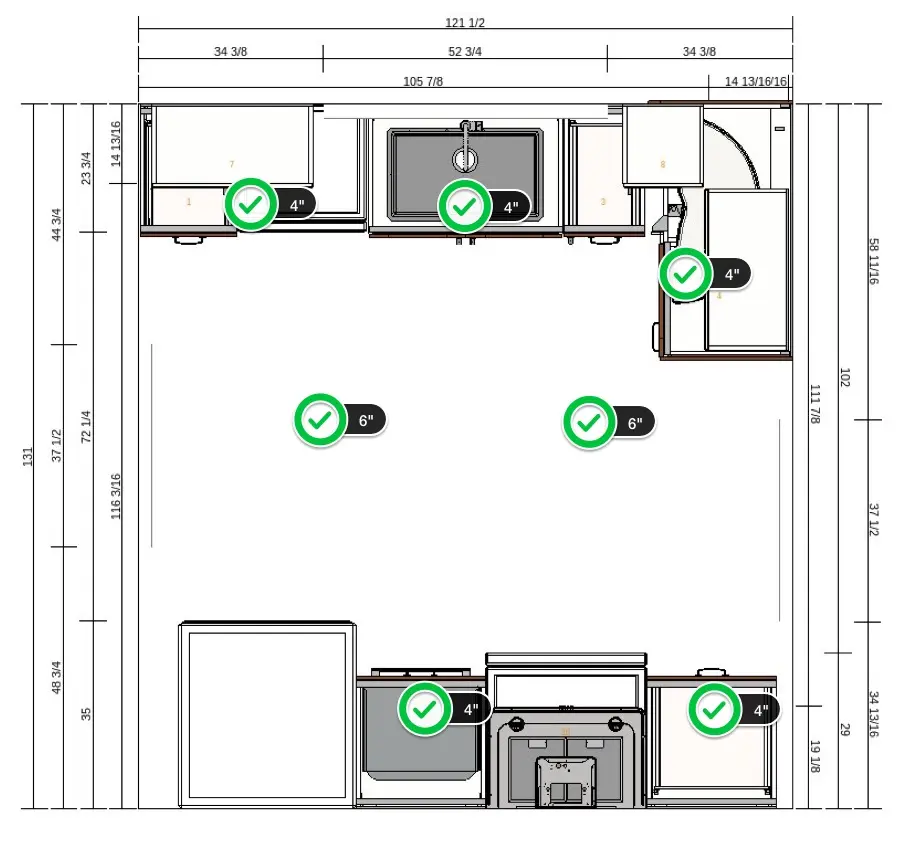
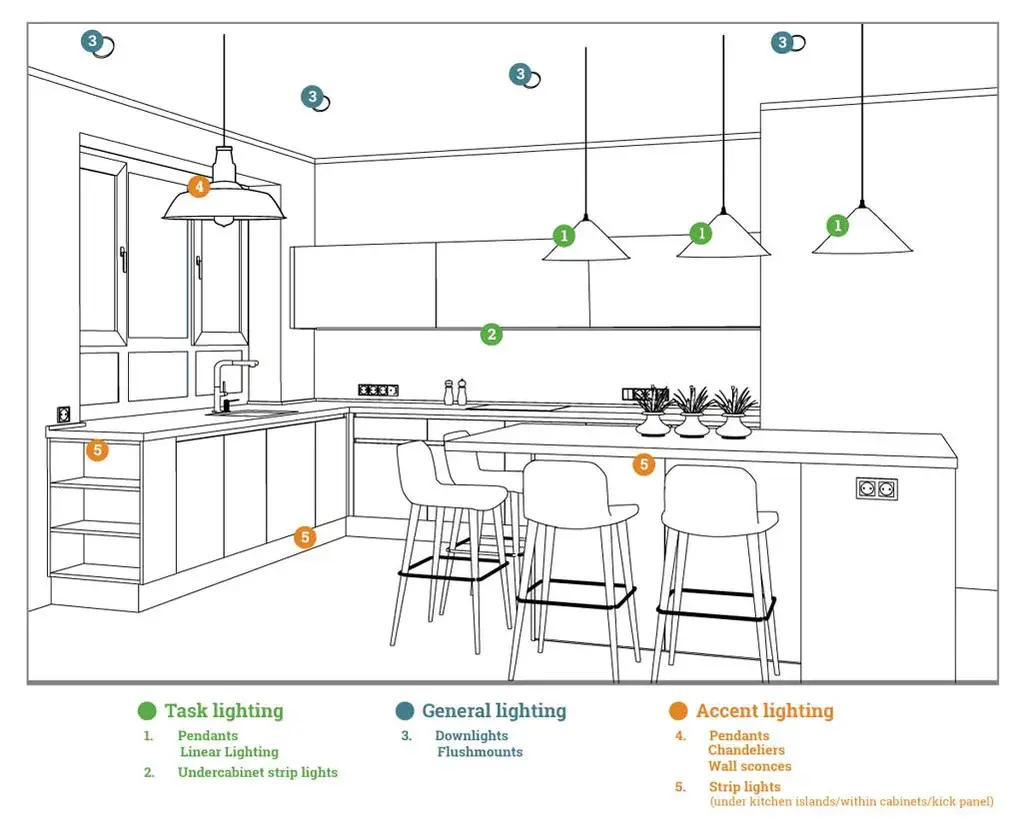
Kitchen Layout Diagrams and Fixture Placement Examples
Kitchen diagrams are some of the most useful lighting visuals because they connect theory to exact placement. These images help show how under-cabinet lighting, pendants, general ceiling lighting, and island lighting can be layered into one plan. They strongly support your kitchen cluster and connect well to Kitchen Lighting Layout Guide, Portfolio Under Cabinet Lighting, and Portfolio Pendant Lighting.

Step 5: Plan Bedroom and Bathroom Lighting Differently
Bedroom Lighting Plan
Bedrooms usually feel best when the lighting is softer, calmer, and easier to control. This is a room where harsh overhead-only lighting often feels wrong, even if it is technically bright enough. Many bedrooms work better when ambient lighting is supported by bedside task lighting and softer secondary light sources.
Bedrooms often benefit from fixture categories such as Portfolio Ceiling Lighting, Portfolio Sconces Lighting, and Portfolio Floor Lamps. Those combinations create better flexibility than one ceiling fixture alone.
Bathroom Lighting Plan
Bathrooms are less forgiving than many homeowners expect because the mirror area can go wrong very quickly. A bright light above the room does not necessarily solve the problem if it throws face shadows at the mirror. Bathroom lighting usually works best when vanity lighting and general room lighting are both considered together.
For bathroom fixture ideas tied to this room-by-room plan, the Portfolio Bathroom Lighting page can help you compare fixture directions and bathroom-specific lighting choices.
Step 6: Plan Dining Rooms, Hallways, and Stair Areas with Purpose
Dining Room Lighting
Dining rooms usually need centered lighting that works with the table rather than with the empty room. Chandeliers and pendants often perform well here because they anchor the space visually and help create a more intimate mood. Dimming control becomes especially valuable in dining rooms because the room may be used very differently at different times.
If you are comparing dining-room-friendly fixture categories, look at Portfolio Chandeliers Lighting and Portfolio Pendant Lighting as part of the room plan.
Hallways and Stairs
Hallways and stairs require lighting that focuses on safety and visibility. For step-specific planning, visit this outdoor stair lighting guide to see how proper spacing and placement improve visibility and reduce hazards. While that page is outdoor-focused, the core lesson still matters indoors too: light should reveal movement paths clearly and consistently.
Hallways also benefit from restraint. They need enough light to feel safe and continuous, but they should not feel more intense than the rooms they connect.
Diagram Set: Best Lighting Setup by Room Type
The chart below is a quick visual summary of how room focus changes from one space to another. This is useful when you are trying to keep the whole house consistent while still giving each room what it needs most.
Layered and flexible.
Ambient + accent should lead, with task lighting where seating supports it.
Task-heavy and precise.
Task lighting over counters and islands matters as much as recessed lights.
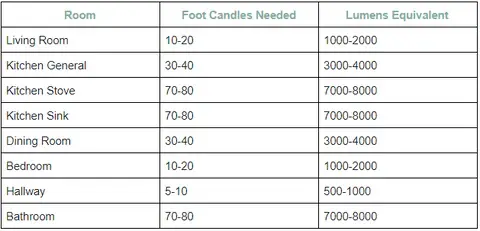
Brightness Targets and Room Output Reference
Homeowners often struggle because they have room layouts but no brightness target. These reference tables help bridge that gap. They are especially useful when you are deciding whether a room needs more general lighting, more task lighting, or simply better fixture placement.
Step 7: Decide How Many Lights Each Room May Need
One of the most common questions homeowners have is how many lights they actually need in each room. The answer depends on room size, ceiling height, and how the space is used. A balanced lighting plan helps you estimate the number of fixtures needed to achieve comfortable lighting without over-lighting or creating dark areas.
A small bedroom may not need the same ceiling strategy as a large open living room. A kitchen with one island and long countertops may need several layered sources. A hallway may need consistency more than quantity. The practical way to think about this is not to ask, “How many lights should I buy?” but instead, “What jobs does the room need the light to do?”
That is usually the difference between a room that feels planned and a room that feels guessed at.
Step 8: Avoid Common Lighting Planning Mistakes
Many lighting problems come from simple planning mistakes like poor spacing, incorrect fixture selection, or relying on a single light source. To avoid these issues, review common lighting mistakes before finalizing your layout.
Even though that page was written from a landscape-lighting angle, the core lesson still applies indoors: bad spacing, poor fixture choice, and the wrong balance of light can make a space feel uncomfortable no matter how expensive the fixtures are.
Mistake 1: One Fixture Doing All the Work
This is one of the most common home-lighting problems. A single overhead fixture is asked to provide brightness, comfort, style, task support, and mood at once. It rarely does all of those well.
Mistake 2: Planning the Room but Not the Task Areas
Many rooms feel bright but still do not work because the actual task zones remain shadowed. Kitchens and bathrooms are the easiest examples, but reading zones, desks, and bedside areas matter too.
Mistake 3: Inconsistent Flow Between Rooms
A room-by-room plan should still feel like one home. Lighting shifts should feel intentional, not jarring.
Step 9: Think About Installation and Wiring Early
If you plan to install lighting yourself, understanding wiring and system setup is essential. This lighting wiring guide explains how to safely connect fixtures and plan your system layout.
While that page is more directly tied to low voltage systems, the larger lesson is still important indoors: installation gets easier when layout decisions are made before the fixtures are in your hands. Planning saves rework.
If you are also evaluating general installation help, the Portfolio Lighting Installation and Instructions page is a good supporting resource.
Step 10: Use This Room-by-Room Lighting Planning Checklist
A practical room-by-room lighting plan usually becomes much easier when you follow the same checklist for each space.
- Define what the room is used for most often.
- Identify where ambient lighting should come from.
- Mark all task areas that need stronger or more direct light.
- Decide whether the room needs accent lighting for depth or emphasis.
- Think about how the room connects visually to the next room.
- Review fixture categories that match the room’s function.
- Check whether the room needs dimming or more flexible control.
- Avoid relying on one fixture to solve every lighting problem.
If you want a broad supporting hub for indoor fixtures after finishing this checklist, use Portfolio Indoor Lighting to continue into room-specific and fixture-specific pages.
Room-by-Room Lighting Plan FAQ
How many lights do I need per room?
It depends on room size, ceiling height, fixture type, and how the room is used. Most rooms work best when the lighting plan combines multiple layers instead of relying on a single fixture.
What is the best lighting layout for a home?
The best layout combines ambient, task, and accent lighting while also creating visual flow between rooms. Each room should respond to its purpose instead of using one formula everywhere.
How far apart should lights be?
Spacing depends on ceiling height, fixture spread, room shape, and the use of the space. The right spacing creates even coverage without glare, clutter, or dead zones.
What type of lighting is best for each room?
Kitchens usually need strong task lighting, living rooms benefit from layers and flexibility, bedrooms usually work best with softer light, bathrooms need strong mirror support, and hallways need safe, even visibility.
Should I use recessed lights everywhere?
No. Recessed lights can be excellent, but they are usually just one part of a stronger plan. Many rooms feel more functional and more comfortable when they include other fixture types as well.