
Quick Answer: My 7-Point Housing Salvage & Moisture Isolation Protocol
Deciding whether to patch up a damaged landscape light housing or pull out the entire fixture boils down to one simple thing: has moisture crossed the internal gasket line? While you can easily swap out a cracked outer cowl or shattered glass faceplate on a solid metal light, the very second wet soil or standing rainwater breaches the inner electrical chamber, it triggers an unstoppable chemical reaction that eats away your wiring and ruins your system.
Whenever I step onto a property to inspect a damaged layout or help a homeowner figure out if their fixtures are worth saving, I make the call using these seven field rules:
- 1. Inspecting Purely Cosmetic Hairlines: If a stray lawnmower or weed whacker leaves a small hairline fracture on an outer plastic shroud but the internal socket stays completely bone-dry, I save the cash and replace just the outer plastic shell piece.
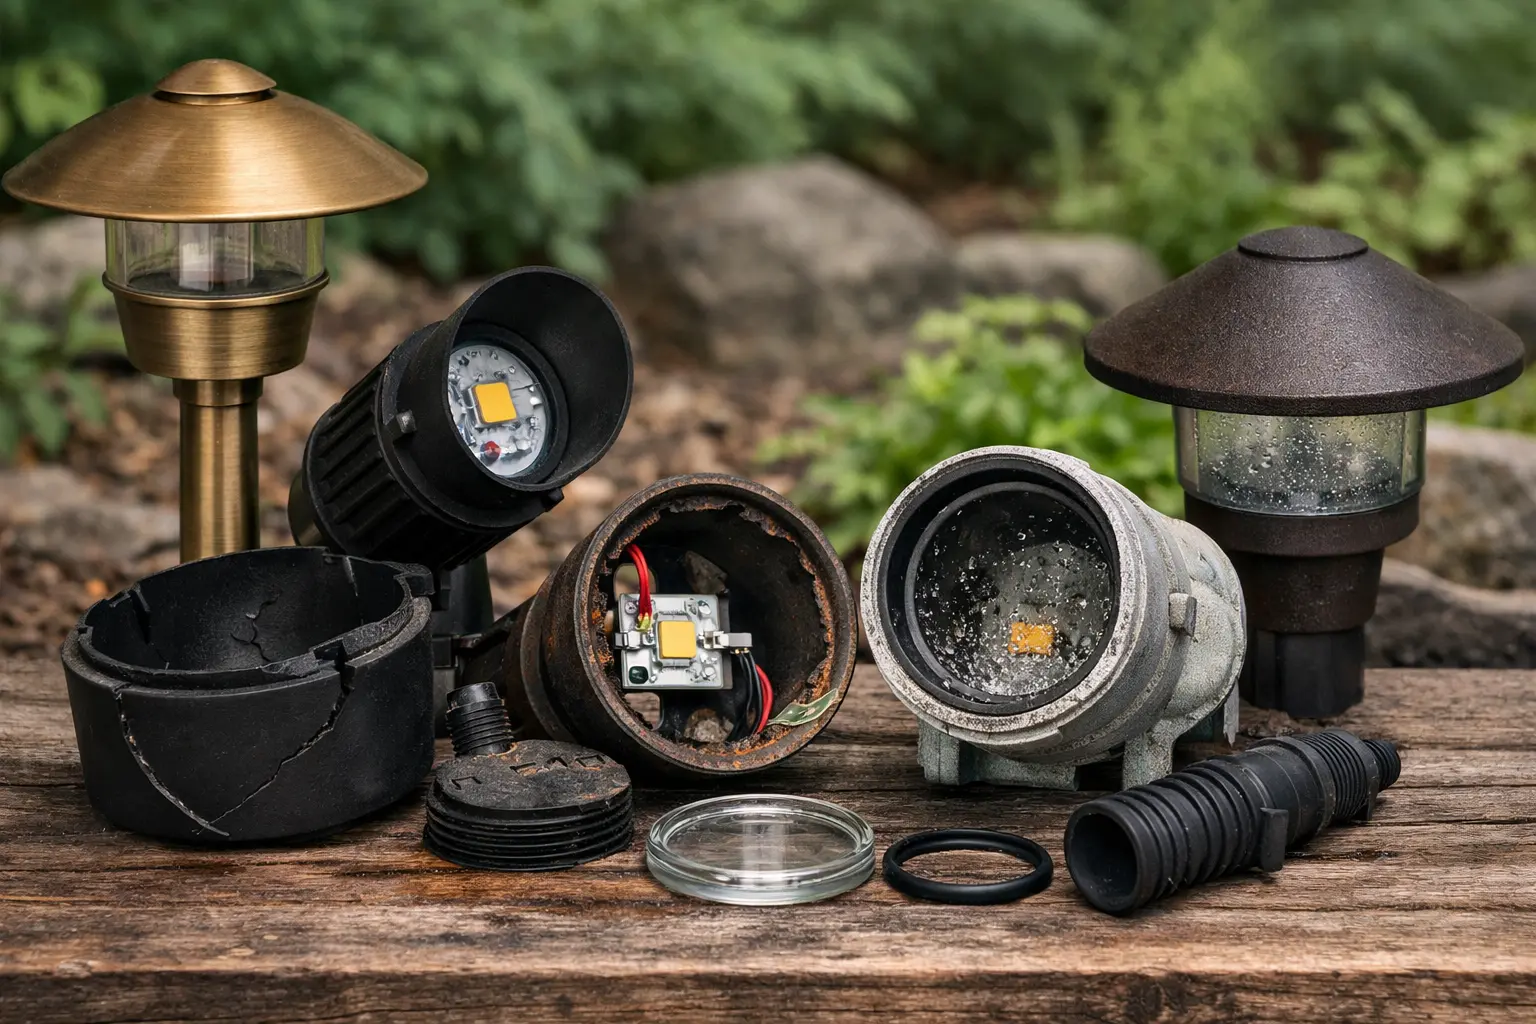
- 2. Testing for Interior Water Pools: When I pull off a lens and find standing water or condensation dripping directly over the bulb or integrated LED board, the unit is done; I replace the entire fixture immediately to prevent it from shorting out the whole circuit.
- 3. Scouting out Green Copper Corrosion: I always look closely at the internal metal socket pins. If you spot a chalky, light-green crust forming on the brass or copper points, the metal has oxidised beyond repair, and a new bulb will burn out in days.
- 4. Checking Wobbly or Stripped Knuckle Joints: If the adjustable swivel knuckle at the bottom of a directional spotlight strips out or snaps, the fixture can no longer hold its angle; unless you can source a matching factory collar swap, replacing the unit is your best bet.
- 5. Evaluating Hardscape Mortar Encapsulation: For steps and retaining wall lights embedded deep inside stone mortar, breaking them out is a nightmare. In these tight spots, I do everything I can to rebuild the internal socket pins and swap the trim plate rather than chipping away the masonry work.
- 6. Upgrading Cheap Polymer Housings: If you are constantly patching up cheap, brittle plastic composite stakes that bake and crumble under the summer sun, stop wasting time on temporary fixes. I tell my clients to scrap them completely and upgrade to solid cast-brass housings that carry lifetime warranties.
- 7. Resealing Saved Units with Silicone Grease: If the fixture passes my tests and I decide to salvage it, I never put it back together dry. I coat every single rubber ring, thread, and wire connection point with heavy-duty dielectric silicone grease to keep morning dew and groundwater locked out for good.
⚠️ CRITICAL SAFETY RISK: Leaving a water-logged, corroded fixture hooked up to a low-voltage line creates a severe continuous power drain that starves your other lights of voltage and will permanently melt your main transformer core. Ignoring these moisture alerts triggers three distinct systemic hardware failures that I chart out step-by-step in our technical repair guides down page.
Don't guess at hidden line resistance or buy random replacement kits blindly. Use my step-by-step housing teardown videos, gasket dimension sheets, and safe direct-burial splicing instructions detailed further down this page to get your yard's layout running beautifully and safely.
Quick Decision: Repair or Replace?
- Small crack, light still works: Repair or replace housing
- Water inside fixture: Replace fixture
- Severe corrosion: Replace fixture
- Loose or broken structure: Replace fixture
When outdoor lighting starts failing, homeowners often focus first on the bulb, the transformer, or the wire connectors. Those parts matter, but the housing deserves just as much attention. If the outer body of the fixture is no longer protecting the light from water, dirt, sun damage, and yard impact, the fixture can become unreliable even if the electrical parts were fine to begin with.
Think of the housing like the protective shell of the fixture. It is the part that faces the weather every day, season after season. Once that shell begins to break down, small problems can turn into bigger ones. A loose lens lets moisture in. A cracked body allows corrosion to form. A bent or weakened mounting point causes the fixture to lean, twist, or aim incorrectly. That is why this page matters to both repair-minded homeowners and anyone trying to keep an older Portfolio lighting system working longer.
If your light has already stopped working, start with landscape lights not working to diagnose the full issue before replacing parts.
What is a landscape light housing?
A landscape light housing is the outer shell or body of the fixture. It surrounds and protects the working parts inside the light. Those internal parts may include the bulb, LED module, socket, internal wiring, seals, and the lens or cover that shapes the beam. In simple terms, the housing is what allows the fixture to survive outdoors.
This matters because outdoor lights live in a rough environment. Rain, irrigation spray, mulch, insects, changing temperatures, sun exposure, and lawn equipment all work against the fixture over time. The housing is the first line of defense. If it stays strong, the fixture has a much better chance of lasting. If it weakens, the entire light becomes more vulnerable.
Portfolio landscape fixtures may use different housing materials depending on the fixture type and price point. Aluminum housings are common because they are lightweight and reasonably durable. Brass housings are often more durable and corrosion resistant, especially in long-term outdoor use. Plastic housings are usually less expensive, but they may crack sooner if they see heavy sun exposure or temperature swings. Composite materials can fall somewhere in the middle depending on design.
| Housing type | Main advantage | Main weakness |
|---|---|---|
| Aluminum | Lightweight and corrosion resistant | Can pit or wear over time in harsh conditions |
| Brass | Very durable and long-lasting | Usually more expensive |
| Plastic | Affordable and lightweight | Can become brittle and crack |
| Composite | Lightweight and weather friendly | Quality varies by fixture |
If you are trying to figure out which type of fixture you have, pages like Portfolio LED landscape lighting, Portfolio path lights, and Portfolio landscape spotlights can help you understand the styles and bodies most commonly used in Portfolio outdoor systems.
Signs your landscape light housing is failing
Housing problems usually do not show up all at once. They often start small. That is why learning the early warning signs is important. If you catch them early, you may be able to save the fixture or replace one part before the whole light fails.
Cracks in the housing body
Cracks are one of the clearest warning signs. On plastic fixtures, this often comes from long-term UV exposure. On metal fixtures, a crack may show up after impact or at a weak joint. Even a small crack can let water in.
Water or condensation inside the fixture
A fixture that repeatedly fogs up or traps moisture may have a damaged housing, a failed seal, or a loose lens ring. Once water gets inside, corrosion becomes much more likely.
Corrosion around screws, seams, or mounting points
Corrosion on the outside often means moisture has been sitting in or around the housing for too long. If you see rust-like buildup, white corrosion, or greenish oxidation, inspect the fixture carefully. The related page on landscape lighting corrosion reasons can help you think through that issue in more detail.
Loose lens or unstable aiming
If the front of the fixture no longer tightens properly, the body may be warped or worn. If the spotlight head will not hold its aim, the housing or pivot assembly may be breaking down.
Fixture leaning or pulling free from the stake
In some fixtures, the lower body or stake connection becomes weak before anything else. When that happens, the light may tilt or twist out of position. The light may still power on, but it will not perform well if it cannot stay aimed correctly.
If the light has already stopped working, compare what you see here with Portfolio landscape lights not working and Portfolio LED lights flickering so you can decide whether the housing failure is now affecting the electrical side of the fixture.
Common causes of landscape light housing damage
Outdoor lighting housings usually fail because of long-term stress, not one dramatic event. Understanding those stresses helps you make better replacement choices and avoid the same failure happening again.
Sun exposure and UV damage
Sunlight slowly breaks down many plastics. Over the years, the housing may fade, lose flexibility, and become brittle enough to crack. This is common in fixtures installed in open beds with little shade.
Water intrusion
Rain and irrigation are normal, but constant water exposure becomes a problem when seals weaken or the fixture body develops gaps. Water inside the housing often leads to corrosion, weak connections, and intermittent failures.
Freeze and thaw cycles
In climates with winter freezing, moisture trapped in tiny cracks can expand and widen those cracks over time. A fixture that seemed fine one season may split open the next.
Yard equipment damage
Weed trimmers, mowers, edging tools, and even kicked mulch can slowly damage fixture bodies. Low fixtures near the edge of beds are especially vulnerable.
Improper installation
A fixture that is mounted too loosely, forced into a poor angle, or installed where the cable constantly tugs on it can wear out faster. For that reason, good installation matters just as much as good replacement parts. Related pages like Portfolio landscape lighting installation and How to wire landscape lighting support this part of the process.
Can you replace just the housing?
Sometimes yes, and sometimes no. This is one of the most important repair questions on the page.
If the light is built in a modular way, the outer body may be replaceable while the bulb, socket, lens, and internal wiring remain usable. That is more likely when the damage is limited to cracked plastic, a broken outer shell, or a housing that no longer seals properly but has not yet destroyed the internal parts.
In other fixtures, especially integrated LED units, the housing and light engine work as one assembled piece. In that case, replacing only the shell may not be practical. The better choice may be a full fixture replacement.
| Situation | Best next step |
|---|---|
| Cracked plastic body, light still works | Check for replacement housing or matching fixture body |
| Heavy corrosion and water inside | Replace the full fixture |
| Housing is fine but wire is damaged | Repair the wiring instead |
| Lens loose or seal failed | Replace lens assembly if available, otherwise replace fixture |
This is where Portfolio lighting parts and accessories and Portfolio lighting replacement parts become helpful. If you can find the right model match, you may be able to save more of the original fixture.
How to replace a landscape light housing
Replacing a housing is usually easier when you work slowly and inspect the rest of the fixture at the same time. Think of this as both a repair and a checkup.
A solid housing can be more valuable than the failed electronics inside it. Before discarding an older metal or glass fixture, review the Portfolio HCL retrofit guide to see how compatible housings can support amber night channels, low-flicker drivers, and better thermal performance.
1. Turn off the transformer
Start by shutting off power at the transformer. Even low voltage systems should be handled carefully during repairs.
2. Remove the fixture from the ground or mount
Pull the fixture from the stake or mounting point gently so you do not damage the wire connections. If the light is stiff or stuck, loosen the surrounding soil instead of forcing it.
3. Inspect the wire connectors and internal parts
Before installing anything new, look at the connectors, socket, LED board, lens, and seals. If those parts also show corrosion or water damage, replacing only the housing may not solve the problem.
4. Install the new housing or replacement fixture body
Transfer the reusable parts carefully if the design allows it. Make sure seals sit properly and the lens ring tightens evenly.
5. Reconnect low-voltage wiring
Use clean, secure connectors. A good replacement can still fail if the wire connection is weak. Support pages like Portfolio landscape lighting wiring, landscape lighting connectors, and Portfolio lighting Transformer Replacement are useful here.
6. Test the light before final placement
Turn the system back on and verify the fixture works, stays dry, and holds its aim correctly before you bury cable or reset the fixture firmly into the landscape.
When to replace the entire fixture instead of only the housing
In some situations, a housing replacement is not worth the time. If the body damage has already affected the inside of the light, the better investment is usually a full fixture replacement.
Replace the whole fixture when the LED module has failed, the socket is heavily corroded, the wire entry area is damaged, or the light has been taking on water long enough that you no longer trust the internals. This is also the smarter choice if the fixture is outdated and compatible replacement body parts are hard to find.
If you are leaning toward a full replacement, pages like Buy Portfolio Lighting and Portfolio lighting alternatives can help you compare whether you want the same style again or a different fixture type that may hold up better in your conditions.
How to prevent future housing damage
A little routine care can extend the life of outdoor housings more than most homeowners expect.
Keep mulch and soil away from the body
When mulch piles up against the housing, it holds moisture close to the fixture and makes inspection harder.
Inspect seals and lens rings once or twice a year
Loose front rings and aging gaskets are some of the earliest signs of future moisture problems.
Clean corrosion before it spreads
Minor corrosion is easier to address than severe corrosion that has already eaten into the body of the fixture.
Re-aim and straighten fixtures seasonally
A light that leans for months may place stress on the housing or stake connection. Straightening and inspecting it early is a simple preventive step.
For broader seasonal care, the landscape lighting maintenance page is a strong companion resource.
Finding Portfolio replacement housings and matching parts
Replacement housings are often fixture-specific. That means the most important step is identifying the exact model or the closest matching version of the original light. Without that, you can easily end up buying a body, lens, or stake assembly that looks similar but will not fit correctly.
Start with Portfolio lighting model number lookup. Once you identify the fixture, move into Portfolio lighting parts and accessories to see whether the housing, stake, lens, or related repair parts are still available.
If you cannot find the exact housing, it is often smarter to replace the full fixture with the closest compatible style instead of forcing a bad match. That is especially true for older discontinued models.
Common Landscape Light Housing Mistakes
- Trying to repair heavily corroded fixtures
- Ignoring water damage inside the light
- Replacing bulbs instead of fixing the housing issue
- Choosing incompatible replacement parts
Frequently asked questions about Portfolio landscape light housings
What is a landscape light housing?
A landscape light housing is the outer body of the fixture. It protects the bulb or LED module, internal wiring, lens, and seals from weather and physical damage.
Can you replace just the housing on a landscape light?
Sometimes you can, especially if the fixture is modular and the internal parts still work. In other cases, the housing and lighting components are integrated, which makes full fixture replacement the better choice.
Why do landscape light housings crack?
They often crack because of UV damage, cold-weather expansion, impact from lawn tools, brittle plastic, or long-term weather exposure.
Are metal housings better than plastic housings?
In many cases, yes. Aluminum and brass housings generally last longer outdoors than plastic housings, especially in harsh weather or high-sun areas.
Can water damage a landscape light fixture?
Yes. Water intrusion can damage wiring, corrode contacts, weaken seals, and lead to flickering or full fixture failure.
When should I replace the whole fixture instead of only the housing?
Replace the full fixture when the light has severe corrosion, LED failure, water damage, or internal wiring issues beyond the housing alone.
Final thoughts
A damaged housing may seem like a small problem, but in outdoor lighting it can affect almost everything else. Once the outer shell begins to fail, moisture, corrosion, loose aiming, and electrical trouble are often close behind. That is why checking the housing early is such a smart step when a Portfolio landscape light starts acting up.
The good news is that many housing problems can be identified quickly and handled before they turn into bigger fixture failures. If you inspect carefully, match parts correctly, and replace the full fixture when necessary, you can keep your landscape lighting looking better and working more reliably for much longer.