
Quick Answer: How to Install Landscape Lighting
Plan your layout first, install the transformer near a power source, run low voltage cable through the yard, connect fixtures, and test the system before final placement. Most installation problems come from poor planning, undersized transformers, or bad wiring connections.
- Lights too dim: transformer undersized
- Some lights not working: wiring or connector issue
- Uneven brightness: poor layout or voltage drop
- System fails later: installation shortcuts
Step-by-Step Landscape Lighting Installation
| Step | What To Do | Why It Matters |
|---|---|---|
| 1 | Plan layout and fixture locations | Prevents poor lighting design |
| 2 | Choose transformer size | Avoids dim or overloaded system |
| 3 | Install transformer near power source | Ensures reliable system operation |
| 4 | Run low voltage cable | Delivers power to all fixtures |
| 5 | Connect fixtures | Completes the lighting system |
| 6 | Test system before burying cable | Prevents rework later |
| 7 | Adjust and finalize placement | Improves final lighting quality |
A good landscape lighting installation is not just about getting fixtures into the ground. It is about building a system that looks balanced, powers the lights reliably, and is easy to maintain later.
Most visitors land on a page like this because they are trying to figure out whether they can install landscape lights themselves and what the process actually involves. In many cases, the answer is yes. But the project goes much more smoothly when you understand layout, transformer sizing, cable routing, and fixture placement before you begin.
If you are still planning your layout, start with the Portfolio lighting planning and placement guide before installing anything.
Most Portfolio landscape lighting systems are built around low-voltage design, which is why understanding how the system works is just as important as the physical installation. If you want a clearer breakdown of transformers, wiring layouts, and how power is distributed across your yard, see our Portfolio low voltage lighting guide before finalizing your setup.
Start Here: What Are You Trying to Do?
- Install a new system → follow full step-by-step guide
- Fix poor lighting layout → adjust placement first
- Lights too dim → check transformer sizing
- Adding fixtures → plan expansion before wiring
The fastest way to a good system is identifying your goal before installing anything.
Quick Answer: How to Install Landscape Lighting
Start by planning your layout, install the transformer near a power source, run low voltage cable through the yard, connect fixtures, and test the system before finalizing placement. The key is planning first so the system works correctly and looks balanced.
Introduction to Portfolio Landscape Lighting Installation
Portfolio landscape lighting installation is usually based around a low voltage system. That matters because low voltage setups are one of the reasons DIY outdoor lighting is possible for many homeowners. Instead of treating every fixture as its own separate electrical project, you are building one organized system made up of a transformer, cable, connectors, and fixtures.
In practical terms, that means your installation usually starts at the transformer and expands outward into the yard. Once the transformer is mounted and powered, low voltage cable carries power to the fixtures you want to install. Those fixtures may include path lights, spotlights, deck lights, step lights, or other specialty outdoor fixtures depending on the layout.
This page is designed to help you understand that system from the visitor's point of view. If you are still in the research stage, it may help to read the broader overviews on Portfolio landscape lighting and Portfolio low voltage lighting first, then use this page when you are ready to install.
Planning Your Landscape Lighting Layout
Before installing anything, take a step back and think about what the lighting is meant to accomplish. The strongest outdoor systems are not built by scattering fixtures wherever there is empty space. They are planned around real goals.
Start by deciding whether each part of the yard needs safety lighting, accent lighting, or general ambiance. Safety lighting usually includes paths, steps, and entry transitions. Accent lighting focuses on trees, walls, columns, or focal features. Ambiance lighting is softer and helps patios, decks, and outdoor seating spaces feel more comfortable at night.
Next, identify focal points. You may want to light a front walk, one standout tree, a stone entry wall, a patio edge, or a deck stair zone. Once you know the focal points, it is easier to decide where the fixtures should go and which categories make sense. Path light spacing should feel balanced and supportive rather than overly tight. Accent fixtures should highlight the property’s best features instead of hitting everything equally.
This is exactly why pages like Portfolio lighting planning and placement guide and Portfolio landscape lighting ideas are so useful before the installation begins. They help you avoid the common DIY mistake of starting with hardware before you have a real lighting plan.
What Most Homeowners Get Wrong
- Installing lights before planning the layout
- Using too many fixtures instead of better placement
- Undersizing the transformer
- Running messy or poorly protected cable
- Not testing the system before finishing installation
Tools and Materials Needed
A typical Portfolio landscape lighting installation does not require a massive tool set, but you do want the right basics before you begin. That keeps the project moving and makes the final system cleaner and more reliable.
- Portfolio transformer
- Low voltage cable
- Lighting fixtures
- Wire connectors
- Shovel or trenching tool
- Voltage tester
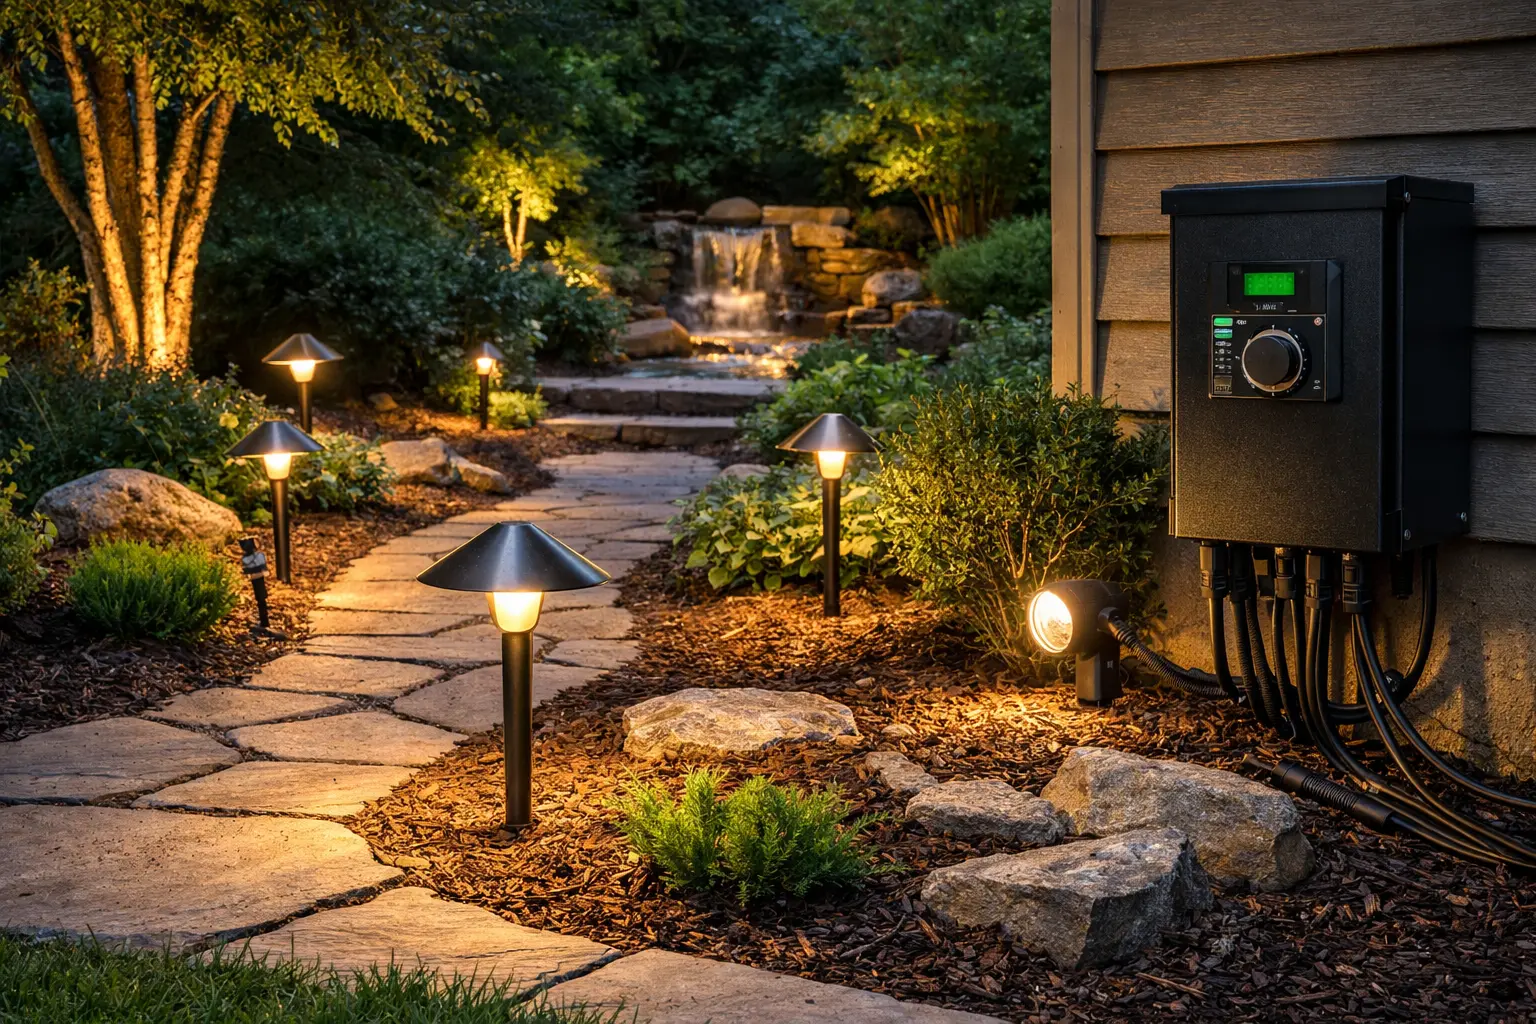
The transformer is the heart of the system because it converts household current into the low voltage power your landscape fixtures use. The cable carries that power through the yard. The connectors make the fixture-to-cable connection possible. The trenching tool helps you route and protect the wire. A simple tester helps confirm that the system is actually working before you bury or finalize everything.
If you need more help understanding the transformer side of the job, use Portfolio outdoor transformer lighting. If you are still unsure which cable size or cable type fits your project, compare it with the landscape lighting cable guide.
Understanding the Low Voltage Lighting System
One reason homeowners can install low voltage landscape lighting themselves is that the system is easy to understand once you break it into parts. You are not wiring each light like a separate indoor fixture. You are building one outdoor system made up of a few basic components.
Portfolio landscape lighting installation is one of the most important steps in building a reliable outdoor system, especially when working with low voltage setups. Understanding how these systems are designed, powered, and wired can make the difference between lights that work consistently and ones that fail over time. If you want a deeper breakdown of transformers, wiring methods, and system layout, review this Portfolio low voltage lighting guide to see how everything connects together properly.
| Component | Purpose |
|---|---|
| Transformer | Converts 120V to 12V |
| Low voltage cable | Carries power |
| Fixtures | Produce light |
| Connectors | Attach fixtures to cable |
The transformer plugs into or connects near a standard power source. From there, the low voltage cable runs out into the yard and feeds the fixtures. That is why transformer planning matters so much. A transformer that is too small for the fixture load can create weak output, uneven performance, or future expansion problems.
If you want a better understanding of that side of the project, use the landscape lighting transformer guide and Portfolio transformer sizing guide. Those pages help you choose the right foundation before you install the rest of the system.
Before installing any fixtures, it helps to understand how the complete lighting system is structured. The low voltage landscape lighting system diagram explains how the transformer, main cable, connectors, and landscape lights work together in a typical outdoor installation.
Step-by-Step Landscape Lighting Installation
Step 1: Choose Lighting Locations
Start with the layout. Decide where path lights should guide movement, where spotlights should create focus, and which outdoor living areas need softer support lighting. If the project includes pathways, compare your spacing approach with Portfolio path lights. If you want to uplight trees, walls, or focal features, use Portfolio landscape spotlights as your reference.
This step matters because installation goes much more smoothly when you know exactly where each fixture is supposed to go before you start running cable.
Step 2: Install the Transformer
Choose a mounting location close enough to a power source and appropriate for outdoor use. You also want to think ahead about timer or photocell control if the system should run automatically. Once the transformer is mounted and connected properly, it becomes the central power source for the entire lighting layout.
If you need more help with this part, read the landscape lighting transformer guide and landscape lighting timer setup.
Step 3: Run Low Voltage Cable
Route the cable in a way that follows the layout you planned. Use shallow trenching where needed and protect the cable from routine damage. The goal is not just to get power to the fixtures. It is to create a neat system that stays serviceable later.
For more detail here, use how to wire landscape lighting.
Before you bury the wiring, check our landscape lighting wire burial depth code guide so your trench depth matches the cable type and installation method.
Step 4: Install the Fixtures
Connect each fixture to the cable and position it based on the job it is meant to do. This may include path lights, spotlights, deck lights, step lights, or a mix of those categories. Once the fixture is connected, adjust its beam angle so the light hits the right target instead of just blasting the general area.
If your installation includes LEDs, compare those choices with Portfolio LED landscape lighting. If it includes outdoor living spaces or stair transitions, use Portfolio deck lighting and Portfolio step lighting.
Step 5: Test the System
Before you finish burying or finalizing everything, test the system. Check every connection, confirm the lights turn on, and make sure the brightness looks right once it gets dark. This is also the time to adjust beam angles and reposition fixtures if necessary.
If something looks off, use Portfolio lighting troubleshooting before assuming a fixture is bad.
When replacing a damaged landscape light housing, it is also a good time to review the overall installation of the fixture. Proper placement, wiring connections, and cable routing all help extend the life of outdoor lighting components. The Portfolio landscape lighting installation guide walks through the key steps for installing and positioning fixtures in a low voltage lighting system.
Common Installation Mistakes to Avoid
Landscape lighting projects usually go wrong in a few familiar ways. The first is spacing lights too close together. A row of path lights that looks fine during installation can feel like an airport runway at night if there is too much overlap and no contrast.
Another common problem is using an undersized transformer. Homeowners often count only the fixtures they are installing today and forget about future additions. That can create dim output or system strain later. Poor cable routing is another issue. If the wire path is messy or vulnerable, troubleshooting becomes much harder down the road.
And if you are mixing in solar fixtures, remember that placing them in shaded locations is a separate mistake altogether. A solar light can be installed perfectly and still perform badly if it never gets enough sun.
For more help with performance-related mistakes, read landscape lighting voltage drop and Portfolio transformer not working.
What Happens If You Install Landscape Lighting Wrong
- Lights look dim or uneven
- Transformer overloads or fails
- Fixtures stop working over time
- Wiring becomes difficult to troubleshoot
Most installation problems do not show up immediately. They appear weeks or months later when the system starts to fail under real conditions.
LED Landscape Lighting Installation Tips
LED fixtures are usually a smart choice in a new installation because they use less power, last longer, and generally produce consistent light when matched correctly to the system. That can make transformer planning easier and reduce future bulb replacement work.
In many landscape systems, LED also means less ongoing maintenance over time. That is especially helpful if your yard includes multiple fixtures and nightly runtime. Many homeowners also prefer the cleaner light quality and energy savings compared with older halogen options.
If your installation uses LED lamps or spotlight bulbs, compare your choices with Portfolio LED lighting and Portfolio MR16 LED replacement bulbs.
Solar vs Low Voltage Installation
Some visitors compare solar lights with low voltage systems because they want to know whether a wiring project is really worth it. Solar lights are easier to place and do not require cable or a transformer. Low voltage systems take more effort up front, but they usually deliver brighter and more consistent results.
| Feature | Solar Lighting | Low Voltage Lighting |
|---|---|---|
| Installation | Very easy | Moderate |
| Brightness | Moderate | Brighter |
| Reliability | Weather dependent | Consistent |
If you are still deciding between the two, compare this page with Portfolio solar lighting.
Maintaining Your Landscape Lighting System
A good installation still needs upkeep if you want it to look right over time. That usually means cleaning fixtures, replacing bulbs when needed, checking connectors, and making seasonal adjustments as plants grow or layouts change.
Path lights may need realignment after landscaping work. Spotlights often need minor beam changes as trees and shrubs mature. Connectors and cable runs should be checked if part of the system becomes unreliable. This is also where replacement parts become useful, so compare this page with Portfolio lighting replacement parts.
Outdoor living spaces usually need a different installation strategy than open planting beds or simple pathway runs because the structure itself affects fixture placement, cable routing, and lighting balance. The Portfolio gazebo lighting guide explains how to think through those choices before installation begins.
Final Thoughts on Portfolio Landscape Lighting Installation
Portfolio landscape lighting installation becomes much easier when you see it as a system instead of a pile of fixtures. Once you know your layout goals, choose the right transformer, route the cable cleanly, and install the fixtures with a clear purpose, the project usually becomes very manageable for a homeowner.
The real key is planning first and installing second. That keeps you from overlighting the yard, undersizing the transformer, or burying cable where it does not make sense. When those basics are handled well, low voltage landscape lighting can be one of the most satisfying DIY outdoor upgrades you can make.
Portfolio Landscape Lighting Installation FAQ
Can I install landscape lighting myself?
Yes, many homeowners can install a basic low voltage landscape lighting system themselves if they plan the layout well, use the right transformer and cable, and take time with the connections and placement.
How deep should landscape lighting cable be buried?
In many residential installations, low voltage cable is buried shallowly or tucked just below the surface, but the right depth depends on the layout and how protected the run needs to be.
How many lights can one transformer power?
That depends on the total fixture wattage and the transformer capacity. It is important to add up the full load and leave room for future expansion.
How far apart should path lights be placed?
Path lights should be spaced for guidance and visual balance rather than maximum brightness. Exact spacing depends on the beam spread, fixture output, and look you want.
Do landscape lights use LED bulbs?
Many modern landscape lights use LED technology, including replaceable MR16 LED bulbs or integrated LED designs depending on the fixture type.
Portfolio landscape lighting installation, landscape lighting installation guide, low voltage landscape lighting installation, installing landscape lights, landscape lighting wiring, path light installation, and outdoor lighting installation.
Recommended for You: