
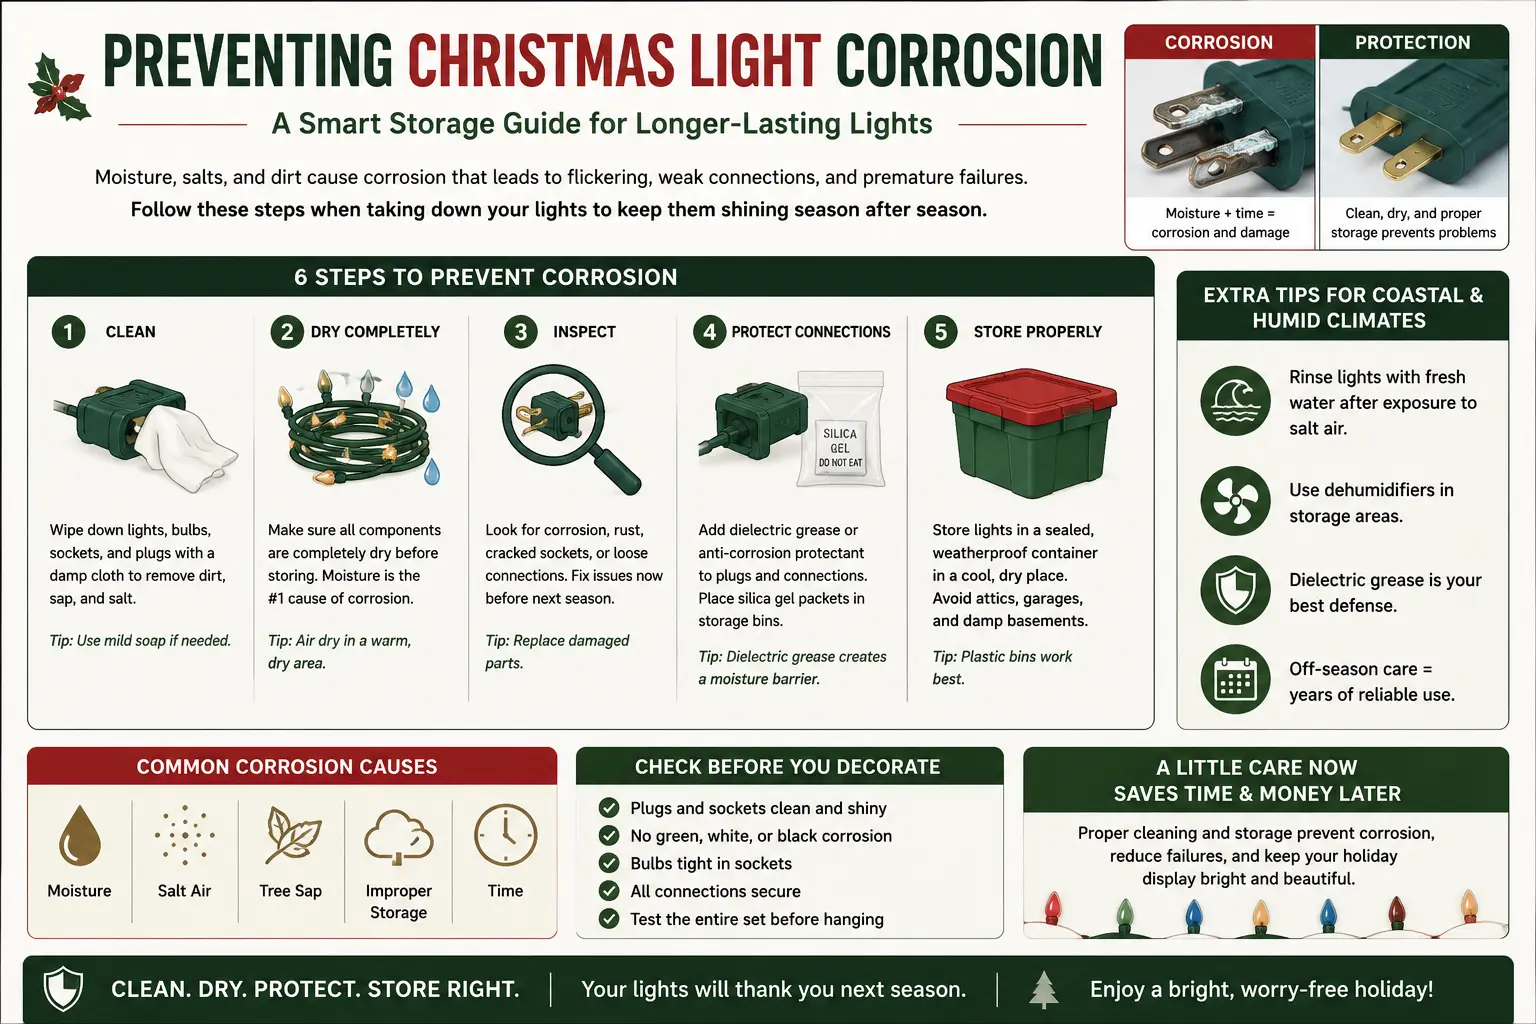
The Chemistry Behind the Green Residue: Why Christmas Lights Corrode
Understanding why Christmas lights corrode — not just that they do — is the foundation for preventing it. The green or blue-green buildup on plugs and socket contacts is a specific, well-understood chemical process, not random aging.
Why Copper Is Both the Best and the Most Vulnerable Choice
Christmas light wiring and plug contacts use copper extensively because of its excellent conductivity and malleability — copper is the obvious electrical choice. But copper is also chemically reactive under common outdoor and semi-outdoor storage conditions. When exposed to moisture (even high ambient humidity, not just liquid water), oxygen, carbon dioxide, and trace chlorides or sulfates — which come from road salt, sea air, or even ordinary indoor dust — copper undergoes a multi-stage oxidation process.
Why This Is a Genuine Hazard, Not Just Cosmetic
Left untreated, the corrosion layer increases electrical resistance at the connection point. Per the documented analysis of the mechanism: this increased resistance causes overheating at the contact, can lead to sparks, and creates real fire hazard and equipment-failure risk — particularly relevant for older incandescent strings or mixed-voltage LED sets where current draw is higher per connection point. This isn't seasonal wear-and-tear; it's preventable electrochemical degradation rooted in physics, environment, and storage habits.
Other Corrosion-Accelerating Factors
- Wire-to-plug solder joints: Heat from poor connections accelerates oxidation at the solder joint, while aging solder — especially lead-free formulations common in modern manufacturing — is more porous and prone to wicking moisture into the joint over time.
- Outdoor-rated plugs stored indoors improperly: Condensation forms when cold, damp lights are brought directly into a warm garage or basement — moisture migrates into the plug housing overnight as the temperature differential causes the air inside the housing to reach its dew point.
Why Storage History Matters More Than Light Age
One of the most counterintuitive and useful findings in this area: corrosion severity correlates less with the age of a light string than with its storage history. This single insight reframes the entire maintenance approach.
A five-year-old set of lights stored in a climate-controlled cabinet may show no visible green corrosion at all. A two-year-old set left coiled loosely in a damp garden shed may be heavily corroded — even if it was rarely used and experienced minimal outdoor exposure time. The determining variable isn't how many holiday seasons the lights have survived; it's the cumulative humidity exposure during the roughly eleven months per year the lights spend in storage rather than on display.
This matters practically because it means upgrading to expensive, premium light strings provides no corrosion protection if the storage conditions remain poor — and conversely, modest-cost light strings can last far longer than their typical replacement cycle if stored correctly. The storage method is the highest-leverage intervention available, more impactful than the original product quality in most household situations.
I've opened storage totes in early November for clients that contained five-year-old basic LED string sets in essentially as-new condition — bright, flexible wire, zero green residue — sitting next to two-year-old premium commercial-grade sets that were heavily corroded and half-dead. The difference in every case traced back to where and how they'd been stored, not what they cost or how many seasons they'd been hung. The cheap set spent its off-season in a sealed, gasketed bin in a climate-controlled hall closet. The expensive set spent its off-season in an open cardboard box on a damp basement shelf. Storage conditions are the dominant variable, full stop.
Storage Method Comparison: Quantified Corrosion Data
Documented testing compared four storage approaches over a 6-month off-season period, measuring corrosion incidence on copper terminals. The results show that container seal quality and humidity control — not just the presence of a desiccant — determine outcomes.
| Storage Method | Container Type | Desiccant | 6-Month Corrosion Rate | Best Use Case |
|---|---|---|---|---|
| Open Tub, No Desiccant | Snap-lid plastic tub (non-gasketed) | None | 92% | Not recommended for any storage period |
| Open Tub + Silica Only | Snap-lid plastic tub (non-gasketed) | Two 10g silica packs | 78% | Marginal improvement only — moisture still enters through lid gaps |
| Vacuum-Sealed Bag + Silica | Vacuum-sealable storage bag, evacuated to ~0.8 atm | One 5g silica pack | 21% | Best for single-season (short-term) storage only — see tradeoff section below |
| Gasketed Tote + Silica + Monitoring | True gasketed storage tote with rubber/silicone seal | Silica packs, refreshed monthly, with hygrometer monitoring | 4% | Best for multi-year preservation of valuable or hard-to-replace strings |
Why the Gasketed Tote Outperforms Everything Else
The key factor distinguishing the 4%-corrosion gasketed tote method from the 78%-corrosion open tub with silica is the seal quality, not the desiccant. A standard snap-lid tote — even a well-fitting one — has gaps at the lid seam that allow ambient air (and the moisture it carries) to continuously exchange with the air inside the container. Silica gel in an open or poorly-sealed container is fighting a losing battle against constant fresh humid air intrusion. A true gasketed container — one with an actual compressible rubber or silicone gasket that creates an airtight seal, not just a snug-fitting lid — stops that air exchange almost entirely, allowing the silica gel to actually deplete the trapped moisture rather than constantly fighting new moisture intrusion.
The Practical Storage Method Selection
- For lights you'll use again next season (most households): A vacuum-sealed bag with a small silica packet, stored in a stable-temperature location (not an attic or unheated garage subject to wide swings), is a reasonable choice if you're not concerned with multi-year preservation beyond 2-3 seasons.
- For commercial-grade, expensive, or hard-to-replace strings you want to last 5+ years: Invest in a true gasketed tote (not just any plastic storage bin — verify it has an actual compression gasket), use silica gel packs, and check/refresh them with a simple humidity card or hygrometer at least once during the off-season, ideally in early spring when humidity often spikes.
- Avoid entirely: Cardboard boxes (no moisture barrier at all), open shelving in unconditioned spaces, and any storage location subject to direct ground contact or known dampness (basement floors, garden sheds without a raised floor).
The Vacuum-Seal Tradeoff: Good Short-Term, Risky Long-Term
Vacuum-sealed storage bags are popular for Christmas light storage because they're inexpensive, save significant space, and the quantified data above shows they perform well (21% corrosion vs 92% for an open tub). But there's an important caveat that the simple corrosion-rate number doesn't capture.
This is why the testing data shows vacuum-sealed bags performing best for short-term, single-season storage (worked best when the off-season period was shorter and temperature swings more limited) while the gasketed tote method was optimal for multi-year preservation — specifically because a quality gasketed tote with active humidity monitoring and periodic silica refresh can be checked and corrected mid-season if condensation or humidity creep starts to occur, while a sealed vacuum bag cannot be monitored or corrected without breaking the seal entirely.
The Practical Compromise
If using vacuum-sealed bags: store them in the most temperature-stable location available (an interior closet rather than a garage or attic), and avoid leaving the same vacuum-sealed bag unopened for more than one full off-season cycle. If you want true multi-year storage without periodic re-checking, the gasketed tote with humidity monitoring is the more reliable long-term method despite requiring more storage volume and slightly more maintenance effort (the monthly silica check).
The Warm-Storage Mistake That Accelerates Everything
One of the most common — and most avoidable — mistakes in Christmas light storage is packing lights away while they're still warm from recent use or from sitting in direct winter sun during takedown.
Even mild residual heat from recent use accelerates the copper oxidation reaction described above and softens PVC wire jackets, making them more prone to permanent deformation and kinking when coiled under tension while warm. The recommendation from documented testing: always allow lights to cool for at least two hours post-use before coiling — or better yet, wait until the following day to begin the takedown and storage process.
Why Heat Accelerates Oxidation
Chemical reaction rates — including oxidation reactions — generally increase with temperature. A copper surface that's warm from recent operation reacts more readily with available moisture and oxygen than the same surface at ambient temperature. Combined with the fact that warm lights packed immediately into a sealed or semi-sealed container trap residual heat and any associated humidity inside that container, the warm-storage mistake compounds two problems simultaneously: accelerated surface oxidation at the moment of packing, and elevated humidity trapped inside the storage container as the warm air cools and releases moisture.
The Drying Step Many People Skip
For lights that have been used outdoors and may have accumulated condensation, dew, or light precipitation exposure: run the lights for approximately 15 minutes indoors after outdoor use specifically to evaporate any residual condensation before beginning the cooling and storage process. This drying step, combined with the cooling period, addresses both the thermal and moisture dimensions of the warm-storage problem before the lights ever reach the storage container.
The Complete Sequence: (1) Unplug lights at the end of the season. (2) If lights were exposed to outdoor moisture, run them briefly indoors (~15 minutes) to evaporate condensation. (3) Allow lights to fully cool — minimum two hours, ideally overnight — before any coiling or packing begins. (4) Inspect and clean per the pre-storage checklist below. (5) Pack into the appropriate storage method based on how long you need them to last. Skipping step 3 is the single most common shortcut that undermines an otherwise careful storage process.
Dielectric Grease vs Conductive Anti-Oxidant Compounds: Which to Use Where
Two different product categories are commonly recommended for Christmas light socket and connection maintenance, and they work through different mechanisms. Using the right one in the right place — and understanding why they're not interchangeable — improves outcomes significantly.
What it is: A viscous, non-conductive, silicone-based compound (typically polydimethylsiloxane plus a thickener). Translucent grayish or milky-clear in appearance.
How it works: Functions as an electrical insulator and physical sealant. It displaces moisture-laden air and physically blocks moisture, dirt, and contamination from reaching the metal contact surface — without conducting electricity itself.
- Best for: C7/C9 bulb base contacts before seasonal reinstallation; sealing around (not between) plug-to-cord connections
- Application: thin coating applied carefully — excess grease directly between two mating contact surfaces can interfere with conductivity, since the grease itself is an insulator
- Documented use: "A small dab of dielectric grease on C7 and C9 bulb bases before reinstalling each season prevents oxidation and keeps connections tight"
- Removal: easily removed with petroleum distillates or a contact cleaner spray if reapplication or inspection is needed
What it is: Compounds like NO-OX-ID "A-Special" — anti-oxidation pastes formulated specifically to prevent oxide, sulfide, and corrosion deposit formation directly on copper, aluminum, and steel conductor surfaces.
How it works: Penetrates into the metal surface itself to inhibit the oxidation reaction at the molecular level, rather than simply sealing moisture away from an untreated surface. Recommended by connector manufacturers for trouble-free joint connections exposed to weather, salt, or chemical vapors.
- Best for: exposed copper wire splices facing repeated multi-season weather exposure; plug terminal connections with documented prior corrosion history; any connection where surface-level oxide prevention (not just moisture exclusion) is the goal
- Application: applied as it comes from the container using a brush or rag, rubbed thoroughly onto the metal to ensure full coverage of all surface irregularities
- Important: surfaces must be clean of existing oxides before application — the compound prevents new oxide formation but does not by itself remove established corrosion
- Caution: true conductive greases (containing suspended conductive metal particles) can cause galvanic corrosion problems if incompatible with the specific metals being joined — verify product compatibility before using a metal-particle-loaded compound rather than a non-metallic anti-oxidant paste
The Practical Decision Rule
For routine annual Christmas light maintenance — the C7/C9 bulb base treatment most homeowners need — dielectric grease is the simpler, more widely available, and adequately effective choice, since the goal is primarily moisture exclusion from a connection that's only exposed to weather for roughly one month per year. For connections with a documented history of repeat corrosion, for permanent or semi-permanent outdoor wiring splices that face weather exposure for extended periods, or for coastal/high-salt-exposure environments, a conductive anti-oxidant compound provides more thorough protection because it treats the underlying metal surface chemistry rather than only excluding moisture from the outside. See the landscape lighting corrosion guide and splice connection requirements guide for the equivalent treatment of permanent outdoor landscape lighting connections, which face this same corrosion chemistry year-round rather than seasonally.
The Pre-Storage Inspection and Cleaning Checklist
A 10-minute-per-string inspection and cleaning routine before storage prevents the majority of next-season failures. Run through this sequence for every string before packing it away.
Proper storage protects more than bulbs and plugs. Organized wire management during installation and removal can reduce strain on connectors, minimize insulation damage, and prevent unnecessary wear that often leads to corrosion problems later. Our hidden holiday lighting wire management guide explains how routing, securing, and protecting wiring can improve both the appearance and longevity of seasonal lighting systems.
C7 and C9 sockets should be checked before storage because corrosion can continue developing around damp bulb bases inside a closed container. Remove debris, allow the string to dry completely, and inspect for green deposits, pitted contacts, seized bulb threads, and sockets that have lost their grip. The C7 and C9 socket maintenance guide explains how to tag defective sockets during takedown, distinguish minor oxidation from active copper corrosion, and prevent a damaged socket from destroying a replacement bulb next season.
Socket-Specific Guidance: C7, C9, and Mini Lights
Different Christmas light bulb and socket types have different corrosion vulnerabilities and maintenance approaches.
C7 and C9 Stringers (Larger Screw-In Bulbs)
C7 and C9 sockets use a screw-base bulb similar in concept to a small household bulb, mounted in a weatherproof-rated socket housing. The screw-base contact area is the primary corrosion point — both the socket's internal contact and the bulb base itself. A small dab of dielectric grease on the bulb base before installation prevents oxidation buildup at this screw contact and keeps the connection tight, since loose, oxidized connections cause arcing that progressively damages the socket. C9 and C7 socket seals — rubber O-ring gaskets that fit between the bulb base and socket — provide an additional moisture barrier at this connection point and are inexpensive, widely available replacement parts. If sockets are damaged beyond what cleaning and a repair pod can address, swap them with replacement sockets rather than attempting to tape over or otherwise patch the problem — a compromised socket housing will continue to admit moisture regardless of surface-level fixes.
Mini Lights (LED and Incandescent String Sets)
Mini light strings have much smaller, typically non-replaceable individual bulb sockets molded directly into the wire jacket, with the wire-to-socket junction being the primary failure and corrosion point rather than a separable contact like C7/C9. Because individual sockets generally cannot be serviced or replaced on mini light strings the way C7/C9 sockets can, prevention through proper storage is even more critical for this light type — once a mini-light socket corrodes to failure, the practical fix is usually a bulb replacement (for incandescent) or, for LED strings where a single failed diode can affect the whole circuit depending on wiring configuration, the entire string. LED Keeper-style repair pods and similar bypass/repair tools can address individual bulb failures on some mini-light and C7/C9 strings without requiring full string replacement — worth investigating before discarding an otherwise functional string over one or two dead positions.
Commercial-Grade vs Standard Light Strings
Commercial-grade LED string sets are built with heavier wire gauges, sealed connections, and more robust overall construction designed to handle repeated seasonal stress without the recurring fuse and connection problems common to lower-cost consumer sets. If blown fuses, dead bulbs, or socket failures are a recurring annual headache despite careful storage practices, the underlying string construction quality — not just the storage method — may be the limiting factor, and upgrading to commercial-grade construction may be the more cost-effective long-term solution.
Coiling Methods That Prevent Tangling and Wire Stress
How light strings are wound for storage affects both next-season tangling and the physical wire stress that contributes to insulation cracking and internal wire fatigue over multiple seasons.
Why Tangling Isn't Random
Tangling follows predictable physical patterns rooted in wire mechanics. When wire is coiled under uneven tension or twisted while winding, it stores torsional (twisting) energy internally. Upon unwinding or even just being jostled during storage, that stored energy releases as kinks, figure-eight loops, and nested tangles. LED light strings are especially prone to this because their thinner, more flexible copper-clad aluminum wire has higher torsional compliance — meaning it twists and holds that twist more readily — than the older, stiffer wire used in traditional incandescent strings.
Recommended Coiling Approach
- Begin by unplugging and gently detangling the string before any coiling begins, to prevent compounding any existing kinks.
- Coil loosely on a sturdy reel or a long cardboard tube rather than tightly wrapping by hand — winding around a cylindrical core distributes tension evenly and avoids introducing new torsional twist into the wire.
- Avoid bunching lights into storage containers where they can be crushed under the weight of other stored items — physical compression can lead to both insulation damage and the kind of contact-point stress that accelerates corrosion at weak points.
- Use plastic or coated hangers/hooks for hanging storage if applicable — metal hangers and nails used as makeshift wrapping cores or hanging points can puncture insulation or crack bulb housings.
- Label each coiled string by location or use (roofline, tree, window) — skipping labeling doesn't damage the lights, but it adds setup-day frustration and increases the odds of mishandling during identification next season.
Repair vs Replace: The Decision Framework
Not every corroded or damaged string is worth repairing. This framework helps decide when repair is the right call and when replacement is more practical and safer.
When to Repair
- Isolated corrosion at a single plug or a small number of sockets, with the bulk of the string's wire and sockets in good condition
- Individual dead bulb positions on a string that otherwise functions normally — addressable with replacement bulbs or repair pods designed for the specific socket type
- A damaged or corroded socket on a C7/C9 string where replacement sockets are readily available and the rest of the stringer is sound
- Minor surface oxidation (Stage 1, light tarnish) at contact points that responds to alcohol cleaning and dielectric grease application
When to Replace (Retire the String Entirely)
- Frayed or cracked wire insulation along significant lengths of the string — once the PVC jacket has cracked from age, UV exposure, or repeated cold-weather stress, exposed conductor is a genuine shock and fire hazard regardless of how the corrosion looks
- Heavy, widespread Stage 3 verdigris corrosion across multiple connection points — mechanical cleaning at this stage often does more harm than good to thin contact plating, and the underlying conductivity loss may not fully recover even after cleaning
- Any visible damage combined with uncertain electrical history — if you can't confirm the string has been used safely and reliably, the cost of replacement is low relative to the fire-safety risk of continuing to use questionable wiring
- Strings with a documented recurring pattern of fuse blowing, flickering, or partial outages despite previous repair attempts — repeated failure usually signals a systemic wire-gauge or construction quality issue rather than an isolated fixable fault
Responsible Disposal of Retired Strings
Many hardware stores and local recycling centers now offer light recycling programs that safely separate the copper wire, glass/plastic bulbs, and other materials for reuse, keeping them out of landfills. Before recycling, remove any reusable clips or hooks for future displays. If you're retiring an older incandescent string in favor of a new purchase, modern LED strands offer both lower energy use and — when properly stored using the methods in this guide — substantially longer service life than older incandescent technology. See the flickering and dim LED lights troubleshooting guide for diagnosing whether a problem string is repairable before deciding to retire it.
Christmas Light Corrosion & Storage FAQ
I found green corrosion on my Christmas light plugs. Can I still safely use them this season, or should I throw them out?
It depends on the extent and stage of the corrosion. Light, Stage 1 tarnish (a faint discoloration, not yet visibly green) can typically be cleaned with isopropyl alcohol and a lint-free cloth, restoring safe function. Visible green or blue-green corrosion (Stage 2 or Stage 3 verdigris) at the plug prongs or socket contacts is a more serious indicator — this level of corrosion has measurably increased the electrical resistance at that connection point, which means the connection runs hotter than it should during normal use. Before deciding, unplug the string, allow it to cool if it was recently used, and clean the corroded area thoroughly using a fiberglass scratch pen or contact cleaner spray to remove all visible green residue down to bare, shiny metal. After cleaning, visually inspect for any pitting or significant material loss at the contact point — if the metal surface looks pitted, thin, or structurally compromised rather than simply discolored, the connection's long-term reliability is questionable even after cleaning, and replacement of that plug or the full string is the safer choice. If the cleaned contact looks intact and the string tests normally (steady illumination, no flickering, plug doesn't feel warm during use), it's reasonable to continue using it for the current season while planning to monitor it closely and store it properly afterward to prevent recurrence. Any string showing corrosion combined with cracked insulation, exposed wire, or a history of tripping breakers should be retired rather than repaired.
Is it better to store Christmas lights in the attic, garage, or a climate-controlled closet?
A climate-controlled interior closet is the best option of the three for corrosion prevention, specifically because it minimizes the temperature swings that drive both humidity fluctuation and the micro-condensation problem described in the vacuum-seal section above. Attics experience some of the widest temperature swings of any common storage location — extreme summer heat followed by winter cold — which maximizes the freeze-thaw and condensation cycling that damages both wire insulation (through repeated expansion/contraction) and metal contacts (through repeated condensation formation). Garages are usually somewhat better than attics in temperature range but still experience meaningful swings and often have higher ambient humidity than interior living space, especially in humid climates or garages without proper sealing against the outdoors. If a climate-controlled closet isn't available or doesn't have the storage volume needed, the next-best approach is to compensate for a less ideal location with a higher-quality storage method: specifically, the gasketed tote with active silica gel and periodic humidity monitoring described earlier in this guide, which can maintain a stable, low-humidity microenvironment inside the container even when the surrounding garage or attic space experiences significant swings. The storage method becomes more important, not less, when the storage location itself is less than ideal.
Does dielectric grease go bad or wear off over time, and do I need to reapply it every year?
Quality silicone-based dielectric grease is formulated to resist hardening, freezing, drying out, or melting across normal temperature fluctuations, and it doesn't have a strict expiration in the way some chemical products do. However, in practical Christmas light use, reapplying a thin coat each season when you reinstall C7/C9 bulbs is a reasonable and recommended habit rather than relying on a single application to last indefinitely. The reasons to reapply annually: (1) the physical act of removing and reinstalling bulbs each season can wipe away some of the existing grease coating; (2) a fresh application gives you a natural opportunity to inspect the contact point at the same time, catching early-stage corrosion before it progresses; (3) the grease's moisture-displacement function is most effective on a clean, dry surface, so combining reapplication with the annual cleaning step (described in the pre-storage checklist) maximizes its protective value. For connections you don't disassemble each year — such as a fixed plug-to-extension-cord junction — periodic inspection (every season or two) to confirm the grease coating still looks intact and hasn't been displaced or contaminated is sufficient; full annual reapplication isn't necessary if the connection is never opened and shows no signs of moisture intrusion or corrosion.
Related Maintenance & Troubleshooting Guides
- Landscape Lighting Maintenance Guide
- Landscape Lighting Corrosion Guide
- Holiday Landscape Lighting Guide
- Fixing Flickering & Dim LED Christmas Lights
- Landscape Lighting Troubleshooting
- One Zone Not Working Guide
- Lights Work Sometimes Guide
- Landscape Lighting Connectors Guide
- Splice Connection Code Requirements
- Transformer Guide
- Voltage Drop Guide
- Voltage Drop Calculator
- Color Temperature Guide
- Lumen Guide
- Electrical Code Safety Guide
- Arc Fault & GFCI Code Requirements
- Coastal Lighting Salt Spray Compliance
- Brand Comparison Guide
- Landscape Lighting Guide