
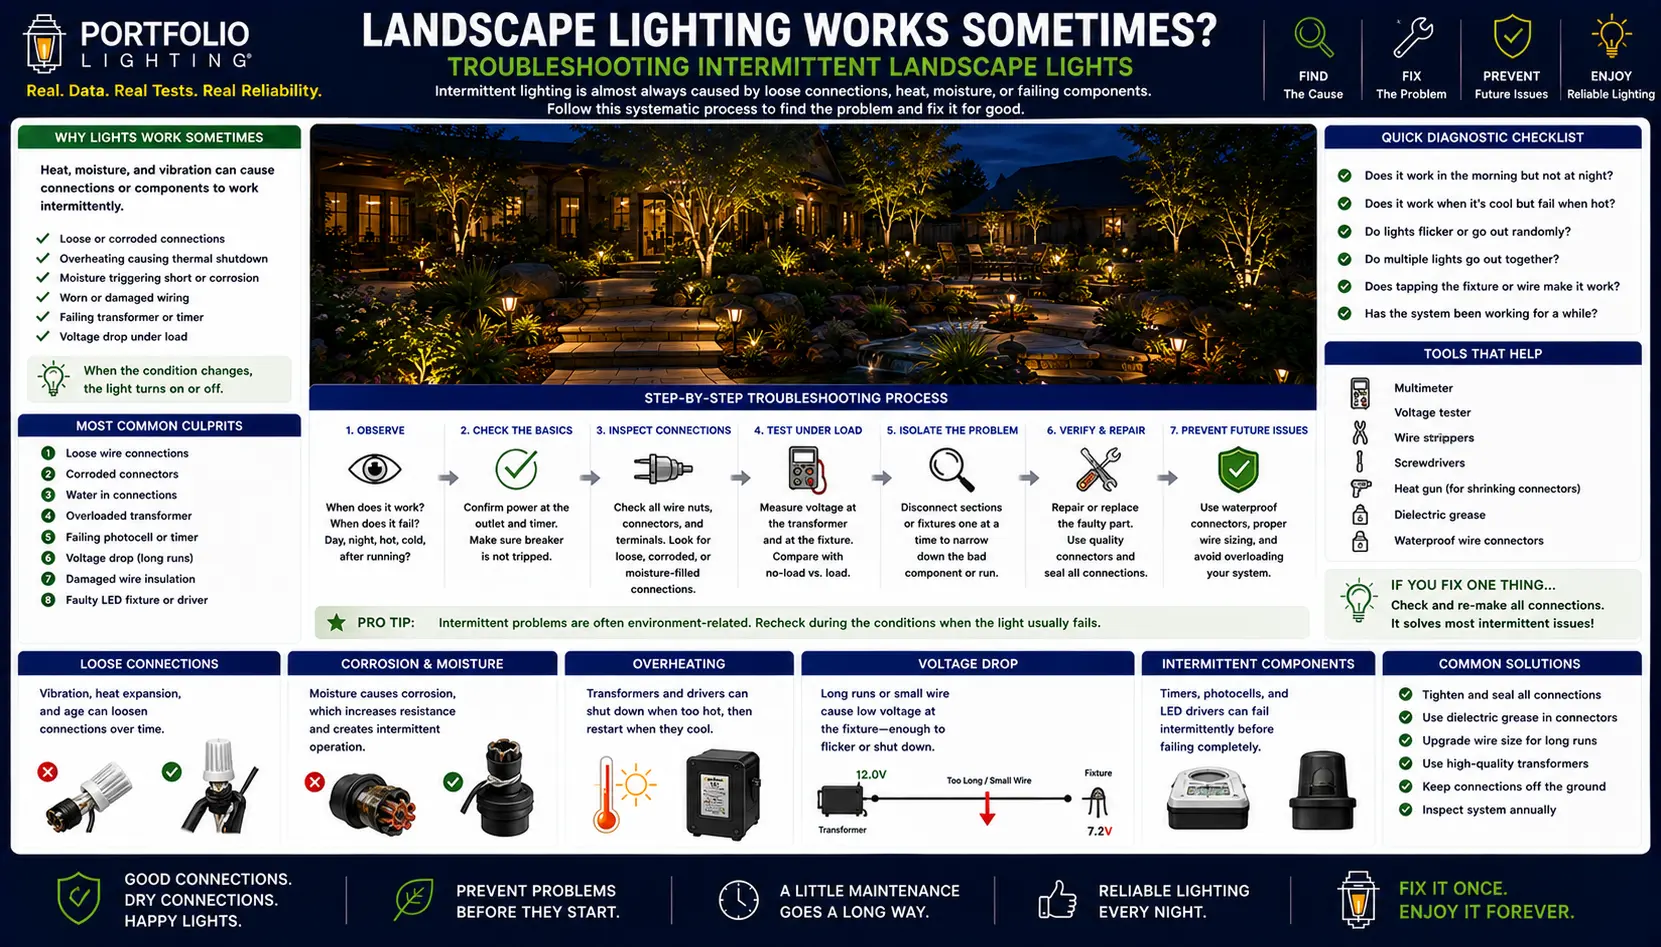
Why Landscape Lights Are Intermittent — The Core Mechanism
Every intermittent electrical fault shares the same underlying structure: a component or connection that functions correctly under one set of conditions and fails under another. The condition that triggers failure might be temperature, moisture, mechanical vibration, sustained current load, or the position of the sun — but there is always a condition. Understanding this is what separates a productive diagnostic approach from hours of random checking that finds nothing because you are never testing the system under the condition that causes the failure.
In landscape lighting systems, intermittent failures fall into six distinct mechanism categories. Each category has a specific trigger condition, a specific set of likely fault locations, and a specific diagnostic approach. Identifying which category your system's failure belongs to is the first step — and it is done by observing when the failure occurs, not by immediately probing connections.
The Six Intermittent Fault Mechanism Categories
1. Thermal expansion / contraction faults. Metal expands when heated and contracts when cooled. A wire connection that is marginally tight at 70°F may lose contact at 30°F as the metal contracts, breaking the circuit — then restore contact when temperatures rise. The opposite also occurs: a connection that works fine in cold weather may develop resistance when expanded metal creates a loose contact under heat. These faults are most common at transformer terminal block connections, screw-type wire connectors, and fixture socket contacts.
2. Moisture ingress faults. Water in a wire splice, connector, or fixture housing creates a conductive path that either creates a ground fault that trips GFCI protection, overloads the transformer by creating a low-resistance parallel path, or corrodes connections until they fail under load. These faults appear after rain and disappear after the system dries — sometimes within hours, sometimes over several days depending on how much moisture entered and where.
3. Thermal overload / protection cycling faults. The transformer's internal thermal protection trips when it overheats — turning all lights off. After it cools, it resets and the lights come back on. If the cause of overheating is not addressed, the cycle repeats. This produces a pattern of lights working, going out after 30 to 90 minutes, then coming back on after a cooling period. The fault is most commonly excess load (too many fixtures for the transformer rating) or a short circuit that creates excess current draw.
4. Marginal connection / loose wire faults. A connection that is not fully seated — a push-in connector that has not fully pierced wire insulation, a terminal screw that is not tight, a fixture socket contact that has corroded to partial contact — conducts intermittently. Vibration from wind, foot traffic near buried wire, or thermal cycling causes the connection to make and lose contact unpredictably. These are the hardest faults to find because they may be fully functional when you test them and only fail under specific mechanical conditions.
5. Photocell and timer threshold faults. A photocell set near its activation threshold activates inconsistently at the light level where it switches — too close to the boundary between "dark enough" and "not dark enough." Overcast evenings may trigger it; clear twilight may not. A timer with a failing clock circuit may activate at the correct time some days and miss activation on others. These faults are consistent within a given evening but inconsistent across evenings with different conditions.
6. LED driver instability faults. An LED driver that is failing — due to capacitor degradation, moisture damage, or approaching end of life — may operate correctly when cold and fail when it reaches operating temperature, or vice versa. These faults are typically zone-specific (one zone fails while others work) and fixture-specific (one fixture in a zone flickers or goes out while others remain on).
The call that comes in most often about intermittent landscape lighting goes something like this: "I've checked everything and I can't find anything wrong — the lights work when I'm out there testing them and then stop working again later." That tells me immediately that this is almost certainly a thermal fault of some kind — either thermal expansion at a connection or thermal protection cycling on the transformer. The system works under test conditions because testing usually happens at mild temperatures, in the presence of the person doing the test (who notices any abnormality and intervenes), and for a short enough period that the transformer doesn't heat up significantly. The fault only appears when the normal operating conditions are present: the full load has been running for an hour, or it's cold, or it just rained.
Intermittent lighting is not always random. When the pattern is tied to weather, especially a system that turns on during rain and fails when dry, use the moisture bridge test for landscape lighting to separate bad connectors from timer, photocell, or transformer problems.
Condition Correlation Table: Match Your Symptom to the Cause
The single most useful piece of diagnostic information for an intermittent fault is not what the system does when it fails — it is what condition is present when it fails. Use this table to match the conditions surrounding your failure to the most likely cause categories. Start your diagnostic work at the highest-probability cause for your specific symptom pattern.
| When does the failure occur? | Most likely cause | Second most likely | Where to look first |
|---|---|---|---|
| After it rains — works fine when dry | Moisture in connector splice or fixture housing | GFCI trip from ground fault in wet wire | All splice connectors in affected zone — look for green corrosion inside connector caps |
| In cold weather — works fine when warm | Thermal contraction at loose connection | Transformer cold-start issue | Transformer terminal block connections — retighten all screws and reseat all wires |
| In hot weather — works fine when cool | Transformer thermal protection tripping from excess load or poor ventilation | LED driver overheating in fixture | Check transformer wattage load vs rating. Check transformer housing ventilation clearance. |
| After running for 30–90 minutes — then goes out, comes back later | Transformer thermal protection cycling | Marginal wire connection developing resistance under load current | Total fixture wattage on transformer — compare to 80% of transformer rating |
| Some evenings but not others — no obvious weather pattern | Photocell at threshold sensitivity — activating inconsistently at dusk | Timer with failing clock circuit | Photocell sensitivity adjustment on transformer. Test system on manual override to confirm transformer and fixtures work correctly. |
| Only one zone — others work fine | Loose connection at that zone's transformer terminal or first connector in the run | Short circuit in that zone's wire run | Transformer terminal for the affected zone — check wire seating and terminal screw tightness |
| Only one or two fixtures — rest of zone works | Failing LED driver in specific fixture(s) | Corroded socket contact or marginal connector at that fixture | Disconnect and reconnect the specific fixture. Check connector at that fixture's splice point. |
| Lights come on then go off within minutes every night | Transformer protection tripping from consistent excess current draw — likely a shorted connector somewhere | Transformer internal fault | Disconnect all zones one at a time — when the trip stops, the shorted zone is identified |
| Randomly — no identifiable pattern at all | Marginal connection that makes/loses contact with vibration (wind, foot traffic near buried wire) | Intermittent transformer internal fault | All mechanical connections in order: transformer terminals, wire splices, fixture connections — every single one |
| Works on manual override — fails on photocell or timer | Photocell or timer fault specifically — transformer and fixtures are fine | Wiring to photocell or timer control input | Photocell function — bypass with manual override. Replace photocell if system works correctly on manual. |
Every Cause: Diagnosis and Fix
Each cause category below includes the specific diagnostic test that confirms it and the specific fix that resolves it. Work through the causes in order of likelihood for your symptom pattern as identified in the correlation table above.
Push-in wire tap connectors — the small plastic caps that pierce wire insulation to make contact — are not fully waterproof. Over time, water infiltrates the connector body through the cap seam, deposits minerals on the copper wire ends inside the connector, and creates corrosion resistance at the contact point. When wet (after rain), the resistance is high enough to interrupt circuit continuity or create a measurable ground fault current. When dry, the resistance drops and the circuit restores.
This is the single most common cause of intermittent landscape lighting failures in systems that have been installed for more than 2 to 3 years.
Every landscape lighting transformer has internal thermal protection — a temperature-sensitive circuit that trips the output when the transformer reaches a critical internal temperature. This protection exists to prevent transformer failure or fire from overheating. When the transformer cools, the protection resets and the output restores. If the cause of overheating is not corrected, the system cycles: lights on, run for 30 to 90 minutes, lights out, 20 to 40 minutes of cooling, lights back on, repeat.
- Over-wattage load: Total fixture wattage exceeds the transformer's rated capacity — the transformer cannot sustain the load without overheating. Verify total wattage is below 80% of the transformer's rated output. See the transformer troubleshooting guide for load calculation procedure.
- Poor ventilation: The transformer housing is mounted in a location with insufficient airflow — tight against a wall, inside a dense shrub, or in direct afternoon sun. Transformers need clearance on all sides for heat dissipation.
- Short circuit in a wire run: A wire run with damaged insulation creating a low-resistance path draws excess current, overloading the transformer even if the fixture load alone is within rating.
The terminal block inside the transformer — the strip of screw-down connections where low-voltage output wires attach — is the highest-traffic connection point in the entire system. Every wire run originates here. Terminal screws that are not fully tightened allow wires to sit loosely in the block, making marginal electrical contact that may be sufficient when the system is warm but fails when cold (thermal contraction) or under vibration.
This is especially common in systems where wires were inserted and the terminal screws were tightened only enough to hold the wire — not enough to make solid electrical contact through the wire's insulation jacket, which in some terminal styles requires the screw to break through the jacket into the conductor.
The photocell on a landscape lighting transformer activates the system when ambient light drops below the photocell's sensitivity threshold. If the threshold is set very close to the actual light level at dusk — either because it was calibrated that way or because the sensitivity has drifted — the system may activate on overcast evenings (lower light levels) but not on clear evenings (higher light levels at the same clock time). It may also fail to activate when a nearby light source — a neighbor's porch light, a vehicle headlamp, or a streetlight — momentarily raises the ambient light level above the threshold.
- Sensitivity too low: Set to require lower light level than typical dusk provides — system activates late or not at all on bright evenings
- Photocell aimed incorrectly: Aimed toward a light source that keeps the photocell reading "daylight" even after dark
- Photocell degraded: Older photocells develop reduced sensitivity over time — response becomes inconsistent
Copper wire and the brass or steel contacts inside connectors and terminal blocks have different coefficients of thermal expansion. When temperatures drop significantly overnight, the wire conductor contracts slightly away from the contact surface — reducing the contact area and potentially breaking the electrical connection entirely. The system fails on cold nights and works during the day when temperatures rise. Freeze-thaw cycles accelerate this problem because the repeated expansion and contraction gradually loosens connections that were marginal to begin with.
If the transformer's 120V supply outlet is protected by a GFCI — as required by NEC 2026 Article 210.8 — an intermittent ground fault anywhere in the system will trip the GFCI and cut power to the transformer. The GFCI does not automatically reset — it requires a manual press of the reset button. This means the system goes off and stays off until someone resets the GFCI, which is why the pattern often looks like "lights work for a while, then go off and won't come back on" rather than the cycling pattern of a thermal protection trip.
LED drivers — the electronic components inside LED landscape fixtures that regulate current to the LED array — have a finite lifespan and degrade over time through heat exposure, voltage stress, and moisture ingress. A failing driver may operate correctly when cold but fail intermittently as it reaches operating temperature, or vice versa. Unlike connector and wire faults that typically affect an entire zone, a failing driver affects only one or two specific fixtures while the rest of the zone continues to operate normally.
Digital timer circuits in landscape lighting transformers can develop faults that cause erratic activation — activating at the wrong time, failing to activate on some days, or cycling on and off on a schedule that does not match the programmed settings. Timer faults are distinct from photocell faults in that they produce a pattern that does not correlate with ambient light conditions or weather — the system may fail to activate on a perfectly dark, overcast evening when the photocell should have activated it.
Step-by-Step Diagnostic Sequence for Intermittent Failures
This sequence is designed to find the cause of an intermittent landscape lighting failure without requiring the fault to be present while you are testing. Follow each step in order — each step eliminates one category of cause and narrows the search space.
How to Log the Failure Pattern: The Most Important Diagnostic Step
The failure log is more valuable than any single diagnostic test for intermittent faults — because it captures the conditions present during actual failures, which no bench test can replicate. A week of careful logging almost always reveals the correlating condition that points to the cause category.
What to Record for Each Failure Event
- Date and time of failure: Note the exact time the lights failed — this distinguishes photocell/timer failures (which occur at dusk) from thermal failures (which occur 30 to 90 minutes after activation) from random connection failures (which can occur at any time).
- Weather conditions: Temperature at time of failure, whether it rained in the past 24 hours, cloud cover (overcast vs clear), recent temperature range. This is the most diagnostic single piece of information for moisture and thermal faults.
- Which zones or fixtures failed: All zones, specific zones, or specific fixtures within a zone. All-zone failures point to the transformer or its supply. Single-zone failures point to that zone's wiring or the transformer terminal for that zone. Individual fixture failures point to the fixture itself or its connector.
- How the failure appeared: Gradual dimming over minutes, sudden complete outage, flickering then out, or some zones off while others work. Gradual dimming under sustained load suggests thermal or voltage issues. Sudden complete outage suggests a protection trip or connection failure.
- How it resolved: Did the system restore automatically after 20 to 40 minutes (thermal protection cycling)? Did it stay off until you reset the GFCI (ground fault trip)? Did you have to manually restore it in some other way?
- What immediately preceded the failure: Had anything changed recently — new fixtures added, landscaping work done near wire runs, sprinkler system recently activated for the season, temperatures dropped significantly.
Tools You Need to Diagnose Intermittent Landscape Lighting Failures
Intermittent faults require better tooling than obvious failures because you often need to measure the system under conditions where the fault is present — which may mean taking measurements in cold weather, during or after rain, or after the system has been running for an hour. Having the right tools staged and ready before the next failure event occurs is significantly better than scrambling to find a multimeter after the lights go out at 9 PM.
| Tool | What it diagnoses | How to use it for intermittent faults |
|---|---|---|
| Digital multimeter (AC/DC voltage, continuity) | Transformer output voltage, wire continuity, connection resistance | Measure output voltage at transformer terminals under load. Measure voltage at most distant fixture on each zone — a reading below 10.8V indicates voltage drop from resistance. Test continuity through each connector with system de-energized. |
| Clamp ammeter (current meter) | Transformer overload — total current draw vs rated capacity | Clamp around the output wire from the transformer with all zones connected. Compare measured amps to transformer rated amps (watts ÷ 12V). If measured exceeds rated, the transformer is overloaded and will thermal-trip under sustained load. |
| Non-contact thermometer | Transformer overheating, hot connections | Measure transformer housing temperature after 45 minutes of operation. Surface temperature above 140°F (60°C) indicates likely thermal protection cycling. Scan wire connectors for anomalous heat — a hot connector is conducting electricity through excessive resistance and will fail under load. |
| Wire connector caps (replacements) | N/A — repair tool | Keep 20–30 waterproof direct-burial rated connector caps ready. When you find corroded connectors during an intermittent fault investigation, you can replace them immediately rather than making a second trip. |
| Screwdriver set (flat and Phillips) | N/A — access tool | Required to open transformer housing for terminal inspection. Required to access fixture socket contacts for inspection. Required to reseat push-in connector caps that have worked loose. |
| Wire stripper | N/A — repair tool | Strip fresh wire ends after cutting out corroded connectors. Fresh copper ends make clean, low-resistance connections that corroded ends cannot. |
Related Troubleshooting Guides
- Portfolio Lighting Troubleshooting Hub
- Landscape Lighting Troubleshooting
- Transformer Troubleshooting Guide
- How to Test a Landscape Lighting Transformer
- Transformer Tripping Breaker
- Transformer Getting Hot
- Photocell Not Working Guide
- Portfolio Photocell Not Working
- How to Replace a Photocell
- Transformer Timer Not Working
- Landscape Lighting Timer Not Working
- Landscape Lights Not Working After Rain
- Portfolio Lights Not Working After Rain
- Portfolio LED Lights Flickering
- Landscape Lights Flickering
- Landscape Lights Not Working
- Low Voltage Wire Connectors Guide
- Low Voltage Connector and Plug Guide
- GFCI Requirements NEC 2026
- Arc Fault and GFCI Code Requirements
- Landscape Lighting Corrosion Guide
- IP Rating Comparison Guide
- LED Lifespan L70 Database
- Landscape Lighting Maintenance Guide
Intermittent Landscape Lighting Failures — FAQ
Why do my landscape lights work sometimes and not others?
Landscape lights that work sometimes and not others have an intermittent fault — a condition that exists continuously but only produces a visible symptom under specific circumstances. The most common causes are: a loose wire connection that makes contact sometimes but not under temperature change or vibration; a photocell set near its sensitivity threshold that activates inconsistently; a transformer that trips its thermal protection when hot and resets when cool; a wire splice that conducts when dry but fails when wet; or a failing LED driver in a specific fixture. The key is identifying which condition correlates with the failure — that condition points directly to the cause category.
Why do landscape lights come on then go off after a few minutes?
Landscape lights that come on and then go off after a few minutes are almost always experiencing a transformer thermal protection trip. The transformer activates, begins delivering current, its internal temperature rises faster than it can dissipate heat, and its thermal protection trips the output. After cooling for 20 to 40 minutes, it may reset and the cycle repeats. The cause is almost always excess load (total fixture wattage above 80% of transformer rating), poor ventilation around the transformer housing, or a shorted wire connection creating excess current draw. Verify total wattage, clear 12-inch airspace around the transformer, and inspect all wire runs for damaged insulation.
Why do my landscape lights only work when warm?
Landscape lights that only work in warm temperatures and fail when cold have a thermal contraction fault at a wire connection. When temperatures drop, metal components contract slightly — a connection that was marginally tight at room temperature may lose electrical contact completely in cold conditions. This is most common at transformer terminal block connections where wire screws were not tightened sufficiently, at push-in wire tap connectors that are not fully seated, and at fixture socket contacts with corrosion. The fix is to inspect and firmly retighten all terminal connections at the transformer, and replace all push-in connectors with properly rated, fully seated connectors.
Why do landscape lights fail after rain and then work again when dry?
Landscape lights that fail after rain and restore when dry have a moisture-related fault. Rain introduces water into a specific component — a wire splice connector that is not fully waterproof, a fixture housing whose IP seal has degraded, or direct-burial wire with cracked insulation. The water either creates a ground fault that trips GFCI protection on the 120V supply, or creates a low-resistance parallel path that overloads the transformer. After drying, the fault temporarily disappears. The fix requires finding the specific moisture entry point — inspect all connectors in the affected zone for corrosion and all fixture housings for IP seal integrity — and correcting the seal or connector at that location.
My landscape lights work on manual override but not on the photocell — what is wrong?
If your landscape lighting system works correctly on manual override but fails to activate on photocell control, the photocell is the fault — not the transformer, wiring, or fixtures. The most common causes are: photocell sensitivity set too low (requires darker conditions than typical dusk provides), photocell aimed toward an artificial light source that keeps it reading "daylight," or a degraded photocell whose sensitivity has drifted over time. Adjust the sensitivity dial toward higher sensitivity and verify the photocell is aimed at the open sky. If adjusting sensitivity does not resolve it, replace the photocell — the photocell replacement guide covers the correct procedure for Portfolio transformers.
How do I find an intermittent fault that disappears when I go to test it?
Log the failure pattern across multiple events before touching anything — record the date, time, weather conditions, which zones failed, how the failure appeared, and how it resolved. After five to seven events, a correlating condition almost always becomes visible: failures after rain point to moisture faults, failures in cold weather point to thermal expansion, failures after 30 to 90 minutes of runtime point to thermal overload, failures correlated with dusk conditions point to photocell issues. Once the condition is identified, test the system under that specific condition — not under normal comfortable conditions when everything works. The most productive diagnostic testing happens when the fault is actually present.