
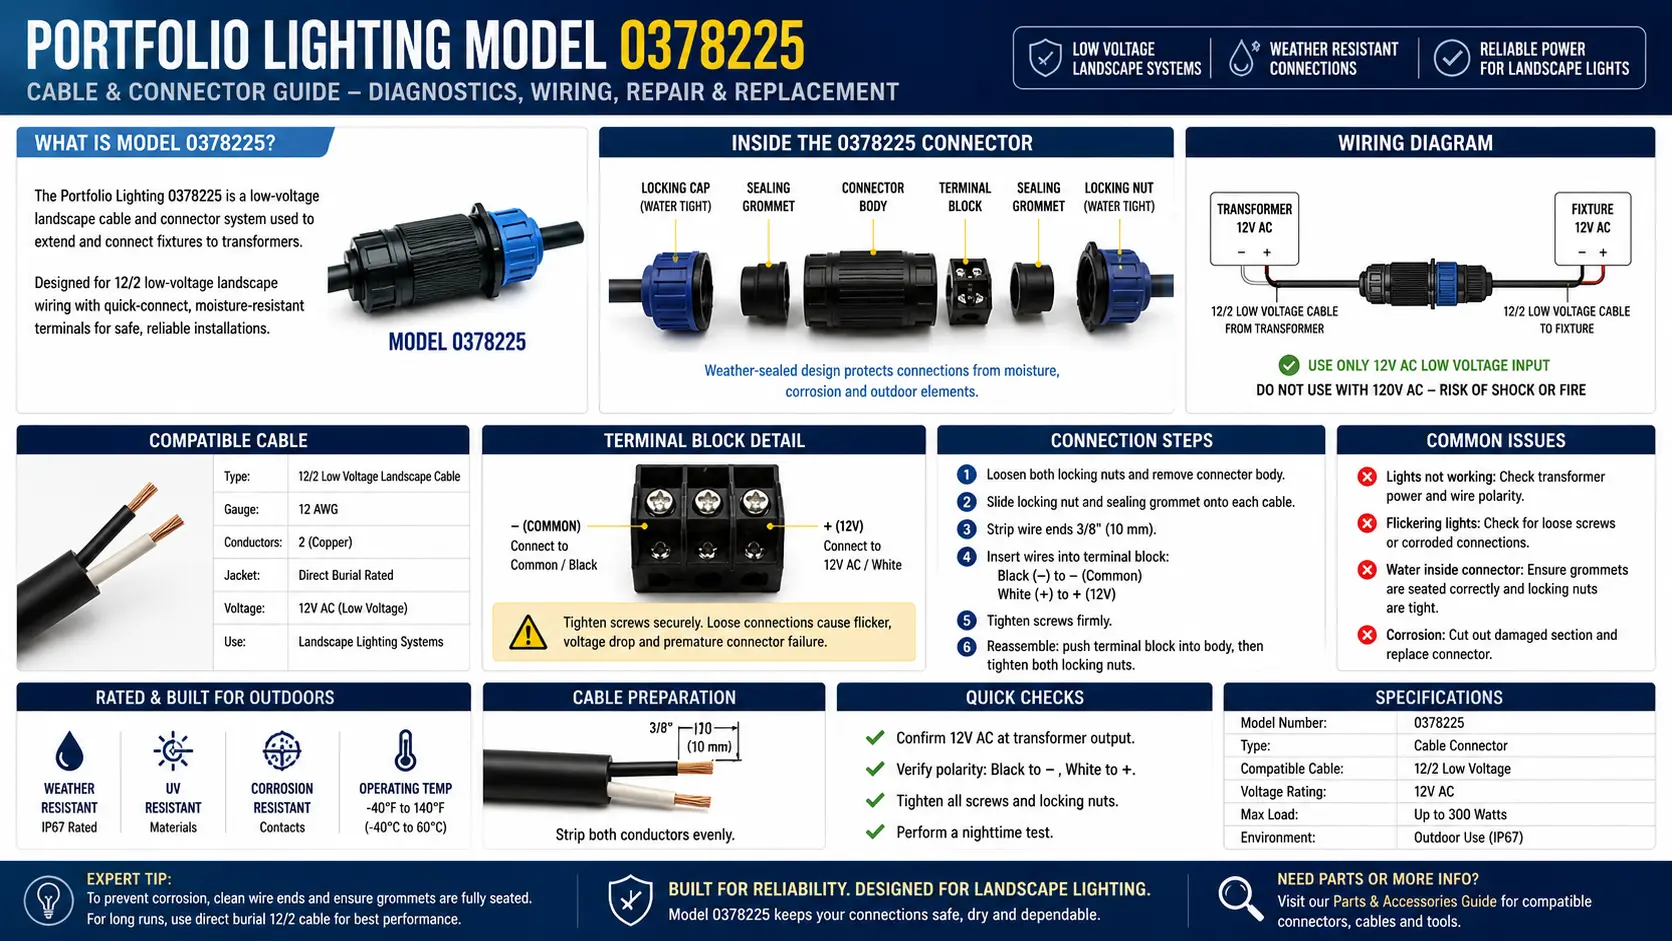
Quick Answer: What Portfolio Model 0378225 Usually Means
Portfolio model 0378225 belongs in the low-voltage cable connector and splice logic category. Treat it as a connection point problem first: wire gauge, insulation-pierce contact, copper condition, moisture intrusion and waterproof splice quality matter more than the appearance of the plastic connector body.
The highest-value diagnostic clue is whether the lights fail randomly, flicker when the cable is touched, work better after rain, or show voltage without lighting the fixture. Those symptoms usually point to a high-resistance connection rather than a dead transformer.
What You Will Learn
Model 0378225 Identification: Do Not Judge the Connector by Shape Alone
Low-voltage landscape lighting connectors often look simple, but the mechanical bite inside the connector is what determines whether the circuit can actually carry current. A connector can still clamp onto the wire and look installed while the copper contact underneath is oxidized, loose or only touching a few strands.
For Portfolio systems, older pierce-style connectors are especially important to inspect because they create a deliberate hole through the cable jacket. That hole can become the beginning of hidden water travel inside the wire.
| Identification Clue | What It Means | Why It Matters | Action |
|---|---|---|---|
| Pierce-style contact teeth | Connector bites through cable insulation | Can create future water-entry path | Inspect copper, not just connector shell |
| Green or white residue | Moisture and mineral contamination | Connection may conduct only when wet | Replace connector and remove damaged copper |
| Loose fixture lead | Mechanical connection has relaxed | Creates flicker or random outage | Re-terminate with sealed connector |
| Black copper under jacket | Wicking corrosion traveled inside cable | New connector will fail if installed here | Cut back until copper is bright |
On mobile, swipe the table horizontally to view all diagnostic columns.
The 0378225 Failure Map: The Symptoms That Reveal a Bad Connector
A failing connector behaves differently from a bad bulb or transformer. The clue is that the failure often changes when the cable moves, when the ground is wet, when the fixture load changes, or when the system warms up during the evening.
| Symptom | Most Likely Connector Problem | Internal Logic | Best Next Test |
|---|---|---|---|
| Fixture flickers when cable moves | Loose or partial strand contact | The connector is touching enough to arc or chatter | Flex cable gently while system is on |
| Works after rain, fails when dry | Moisture bridge across oxidized copper | Water temporarily lowers resistance | Mist one connector at a time |
| Meter shows voltage but light stays off | High-resistance splice | Voltage appears with no load but collapses under lamp load | Test voltage with lamp connected |
| Only downstream lights fail | Open splice at first bad connector | Power path is interrupted beyond one point | Test first non-working fixture connection |
| Connector feels warm | Resistance is generating heat | Bad contact is acting like a tiny heater | Shut down and rebuild splice |
On mobile, swipe the table horizontally to view all diagnostic columns.
The Hidden Freeze/Thaw Failure Behind Portfolio 0378225 Connectors
One of the biggest long-term weaknesses of the Portfolio 0378225 connector system is its “Pierce and Forget” installation design. These connectors were intended to create a fast field connection without stripping insulation, but over time the mechanical bite inside the connector becomes one of the main failure points in older landscape lighting systems.
What most guides never explain is that the connector does not simply touch the copper wire — it compresses and flattens the copper strands under tension. During seasonal heating and cooling cycles, those flattened strands slowly lose spring pressure.
This is why many older Portfolio systems behave normally during wet weather but fail during dry periods. The connection may still show voltage on a multimeter while failing to carry enough current under actual fixture load.
| Connector Symptom | What Is Happening Internally | Why It Gets Worse Over Time | Best Repair Strategy |
|---|---|---|---|
| Lights flicker after winter | Flattened copper strands losing tension | Freeze/thaw cycling weakens contact pressure | Move connector to fresh cable section |
| Works after rain | Moisture temporarily lowers resistance | Oxidation continues inside compressed strands | Replace connector and inspect copper condition |
| Connector feels warm | High resistance generating heat | Heat accelerates copper oxidation | Rebuild splice completely |
| Random outages | Mechanical bite no longer stable | Expansion/contraction loosens connection further | Use gel-filled sealed replacement connector |
The Specialist “Double-Bite” Repair Hack
One of the best field tricks for diagnosing a failing 0378225 connection is what many installers informally call the “Double-Bite” method.
This matters because the original connector location may already contain microscopic oxidation or weakened copper strands under the insulation where you cannot see them from the outside.
Many homeowners reinstall a new connector in the exact same bite location, unknowingly clamping onto already damaged copper. The system may work temporarily, then fail again after another moisture cycle.
The “Green Dust” Warning Most Connector Guides Miss
If you open an older 0378225 connector and see green powder or green dust inside the housing, you are looking at copper carbonate contamination. This is a major warning sign that the connector seal has already failed.
The correct repair is to cut back the cable until you reach bright, shiny copper under the insulation. If blackened or green-stained copper remains inside the jacket, the replacement connector may fail again even if the outside looks clean.
| Copper Appearance | What It Means | Can It Be Reused? | Recommended Action |
|---|---|---|---|
| Bright copper | Healthy conductor | Yes | Install sealed connector normally |
| Dull brown copper | Early oxidation beginning | Sometimes | Clean and inspect carefully |
| Black copper | Advanced moisture intrusion | No | Cut back cable farther |
| Green dust or powder | Copper carbonate contamination | No | Remove affected wire section completely |
That hidden “green dust” clue is one of the strongest real-world indicators that the connector failure has already spread beyond the visible splice point.
The Wicking Corrosion Test: The Hidden Problem Most Connector Pages Miss
The real information-gain clue with old Portfolio connectors is capillary action. When a connector pierces the cable jacket, water can travel inside the copper strands like liquid moving through a straw. The connector may be replaced, but the corrosion can already be several inches away under the insulation.
| Copper Appearance | Diagnosis | What Not to Do | Correct Repair |
|---|---|---|---|
| Bright copper | Healthy conductor | Do not overcut good cable | Install sealed outdoor connector |
| Black copper | Water wicked inside jacket | Do not scrape and reuse | Cut back farther |
| Green powder | Copper oxide formation | Do not tighten old connector | Remove damaged section |
| White mineral film | Water intrusion with dissolved minerals | Do not assume it is just dirt | Replace splice and seal entry point |
On mobile, swipe the table horizontally to view all diagnostic columns.
The Correct 0378225 Repair Path
The safest repair path is not to reuse the old pierce point. Move to clean cable when possible, cut back to healthy copper, and use a waterproof connection method sized for the wire gauge. If the fixture lead is too short, add a properly sealed pigtail instead of stretching the old lead.
- Turn off the transformer. Do not rebuild splices while energized.
- Open the old connector. Look for green residue, loose teeth, cracked plastic or water inside the shell.
- Cut back the cable. Inspect copper color under the insulation.
- Use a sealed connector. Match connector size to main cable and fixture lead.
- Lift the splice if possible. Avoid burying the repaired splice in a low wet pocket.
- Test under load. A fixture must light normally, not just show voltage on a meter.
Connector Compatibility: Match the Wire, Not Just the Brand
For model 0378225-style repairs, compatibility depends on cable gauge, fixture lead size, wet-location exposure and copper condition. A connector that fits 16-gauge cable may not properly bite 12-gauge cable, and a connector designed for dry indoor splicing is not appropriate underground or near irrigation spray.
Related Existing Portfolio Lighting Help
- Portfolio Lighting Parts and Accessories
- Portfolio Lighting Model Number Lookup
- Portfolio Model Parts Directory
- Master Model Technical Database
- Portfolio Lighting Compatibility Guide
- Portfolio Lighting Replacement Parts
- Low Voltage Wire Connectors for Landscape Lighting
- Portfolio Lighting Wire Replacement
- Landscape Lighting Cable Guide
- Landscape Lighting Corrosion Guide
- Landscape Lighting Works in Rain But Not When Dry
- Landscape Lighting Troubleshooting
FAQ: Model 0378225 Cable Connector Guide
What is Portfolio model 0378225?
Portfolio model 0378225 is best treated as a cable connector or low-voltage wire connection part used in the landscape lighting ecosystem. The repair logic should focus on cable gauge, pierced insulation, waterproofing and copper condition before blaming the transformer.
Can I reuse an old Portfolio 0378225 connector?
Usually no. If the connector has already pierced the cable jacket, loosened, corroded or allowed water inside the copper strands, reuse can create the same high-resistance failure again.
Why does a connector fail only when the yard is dry?
A dry-only failure often means the metal contact is weak and rain temporarily creates a moisture bridge. The connection may show voltage on a meter but fail under fixture load.
What is the best replacement for an old pierce connector?
For long-term repair, cut back to clean copper and use an outdoor-rated gel-filled connector or splice system sized for the cable gauge and fixture lead.
Use and Safety Note
This page is an independent model-specific guide for Portfolio lighting owners. Always verify the label on your own product and consult a qualified electrician for damaged wiring, water intrusion, hardwired power, line-voltage repairs or unsafe outdoor electrical conditions.