
Quick Diagnosis: What This Failure Pattern Usually Means
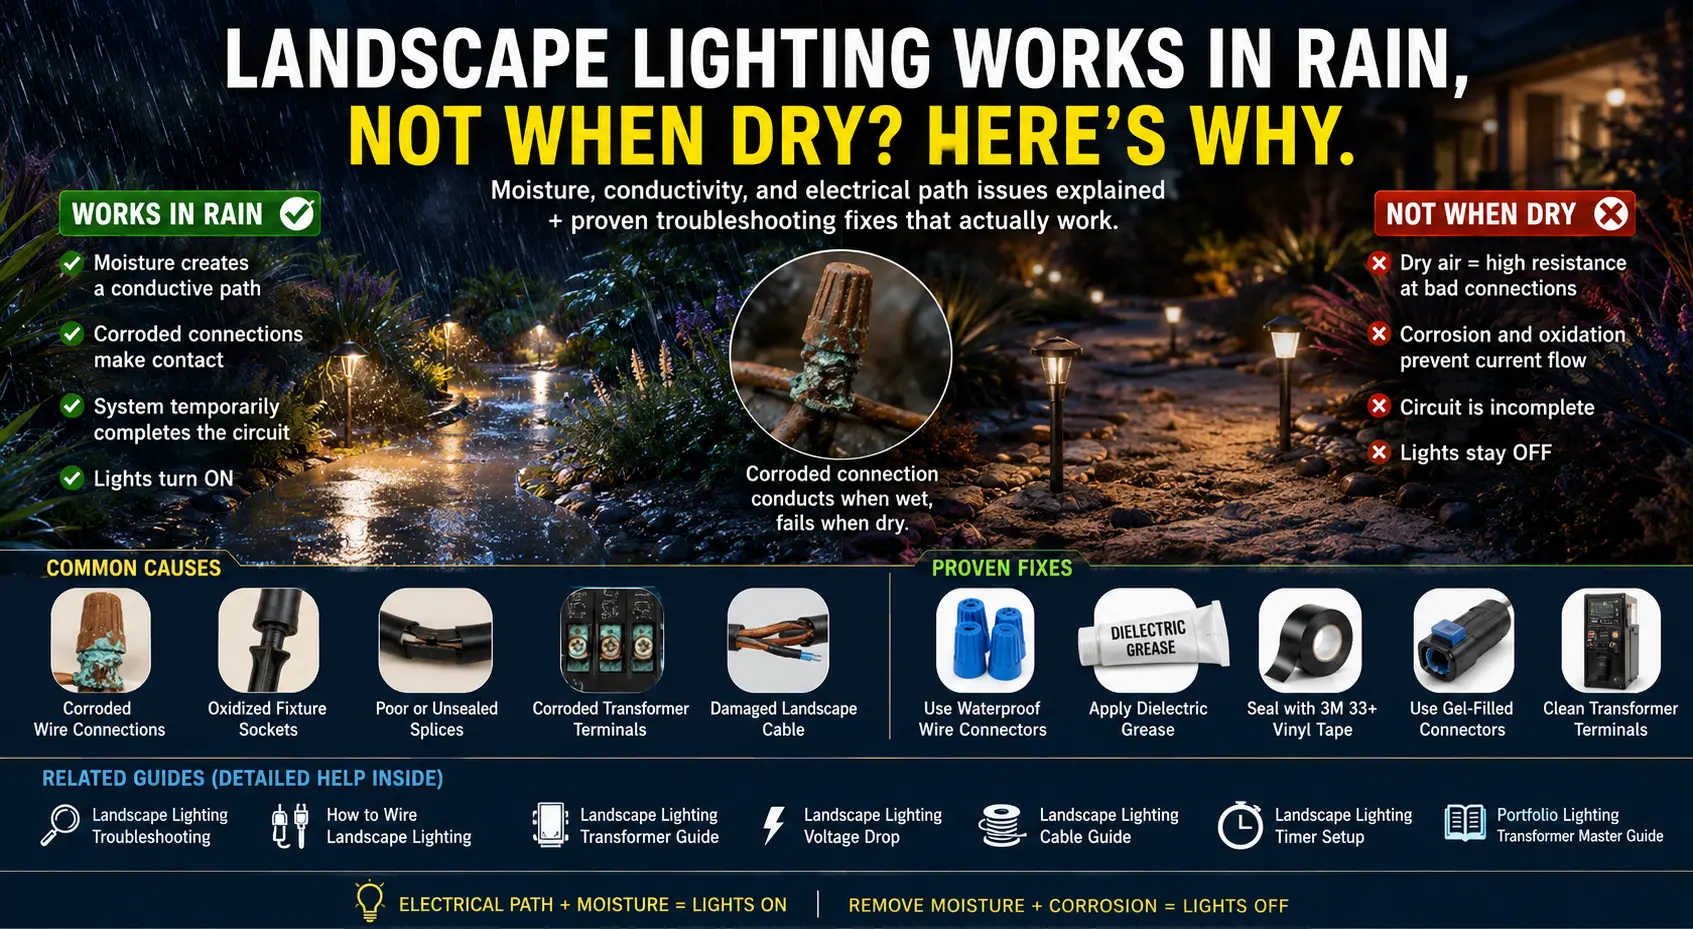
A landscape lighting system that works in rain but not when dry usually has a marginal electrical path. In plain language, one connection is almost good enough to carry current, but not quite. Rainwater, damp soil, wet mulch, or condensation temporarily changes the resistance at that weak point, so the lights come back on and make the system look healed.
The most common culprit is not the transformer. It is usually a field connection: a clamp-on connector that no longer bites the cable cleanly, a corroded splice near a fixture, an old pierce connector hidden under mulch, a cracked cable jacket, or a lamp socket that has oxidized just enough to fail when dry. If the whole system is affected, start with the transformer terminals and the first main cable run. If only one section wakes up after rain, treat that section as a separate branch-zone problem and compare it with the process in the one-zone landscape lighting troubleshooting guide.
This problem also overlaps with several other outdoor lighting failure patterns. If the system works only sometimes, compare your symptoms with landscape lighting that works intermittently. If the system specifically fails after storms, use the companion guide on Portfolio landscape lights not working after rain. This page covers the opposite clue: rain temporarily helps the system instead of hurting it.
Do not troubleshoot this while the yard is wet and the lights are working. Troubleshoot it when the system is dry and failing. That is when voltage readings, connector checks, and branch isolation actually reveal the fault.
Logic Summary: Why Rain Helps a Broken Lighting Circuit
I use this logic before replacing any parts. Rain changes four things at once: conductivity, temperature, photocell light level, and ground moisture. The winning diagnosis is the one that explains exactly which of those changes made the lights come back.
- If rain makes one fixture or a small group work: suspect the closest connector, splice, socket, or branch tap.
- If rain makes the entire system work: suspect the transformer terminal connection, the first main cable connection, a photocell, or a GFCI/outlet issue.
- If heavy clouds make the lights work before rain hits the ground: suspect a photocell or timer setting rather than a buried connection.
- If misting one connector wakes up the lights: replace that connector instead of cleaning it and hoping it lasts.
- If voltage is present at the transformer but absent at the first fixture: the failure is in the cable path between those two points, not in the fixture at the end of the run.
For the broader electrical sequence, keep the landscape lighting troubleshooting page open while using this guide. For Portfolio-branded systems, the related Portfolio landscape lighting troubleshooting page helps connect these rain clues to older Portfolio connectors, transformers, and replacement parts.
The Moisture-Bridge Effect: The Hidden Reason Rain Can Wake Up Lights
A 12-volt landscape lighting system is forgiving enough that weak connections can limp along for months. That is what makes this failure so confusing. A bad connection does not always fail completely. Sometimes it becomes a high-resistance connection: enough contact to show voltage on a meter, but not enough clean metal contact to carry the load of several lamps.
When rain reaches that weak point, it can create a temporary conductive bridge across oxidized metal. It can also pack wet soil against a nicked cable jacket, let minerals in water carry a tiny amount of current, or change pressure around a connector buried in mulch. This is especially common with older clamp-style landscape lighting connectors, where the metal teeth were supposed to pierce the cable jacket. Once the copper strands flatten, corrode, or pull slightly away from the blade, the connector may fail dry and revive wet.
The key word is temporary. A wet connector that makes the lights work is not a good connector. It is a connector that has lost its clean mechanical bite. If you see green copper oxide, blackened contact marks, loose screw pressure, brittle insulation, or white mineral crust inside the connector, treat that location as a repair point. The landscape lighting connectors guide explains why connector type matters, and the low-voltage wire connector replacement page is useful when deciding whether to replace old pierce taps with waterproof gel-filled or heat-shrink splices.
The field clue I trust most is repetition. If the same fixture group wakes up every time the mulch gets wet, the rain is acting like a diagnostic spray. It is pointing at a physical connection, not randomly blessing the system. I would rather replace one ugly buried connector with a proper waterproof splice than replace a transformer that was never the problem.
Failure Map: Match the Rain Pattern to the Most Likely Fault
Use this table before digging up the whole yard. The pattern tells you where to start. The goal is to find the smallest section of the system that changes behavior when wet.
After a storm, it can be hard to tell whether your landscape lights are off because of a power outage, a tripped GFCI, a flooded fixture, or a transformer problem. Generator power can help test the system, but only if the setup is safe and the transformer is protected from wet conditions. Use our landscape lighting generator outage guide before powering outdoor lights during or after severe weather.
| What You See | Most Likely Cause | Where to Test First | Best Next Move |
|---|---|---|---|
| All lights work after rain, all fail when dry | Weak main cable connection, transformer lug corrosion, photocell behavior, or GFCI/outlet issue | Transformer output, terminal lugs, first cable splice, outlet/GFCI | Confirm voltage at transformer, then at first fixture while system is dry and failing |
| Only one side of the yard works after rain | Branch tap or zone splice becoming conductive when wet | Junction where that branch leaves the main run | Isolate the zone and compare with low-voltage lighting zone logic |
| One fixture wakes up after rain | Fixture socket corrosion, loose lamp pins, failed connector, or water-activated ground path | Fixture connection and lamp socket | Bypass the fixture connector with a temporary direct test lead |
| Lights work during cloudy storms before the ground gets wet | Photocell is being triggered by lower light level | Photocell lens, timer mode, transformer control setting | Cover the photocell by hand and compare with photocell troubleshooting |
| Lights flicker as the soil dries out | High-resistance splice or damaged cable jacket affected by soil moisture | Buried cable path near recent edging, planting, or mulch work | Perform a controlled mist test in small sections |
| Transformer buzz changes after rain | Load changes when a branch reconnects or shorts partially through moisture | Transformer load and branch disconnect points | Compare symptoms with landscape lights buzzing and transformer load checks |
The Dry-Failure Test: How I Would Diagnose It Without Guessing
The dry-failure test is simple: test the system while it is not working, before rain or irrigation changes the evidence. You are looking for the point where voltage disappears, collapses under load, or returns only after moisture reaches a connector.
- Confirm the outlet first. Make sure the transformer is plugged into a live, reset GFCI-protected outlet. If the outlet is questionable, compare the issue with landscape lighting GFCI tripping.
- Test transformer output at the lugs. A normal 12-volt output may read slightly above 12 volts with no load. Multi-tap units may show 12, 13, 14, or 15 volts depending on the terminal.
- Test the first fixture while the system is dry and failing. If the first fixture has no usable voltage, the problem is between the transformer and that fixture.
- Test the last fixture on the run. If the first fixture is strong but the last fixture is dead or very low, the failure is likely mid-run, at a branch tap, damaged cable, or voltage-drop-sensitive connection.
- Disconnect branches one at a time. If one branch drags the whole system down, isolate it like a zone failure, not a whole-system failure.
If you are not sure how to read the transformer, use how to test a landscape lighting transformer before replacing anything. If the transformer truly has no output, move to landscape transformer not working or the Portfolio-specific Portfolio transformer not working guide. But if transformer output is present and the lights wake up only after rain, keep hunting downstream.
Low-voltage lighting is safer than line-voltage lighting, but the transformer plugs into household power. Do not open a transformer housing, work inside a live outlet box, or bypass GFCI protection. If the problem appears to involve the 120-volt side, stop and call a qualified electrician.
The Controlled Mist Test: Recreate the Rain Without Flooding the System
The best way to prove a moisture-bridge failure is to recreate the rain in a controlled way. I do not soak the whole yard. I use a small spray bottle or gentle hose mist and wet one suspect location at a time, waiting between each location to see whether the circuit changes.
Start at the transformer end and work outward. Mist the transformer terminal area only if the enclosure and wiring are appropriate for outdoor exposure and you are not spraying into live line-voltage components. Then move to the first fixture connector, the first branch splice, the next fixture connector, and so on. When the lights wake up, brighten, or flicker, you have found the area where moisture is changing the circuit.
This test is especially revealing on older Portfolio, Malibu, Hampton Bay, and similar consumer low-voltage systems that used pierce-style connectors. Those connectors can work for years, then become unreliable after mulch replacement, edging, freeze/thaw movement, or fixture repositioning. If your system uses discontinued Portfolio parts, the broader discontinued Portfolio lighting guide can help you decide whether to repair the old connector style or modernize the connection method.
How to Read the Mist Test
- Lights turn on immediately after misting one connector: replace that connector or splice.
- Lights brighten slowly after soil gets wet: suspect damaged cable insulation or a buried connection under mulch.
- Nothing changes until you cover the photocell: the control circuit is more likely than the cable run.
- Transformer trips after misting one branch: that branch may have a partial short that becomes worse when wet.
- Only one fixture responds: test that fixture socket, lamp pins, and fixture lead wire.
Connector Forensics: What a Rain-Reactive Connection Looks Like
When you open the connector that rain seems to activate, do not just check whether the wires are touching. Look for the reason the dry connection was weak. Most rain-reactive failures are mechanical before they are electrical.
A good connection has firm metal-to-metal contact, clean copper, strain relief, and a moisture-resistant enclosure. A bad dry-weather connection may have green copper oxide, white powdery mineral residue, black arc marks, flattened cable insulation, weak clamp pressure, or conductor strands that have broken off where the connector tooth entered the cable. In older cable, the copper may look dark and dull instead of bright. That oxidation raises resistance, and resistance is what makes the system sensitive to moisture and load.
Fixture sockets can behave the same way. A wedge-base lamp, MR16 pin, or integrated LED lead can lose clean contact. Rain or condensation changes the contact surface just enough for current to pass. If you are comparing bulb behavior, the Portfolio bulb replacement guide and MR16 LED replacement bulb guide help separate lamp problems from wiring problems.
| Clue Inside Connector | What It Means | Why Rain Helps | Permanent Fix |
|---|---|---|---|
| Green copper residue | Copper oxidation and moisture exposure | Wet minerals can temporarily bridge contact | Cut back to clean copper and install waterproof splice |
| Black marks or melted spot | Arcing or high-resistance heating | Water changes contact pressure or resistance briefly | Replace connector and inspect fixture load |
| Loose pierce blade | Connector tooth no longer bites cable | Wet surface lowers resistance around weak bite | Remove pierce connector and use direct splice |
| Brittle or cracked insulation | Aging cable jacket or physical damage | Wet soil may create a temporary conductor path | Replace damaged cable section |
| Dry white crust | Evaporated irrigation minerals | Mineral film conducts better when wet | Replace connector and relocate above heavy splash zone |
Capillary Action: The Hidden Wire Damage Most Homeowners Never See
One of the strongest clues in a rain-only landscape lighting failure is hidden wicking corrosion. This happens when water does not just sit inside a bad connector — it travels inside the wire itself.
When an old pierce connector punches through the cable jacket, it can create a tiny straw-like opening. Rainwater, irrigation water, and mineral-heavy moisture can wick into the stranded copper under the insulation. Once that happens, the wire may look fine on the outside while the copper inside has turned black, green, or dull gray several inches away from the connector.
Snip the wire back about 2 inches from the failed connector. If the copper inside the jacket is black or green instead of bright and shiny, you have wicking corrosion. Keep cutting back until you reach clean copper, or the new connector can fail in dry weather just like the old one.
This is why simply replacing the connector in the exact same spot sometimes does not solve the problem. The connector may be new, but the copper underneath may still be oxidized. A low-voltage meter may show voltage, yet the connection cannot carry the actual lamp load. That is the difference between a visible voltage reading and a usable electrical path.
| Wire Appearance | What It Means | Best Repair | Why It Matters |
|---|---|---|---|
| Bright copper strands | Healthy conductor | Install new waterproof connector or splice | Clean copper can carry load reliably |
| Black copper under insulation | Water wicked inside cable jacket | Cut back farther until copper is shiny | Blackened copper creates high resistance |
| Green powder or crust | Copper oxide corrosion | Replace connector and remove damaged wire section | Copper oxide acts more like an insulator than a conductor |
| White mineral residue | Water intrusion with dissolved minerals | Move splice above splash zone if possible | Mineral residue can create unpredictable wet/dry behavior |
The Dry-Night Voltage Drop Test: How to Prove It Is a High-Resistance Connection
The best time to test this problem is at night when the system is dry and the lights are failing. That is when the bad connection reveals itself.
- Test voltage at the transformer terminals. If you see normal output, such as 12.0 to 13.5 volts, the transformer is probably sending power.
- Test voltage at the first fixture. If the meter still shows voltage but the fixture will not light, do not assume the connection is good.
- Add load to the test. A weak connection can show “ghost voltage” on a meter because the wire is barely touching, but it cannot carry enough current to power the lamp.
- Mist one connector at a time. If the light suddenly turns on after moisture reaches one connector, that connector is creating a moisture bridge.
The hidden clue is this: voltage without light usually means the circuit can show electrical potential but cannot deliver usable current. Rain temporarily lowers resistance across the bad connection, which is why the system appears to come back to life when wet.
Do Not Clean the Green Connector — Replace It
A common homeowner mistake is scraping green corrosion off an old connector, tightening it, and assuming the repair is finished. That may work for a few weeks, but it is rarely a real fix.
Green copper oxide is not just dirt. It is evidence that the copper surface has chemically changed. Once the connector has turned green, the metal contact area is compromised and the copper strands may already be weakened under the jacket. Scraping the surface can create a short-term contact point, but it does not restore the conductor or seal the moisture path.
Scraping a corroded connector is a 30-day fix. Cutting back to bright copper and installing a gel-filled waterproof connector is the long-term repair.
Why I Do Not Replace the Transformer First
A transformer can fail, but this specific symptom usually points away from the transformer. Rain does not normally repair a transformer winding, a failed timer board, or a burned terminal block. Rain is far more likely to change a buried connector, branch splice, photocell lens, outlet/GFCI condition, or fixture socket.
That said, the transformer still needs to be tested. Check the output at the terminal lugs. If the voltage is absent, unstable, or drops dramatically when the cable is connected, then the transformer, load, short circuit, or control module deserves attention. Use the Portfolio transformer troubleshooting guide and Portfolio transformer wiring diagram when identifying terminals, taps, and cable connections.
If the transformer output is strong but voltage disappears downstream, do not blame the box on the wall. Follow the cable. A dry-weather open circuit between the transformer and first fixture can make a perfectly good transformer look dead. For sizing and load confirmation, compare the installed wattage with the Portfolio transformer wattage guide and landscape lighting transformer size calculator.
Repair Priority Table: What to Fix First
Once you find the point that reacts to moisture, fix the weakest physical connection first. Do not make five changes at once. One clean repair followed by a dry-weather retest tells you more than replacing random parts.
| Priority | Repair | Why It Matters | When to Move On |
|---|---|---|---|
| 1 | Replace the rain-reactive connector or splice | This is the most common moisture-bridge failure point | After lights work during a dry-night test |
| 2 | Cut back to clean copper | Oxidized conductor can make a new connector fail again | When copper is bright and firm, not dark or brittle |
| 3 | Inspect fixture socket and lead wire | One bad socket can mimic a cable problem | After bypassing fixture and confirming cable voltage |
| 4 | Isolate branch zones | A bad branch can drag down several good fixtures | When each branch is tested separately under load |
| 5 | Replace damaged cable section | Cracked cable jacket can create wet/dry behavior along the run | When connector repairs do not hold during dry testing |
| 6 | Evaluate transformer, photocell, and timer | Control problems can imitate moisture problems | When field wiring tests clean but system still changes with weather |
When you rebuild connections, think about the future service path. Keep splices accessible where possible, avoid burying fragile clamp connectors directly under mulch, and label branch runs if the system has multiple zones. The landscape lighting wiring guide, landscape lighting cable guide, and how to wire landscape lighting guide are useful next steps if the repair turns into a cable cleanup project.
FAQ: Landscape Lighting Works in Rain But Not When Dry
Why would rain make landscape lights work?
Rain can temporarily improve a weak electrical path by wetting oxidized copper, mineral residue, a cracked cable jacket, or a loose connector. It can also darken a photocell or cool a heat-sensitive component. The most common explanation is a bad connection that becomes conductive only when moisture is present.
Is this dangerous?
The low-voltage side is usually not dangerous in the same way as household wiring, but the symptom still matters. A high-resistance connection can heat, arc, corrode further, damage fixtures, or trigger nuisance GFCI behavior. The transformer and outlet side still involve household voltage, so do not bypass safety devices or open live electrical equipment.
Can I just waterproof the connector that seems bad?
Only waterproof it after making a clean mechanical and electrical repair. Sealing a corroded or loose connector traps the problem inside. Cut back to clean copper, use a proper outdoor-rated splice or connector, then protect the repaired connection from direct soil and mulch saturation when possible.
Could the photocell be the whole problem?
Yes, especially if the lights respond to dark storm clouds before anything gets wet. Cover the photocell by hand during dry weather. If the lights turn on normally, the photocell or timer setting may be the issue. If the lights only respond after connectors or soil get wet, the problem is more likely in the wiring path.
Should I replace old Portfolio pierce connectors?
If they are loose, corroded, cracked, or rain-reactive, yes. Older pierce connectors often fail because the metal tooth loses clean contact with the cable conductor. A modern waterproof splice or connector is usually more reliable than trying to tighten a worn connector back into service.
What if the lights work after irrigation but not after natural rain?
That usually means the wet area is local. Irrigation may be hitting a specific fixture, branch tap, or splice that rain does not wet the same way. Run the controlled mist test around that irrigation zone and focus on the first connector that changes behavior.
Can I use WD-40 to fix a wet-only lighting connection?
No. WD-40 is a water displacer, not a conductive grease or permanent electrical repair. It may temporarily move moisture or clean a contact, but it should not be used as the final fix for a corroded Portfolio or low-voltage landscape lighting connector. Use electrical contact cleaner only for diagnosis, then cut back to clean copper and seal the repair with a proper outdoor-rated gel-filled connector or dielectric grease where appropriate.

About This Troubleshooting Guide
Written from a field-diagnostic perspective for homeowners maintaining older low-voltage landscape lighting systems.I built this page to solve a very specific problem that generic troubleshooting guides usually miss: a system that improves when wet. The goal is to help you read the weather pattern as evidence, test the system in the right order, and repair the actual weak point instead of replacing good parts.