
Quick Answer
You can fix most Portfolio landscape light wire problems by cutting back to clean copper and splicing in new 18/2 low-voltage wire using a waterproof connector. If corrosion has spread inside the cable, you may need to replace a longer section of wire.
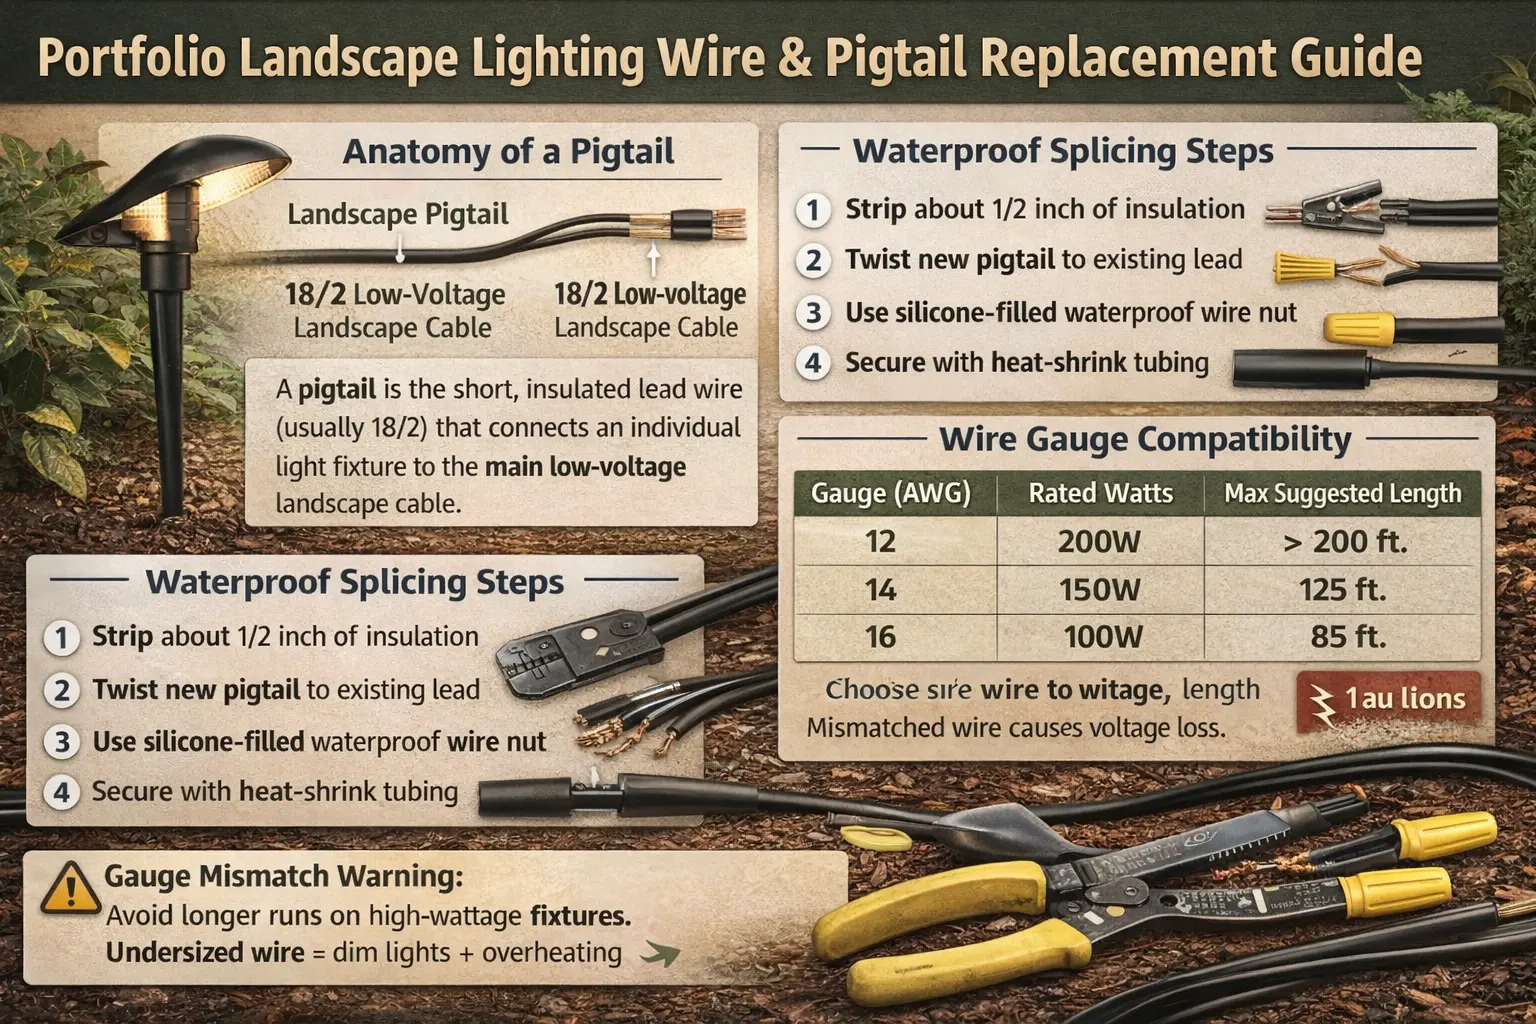
If your Portfolio light has a broken, brittle, cut, or corroded lead wire, you can usually repair it without replacing the entire fixture. Most repairs involve replacing the short fixture lead, also called the pigtail, and reconnecting it to the main low-voltage cable with a waterproof splice.
This type of repair is part of a larger low-voltage system. See our low voltage landscape lighting guide for a full overview of how transformers, cable, and fixtures work together.
This is one of the most practical low-voltage repairs because the fixture body, stake, lens, or shade may still be perfectly usable. The problem is often only the last few inches of damaged wire near the fixture base.
- Clean copper with no green corrosion
- Correct wire gauge for the fixture lead
- Waterproof direct-burial connector
- Heat-shrink or strain relief to reduce future breakage
- Transformer turned off before working on the splice
- Light flickers when wire moves → damaged pigtail
- Wire looks green or brittle → corrosion / wicking
- Multiple lights out → main cable issue
- Works after moving connector → bad splice
Most wire failures follow a simple pattern—physical damage, moisture intrusion, or poor splices—so identifying the symptom usually points directly to the correct repair.
What Is a Pigtail on a Portfolio Landscape Light?
A landscape lighting pigtail is the short lead wire that comes out of the fixture and connects that single light to the main low-voltage power cable. On many Portfolio fixtures, this lead wire is thinner than the main cable because it only serves one light, not the full circuit.
When people search for wire replacement, they are often really dealing with a failed pigtail. It may be split, cut by a shovel, chewed, stretched, or rotted from years of moisture exposure. Replacing this short section is often easier and cheaper than replacing the whole fixture.
The Mechanical Bridge That Makes the Fixture Work Again
The pigtail is the bridge between the light and the underground supply cable. If that bridge fails, the fixture can look completely dead even though the transformer and main cable are still fine.
Why This Part Fails So Often
The wire at the base of the fixture lives in one of the worst places in the whole system. It gets wet, buried, bent during maintenance, and exposed to weed trimmers, mulch, and soil movement. That is why pigtail repairs are so common in outdoor lighting systems.
Wire Gauge Compatibility Guide
This table helps you separate the fixture lead wire from the main low-voltage cable. The fixture pigtail is often 18 gauge, while the trunk line is usually heavier to handle more wattage and longer runs.
| Wire Gauge | Common Use | Best For | General Capacity Guidance |
|---|---|---|---|
| 12 gauge | Main trunk cable | Longer runs and higher system wattage | Best choice when voltage drop is a concern |
| 14 gauge | Main cable on medium runs | Moderate wattage systems | Common balance of cost and performance |
| 16 gauge | Shorter branch cable | Smaller lighting zones | Acceptable for lighter loads and shorter distances |
| 18 gauge | Fixture lead or pigtail | Single fixture connection | Usually not ideal as the main supply cable for a larger run |
Voltage Drop & Wire Gauge Guide
This table shows how wire gauge and distance affect voltage drop in low-voltage landscape lighting systems. Longer runs and smaller wire increase voltage drop, which can cause dim or inconsistent lighting.
| Wire Gauge | Max Recommended Run | Best Use Case | Risk If Exceeded |
|---|---|---|---|
| 12 gauge | 100+ feet | Main trunk lines, high-wattage systems | Minimal voltage drop, best performance |
| 14 gauge | 50–100 feet | Medium runs and moderate loads | Slight dimming at longer distances |
| 16 gauge | 25–50 feet | Short runs and small lighting zones | Noticeable brightness drop beyond range |
| 18 gauge | Under 25 feet | Fixture leads and pigtails only | Severe voltage drop if used as main cable |
How to Tell If the Wire Is the Real Problem
Before replacing anything, confirm the fixture lead is actually the failed part. A dead light can also come from a bad bulb, failed LED module, loose connector, overloaded transformer, or voltage drop elsewhere in the system.
If you are unsure how the system is wired overall, review our landscape lighting wiring guide to understand how fixtures connect to the main cable.
If wire damage extends into the transformer connection, follow our terminal block repair guide to properly reconnect the cable.
Signs the Fixture Wire or Pigtail Is Bad
- The insulation is cracked, split, or brittle near the fixture
- The copper inside looks green, black, or powdery
- The light flickers when the wire is moved
- The fixture works only after being repositioned
- The connector area stays wet and corroded
Signs the Problem May Be Somewhere Else
- Several lights are out together
- The transformer is not outputting power
- The entire zone is dim
- The timer, photocell, or main cable has failed
If several fixtures are affected, compare the broader wiring guides and troubleshooting pages before assuming every pigtail needs replacement.
Hidden Cause of Wire Failure: Moisture Wicking (Capillary Action)
One of the most common reasons Portfolio landscape lighting wires fail is something many homeowners never see—moisture wicking, also known as capillary action.
When water enters a small cut, crack, or exposed end of low-voltage wire, it can travel inside the copper strands. Instead of staying at the surface, the moisture slowly moves through the wire over time, leading to internal corrosion, green copper buildup, and eventual failure—even far away from the original damage.
If your wiring keeps failing or shows signs of unexplained damage, the issue may be surge-related rather than physical wear. See the landscape lighting surge protection guide to learn how voltage spikes can damage low-voltage cable runs.
How to Prevent Wicking with a Drip Loop
The best way to stop moisture from traveling into the wire is to create a small downward loop—called a drip loop—before the connection point.
- Let the wire dip slightly below the connection before rising up to the fixture
- This forces water to drip off the lowest point instead of entering the connection
- Always position splices and connectors above the lowest point of the loop
Using drip loops along with waterproof connectors is one of the most effective ways to extend the life of your landscape lighting system and prevent repeat wire failures.
Why Low-Voltage Landscape Wires Fail: The Wicking Problem
One repair detail many generic parts sites ignore is wicking. Wicking happens when water travels inside the wire jacket or through a damaged splice and slowly moves along the copper strands. Over time, that moisture corrodes the conductor from the inside out.
What Wicking Looks Like in Real Repairs
If you strip back the insulation and the copper is dark, green, or crumbly, the damage often goes farther than the visible cut or nick. In that case, keep trimming back until you reach clean, bright copper before making the splice.
How to Reduce Future Wicking
Use sealed waterproof connectors, avoid leaving bare copper exposed, and keep the splice slightly elevated or protected if the area stays constantly saturated. A dry, tight splice lasts much longer than a quick twist-and-tape repair.
How to Replace a Portfolio Fixture Wire or Pigtail
This is the core repair process for most cut or corroded fixture leads. Turn the transformer off first and keep the splice as clean and dry as possible.
If you are repairing an older Portfolio system, check the Portfolio technical archive to match wiring notes and model-specific part references.
- Wire cutters and strippers
- Waterproof direct-burial connectors
- Replacement 18/2 low-voltage wire
- Heat-shrink tubing or electrical seal
If your system has grown over time, spacing and fixture density may also contribute to wiring stress. See our landscape lighting spacing guide for better layout planning.
- Turn off the transformer. Never cut or strip the low-voltage cable while the system is energized.
- Expose the damaged section. Pull back mulch or soil until you can see the full damaged area and both sides of the repair.
- Cut back to clean wire. Remove all brittle insulation and any conductor that shows corrosion or darkened copper.
- Strip about 1/2 inch of insulation. Strip the fixture lead and the new pigtail carefully so the strands stay intact.
- Match the conductors. Twist the replacement wire to the existing fixture lead and the main cable as needed, keeping polarity consistent if your fixture requires it.
- Use a waterproof connector. Install a silicone-filled wire nut or direct-burial splice connector rated for wet outdoor use.
- Add heat-shrink for strain relief. This helps protect the splice from movement and moisture intrusion.
- Restore power and test. Turn the transformer back on and confirm the light is stable with no flicker or intermittent operation.
Wire gauge also influences startup reliability. Smaller conductors and long cable runs add source impedance, which can limit an LED driver's charging current by collapsing the fixture voltage instead of delivering a clean startup pulse. The landscape lighting peak-current database shows how cable impedance, simultaneous fixture startup, and driver design interact before the system reaches its normal running load.
What to Buy: SPT-2W vs Direct Burial Wire
Choosing the correct replacement wire depends on whether you are repairing a short fixture lead or replacing a section of the main underground cable.
| Wire Type | Best Use | Good Choice When | Not Ideal When |
|---|---|---|---|
| 18/2 fixture wire or pigtail wire | Short lead from fixture | You are repairing the final few inches at one light | You need to replace a long shared cable run |
| SPT-2W style low-voltage wire | General low-voltage fixture and branch repairs | You need flexible outdoor-rated wire for a standard repair | The full run is undersized for system load |
| Direct burial low-voltage cable | Main cable replacement | You are replacing a damaged underground run between fixtures | You only need a short fixture pigtail |
When a Simple Patch Is Enough
A patch is usually enough when the damage is limited to a short section near the fixture and the rest of the cable still tests well. This is common after physical damage from edging, digging, or a worn connector near the stake.
If you are reworking part of your system, it helps to review the full landscape lighting layout guide to avoid repeated repairs caused by poor design.
- The break is isolated to one fixture
- The main trunk cable is otherwise healthy
- The copper is still clean once the damaged section is removed
- The fixture housing itself is still worth saving
When to Repair vs Replace Landscape Lighting Wire
- Repair: damage is limited to a short section near the fixture
- Replace section: corrosion extends beyond the visible damage
- Replace full run: multiple failures or widespread insulation breakdown
Rule: If corrosion or wicking has spread inside the wire, replacing a longer section is more reliable than patching repeatedly.
Before replacing the wire on a holiday light strand, check our troubleshooting guide for Christmas lights half out to confirm whether the issue is really a damaged section or just a bulb or fuse.
When You Should Replace More Than the Pigtail
Sometimes the damaged wire is just the visible part of a larger problem. If the main cable has widespread cracking, repeated splice failures, or severe corrosion from standing water, replacing only the pigtail may not solve the issue for long.
- The cable insulation is failing in multiple places
- Several fixtures on the same run are affected
- The voltage drop is already severe
- The old connectors were never sealed properly
What If the Wire Pulled Out from Inside the Fixture?
If the lead wire has pulled loose from inside the light body, the repair becomes more fixture-specific. Some Portfolio fixtures let you open the base or housing and reconnect the wire to a socket, terminal, or LED driver. Others are sealed more tightly and may not be worth opening if the internal connection is damaged.
This is where it helps to compare replacement parts and fixture compatibility rather than forcing a repair on a badly compromised housing.
If the fixture housing is too damaged to repair, compare replacement options on the buy Portfolio lighting page.
Common Repair Mistakes That Cause Repeat Failures
Most repeat failures come from the splice, not the replacement wire itself. A rushed repair may work for a week and then fail again after the first hard rain or the next time the fixture is moved.
Mistake 1: Splicing Onto Corroded Copper
If the copper is green or brittle, the damage has already traveled beyond the visible cut. Trim farther back until the conductor is bright and solid.
Mistake 2: Using Indoor Connectors Outside
Standard dry-location wire nuts are not enough for wet soil, mulch, and irrigation zones. Use direct-burial or silicone-filled waterproof connectors.
Mistake 3: No Strain Relief
Even a waterproof splice can fail if the fixture wire keeps flexing at the same point. Heat-shrink tubing or a well-supported splice helps prevent future breaks.
Mistake 4: Ignoring the Main Cable Condition
If the trunk line is already undersized, overloaded, or deteriorated, fixing one pigtail will not restore the whole system.
For a broader look at system issues beyond wiring, review these landscape lighting mistakes before rebuilding your setup.
If you are replacing fixtures while repairing wiring, review the LeonLite vs Portfolio comparison guide to understand how new fixtures will connect and perform in your existing system.
Common Wire Repair Mistakes
- Splicing onto corroded copper instead of trimming back further
- Using indoor wire nuts instead of waterproof connectors
- Skipping strain relief so the splice fails again
- Assuming the pigtail is the only problem when the main cable is damaged
- Leaving splices buried in constantly wet soil
Portfolio Lighting Wire Replacement FAQ
Can you replace the wire on a Portfolio landscape light?
Yes. If the lead wire or pigtail is cut, split, or corroded, you can usually splice in a new piece of 18/2 low-voltage wire with a waterproof connector. If the wire has pulled loose inside the fixture, you may need to open the housing and reconnect it internally.
What is a pigtail on a landscape light?
A pigtail is the short lead wire that comes out of the fixture and connects that individual light to the main low-voltage cable.
What gauge wire should I use for a Portfolio fixture lead?
Most fixture pigtails use 18-gauge low-voltage wire, while the main supply cable is often 12, 14, or 16 gauge depending on run length and total wattage.
Why do low-voltage wires fail even when the fixture still looks fine?
They often fail from corrosion, damaged insulation, poor splices, or water intrusion. Wicking is especially common outdoors because moisture can travel inside the wire jacket and corrode the copper from the inside.
PortfolioLighting.net is an independent resource and is not affiliated with Lowe's or the Portfolio brand.