
Quick Answer: Can You Replace a Portfolio Transformer Terminal Block?
Yes, many failed Portfolio transformer terminal blocks can be repaired with a replacement lug screw, universal barrier strip, or properly rated terminal block retrofit. But if the internal transformer leads are burned, the enclosure is cracked, or the transformer overheats after repair, replacing the transformer is usually safer.
- Replace a stripped lug screw if the plastic block is intact.
- Retrofit a rated terminal strip if the original block is cracked or melted.
- Use dielectric grease only after the connection is clean and tight.
- Replace the transformer if heat damage extends inside the unit.
If the transformer will not power any lights after the terminal is cleaned or replaced, continue with Portfolio transformer not powering lights.
Most Common Causes of Melted Transformer Terminals
- Loose terminal screw causing heat buildup
- Stranded wire not clamped tightly
- Corroded copper increasing resistance
- Undersized wire carrying too much load
- Moisture entering the transformer housing
In most cases, the transformer itself is still good — the connection failed first.
Logic Summary: Diagnose the Connection Before Replacing the Transformer
A Portfolio transformer can look like it failed when the actual weak point is the low-voltage output connection. The transformer may still produce power, but a loose screw, corroded conductor, or stripped lug prevents that power from reaching the landscape lighting cable.
One bad terminal
Usually points to a loose screw, stripped lug, or corroded conductor. A terminal block repair may be enough.
All terminals damaged
Often means overload, water intrusion, poor connections, or long-term heat exposure. Replacement becomes more likely.
Transformer trips or resets
Move beyond the terminal and check load, short circuits, photocell issues, or overload protection.
Transformer body gets hot
Check wattage load, wire size, damaged cable, and output connections before continuing operation.
For broader transformer behavior, use Portfolio lighting transformer reset and Portfolio transformer getting hot.
If your issue may be wiring-related instead of the terminal itself, continue with Portfolio lighting wiring diagram to trace the full system.
Should You Repair or Replace the Transformer?
- Repair it: Terminal is melted but wires and transformer still test good
- Replace it: Internal wires are burned or transformer overheats after repair
- Upgrade it: System is overloaded or connections keep failing
Portfolio lighting replacement terminal blocks and transformer lugs are high-intent repair parts because users usually arrive at this problem after opening the transformer and seeing something wrong: melted plastic, green buildup, a stripped screw, a loose cable, or a terminal that no longer clamps the landscape wire.
This guide focuses on the real repair decision: whether you can clean and re-secure the existing terminal, replace the screw or lug, retrofit a universal terminal strip, bypass a failed low-voltage output block, or replace the entire transformer.
What to Check First
- Is the screw tight?
- Is the wire clean copper or corroded?
- Is only one terminal damaged?
- Is the transformer still producing power?
Signs of a Failing Transformer Terminal Block
A bad terminal block usually creates intermittent symptoms before total failure. The transformer may still run, but the wire connection at the low-voltage output side becomes unstable.
- Burnt plastic smell around the transformer
- Warm or hot terminal area after the lights run for a while
- Flickering lights when the cable is touched or moved
- Green or white buildup on copper wire or screws
- Black char marks near one output lug
- Stripped screw that spins without clamping the wire
- Lights work briefly, then shut off when the connection heats up
If the whole system is dark, use this page with Portfolio landscape lights not working to separate transformer terminal failure from cable, fixture, and photocell problems.
If the problem affects the entire system and not just one connection, use Portfolio lighting troubleshooting to diagnose power, wiring, and fixture issues.
Corrosion vs. Arcing: What the Terminal Damage Means
The color and texture of the damage tell you a lot. Green and white buildup usually points to moisture and corrosion. Black marks, charred plastic, and a burned smell usually point to arcing or heat from a loose mechanical connection.
| What You See | Likely Cause | What It Means | Best Next Step |
|---|---|---|---|
| Green or white crust on wire | Moisture corrosion | Copper or terminal metal has oxidized and resistance may increase | Cut back to clean copper, clean terminal, apply dielectric grease after tightening |
| Blackened screw or terminal | Arcing from loose contact | The wire was not clamped tightly enough or strands spread under the screw | Replace the screw, lug, or terminal block if heat damage is visible |
| Melted plastic around one output | High resistance heat | One terminal overheated locally | Retrofit a rated terminal block or replace the transformer if internal leads are burned |
| Both outputs melted | Overload, bad cable, or repeated loose connections | The issue may be system-wide, not one screw | Check total wattage, wire gauge, cable damage, and transformer load |
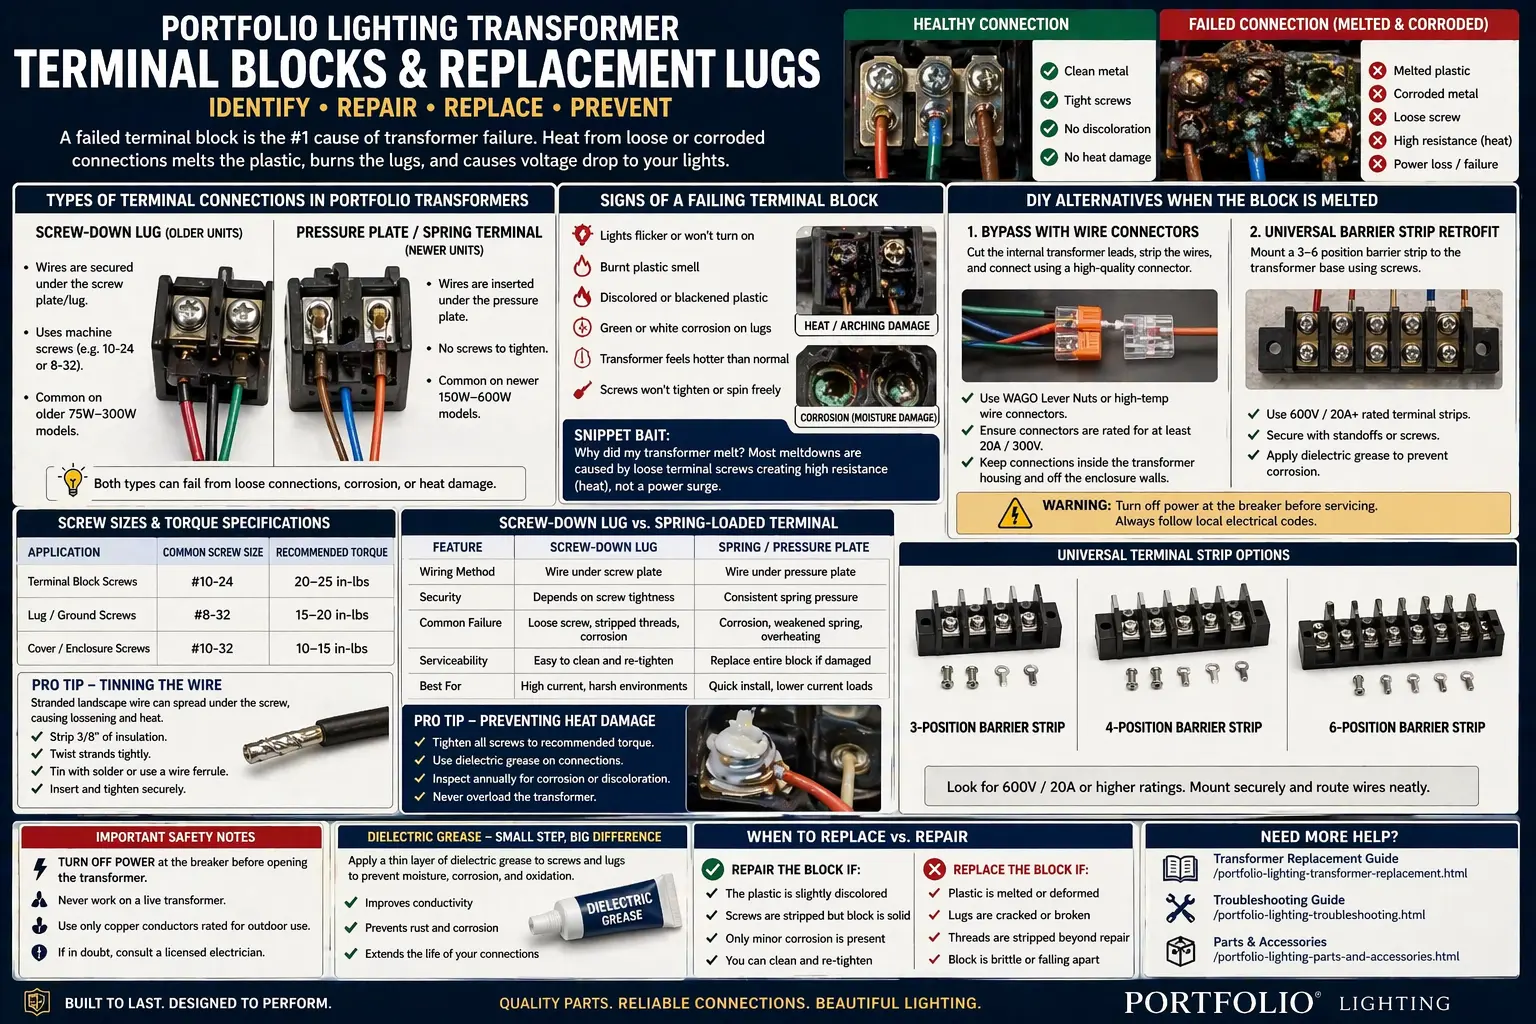
Identify the Terminal Type: Screw-Down Lug vs. Pressure Plate
Portfolio transformers are commonly found with two low-voltage output connection styles. Knowing which one you have helps you choose the right repair path.
Screw-Down Lug Style
Common on many older low-voltage transformers. The landscape wire is trapped directly under a screw or lug. These can strip, loosen, corrode, and heat up if the wire strands spread.
Pressure Plate Style
Often found on newer or higher-wattage units. A plate compresses the wire more evenly. These can still fail if the screw backs out or corrosion forms under the plate.
If you are unsure which transformer family you own, start with Portfolio lighting model number lookup.
Screw Sizes and Thread Pitches: #10-24, #8-32, and Replacement Lug Screws
Terminal hardware varies by transformer model, but many low-voltage output terminals use small machine screws in common electrical sizes. The two sizes homeowners often encounter are #10-24 and #8-32. Do not force a screw that does not thread smoothly; it can crack the block, strip the insert, or create a weak connection that overheats again.
- #10-24: often used where a larger clamping screw or lug is needed.
- #8-32: often used on smaller terminals, covers, and light-duty electrical hardware.
- Replacement rule: match diameter, thread pitch, head style, and metal condition.
Universal Terminal Strip Retrofit: When the Original Portfolio Block Is Gone
Portfolio-branded terminal blocks are not always sold as individual parts. When the original block is cracked, stripped, or melted, a universal barrier strip or terminal block may be a practical repair if it fits safely inside the transformer housing and matches the electrical requirements.
To find compatible replacement parts, start with Portfolio lighting parts and accessories before selecting a terminal block or barrier strip.
What to match before using a universal block
- Voltage rating equal to or greater than the transformer output
- Amperage rating suitable for the connected lighting load
- Wire gauge range that fits your landscape cable
- Secure mounting inside the transformer enclosure
- Enough clearance so bare terminals cannot touch the case or other conductors
Basic retrofit logic
- Turn off power and unplug the transformer.
- Photograph the original wiring before removing anything.
- Remove burned or cracked plastic and any damaged lug screws.
- Cut back burned wire until clean copper is visible.
- Mount the rated barrier strip securely inside the enclosure.
- Connect transformer output leads and landscape cable to the correct terminals.
- Test under load and check for heat before closing the housing.
If the terminal area is too badly damaged, compare replacement options at Portfolio lighting transformer replacement.
Heat-Shrink and Direct-Splice Alternative: Can You Bypass a Broken Terminal Block?
Some DIY users search for a way to bypass a destroyed terminal block because they cannot find the original replacement. A direct splice may be possible on some low-voltage output connections, but it must be done cleanly, insulated correctly, protected from moisture, and secured so the cable cannot pull on the internal transformer leads.
When a bypass may make sense
- The terminal block is melted but the transformer output leads are still intact.
- The splice can fit inside the housing without strain or compression.
- The connector is rated for the wire size and current.
- The repair can be insulated and kept away from sharp metal edges.
Common bypass connection options
- Lever connector: useful for solid or stranded conductors if rated for the wire size and current.
- High-quality wire nut: can work for low-voltage output splices if the connection is tight and protected.
- Heat-shrink insulation: helps protect the finished splice, especially where vibration or moisture is possible.
If a bypass is being considered because the transformer repeatedly shuts down, also check Portfolio transformer tripping breaker.
Screw-Down Lugs vs. Spring-Loaded or Lever-Style Terminals
The best connection style depends on the transformer design, wire size, available space, and whether the connection must be serviceable later.
| Connection Type | Best Use | Strength | Weak Point |
|---|---|---|---|
| Screw-down lug | Traditional transformer output terminals | Simple, strong, serviceable, familiar | Can loosen if wire strands spread or screw is not tight |
| Pressure plate terminal | Newer transformer terminal blocks and multi-tap outputs | Compresses wire more evenly than a bare screw | Still vulnerable to corrosion and poor torque |
| Universal barrier strip | Retrofit inside a damaged transformer housing | Good replacement when original block is unavailable | Must be rated, mounted securely, and protected from shorts |
| Lever connector | Low-voltage direct splice or bypass in limited space | Fast, reusable, good for stranded wire if rated | Needs strain relief and proper enclosure protection |
Preventing Heat Damage: Tight Connections, Ferrules, and Dielectric Grease
Terminal block failure usually comes back to contact quality. A clean, tight, protected connection runs cooler and lasts longer. A loose or corroded connection behaves like a small heater inside the transformer.
The terminal area on the GLA-200-12WF-1 should be inspected before a no-output or flickering condition is blamed on the transformer core. Darkened copper, loose strands, corroded screws, and overheated terminal plastic can create voltage loss that affects an entire branch. The GLA-200-12WF-1 terminal and troubleshooting guide explains how to unplug the unit, cut back to clean copper, reseat the conductors, verify separation between terminals, and decide when the terminal block is too damaged to reuse.
For load planning, review Portfolio lighting transformer wattage guide and Portfolio lighting transformer sizing guide.
How to Prevent Terminal Block Failure Again
- Always tighten screws firmly (not just snug)
- Use clean copper — never reuse burned wire
- Keep stranded wire tightly twisted or use ferrules
- Match wire size to load
- Check connections after first run for heat
When the Terminal Block Is Not the Real Problem
A melted terminal block is often a symptom of the connection itself, but it can also be part of a larger system problem. If the repair fails again, look for overload, short circuits, cable damage, moisture, or a transformer that is no longer stable.
- If the transformer has no output after repair, test the transformer directly.
- If the breaker trips, check for short circuits and overload.
- If only one zone fails, inspect the cable run and connectors.
- If the terminal melts again, the load or connection method is still wrong.
Use how to test a landscape lighting transformer, Portfolio landscape lights short circuit, and Portfolio lighting wiring diagram to move beyond the terminal block.
Repair vs. Replace: What Should You Do?
The right decision depends on where the damage stops. A stripped screw or lightly corroded lug may be a small repair. A melted block with burned internal wiring is different.
Repair the terminal
Best when the transformer works, plastic damage is minor, wires are clean after trimming, and the replacement lug or terminal clamps securely.
Retrofit a barrier strip
Best when the original terminal block is damaged but the transformer output leads and housing are still usable.
Bypass carefully
Only for low-voltage output-side repairs where a secure, insulated, strain-relieved splice can fit safely in the enclosure.
Replace the transformer
Best when internal wiring is burned, the unit overheats, output is unstable, or the terminal damage is part of a larger failure.
If replacement is the safer path, start with how to replace a landscape lighting transformer.
Portfolio Transformer Terminal Block and Replacement Lug FAQ
Can I use a terminal block from a different brand?
Yes, if the terminal block or barrier strip is rated for the transformer output voltage, amperage, wire gauge, and installation environment. The replacement must also fit securely inside the enclosure without exposing live metal parts.
Why did my landscape lighting transformer terminal block melt?
Most meltdowns are caused by loose terminal screws creating high resistance and heat. Corrosion, overload, undersized wire, and poorly prepared stranded wire can make the failure happen faster.
Can I bypass a melted transformer terminal block?
Sometimes, but only on the low-voltage output side and only if the splice can be rated correctly, insulated, strain-relieved, and kept inside the protected transformer housing. Never bypass fuses, overload protection, or 120V input wiring.
What does green stuff on transformer wires mean?
Green or white buildup usually means copper corrosion from moisture. Cut back to clean copper, replace badly corroded terminals, and protect the finished connection after it is mechanically tight.
What screw size do Portfolio transformer lugs use?
Screw size can vary by model, but common small electrical machine screw sizes include #10-24 and #8-32. Match the original screw diameter and thread pitch instead of forcing a similar screw into the block.
Final Thoughts on Portfolio Lighting Replacement Terminal Blocks and Transformer Lugs
A bad terminal block can make a Portfolio transformer look completely dead, but the actual problem is often a small mechanical connection failure. Loose screws, corrosion, stripped lugs, and poorly clamped stranded wire create resistance, and resistance creates heat.
The best repair starts with inspection. If the transformer is otherwise healthy, a replacement screw, lug, terminal strip, or carefully rated low-voltage splice may restore the system. If heat damage has moved inside the transformer or the unit continues to overheat, replacement is the safer decision.
More Portfolio Transformer and Troubleshooting Guides
Portfolio Lighting Transformer Troubleshooting
Use this broader diagnostic guide if the terminal block is only one part of the transformer problem.
Read the guidePortfolio Lighting Transformer Replacement
Best if the terminal block is melted beyond repair or the internal wiring is visibly damaged.
Read the guidePortfolio Lighting Parts and Accessories
Start here when looking for replacement hardware, wire parts, transformer components, and repair accessories.
Read the guidePortfolio Transformer Not Powering Lights
Use this if the terminal repair is complete but the landscape lights still do not turn on.
Read the guidePortfolio Transformer Lug Repair, Terminal Strip Retrofit, and Low-Voltage Connection Help
This page is designed to help homeowners and DIY repairers understand why a Portfolio lighting transformer terminal block fails and what safe repair paths exist. It focuses on low-voltage output terminals, not bypassing line-voltage input wiring or safety protection.
If the transformer housing is cracked, the internal wiring is burned, or the unit overheats after terminal repair, replacement is the safer option. Start with Portfolio lighting transformer master guide for a complete transformer overview.