
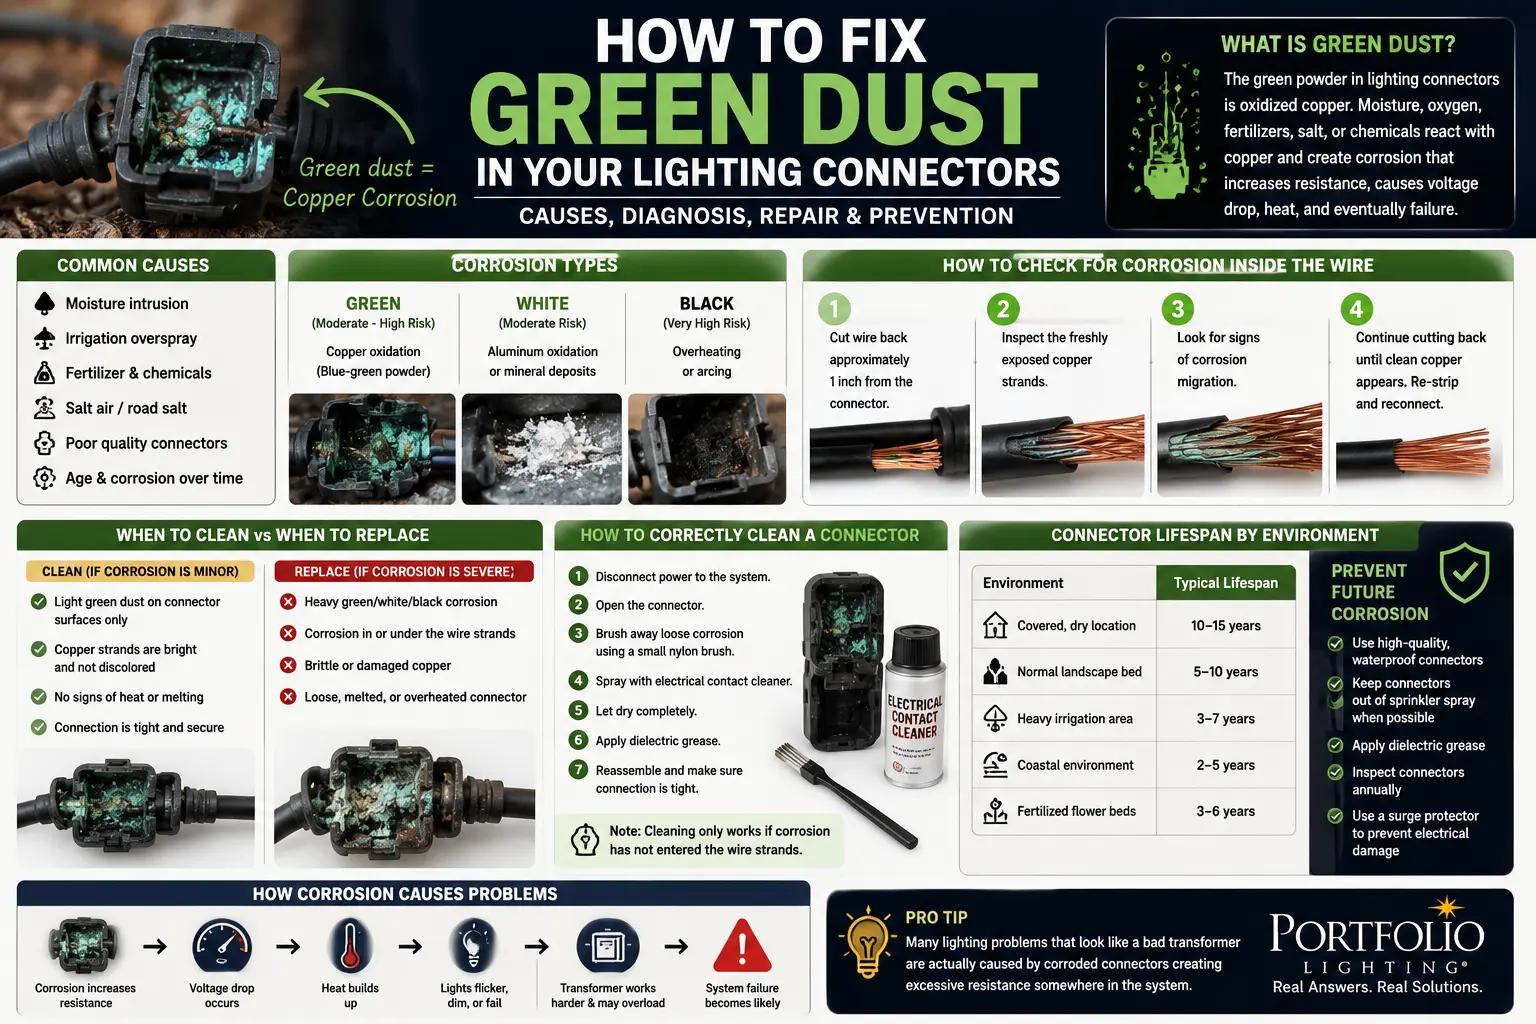
Quick Answer
Green dust in a landscape lighting connector is usually copper corrosion, not harmless dirt. It forms when moisture, oxygen, fertilizer residue, lawn chemicals, salt, or irrigation water reaches exposed copper inside a low-voltage connector. Once that green powder appears, the connection can develop higher resistance, lower voltage, flickering lights, heat buildup, intermittent failures, and symptoms that look like a bad transformer.
The right fix depends on how far the corrosion has traveled. If the green powder is only on the connector surface and the copper wire underneath is still bright, you may be able to clean and reseal the connection. If the copper strands are green, dark, brittle, blackened, or powdery after you cut the connector off, you need to cut back to clean copper and install a new waterproof connector.
Logic Summary: Why Green Dust Causes Landscape Lighting Failures
Green dust inside a landscape lighting connector is not the actual problem—it is evidence that the electrical connection is deteriorating. The green powder forms when moisture reaches exposed copper conductors and creates corrosion compounds that increase electrical resistance. As resistance rises, the connector becomes less efficient at carrying power from the transformer to the fixture.
The failure usually follows a predictable sequence. Moisture enters the connector, copper corrosion develops, resistance increases, voltage begins to drop, LEDs become unstable, fixtures start flickering or dimming, heat builds inside the connector, and eventually the connection fails completely. In advanced cases, the added resistance can make a healthy transformer appear defective because the symptoms mimic transformer overload, low voltage output, or intermittent power loss.
The most important diagnostic step is determining whether corrosion is limited to the connector or has migrated into the copper strands beneath the insulation. If corrosion has entered the cable itself, replacing the connector alone often results in another failure because the damaged copper remains in the circuit. Successful repairs remove all compromised conductors, restore a low-resistance connection, and prevent future moisture intrusion through proper waterproof sealing methods.
In practical terms, green dust should be viewed as an early warning system. Catching connector corrosion before it spreads can prevent voltage drop issues, fixture failures, unnecessary transformer replacements, and costly rewiring projects later. The goal is not simply to clean the connector—it is to identify where corrosion started, how far it has traveled, and what environmental conditions allowed it to develop in the first place.
What You Will Learn
- Why green dust forms inside low-voltage lighting connectors
- How to tell copper corrosion from mineral deposits, overheating, and arcing
- When cleaning is reasonable and when replacement is mandatory
- The one-inch cutback test that shows whether corrosion has migrated into the cable
- How green corrosion causes voltage drop, dim lights, flicker, and transformer cycling
- Which connector types last longest in wet soil, mulch, flower beds, and coastal air
- How to prevent the same connector from failing again after repair
What Is the Green Dust Inside a Lighting Connector?
The green powder inside a landscape lighting connector is usually a copper corrosion product. Most low-voltage landscape wire uses stranded copper conductors. When a connector pierces the wire jacket, clamps on a conductor, or exposes copper during a splice, that copper must remain protected from water and oxygen. If the seal weakens, moisture reaches the copper and the chemical reaction begins.
In a clean, dry connection, copper stays bright and conductive. In a wet or contaminated connection, copper can form blue-green corrosion compounds. Those compounds do not conduct electricity the same way clean copper does. Instead, they act like a resistance layer between the transformer, wire, connector, and fixture lead.
That is why a connector can look only slightly dirty but behave like a major electrical bottleneck. The fixture may still work for a while, but the connection is already becoming less reliable. The first signs are often intermittent flicker, random dimming, one fixture dropping out, or a zone that only fails after rain.
Green, White, Black, and Blue Corrosion: What Each Color Means
Color is not a perfect lab test, but it gives useful field clues. Use this table before deciding whether to clean, cut back, or replace the connector.
| What You See | Likely Cause | Electrical Risk | Best Action |
|---|---|---|---|
| Light green dust | Early copper oxidation from moisture reaching exposed copper | Moderate. Resistance is starting to rise. | Open, inspect, clean if copper is still bright, then reseal or replace. |
| Thick blue-green crust | Advanced copper corrosion, often from repeated wet-dry cycles or fertilizer exposure | High. Voltage drop and intermittent contact are likely. | Cut connector off and inspect wire strands. Replace connector. |
| White powder | Mineral deposits, aluminum oxidation, hard-water residue, or soil salts | Moderate. May indicate water intrusion even if copper is not yet green. | Clean and inspect. Replace if connector seal is compromised. |
| Black residue or soot | Overheating, arcing, carbon tracking, or burned insulation | Very high. This is not normal corrosion. | Replace the connector and inspect load, wire size, and fixture condition. |
| Green strands inside the wire | Corrosion migration under the insulation | High. A new connector may fail again quickly. | Cut back to clean copper before installing any new connector. |
Why Lighting Connectors Develop Green Corrosion
Green dust usually starts because the connector was never as sealed as it looked. Landscape lighting connectors live in a difficult environment: wet mulch, fertilizer, sprinkler overspray, freeze-thaw movement, soil pressure, UV exposure, insects, and lawn tools all work against the seal over time.
Older Portfolio-style pierce connectors are especially vulnerable because they depend on pressure and jacket penetration. They work well when new, but if the wire jacket is nicked, the connector is reused, the cable is too small, the clip is loose, or the fixture lead is pulled sideways, the seal can open enough for moisture to enter.
The most common accelerators are sprinkler spray, wet flower beds, fertilizer salts, pet urine near path lights, coastal air, mulch that stays damp, and connectors buried too deeply without drainage. Once corrosion starts, it often spreads under the insulation where it cannot be seen from the outside.
The One-Inch Cutback Test: The Step Most Homeowners Skip
The biggest mistake is replacing the connector without checking whether corrosion has traveled into the wire. Copper corrosion can migrate under the insulation by capillary action. That means the outside connector may be the visible failure, but the real damaged copper may extend an inch or more into the cable.
- Turn off power at the transformer.
- Cut the failed connector off the cable.
- Strip back about one inch of insulation from the main landscape wire.
- Inspect the copper strands in strong light.
- If copper is bright and flexible, the corrosion was probably localized.
- If copper is green, dark, brittle, or powdery, cut back another inch and inspect again.
- Do not install the new connector until clean copper appears.
Why Green Dust Causes Voltage Drop, Flicker, and Dim Lights
Landscape lighting connectors are not just mechanical clips. They are part of the electrical path. When copper corrosion builds up, the connection behaves like a small resistor. That resistor steals voltage from the fixture and turns some energy into heat.
As resistance rises, several things can happen at once: the fixture receives lower voltage, LEDs become unstable, halogen bulbs run dimmer, the connector warms up, the transformer sees abnormal load behavior, and flicker appears when temperature or moisture changes the contact pressure.
This is why one corroded connector can make a lighting system look like it has a transformer issue. Before assuming the power pack is bad, compare the symptoms with the bad landscape lighting transformer symptoms guide, then inspect the affected cable run with the landscape lighting connectors guide and the landscape lighting voltage drop guide.
Clean It or Replace It? Connector Repair Decision Table
This is the practical decision table I would use before spending money on a transformer, fixture, or full cable replacement.
| Condition | Can You Clean It? | Should You Replace It? | Why |
|---|---|---|---|
| Light surface green dust, copper still bright after stripping | Possibly | Optional | The corrosion may be early and localized, but resealing is still critical. |
| Green crust inside the connector body | No | Yes | The connection surface is already compromised. |
| Green copper strands under insulation | No | Yes, after cutting back wire | Corrosion has migrated beyond the connector. |
| Black residue, melting, brittle plastic, or burned smell | No | Immediately | Heat or arcing may be present. |
| Connector fails only after rain | Rarely | Usually | The seal is no longer weatherproof. |
| Fixture lead is green but main cable is clean | No | Replace connector and evaluate fixture lead | The fixture-side lead may be the weak point. |
How to Fix Green Dust in a Lighting Connector
This process is for low-voltage landscape lighting connectors, not line-voltage wiring. If you are dealing with 120V wiring, junction boxes, pool lights, dock lights, burned wiring, repeated breaker trips, or anything you cannot identify safely, stop and use a qualified electrician.
Step 1: Turn Off the Transformer
Switch the landscape lighting transformer off and unplug it if possible. Do not work on connectors while the system is energized, even though the lighting side is low voltage.
Step 2: Open or Remove the Connector
If the connector is reusable, open it carefully. If it is brittle, swollen, cracked, or packed with green powder, cut it off instead of trying to save it.
Step 3: Inspect Both Sides of the Connection
Look at the main cable and the fixture lead. Many failures are uneven: the main cable may be clean while the smaller fixture lead is corroded, or the fixture lead may look fine while the main cable has corrosion under the jacket.
Step 4: Cut Back to Clean Copper
Use the one-inch cutback test. Keep cutting back in small increments until the copper is bright, flexible, and not powdery.
Step 5: Install a Better Sealed Connector
For wet locations, use a waterproof connector, gel-filled connector, heat-shrink splice, or sealed low-voltage splice kit. A basic pierce connector may work in a dry protected bed, but it is usually not the best choice for irrigation zones or wet mulch.
Step 6: Reposition the Connection
Do not leave the repaired connector sitting in a low spot where water collects. Raise it slightly above saturated soil, keep it out of direct sprinkler spray when possible, and avoid burying it under heavy mulch without drainage.
Portfolio Lighting Connector Corrosion: Why It Shows Up So Often
Portfolio low-voltage lighting systems are common in older homeowner-installed landscape lighting. Many use consumer quick-connect hardware that was convenient at installation but not always ideal after years of moisture, soil movement, fertilizer exposure, and LED retrofit changes.
The important point is that Portfolio fixture failure is often a connector failure, not a fixture failure. A path light that goes dark may still have a working bulb and housing. A flood light that flickers may have a weak pierce connection. A transformer that cycles may be reacting to a corroded connector on one run.
If you are trying to decide whether the problem is the connector, socket, fixture, or transformer, compare this guide with Portfolio corroded socket cleaning and repair, low-voltage wire connectors for landscape lighting, low-voltage landscape lighting failure points, and Portfolio Lighting troubleshooting.
Green corrosion inside connectors is often accompanied by damaged or deteriorating wire insulation that allows moisture to migrate into the electrical connection. Our Landscape Lighting Insulation Breakdown Guide explains how insulation failure and connector corrosion are commonly related.
Connector Lifespan by Environment
Connector lifespan depends less on brand and more on water exposure, soil chemistry, installation depth, and seal quality.
| Installation Environment | Typical Connector Life | Failure Pattern | Best Upgrade |
|---|---|---|---|
| Covered dry bed near house wall | 10–15 years | Slow oxidation, physical loosening, occasional wire pull | Standard waterproof low-voltage connector |
| Normal mulch bed | 5–10 years | Wet-dry cycles and mulch acid exposure | Gel-filled connector or sealed splice |
| Sprinkler spray zone | 3–7 years | Repeated moisture intrusion and mineral deposits | Heat-shrink waterproof splice above saturated soil line |
| Fertilized flower bed | 3–6 years | Green/blue copper salts and accelerated oxidation | Gel-filled direct-burial connector |
| Coastal or de-icing salt exposure | 2–5 years | Rapid corrosion, brittle strands, recurring failures | Sealed splice kit plus more frequent maintenance |
| Low spot where water pools | 1–4 years | Connector stays wet internally and fails repeatedly | Move connection location and rebuild with waterproof splice |
How to Stop Green Dust From Coming Back
The repair is only successful if the new connection stays dry and mechanically stable. Use these prevention rules after cleaning or replacing the connector.
- Do not reuse weak pierce holes. Move the connector to fresh, clean copper when possible.
- Keep connectors out of water pockets. A waterproof connector still fails faster if it sits in a saturated low spot.
- Avoid stretched fixture leads. Tension breaks seals and allows moisture to wick into the connection.
- Use direct-burial rated connectors. Indoor wire nuts and basic tape wraps do not belong in wet landscape beds.
- Document the repaired zone. If a failure returns, you will know which run has a moisture history.
- Inspect after heavy irrigation changes. New sprinkler patterns often create lighting failures months later.
For broader maintenance, pair this repair with the landscape lighting maintenance guide, landscape lighting corrosion guide, and Portfolio transformer surge protector installation guide.
Use AI if You Are Not Sure Whether It Is the Connector, Fixture, or Transformer
Green dust can be obvious, but the larger failure pattern is not always obvious. One corroded connector can mimic a bad fixture, a bad transformer, a voltage-drop issue, or a shorted run. If you are not sure what to check next, the Portfolio Lighting AI assistance tool can help you describe the symptom, compare likely causes, and decide whether to inspect connectors, sockets, transformer output, voltage drop, or the fixture itself.
For best results, tell the AI whether the problem affects one fixture, one zone, or the whole system; whether it happens after rain; whether the connector shows green, white, or black residue; and whether the transformer is buzzing, cycling, or staying on normally.
Green Dust in Lighting Connectors FAQ
What is the green dust inside landscape lighting connectors?
Green dust is usually copper corrosion caused by moisture, oxygen, fertilizer, lawn chemicals, salt exposure or repeated wet-dry cycles reaching exposed copper wire inside the connector.
Can green corrosion make landscape lights flicker?
Yes. Green corrosion increases resistance at the connector. That can reduce voltage to the fixture, create intermittent contact, cause LED flicker, dim lights, heat buildup or complete fixture failure.
Can I clean a green corroded lighting connector?
Only minor surface corrosion should be cleaned. If the connector is swollen, brittle, blackened, heat damaged, wet inside, or the copper strands are green beyond the connector, replacement is the better repair.
Should I replace the wire if the connector has green dust?
Cut back the wire and inspect the copper. If the copper is bright, the corrosion was likely limited to the connector. If the strands are green, dark, powdery or brittle, cut back until clean copper appears before installing a new connector.
Does green corrosion mean my transformer is bad?
Not usually. Corroded connectors often mimic transformer failure by causing dim lights, flicker, shutdowns or voltage drop. Diagnose the connector and cable run before replacing a transformer.
What kind of connector prevents green corrosion best?
Waterproof gel-filled connectors, heat-shrink butt splices and sealed low-voltage splice kits usually resist moisture better than basic pierce-style connectors in wet soil, irrigation zones and fertilized beds.