
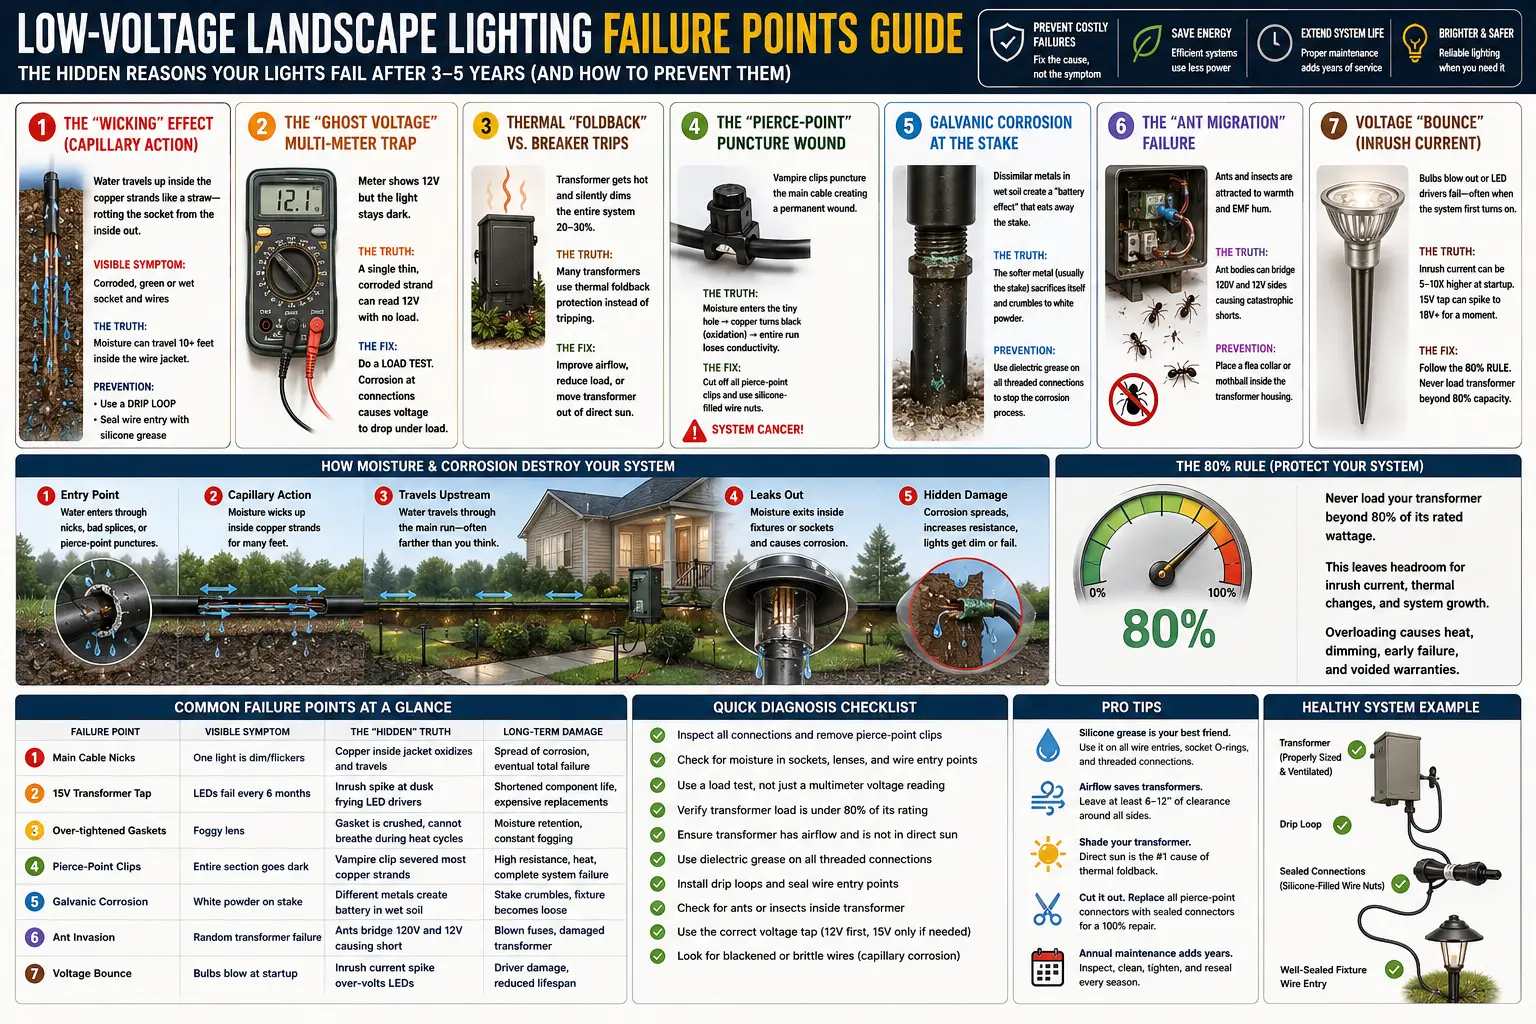
Quick Answer: What Usually Kills a Low-Voltage Landscape Lighting System
Most low-voltage landscape lighting systems do not fail because one bulb burns out. They fail because moisture, corrosion, heat, pests, mechanical movement, bad connectors, and overloaded transformers slowly damage the hidden electrical path that carries power through the yard.
The most overlooked failure points are wire wicking, ghost voltage, pierce-point connector punctures, thermal foldback, transformer inrush stress, galvanic corrosion at stakes, and pest intrusion inside transformer housings. These are the silent killers that manuals rarely explain.
Logic Summary: The Failure Chain Most Homeowners Miss
A low-voltage lighting system is a chain: transformer, timer or control, cable, connector, fixture lead, socket, lamp or LED module, gasket, stake, and soil environment. The failure usually starts at the weakest link and spreads outward.
- Moisture enters first: through wire nicks, pierce clips, crushed gaskets, or fixture wire entries.
- Copper changes next: bright copper turns dull, then black or green, raising resistance.
- Voltage becomes misleading: a digital meter may still show 12 volts even though the connection cannot power a lamp.
- Heat accelerates damage: high resistance creates heat, which weakens sockets, drivers, terminals, and splices.
- The visible symptom appears last: flickering, dimming, random outages, transformer buzz, fogged lenses, or sections going dark.
What You Will Learn
- The hidden low-voltage failure-point table
- Why water travels inside wire
- The ghost voltage multimeter trap
- Thermal foldback vs breaker trips
- Why pierce connectors become system cancer
- Galvanic corrosion at stakes and threads
- Ant and spider transformer failures
- Voltage bounce and inrush current
- The field diagnostic sequence
- FAQ
The Low-Voltage Failure Points Manuals Rarely Explain
Most troubleshooting charts focus on obvious symptoms: bad bulb, tripped GFCI, dead transformer, loose wire. The table below shows the hidden physical, chemical, and biological causes that often create those symptoms years later.
| Failure Point | Visible Symptom | The Hidden Truth | Best Fix |
|---|---|---|---|
| Main cable nicks | One light is dim or flickers | Copper inside the jacket is turning black and oxidation is traveling under the insulation | Cut back to bright copper and seal the entry point |
| 15V transformer tap | LEDs fail every 6 months | The inrush spike at dusk can over-stress small LED drivers | Use correct tap, reduce load, and follow the 80% rule |
| Over-tightened gaskets | Foggy lens that keeps returning | The gasket is crushed and cannot expand or breathe during heat cycles | Replace or relax gasket and reseal on a low-humidity day |
| Pierce-point clips | Entire section goes dark | The vampire clip damaged the main cable and opened a water path | Remove clip and rebuild with sealed connectors |
| Mixed metal stakes | Fixture neck seizes or stake crumbles | Wet soil creates galvanic corrosion between different metals | Use dielectric grease or compatible hardware |
| Transformer pests | Random trips or burnt smell | Ants or spiders bridged circuit points inside the warm transformer housing | Clean housing and prevent pest entry |
| High-resistance connector | Meter shows voltage but light stays off | The circuit has voltage potential but cannot deliver amperage | Load-test the fixture and rebuild splice |
On mobile, swipe the table horizontally to view all diagnostic columns.
Most low-voltage lighting failures repeat because the repair fixes the visible symptom but never checks the full system. A corroded connector, bad splice, dim fixture, overloaded transformer, or damaged cable run should trigger a complete inspection, not just a single-part replacement. Use the low-voltage landscape lighting inspection checklist to convert failure-point troubleshooting into a structured review of transformer protection, wiring path, burial depth, connector ratings, fixture condition, voltage drop, and final documentation.
1. The Wicking Effect: Why a Dry Fixture Can Be Wet Inside
Most people assume water enters a landscape light from the top through the lens. That does happen, but one of the most destructive moisture paths starts underneath the fixture through the wire.
If a cable is nicked underground, pierced by a cheap connector, or joined with a non-waterproof splice, water can enter the stranded copper. Once inside, capillary action lets the moisture travel between the copper strands like liquid through a straw. In severe cases, moisture can travel many feet inside the insulation before it appears inside a fixture socket.
The prevention strategy is to keep wire entry points sealed, use drip loops where the lead enters the fixture, and avoid allowing underground splices to become the lowest wet point in the circuit. A small silicone plug or outdoor-rated seal at the wire entry can stop moisture from climbing into the fixture body.
| Wicking Clue | What It Means | Why It Happens | Repair Logic |
|---|---|---|---|
| Socket rotted from bottom upward | Water entered through wire path | Moisture followed copper strands | Replace socket and seal wire entry |
| Black copper under insulation | Water traveled inside cable jacket | Capillary action pulled moisture along wire | Cut back until copper is bright |
| Fixture is dry outside but wet inside | Moisture entered through lead wire | Wire became the hidden drain path | Create drip loop and seal entry hole |
| Repeated socket corrosion | Moisture source was never removed | New bulb installed into same wet path | Rebuild connector and wire entry |
On mobile, swipe the table horizontally to view all diagnostic columns.
2. The Ghost Voltage Multimeter Trap
A digital multimeter can mislead homeowners because it needs almost no current to display voltage. A single thin, oxidized copper strand can show 12.1 volts at a dark fixture even though it cannot carry enough amperage to power an LED or halogen lamp.
This is the difference between voltage potential and usable load capacity. The circuit may technically have voltage, but the moment a bulb is attached, the weak connection collapses.
| Meter Reading | Visible Behavior | Hidden Diagnosis | Correct Test |
|---|---|---|---|
| 12V with no bulb | Fixture stays dark | Ghost voltage through corroded copper | Test voltage with bulb installed |
| Voltage drops to near zero under load | Bulb will not fire | Connection cannot carry amperage | Rebuild splice or connector |
| Voltage jumps when wire moves | Flicker or random outage | Loose or fractured copper path | Flex-test and inspect cable |
| Normal voltage at transformer but low at fixture | Dim output | Voltage drop or high resistance | Test each connector along the run |
On mobile, swipe the table horizontally to view all diagnostic columns.
The model number can reveal whether a Portfolio failure is more likely at the bulb, socket, connector, stake, lens, LED module, transformer terminal, photocell, or solar battery. When the number does not produce a normal product result, use the Portfolio Lighting Lost Models Archive to match the model family with the most likely failure point before troubleshooting blindly.
3. Thermal Foldback vs. Breaker Trips
Many homeowners think a transformer is either working or blown. In real systems, thermal behavior can be much subtler. Some modern transformers and LED drivers use thermal foldback: they reduce output when heat builds up instead of hard-tripping the breaker.
If your lights look dimmer on hot summer evenings but brighter in cool weather, the system may be protecting itself from heat. That problem is not always solved by larger wire. It may require better airflow, reduced load, shade, or moving the transformer away from direct sun.
Buzzing is one of the earliest warning signs that a low-voltage lighting system is under electrical stress. Our landscape lights buzzing troubleshooting guide explains how magnetic core saturation, loose terminals, voltage imbalance, startup surge, and transformer overheating create different buzzing sounds that can reveal hidden system problems before a total outage occurs.
| Symptom | Foldback or Breaker? | What Is Happening | Best Fix |
|---|---|---|---|
| Entire system dims gradually | Thermal foldback | Transformer or driver reduces output to protect itself | Improve airflow and reduce wattage |
| System shuts off suddenly | Breaker or overload trip | Protection circuit opens under load | Find short or overload |
| Works in winter, weak in summer | Heat stress | Ambient temperature pushes system over limit | Shade or relocate transformer |
| Transformer too hot to touch | Severe overload or poor ventilation | Heat is damaging components | Reduce load immediately |
On mobile, swipe the table horizontally to view all diagnostic columns.
4. Pierce-Point Clips: The Puncture Wounds in Your Main Cable
Cheap fixtures often come with vampire clips or pierce-point connectors. They are fast to install, but every one creates a permanent hole in the main cable insulation. Even if the light is removed later, the puncture remains.
Over time, water enters the tiny hole, oxidizes the copper, and reduces conductivity through the main run. A single connector can damage a cable section that feeds several fixtures downstream.
The repair-minded approach is to remove old pierce clips and rebuild connections with silicone-filled wire nuts, gel-filled connectors, or outdoor-rated low-voltage splice systems sized for the cable gauge.
Many hidden low-voltage failure points eventually escalate into a complete system outage where every landscape light suddenly shuts off together. The landscape lighting all-lights-out troubleshooting guide explains how thermal overload, cable damage, transformer shutdown, severe connector corrosion, and catastrophic branch shorts can disable an entire outdoor lighting system instantly.
| Pierce-Point Clue | What It Damaged | Why It Spreads | Repair Strategy |
|---|---|---|---|
| Small slit in insulation | Cable jacket | Water enters main cable | Cut out or seal puncture |
| Black copper near clip | Copper strands | Oxidation travels under jacket | Cut back to bright copper |
| Section after clip goes dark | Downstream conductor path | Clip severed or weakened strands | Rebuild feed connection |
| Removed fixture leaves old bite mark | Permanent insulation wound | Moisture can enter later | Do not leave unsealed |
On mobile, swipe the table horizontally to view all diagnostic columns.
5. Galvanic Corrosion at Stakes, Threads and Fixture Necks
Low-voltage lighting lives in wet soil, mulch, fertilizer, and mineral-heavy irrigation water. When two different metals touch in that environment, they can create a battery-like reaction. The softer or more reactive metal sacrifices itself and slowly crumbles.
This is why a brass light on an aluminum stake, or a metal fixture neck threaded into a different metal base, can seize, powder, or break after only a couple seasons.
| Metal Pair | Failure Risk | What You See | Prevention |
|---|---|---|---|
| Brass fixture on aluminum stake | High | White powder or frozen threads | Use dielectric grease on threads |
| Steel screw in aluminum body | Medium to high | Rust stain, stripped screw, seized head | Use compatible hardware |
| Pot-metal neck and metal stake | Medium | Cracking or thread galling | Hand-tighten and lubricate |
| Plastic stake with metal fixture | Low galvanic risk, high mechanical risk | Plastic neck snaps | Use stronger compatible stake |
On mobile, swipe the table horizontally to view all diagnostic columns.
6. The Ant Migration Failure Inside Transformers
This sounds like a joke until you open an outdoor transformer and see insects inside. Ants, spiders, and small pests are attracted to warmth, shelter, and sometimes the faint electromagnetic hum around transformer housings.
When pests crawl near contactors, terminals, timers, or circuit boards, their bodies and debris can create bridges between points that should remain separate. In the worst case, this causes a short, burning smell, tripped GFCI, failed timer, or transformer death.
Some installers use dry pest deterrents in the bottom of the transformer housing, such as a small enclosed mothball container or pest-repellent strip, placed away from terminals and wiring. Do not block ventilation, touch live parts, or place loose materials where they can contact electrical components.
| Pest Clue | Likely Location | Electrical Risk | Safe Response |
|---|---|---|---|
| Ant debris inside housing | Bottom of transformer | Contamination and bridging | Power off, clean, deter re-entry |
| Spiders behind timer | Control compartment | Moisture and web debris | Clean and inspect contacts |
| Burnt smell after rain | Board or terminal area | Wet debris conducting current | Disconnect and inspect |
| GFCI trips randomly | Line-voltage side or damp debris | Unsafe leakage path | Use electrician if line side is involved |
On mobile, swipe the table horizontally to view all diagnostic columns.
7. Voltage Bounce and Inrush Current: Why Bulbs Fail at Turn-On
Bulbs and LED drivers are often stressed hardest at startup. When a low-voltage system first turns on, inrush current can be several times higher than the normal running current for a brief moment.
If a transformer is set to a higher voltage tap to compensate for a long run, the startup surge may briefly push sensitive LED drivers beyond what they experience during steady operation. That can pre-age drivers every night at dusk.
Some apparent wiring failures only occur at the moment the lighting system turns on. Transformer magnetizing current, cold-filament surge, and overlapping LED-driver inrush can produce breaker trips, relay chatter, transformer noise, or momentary voltage collapse even when every fixture works normally after startup. The landscape lighting inrush-current and peak-load database provides a symptom-to-cause map for identifying these startup-specific failures.
| Startup Condition | Hidden Stress | Visible Result | Prevention |
|---|---|---|---|
| 15V tap on long run | Brief high startup voltage | LEDs fail early | Confirm actual fixture voltage under load |
| Transformer loaded near 100% | High inrush with no margin | Buzzing, trips, or flicker | Keep load near 80% |
| Mixed LED and halogen loads | Uneven startup behavior | Some fixtures flash or delay | Separate zones or balance load |
| Oversized voltage compensation | Overvoltage near transformer | Early bulb failure close to transformer | Use correct tap by measured voltage |
On mobile, swipe the table horizontally to view all diagnostic columns.
Failure Points Often Overlap
A low-voltage lighting failure rarely exists in isolation. One corroded connector can cause dim lights, flicker, voltage drop, transformer cycling, and fixture misdiagnosis at the same time. For confusing Portfolio-specific cases, the free Portfolio Lighting AI troubleshooting tool can help compare symptoms against likely causes. If the failure includes green dust, powdery copper, or recurring connector problems after rain, the green copper corrosion connector guide explains when cleaning is safe and when wire must be cut back. If repaired fixtures are brighter, re-aimed, or moved closer to a property line, the light trespass laws and foot-candle guide helps prevent the repair from creating glare or spill-light problems.
Wire insulation is one of the most overlooked failure points in older landscape lighting systems. As insulation deteriorates, electrical leakage, corrosion, and intermittent operation become more likely. Our Landscape Lighting Insulation Breakdown Guide explains what causes insulation to fail and how to inspect aging cable.
Knowing where a low-voltage system can fail is only half of the diagnosis. To match an actual symptom to the most likely cause, use the Landscape Lighting Failure Mode Database. It connects patterns such as one dead fixture, an entire branch going dark, failures after rain, repeated transformer shutdowns, dim end-of-run lights, flickering LEDs, and intermittent operation with the specific components and tests that deserve attention first.
Failure Points Become Inspection Problems Without Documentation
Low-voltage lighting failures often start as small defects—wet connectors, shallow cable, overloaded transformers, undocumented splices, or fixtures installed in the wrong exposure—but those same defects can later become inspection or warranty problems. Use the landscape lighting inspection failure database to identify which failure category applies, then compare the repair against the common landscape lighting code violations guide. If the repair is part of a permitted project, the as-built lighting diagram guide shows how to document hidden work, while the permit requirements by state page helps frame local approval expectations. For solar fixtures, the UL 8750 solar lighting performance guide adds the product-compliance layer.
One overlooked low-voltage lighting failure point is not electrical at all. Threaded collars, lens caps, and adjustable heads can seize after years of soil moisture and oxidation. When that happens, the fixture may be electrically repairable but mechanically impossible to service unless it is opened correctly. For a step-by-step extraction method, use the guide to opening stuck Portfolio landscape lighting fixtures before replacing an otherwise repairable light.
A loose or damaged threaded connection can create an electrical failure even when the thread itself does not carry current. A rotating fixture head can twist the internal wire, a leaning stake can pull on the buried connector, and a cross-threaded knuckle can break the wire where it passes through the hollow stem. The landscape lighting screw thread and mechanical-failure guide shows how to verify the connection before tightening it and how to recognize thread damage that is likely to become a wiring problem.
The Field Diagnostic Sequence for Hidden Failure Points
Use this sequence when basic troubleshooting does not explain the problem. It separates transformer failure, cable failure, connector failure, fixture failure, and environmental failure.
- Test transformer output with the cable disconnected. This separates transformer health from field wiring faults.
- Reconnect one zone or run at a time. The failing run will usually reveal overload, short, or high resistance.
- Load-test the first dark fixture. Do not trust open-circuit voltage alone.
- Inspect every pierce connector near the failure. Look for black copper, green dust, loose bite marks, or wet insulation.
- Check fixture wire entry points. Water entering from below can rot a socket inside a dry-looking fixture.
- Listen to the transformer. A hum that changes pitch when one run is connected often points to partial short or excessive load.
- Check seasonal pattern. Summer dimming suggests heat or foldback; spring failures suggest freeze/thaw and moisture movement.
Related Low Voltage Landscape Lighting Guides
- Landscape Lighting Transformer Guide
- How to Wire Landscape Lighting
- Landscape Lighting Voltage Drop
- Landscape Lighting Timer Setup
- Landscape Lighting Cable Guide
- Landscape Lighting Layout Design
- Landscape Lighting Troubleshooting
- Portfolio Transformer Sizing Guide
- Portfolio Transformer Wattage Guide
- Portfolio Low Voltage Timer Guide
- Low Voltage Landscape Lighting Zones
- Low Voltage System Diagram
- How to Replace a Landscape Lighting Transformer
- How to Fix Landscape Lights That Won't Turn On
- Landscape Lighting Voltage Drop Calculator
- Landscape Lighting Voltage Tap Calculator
- Low Voltage Plug and Limited Energy Connector Guide
FAQ: Low Voltage Landscape Lighting Failure Points
Why do low-voltage landscape lights fail after a few years?
Most failures come from moisture, corrosion, mechanical stress, overloaded transformers, poor connectors, voltage drop, pest intrusion, or thermal cycling. The bulb is often the last symptom, not the root cause.
Why does my multimeter show 12 volts but the landscape light stays off?
That is often ghost voltage. A digital meter can show voltage through a tiny corroded copper path, but the connection cannot carry enough current once the bulb or LED module is connected.
Can water travel inside landscape lighting wire?
Yes. Through capillary action, water can travel inside stranded copper under the insulation after a nicked cable, pierce connector, or failed splice lets moisture enter.
Why are my lights dimmer in summer than winter?
Some transformers and LED drivers reduce output when heat builds up. This thermal foldback behavior protects the equipment but makes the system appear weak or undersized.
Are pierce-point connectors bad for low-voltage lighting?
They are convenient, but every pierce connector creates a permanent hole in the cable jacket. Over time, that puncture can admit moisture and oxidize the main cable.
Why do stakes and threaded fixture parts corrode together?
Different metals in wet soil can create galvanic corrosion. The softer metal sacrifices itself, which can cause stakes to crumble or fixtures to seize onto threads.
Use and Safety Note
This page is an independent low-voltage landscape lighting guide. Low-voltage circuits are safer than line voltage, but transformers still connect to 120V power. Do not open line-voltage compartments, repair damaged power cords, or work inside energized transformer housings unless qualified. Use a licensed electrician for unsafe wiring, water intrusion, GFCI trips, damaged outlets, or hardwired systems.