
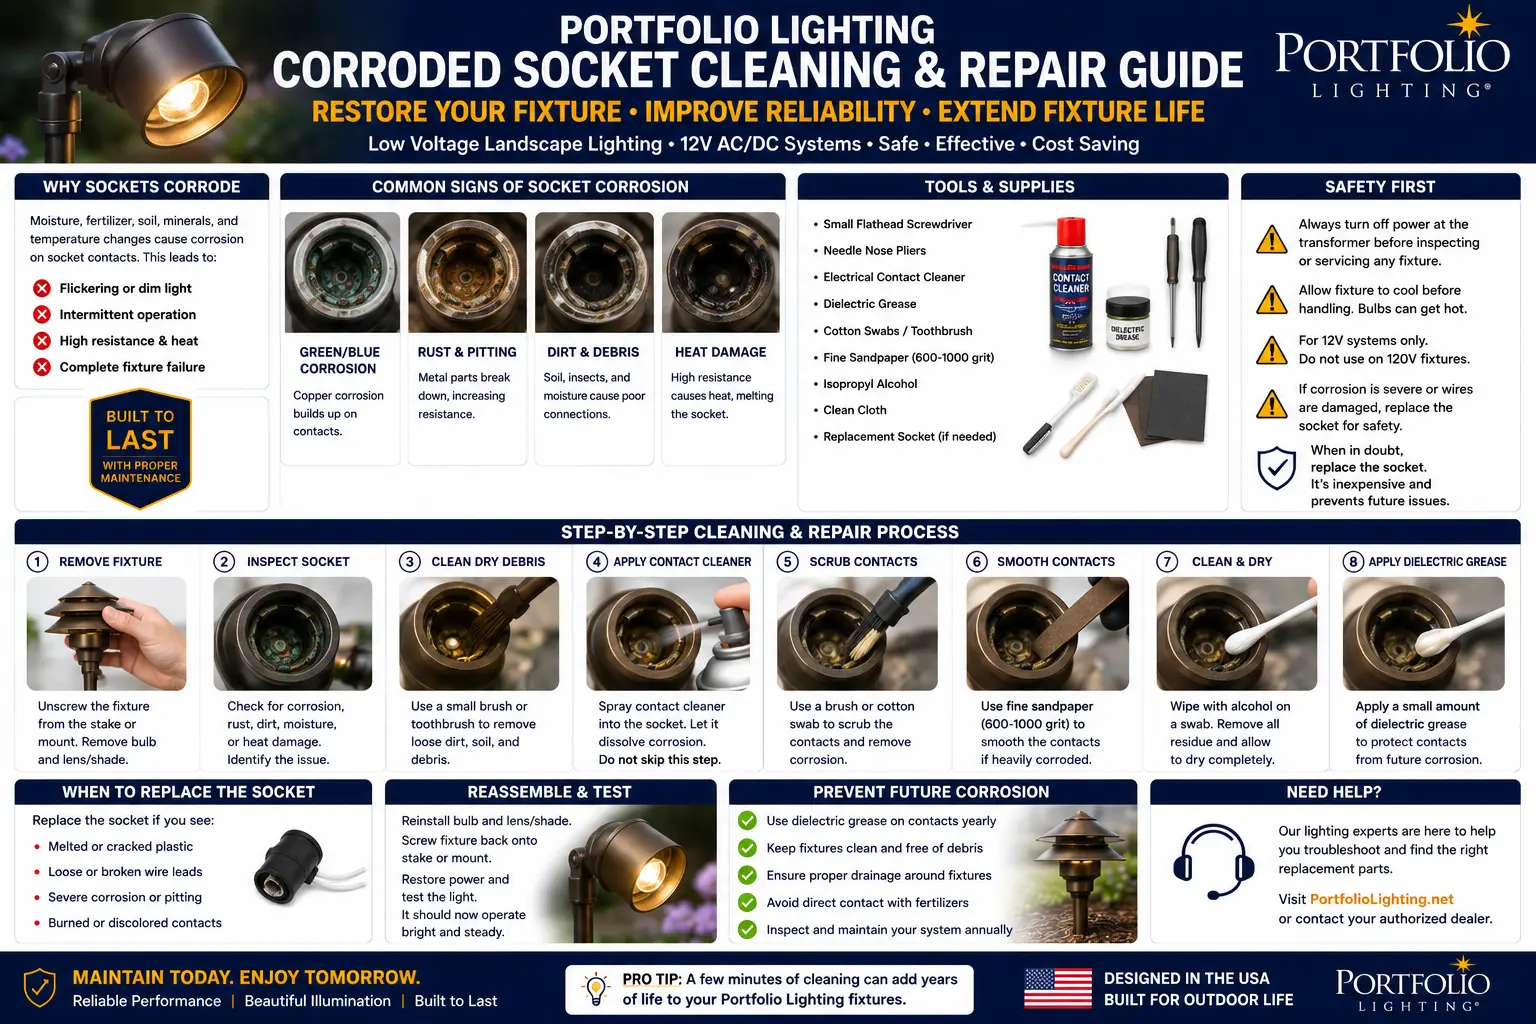
Three Corrosion Types: What the Color Tells You
The color and texture of deposits inside a landscape lighting socket are diagnostic information — each color represents a specific chemical reaction, which points to a specific cause, which determines the correct treatment. Treating all socket corrosion the same way produces inconsistent results because the underlying chemistry differs.
Green corrosion is copper carbonate, the same patina that forms on the Statue of Liberty. It forms when copper contacts react with moisture, oxygen, and carbon dioxide. In landscape lighting sockets, green deposits appear on the copper spring contacts inside the socket body — the flat metal strips that grip the bulb pins.
Why it matters:Copper carbonate is electrically non-conductive. A green-coated contact surface has dramatically higher resistance than a clean copper surface — causing voltage drop at the socket, flickering, dimming, or complete circuit failure. The green layer is moderately soft and responds to both mechanical cleaning and chemical treatments.
Sources in landscape lighting:- Moisture condensation inside the fixture body
- Water intrusion through cracked lens gasket
- Wicking from a wet wire splice upstream
- Normal outdoor exposure when the fixture seal has worn
White chalky deposits inside a landscape socket indicate aluminum corrosion. This happens when aluminum components from the fixture body — the reflector, the housing, the fixture neck — contact moisture in the socket area. Aluminum oxide is extremely hard and electrically non-conductive.
Why it matters:Aluminum oxide is harder than copper carbonate and more firmly adhered to the substrate. It requires more aggressive mechanical cleaning. Because aluminum forms a self-passivating oxide layer that re-forms almost immediately when exposed to air, even a freshly cleaned aluminum surface will begin re-oxidizing within hours. Dielectric grease application immediately after cleaning is especially critical for aluminum contact areas.
Sources in landscape lighting:- Aluminum fixture bodies corroding in contact with the socket
- Aluminum reflectors inside the fixture degrading over time
- Dissimilar metal galvanic corrosion between aluminum housing and copper socket contacts
Brown or rust-colored deposits indicate iron or steel components corroding. In landscape lighting, brown corrosion typically appears on steel mounting hardware (screws, spring clips, retaining rings) rather than on the copper socket contacts themselves. When rust from hardware migrates into the socket area, it deposits brown residue on the contact surfaces.
Why it matters:Rust has two problems beyond conductivity: it expands as it forms, which can mechanically deform socket components and seize bulb pins in the socket. A lamp that is stuck and cannot be removed from a rusted socket is a common result of prolonged brown corrosion. The fix for severe iron oxide seizure is penetrating oil (not dielectric grease) — penetrating oil is needed to break the mechanical bond before cleaning can begin.
Sources in landscape lighting:- Steel retaining clips in the socket rusting
- Steel mounting screws corroding and transferring rust to socket interior
- Galvanized or zinc-coated hardware degrading in mulch acids or fertilizer
The Wicking Mechanism: Why the Socket Corrodes When There's No Visible Water Intrusion
The most confusing socket corrosion scenario: you open a fixture, find heavy green and white deposits inside, but the fixture is dry and the lens and gasket appear intact. No obvious water pathway into the fixture body. Where did the moisture come from? The answer is almost always wicking — and it's the mechanism that causes repeated corrosion to return after cleaning.
How Wicking Works
Direct-burial landscape lighting wire is two-conductor cable with a plastic jacket and copper conductors inside. The copper conductor strands are not sealed inside the jacket — there is air space between the individual strands in each conductor. Wherever the cable is nicked, spliced, or connected to a fixture, moisture can enter this air space between the strands.
Once water enters the copper strand bundle at one point — most commonly at a pierce-point connector, a wire nut splice, or an unsealed cut end — capillary action draws that water along the air channels between the strands in both directions. The water wicks up the cable, inside the jacket, without any external indication. When the wicking reaches the inside of the fixture body, it enters the socket area from below or behind — completely bypassing the lens gasket and housing seal that you just inspected and found intact.
Per NightScenes Landscape Lighting's published troubleshooting documentation: "Also, a bad or sub-par connection will allow water into the wiring causing corrosion in the wire. This 'wicking' will wreak havoc by making it much harder for the electricity to travel to the fixtures." The professional landscape lighting diagnosis community universally identifies wicking as the leading cause of socket corrosion in otherwise well-sealed fixtures.
How to Detect Wicking
When you open a corroded fixture, inspect the wire insulation where it enters the fixture body. Indicators of active wicking:
- Dark or stained insulation at the entry point — the plastic jacket discolors slightly where moisture has been wicking through it
- Green deposits on the wire strands where the conductor is visible inside the fixture — not just on the socket contacts
- Soft, swollen-looking insulation near the socket entry — the jacket absorbs moisture over time and swells very slightly
- Corrosion that starts at the wire entry point and radiates outward to the socket contacts, rather than originating at the contacts themselves
If wicking is the moisture source and you clean the socket without fixing the wet splice, the moisture pathway remains active. The socket will re-corrode within weeks to months, not years. The correct repair sequence when wicking is present: (1) Find the upstream wet splice — typically within 3–6 feet of the fixture, at the nearest pierce-point or wire nut connection; (2) Replace that connection with a direct-burial-rated waterproof connector (UL 486D listed, silicone-filled); (3) Let the wire dry — leave the fixture open in warm conditions for 24 hours; (4) Clean the socket; (5) Apply dielectric grease; (6) Reassemble with a new gasket if the original is compressed or cracked. Fixing only the socket without fixing the splice replaces a $0.50 grease application job next month with a $15 socket replacement job next year. See the splice connection code requirements guide for the correct direct-burial connector types.
Socket Corrosion Symptoms vs Other Failure Causes
Socket corrosion is one of several causes of landscape light problems. Identifying it correctly before cleaning saves time — and rules out the other causes that socket cleaning won't fix.
Corrosion inside outdoor lighting fixtures is often a sign that moisture protection has failed. Before repairing a damaged socket, inspect the fixture’s sealing components. Our outdoor lighting gaskets, O-rings, and seals guide covers how protective seals help prevent water intrusion and extend fixture life.
| Symptom | Socket Corrosion? | Other Likely Causes | Quick Diagnostic Test |
|---|---|---|---|
| Light is completely dead — no output | Possible — severe corrosion can open the circuit | Dead lamp; failed LED driver; no voltage at fixture; bad wire splice | Measure voltage at fixture connection point with multimeter. If 0V, problem is upstream of socket. If 10–13V, inspect socket and lamp. |
| Light flickers or pulses | Likely — intermittent resistance from corrosion film | Voltage drop (low wire voltage); loose wire connection; failing LED driver | Check voltage at fixture — below 10.8V = voltage drop problem, not socket. If voltage is good, inspect socket contacts. See voltage drop guide. |
| Light is permanently dim (not flickering) | Possible — high resistance corrosion reducing current | Voltage drop; wrong lamp wattage; LED driver at end of life | Replace lamp first. Check voltage at fixture. If voltage is good and new lamp is still dim, check socket contacts for resistance-causing deposits. |
| New bulb works briefly then fails | Highly likely — corrosion layer contaminates new lamp pins | Wrong lamp voltage rating; fixture overheating; moisture killing LED driver | Open fixture, inspect socket. If deposits are visible on contacts, clean socket before installing the next lamp. |
| Lamp stuck and won't come out of socket | Yes — brown iron oxide seizure or copper carbonate buildup has fused the lamp base | Thermal bonding in halogen systems (rare in LED) | Apply penetrating oil (not dielectric grease) to the pin-to-socket interface. Wait 5 minutes. Extract with gentle rocking motion. Never force — you'll damage the socket body. |
| Burning smell from fixture | Possible but combined with other failure | Overloaded lamp; wrong wattage; wire insulation damage; arcing at corroded contacts | Do NOT clean — replace fixture. Burning smell indicates thermal damage that socket cleaning cannot address safely. |
Portfolio Socket Types: Understanding MR16, GU5.3, and G4
Before cleaning or replacing a socket, identify which socket type you have. Portfolio landscape lighting uses two primary socket types, and the replacement parts, cleaning approaches, and corrosion failure modes differ between them.
MR16 / GU5.3 Bi-Pin Socket — Standard Portfolio Path Lights and Spotlights
The vast majority of Portfolio landscape path lights, spotlights, and area lights use the MR16 / GU5.3 bi-pin socket. The GU5.3 designation refers to the base type: two pins spaced 5.3mm center-to-center. This socket accepts standard MR16 lamps — the 2-inch diameter reflector lamps used in virtually all consumer landscape lighting at every price point.
A GU5.3 bi-pin socket consists of: a ceramic or plastic body (the housing); two metal contact springs (typically phosphor bronze or brass) that grip the lamp's pins; and two lead wires connecting to the fixture's supply circuit. The contact springs are the most corrosion-susceptible component — they are under slight spring tension against the lamp pins, which means any corrosion on their surface directly increases contact resistance.
Replacement GU5.3/MR16 sockets are widely available from DiCUNO, DEMASLED, Bioluz LED, and others in packs of 5–10 for $6–15. The critical specification when buying: ceramic body, not plastic. See the ceramic vs plastic section below.
G4 Bi-Pin Socket — Smaller Portfolio Fixtures
Some smaller Portfolio fixtures and decorative fixtures use the G4 bi-pin socket — 4mm center-to-center pin spacing, accepting smaller T3 halogen or G4 LED lamps. The G4 socket is the same construction as GU5.3 but smaller and lower-current capacity. G4 sockets are also available as ceramic bi-pin replacements in the same multi-packs that include GU5.3 sockets — most landscape lighting replacement socket packs include both G4 and GU5.3 compatible sockets in the same body with adjustable pin hole spacing.
Identifying Your Socket Without the Fixture Label
If the fixture label is gone and you're unsure which socket type you have: measure the lamp pin spacing with a ruler or calipers. 5.3mm spacing = GU5.3 (MR16). 4.0mm spacing = G4. Alternatively: most Portfolio path lights and spotlights that take a 50mm (2-inch) diameter lamp use GU5.3. Most candle-style or very small accent fixtures use G4. If you have the original lamp, check its base designation printed on the lamp edge. The Portfolio bulb replacement guide and the Portfolio model number lookup can identify the correct socket type for specific Portfolio models.
Five-Step Socket Cleaning Procedure
This procedure works for all three corrosion types and all socket materials. The sequence is non-negotiable: mechanical abrasion first, then chemical treatment, then protective coating. Skipping step 1 produces results that last weeks; following all five steps produces results that last years.
Contact Cleaner vs DeoxIT: The Critical Difference Most Guides Don't Explain
Contact cleaner and DeoxIT are both sprayed from small cans onto electrical contacts. They look similar and are often mentioned together. They do completely different things — and using one where you need the other produces poor results.
Socket corrosion repairs often begin with a bigger challenge: getting the fixture open. If the collar is seized, forcing it with metal tools can damage the housing before the socket can be cleaned. The safest sequence is to loosen the exterior threads first, then inspect the gasket, socket, lamp base, and wire entry point. Use the stuck corroded Portfolio fixture guide before beginning socket cleaning on any older outdoor fixture.
What Aerosol Contact Cleaner Does (and Doesn't Do)
Aerosol electrical contact cleaner — CRC QD Electronic Cleaner, WD-40 Specialist Contact Cleaner, Akfix A60, and similar products — is a quick-evaporating solvent. It dissolves and removes: oil and grease; flux residue from soldering; dust and particulate contamination; condensed moisture. It leaves no residue when properly formulated. Per BobIsTheOilGuy community documentation: "I use CRC QED simply to flush out old crusty dielectric grease and everything it grabbed over the years, but this product does nothing for the oxidation on the conductive surfaces."
Contact cleaner does not dissolve or remove: copper carbonate (green corrosion); aluminum oxide (white deposits); iron oxide (rust). These are chemical compounds bonded to the metal surface — not soluble in typical contact cleaner solvents. If corrosion deposits are present, contact cleaner alone leaves the electrically resistive layer intact and the conductivity problem unresolved.
What DeoxIT D5 Does
DeoxIT D5 (CAIG DeoxIT) is a chemical contact enhancer that actively reacts with metal oxide layers and lifts them from the substrate. Per the product chemistry: it contains a reducing agent that converts metal oxides back toward a lower-oxidation-state form that is more conductive and easier to remove. Per the electrical repair community documentation cited above: DeoxIT "has removed astounding oxidation from conductive surfaces slathered with Dielectric grease their whole life." It is substantially more expensive than contact cleaner ($15–25 for a small bottle vs $5–10 for contact cleaner) but solves the corrosion removal problem that contact cleaner cannot address.
The Correct Sequence and When to Use Each
- Mild corrosion, first occurrence: Mechanical abrasion → contact cleaner → dielectric grease. DeoxIT optional.
- Moderate to heavy corrosion, or recurring corrosion: Mechanical abrasion → contact cleaner to remove debris → DeoxIT D5 to chemically lift residual oxidation → contact cleaner again to remove DeoxIT residue → dielectric grease.
- Stuck bulb with brown rust seizure: Penetrating oil (not dielectric grease, not contact cleaner) → wait 5 minutes → extract lamp → mechanical abrasion → contact cleaner → dielectric grease.
The WD-40 Debate for Socket Cleaning: WD-40 classic formula is oil-based and non-conductive — it works as a mild penetrating agent and moisture displacer but leaves an oily residue that attracts dust. Per electrical repair documentation: "WD-40 is oil-based and non-conductive and really not meant for that." WD-40 Specialist Electrical Contact Cleaner is a different product — a quick-evaporating residue-free formula that behaves like CRC QD and is acceptable for the contact cleaning step. The key distinction: the blue "WD-40 Specialist" product is acceptable; the original yellow-and-blue WD-40 classic is not ideal for socket contact cleaning because of its residue. For landscape lighting sockets, the correct tool for the spray step is any residue-free contact cleaner in the Specialist or QD product category.
A corroded socket is often repairable, especially on older Portfolio fixtures built with serviceable metal housings and replaceable wiring. The Portfolio Vintage Lighting guide explains how to evaluate the entire fixture—including wiring, finish, glass, and mounting hardware—before deciding whether a socket replacement is enough or a complete restoration is more appropriate.
Dielectric Grease: Exactly How Much, Where, and the Non-Conductive Paradox
Dielectric grease is electrically non-conductive — yet it is the standard product for protecting electrical contacts. This seems contradictory. Understanding why it works despite being non-conductive prevents the most common application mistakes that cause people to conclude "dielectric grease made it worse."
Why Non-Conductive Grease Protects Electrical Contacts
Dielectric grease protects contacts by excluding moisture and oxygen from the contact surface. Corrosion requires moisture plus oxygen. A contact coated with dielectric grease has neither — the grease forms a physical barrier that displaces both. When the lamp's pins are pushed into a greased socket, the pins penetrate the thin grease layer and make direct metal-to-metal contact at the center of each contact point. The grease is squeezed to the edges of the contact zone, where it seals the perimeter against moisture infiltration. The contact itself remains metal-to-metal. The grease is not in the electrical path — it is around it.
This mechanism only works correctly when the grease application is thin enough that the lamp pins fully penetrate through it and make metal-to-metal contact. If the grease layer is thick — if the pin holes are packed with grease — the pins cannot reach the metal contact springs underneath and the lamp cannot complete a circuit.
The Correct Application for Landscape Lighting Bi-Pin Sockets
- Use a cotton swab, toothpick, or small brush tip — not a direct squeeze from the tube
- Apply to the flat spring contact surfaces — not into the pin holes
- Wipe off any excess that enters the pin holes
- The correct amount: a film you can barely see under good light. If you can see a visible blob, you've applied too much.
- For bi-pin sockets with very small contact areas (G4), use even less — the smaller surface area means less grease is needed to provide full coverage
Ceramic vs Plastic Sockets: Why Material Matters and Which Is Correct
When replacing a landscape lighting socket, the body material is more important than the price. Most original Portfolio landscape fixtures use plastic-body sockets. Most quality replacement sockets use ceramic. This is not a cosmetic difference.
The Three Problems With Plastic Landscape Sockets
Portfolio and most consumer landscape lighting uses plastic (typically polycarbonate or nylon) socket bodies in their path lights and spotlights. These work adequately when new but develop three problems over time:
- UV degradation: Outdoor plastic exposed to sunlight becomes brittle over 3–7 years. A brittle plastic socket body cracks when the lamp is inserted or removed — which then admits water and accelerates corrosion of the contacts.
- Heat sensitivity: Plastic has limited thermal resistance. Higher-wattage halogen MR16 lamps operating at the rated maximum can soften the plastic socket body over years of use. Even LED lamps produce some heat at the driver, which gradually deforms plastic sockets in some configurations.
- Moisture wicking: Plastic socket bodies can absorb very small amounts of moisture over time (depending on the plastic formulation), which contributes to internal corrosion that would not occur in ceramic.
Why Ceramic Replacement Sockets Are the Correct Choice
Quality replacement GU5.3/MR16 bi-pin sockets use ceramic bodies. Ceramic is: completely UV-stable (no degradation after decades of outdoor exposure); heat-resistant to temperatures well above any LED or halogen lamp operating temperature; electrically insulating; and non-moisture-absorbing. The contact springs in quality ceramic sockets are typically phosphor bronze or brass with tinned or silver-plated surfaces — significantly more corrosion-resistant than the bare copper contacts in economy plastic sockets.
Per the product documentation for DiCUNO ceramic bi-pin sockets: "Ceramic base, mounting holes, thick silicone copper wires." The silicone wire insulation on replacement ceramic sockets is also important — standard PVC wire insulation becomes stiff and brittle at the elevated temperatures inside fixture bodies. Silicone insulation remains flexible through wide temperature ranges and is the correct wire type for sockets inside enclosed landscape fixtures.
Where to Buy and What to Specify
Ceramic GU5.3/MR16 bi-pin sockets are available on Amazon in packs of 5–20 from DiCUNO, DEMASLED, Bioluz LED, DKARDU, and Letaclanic for $6–15 per pack. When ordering, verify: ceramic body (not plastic); silicone-insulated lead wires; appropriate lead wire length for your fixture (typically 4–6 inches); stainless steel or tinned retaining clips (some socket packs specify stainless clips which are significantly more corrosion-resistant than zinc-coated steel clips). One pack of 10 ceramic sockets handles multiple fixture repairs and provides spares for future maintenance — the per-socket cost is $0.60–$1.50.
For Portfolio-brand replacement sockets, see the landscape lighting replacement parts guide and the Portfolio replacement parts guide for current availability. For the full corrosion context that goes beyond just socket repair, see the landscape lighting corrosion guide.
Socket Replacement: Step-by-Step Procedure
When cleaning is the wrong answer (see the decision guide below), or when you want to upgrade from a deteriorated plastic socket to ceramic, socket replacement is a straightforward repair. The total parts cost is under $2 per fixture and the procedure takes 10–15 minutes per fixture.
- Disconnect the transformer from the GFCI outlet. Never work on a fixture with the transformer plugged in.
- Open the fixture and remove the lamp. Remove the lens ring, extract the lamp, and set aside. Photograph the wire routing inside the fixture before disconnecting anything.
- Locate the socket connections. Inside the fixture body, trace the two socket lead wires from the socket to where they connect to the supply lead wires (the wires from the main cable). These connections are typically wire nuts, push-in connectors, or in some Portfolio fixtures, small push-in connector blocks.
- Disconnect the old socket. Unscrew or pull apart the connector(s) joining the old socket wires to the supply wires. Note which wire connects to which — in a 12V AC system polarity technically doesn't matter for the lamp to light, but consistent wiring is good practice.
- Check for wicking evidence. Before installing the new socket, inspect the supply wire insulation for darkening, softness, or green deposits. If wicking evidence is present, find and fix the upstream wet splice before sealing the fixture. Dry the wire for 24 hours if possible.
- Install the new ceramic socket. Route the new socket's lead wires through the same path as the old socket. Connect the new socket wires to the supply wires using the same connection method. Ensure connections are secure and no copper strand is exposed outside the connector.
- Apply a thin coat of dielectric grease to the new socket's contact springs before installing the lamp.
- Inspect the gasket before closing the fixture. Replace it if it is compressed, cracked, or stiff. A new gasket is the most important corrosion prevention step — it is what keeps moisture out of the fixture body.
- Reassemble, plug in, and test. The light should illuminate steadily at full brightness. If it flickers, check the new socket wire connections and verify the lamp is fully seated.
Repair vs Replace Decision Guide
Per Custom Lighting of America's published service guidance: "If they're quality components like brass and copper, they can be repaired. If your fixtures are low-quality plastic, composite or aluminum and aging, they're probably not worth repairing." Apply this framework to socket-specific decisions.
A corroded socket does not always mean the fixture has reached the end of its service life. Whether repair is practical depends on the overall fixture design, the condition of the housing, lens, wiring, mounting hardware, and weather seals. The Portfolio Lighting Fixtures guide explains how to evaluate the complete fixture before deciding whether to replace only the socket or the entire light.
Prevention After Repair: What Actually Stops Corrosion from Returning
The most effective corrosion prevention work happens at reassembly, not at the next service call. These steps — all done at fixture closing — determine whether the next corrosion event is in two years or two months.
The Gasket: The Single Most Important Corrosion Prevention Component
The lens ring gasket is what keeps moisture out of the fixture body. It is a simple rubber or silicone O-ring or flat gasket that compresses between the lens ring and the fixture body when tightened. When a gasket compresses permanently (cold-flow deformation over years of compression), it no longer seals — it allows moisture to enter the fixture body on every rain event, creating the perfect conditions for socket corrosion.
Gasket replacement is cheap ($0.50–$2 per fixture from landscape lighting suppliers), takes 30 seconds, and is the most effective single step for preventing socket corrosion recurrence. Always replace gaskets when opening a fixture for any reason. Custom Lighting of America's service documentation specifically identifies broken seals and inadequate gaskets as the primary moisture entry pathway for socket corrosion.
Voltage Drop and Its Corrosion Connection
A landscape system running at the correct 12V develops minimal heat at the socket connections. A system with significant voltage drop — fixtures receiving 10.5–11V — has the LED drivers working harder to maintain output, generating more heat at the driver connections. More heat means more thermal cycling, which expands and contracts the socket contacts, which eventually fatigues the protective oxide layer and dielectric grease film and makes the contacts more susceptible to corrosion. Keeping voltage in the correct 11.5–12.5V range at each fixture reduces thermal stress on socket components and slows corrosion initiation. Use the voltage drop calculator to verify all fixture voltages and the voltage drop guide for correction approaches.
Annual Maintenance Schedule for Socket Longevity
Per the landscape lighting maintenance guide, a brief annual inspection extends socket life significantly:
- Spring (after winter): Open two or three representative fixtures and inspect for corrosion. If any green deposits are visible, clean all fixtures proactively — don't wait for flickering symptoms.
- Check all wire connectors for water entry once per year. Pierce-point connectors in particular should be inspected — any that show green deposits on the exposed wire at the connector should be replaced with waterproof direct-burial connectors.
- Verify lamp seating — a lamp that has worked slightly loose from the socket (from ground vibration, lawn maintenance, or thermal cycling) has reduced contact pressure, which accelerates corrosion at the contact interface. Ensure each lamp is fully seated before closing the fixture.
Corrosion is not limited to landscape lighting sockets. Holiday light plugs, bulb sockets, inline connectors and controller contacts can also develop oxidation after outdoor exposure or damp storage. That corrosion increases resistance and often shows up as dim LEDs, flickering sections or random strand failure. This flickering LED Christmas light repair guide explains how to inspect and diagnose seasonal lighting contacts before replacing the entire strand.
Corroded Socket Cleaning & Repair FAQ
My landscape light flickers even after I cleaned the socket. Why?
Four causes in order of likelihood after socket cleaning: (1) Low voltage at the fixture — if the circuit has voltage drop pushing the fixture below 10.8V, the LED driver cannot maintain stable output and flickers regardless of socket condition. Use a multimeter to check voltage at the fixture connection. If it's below 11V, the problem is voltage drop, not the socket. See the voltage drop calculator and Portfolio lights too dim guide. (2) Too much dielectric grease in the pin holes — if you applied grease into the pin holes themselves, the lamp pins cannot make full metal-to-metal contact. Remove the lamp, wipe out excess grease with a cotton swab, reinstall. (3) Loose wire connection inside the fixture body — the wires connecting the socket to the supply cable have a loose or partially corroded connection that the socket cleaning didn't address. (4) Failing LED driver in the lamp — the lamp itself is dying. Replace the lamp with a new one and test.
Can I use WD-40 to clean a corroded landscape lighting socket?
The original yellow-and-blue WD-40 classic formula is not ideal for socket contact cleaning because it leaves an oil-based residue that attracts dust and is not specifically formulated for electrical contacts. It will work as a temporary penetrating agent to free a stuck lamp, but it's not the correct tool for the cleaning step. WD-40 Specialist Electrical Contact Cleaner (a different product in the same brand family, usually in a blue-and-white can) is a residue-free contact cleaner that is acceptable for the cleaning spray step. If you only have classic WD-40 available, use it to free a stuck lamp only, then follow with a proper residue-free contact cleaner. For the mechanical abrasion step — which is the most important step — no spray product helps; you need a brass brush or sandpaper.
Where can I buy a replacement socket for a Portfolio landscape light?
Portfolio-branded replacement sockets are not widely available as standalone parts. The standard GU5.3/MR16 bi-pin socket used in Portfolio path lights and spotlights is an industry-standard part available from multiple third-party suppliers. Search Amazon for "ceramic GU5.3 MR16 socket" — packs of 5–20 ceramic bi-pin sockets from DiCUNO, DEMASLED, Bioluz LED, or DKARDU cost $6–15 and are fully compatible with Portfolio fixtures. Verify "ceramic base" in the product description. For other Portfolio parts, see the replacement parts guide and the Portfolio replacement parts guide. For specific Portfolio model compatibility, the Portfolio compatibility guide and model number lookup can confirm the socket type for your specific fixture.
How do I prevent the socket from corroding again after cleaning?
Three steps at reassembly, in order of importance: (1) Replace the lens gasket — a new gasket is the primary barrier between outdoor moisture and the socket interior. Even a visually acceptable gasket that has been compressed for years no longer seals well. Budget $1–2 for a new gasket each time you open a fixture. (2) Apply a correct amount of dielectric grease to the contact springs — thin film, not packed in the pin holes. (3) Fix any upstream wicking source — inspect the nearest wire splice or connector within 6 feet of the fixture. If that splice shows any corrosion or moisture entry, replace it with a waterproof direct-burial connector before closing the fixture. Address all three together and the socket will stay clean for 2–5 years. Address only one or two and re-corrosion returns much faster.
Related Repair, Troubleshooting, and Parts Guides
- Landscape Lighting Corrosion Guide
- Landscape Lighting Troubleshooting
- Portfolio Landscape Troubleshooting
- Portfolio Landscape Lights Not Working
- Landscape Lighting Maintenance Guide
- Portfolio Bulb Replacement Guide
- Portfolio MR16 LED Replacement Bulbs
- Landscape Lighting Replacement Parts
- Portfolio Replacement Parts
- Portfolio Compatibility Guide
- Portfolio Model Number Lookup
- Splice Connection Code Requirements
- Low-Voltage Wire Connectors
- Landscape Lighting Connectors
- Voltage Drop Guide
- Voltage Drop Calculator
- Portfolio Lights Too Dim Guide
- Lights Work Sometimes Guide
- One Zone Not Working Guide
- Broken Stake Repair Guide
- Portfolio Replacement Fixtures
- Best Portfolio Replacements