
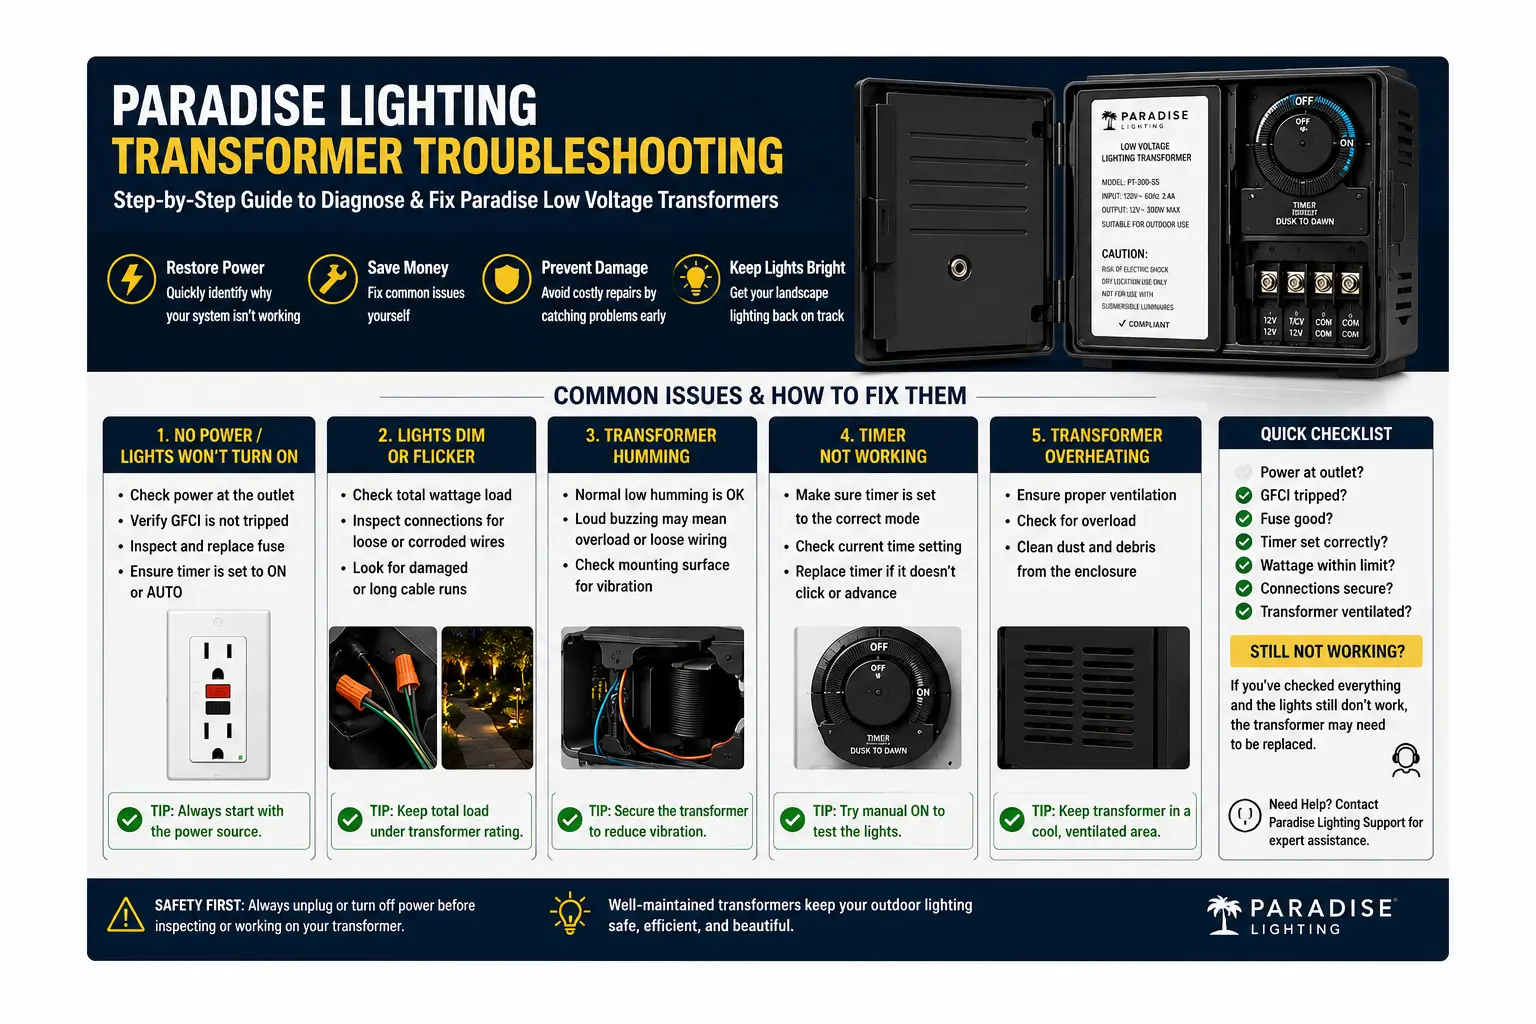
Paradise Transformer Models: Specs, Brand History, and Compatibility
Paradise Garden Lighting transformers have been sold under multiple brand names across a corporate ownership chain. Southwire previously owned the brand. In February 2021, Southwire divested the Moonrays intellectual property (a sister brand) to Fusion Products LTD, headquartered in Cambridge, Ontario. Paradise transformers appear on Amazon and in retail as both "Paradise" and "Sterno Home" — these are the same product line with the same model numbers and the same official manual (ManualsLib document 1296511 for the GL33120).
| Model | Capacity | Output | All 5 Modes | Photocell | Sunwise | Install |
|---|---|---|---|---|---|---|
| GL33050 | 50W | 12V AC | Yes | AUTO mode only | Yes — 3 zones | Indoor or outdoor |
| GL33120 | 120W | 12V AC | Yes | AUTO mode only | Yes — 3 zones | Indoor or outdoor |
| GL33300 | 300W | 12V AC | Yes | AUTO mode only | Yes — 3 zones | Indoor or outdoor |
| GL33600 | 600W | 12V AC | Yes | AUTO mode only | Yes — 3 zones | Outdoor recommended |
All Paradise transformer models output 12V AC — the universal standard for consumer low-voltage landscape lighting. This means Paradise transformers are fully compatible with Portfolio, Malibu, Hampton Bay, Moonrays, and virtually all consumer 12V landscape fixtures. The wire connection format uses a screw-terminal block inside the front panel. For full cross-brand compatibility details, see the brand connector compatibility guide. For how Paradise compares to other brands in the consumer and mid-tier market, see the low-voltage landscape lighting brand comparison.
The 5 Paradise Operating Modes — What Each One Does and When to Use It
Every Paradise transformer problem starts with identifying the current mode on the LCD display. A transformer in OFF mode looks identical to a failed transformer until you check the screen. These five modes govern all transformer operation.
The LOAD Icon: What Every Display State Means
The Paradise LCD display includes a five-segment LOAD bar that shows real-time power consumption as a percentage of the transformer's rated capacity. It is the most important diagnostic indicator on the unit — and the one most homeowners ignore until a problem occurs.
| LOAD Icon State | What It Indicates | Correct Response |
|---|---|---|
| 0% — empty | No load detected. Mode may be OFF, no fixtures connected, or wire connections are not making contact at terminals. | Check mode setting. Open front panel and verify wire connections are clamped securely under terminal screws. |
| Less than 20% | Normal — low load, well within capacity. Healthy for the transformer. | No action. Adequate headroom for additional fixtures if desired. |
| 20%–99% | Normal operating range. Optimal operation is 60–80% of capacity. | No action. System operating as designed. |
| Flashing / blinking | OVERLOAD — total fixture wattage exceeds 100% of rated capacity. Transformer is stressed and at risk of thermal shutdown. | Disconnect fixture runs from terminals one at a time until LOAD stops flashing. Use the transformer sizing guide to verify correct sizing. Keep load at or below 80% of rated capacity. |
| Auto-shutdown (all dark) | CRITICAL OVERLOAD — load exceeded 120% of rated capacity and the internal protection circuit shut the transformer down. | Unplug transformer. Wait 5 minutes. Reconnect with significantly reduced fixture load. If transformer shuts down immediately with no fixtures connected, a short circuit in the wire runs is likely — see step 3 of the diagnostic sequence below. |
Sunwise Astronomical Timer: Complete Setup and Fix Guide
Sunwise is the feature that makes Paradise transformers genuinely distinctive in the consumer landscape lighting market. It is also the feature that generates the most setup errors. This section covers exactly how Sunwise works, the three geographic zones, the mandatory two-step setup sequence, and every documented failure mode.
How Sunwise Calculates Dusk and Dawn
Sunwise uses a three-zone geographic classification of the continental United States combined with the current date and time to mathematically estimate local sunset and sunrise. No photocell is needed because the transformer is not reading sky light — it is computing when sky light should end based on your latitude band and the time of year. As the seasons progress, the calculated dusk time automatically shifts: later in summer, earlier in winter. A landscape lighting system set to Sunwise mode in March will automatically turn on later at night by June with no user intervention.
The Three Sunwise Geographic Zones
The Mandatory Two-Step Sunwise Setup Sequence
Both steps must be completed before Sunwise will operate correctly. The official manual states explicitly: "This step is needed for the lighting modes Auto, Timer and Sunwise to work properly or else they won't open/close at the right time."
Step 1 — Set current time and date:
Press MODE and ENTER at the same time. The display will enter time/date setting mode. Use the UP and DOWN arrows to select values. Press ENTER to confirm each value. Set date first, then time. Without this step, Sunwise cannot calculate the correct dusk time for your location and date.
Step 2 — Set Sunwise geographic zone:
Press MODE and UP at the same time. Select NORTH, CENTRAL, or SOUTH based on your location. Press ENTER to confirm. This setting persists after power loss — you do not need to reset it unless you move the transformer to a different geographic location.
Step 3 — Select SUNWISE mode: Press MODE alone to cycle through modes until SUNWISE appears on the display.
Step 4 — Set end time: Choose between DAWN (automatic, recommended) and a fixed end time. To select DAWN, scroll UP/DOWN during end-time selection until the DAWN icon (sunrise symbol) appears on the display, then press ENTER. DAWN end time adjusts automatically with the seasons — the lights turn off later in summer and earlier in winter.
Common Sunwise Failures and Their Causes
| Symptom | Cause (From Official Manual) | Fix |
|---|---|---|
| Sunwise set but nothing happened | Mode was programmed after today's dusk. "Timer and Sunwise mode only open up at their exact start time setting (Start for timer and dusk for Sunwise)." | Switch to ON mode to verify the system works. Wait until tomorrow's dusk, or reset the clock to a slightly earlier time temporarily. |
| Significant delay vs actual local dusk | Wrong geographic zone selected. "Make sure that you selected the right zone." | Access zone setting (MODE + UP) and try the next zone south. Repeat if needed. |
| Sunwise not optimal at all | Extreme latitude. "If you live far to the north, or far to the south, Sunwise may not be optimal." | Use TIMER mode with manually set times, adjusting seasonally. Or use AUTO mode with correctly positioned photocell. |
| Lights stay on past dawn | DAWN end time not selected — fixed end time was set instead. | Re-enter end time setting, scroll until DAWN icon appears, press ENTER to select it. |
| Sunwise stopped working after power outage | Current time and date were lost. Sunwise cannot calculate dusk without correct date. | Re-enter time and date (MODE + ENTER), then verify SUNWISE is still the selected mode. |
Every "my Paradise transformer stopped working in Sunwise mode" case I have investigated resolved at one of two points: either the mode was set after that day's dusk had already passed (lights come on the next evening and the homeowner thinks the transformer mysteriously fixed itself overnight), or the time and date were never set before Sunwise was selected. The official manual is explicit about both issues but neither is mentioned in any consumer-facing FAQ or retailer support documentation. The fastest diagnostic: switch to ON mode. If lights come on immediately, Sunwise was a configuration issue, not a hardware failure.
Complete Paradise Transformer Troubleshooting — 7 Steps in Order
Work through these steps in sequence. Skipping to a later step wastes time — approximately 70% of reported Paradise transformer failures resolve at steps 1 through 3.
Complete Button Combination Reference — GL33120 and GL33300
Sourced directly from Paradise Datacom GL33120 and GL33300 official instruction manuals (ManualsLib documents 1296511 and GL33300). These are the exact button sequences — no third-party interpretation.
| What You Want to Do | Button Combination | Notes |
|---|---|---|
| Set current time and date | MODE + ENTER simultaneously | Mandatory for TIMER, AUTO, and SUNWISE to work correctly. Use UP/DOWN to change values, ENTER to confirm each. |
| Set Sunwise geographic zone | MODE + UP simultaneously | Select NORTH, CENTRAL, or SOUTH. Required for Sunwise accuracy. Persists after power loss. |
| Cycle through operating modes | MODE alone | Cycles: ON → OFF → TIMER → AUTO → SUNWISE → ON. Hold in ON mode for immediate test. |
| Exit any setting without saving | MODE alone during setting screen | Press MODE to exit any MODE settings screen without saving changes made during that session. |
| Navigate and confirm settings | UP / DOWN to navigate, ENTER to confirm | Standard navigation for all programming screens including mode setup and timer times. |
| Select DAWN as end time | During end-time selection: scroll UP/DOWN until DAWN icon appears, then ENTER | DAWN icon is a sunrise symbol. Selecting it makes the end time season-adjusted automatically. |
| Set TIMER start time | After entering TIMER mode: UP/DOWN to set hours, ENTER to confirm, repeat for minutes | Start time is the ON time. Set separately from end time. Timer fires at this exact time — if missed today, activates tomorrow. |
When to Replace Your Paradise Transformer
A Paradise transformer that reads 0V output in ON mode with a verified working GFCI outlet has failed internally and is not serviceable. Paradise transformers have no user-accessible internal components or fuses that can be replaced at home.
Any standard 12V AC landscape lighting transformer is a compatible replacement. Your existing wire runs and fixtures connect without modification — only the terminal wire connections need to be transferred. If you valued the Sunwise astronomical timer feature, the Hampton Bay Hubspace 200W smart transformer provides a comparable astronomical timer function with additional WiFi and app control. For standard dusk-to-dawn operation without smart features, the Hampton Bay SL-120-12A (120W) or SL-200-12A (200W) are the most widely available current-production equivalents. For complete replacement guidance see the Hampton Bay transformer replacement guide and the transformer replacement guide.
For selecting a replacement based on your system's total wattage, see the transformer sizing guide. For understanding what other brands are available at similar and higher price points, see the brand comparison guide.
Paradise Transformer Troubleshooting FAQ
Why won't my Paradise GL33120 turn on after I set Sunwise mode?
Sunwise mode only activates at the calculated local dusk time for your geographic zone. If today's dusk has already passed when you finish programming, the system will not activate until the following evening's dusk — this is documented behavior, not a malfunction. Switch to ON mode to immediately verify the transformer and fixtures are working. If they are, return to Sunwise and wait until tomorrow evening. Also verify the current time and date are correctly set using the MODE+ENTER button combination.
What does the flashing LOAD icon mean on my Paradise transformer?
A flashing LOAD icon means the total wattage of connected fixtures exceeds 100% of the transformer's rated capacity. The GL33120 shuts down automatically at 120% overload. Disconnect fixture runs from the terminal block one at a time until the LOAD icon stops flashing. Keep total connected wattage at or below 80% of rated capacity — 96W maximum for the GL33120, 240W for the GL33300. See the transformer size calculator.
Can I use a Paradise transformer without the photocell?
Yes — Sunwise mode operates entirely without a photocell. It uses your geographic zone setting (NORTH/CENTRAL/SOUTH) and the current date to calculate dusk and dawn. You can install a Paradise transformer in a garage, basement, or behind dense landscaping in Sunwise mode and it will operate on the correct schedule. Only AUTO mode requires the photocell. ON, OFF, and TIMER modes also require no photocell.
My Paradise transformer worked fine and suddenly went completely dark — what happened?
Four most common causes in order of frequency: (1) mode accidentally changed to OFF — check the LCD display first; (2) GFCI outlet tripped from a ground fault in landscape wiring — reset the GFCI outlet; (3) overload protection activated from a wiring short or new fixture added that pushed load over 120% — check LOAD icon; (4) power outage caused Sunwise mode to lose its time/date setting and the mode defaulted incorrectly. Switch to ON mode as the first diagnostic step.
Are Paradise transformers compatible with Portfolio, Malibu, and Hampton Bay fixtures?
Yes. All Paradise GL-series transformers output 12V AC, which is the universal standard for consumer low-voltage landscape fixtures. Portfolio, Malibu, Hampton Bay, Moonrays, and generic consumer 12V fixtures are all compatible. The screw terminal connection at the Paradise transformer accepts standard 14AWG and 12AWG landscape wire used by all consumer brands. See the connector compatibility guide for details on cross-brand connections.
Related Guides: Alternatives, Transformers, and Troubleshooting
- Paradise Lighting Replacement Parts
- Low-Voltage Brand Comparison
- Hampton Bay Transformer Guide
- Malibu 8100 Transformer Guide
- Portfolio Transformer Alternatives
- How to Replace a Transformer
- How to Test a Transformer
- Transformer Sizing Guide
- Transformer Size Calculator
- GFCI Keeps Tripping
- Voltage Drop Guide
- Landscape Lighting Connectors
- Brand Connector Compatibility
- Lights Work Sometimes
- Landscape Lights Not Working
- Portfolio Troubleshooting Hub
- Minimizing Voltage Drop Waste
- Discontinued Parts Guide
- FX Luminaire vs Portfolio
- All Portfolio Alternatives
- Moonrays Replacement Parts
- Malibu Lighting Parts
- Best Portfolio Replacements
- Landscape Lighting Cost Guide