
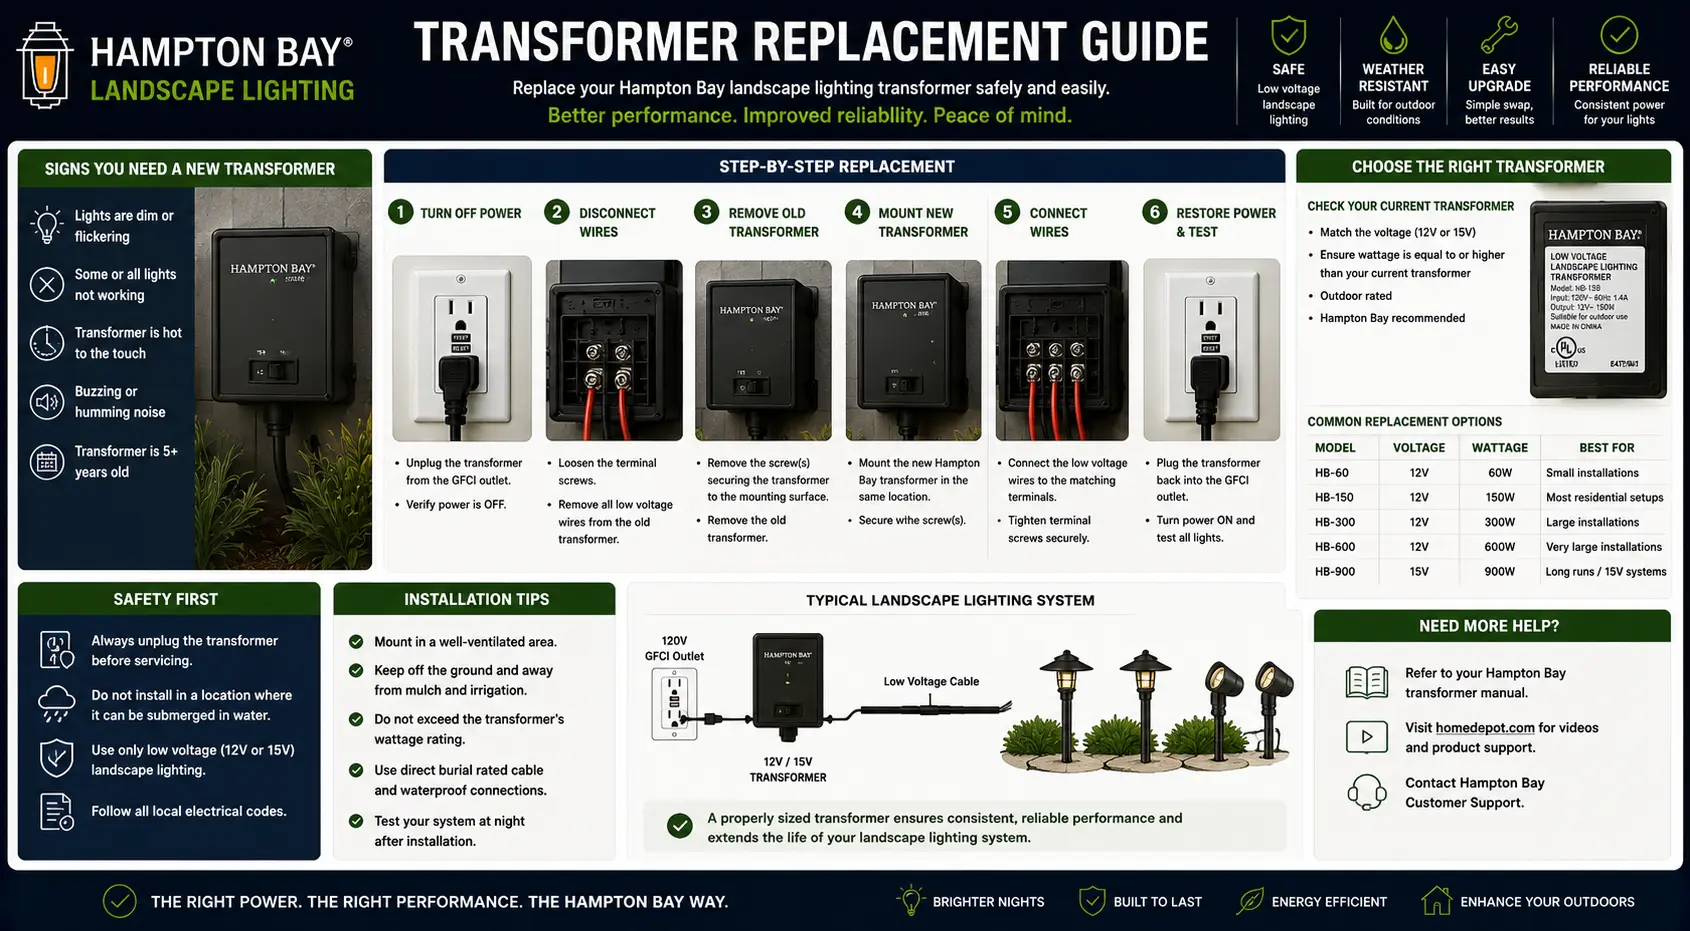
Quick Answer: Sourcing the Right Hampton Bay Landscape Transformer Model
Matching a Hampton Bay transformer to your yard layout requires decoding their specific digital and wireless families rather than just shopping by box price. While their entire current lineup delivers a standard 12V AC secondary circuit that works beautifully with all standard low-voltage yard lights, the internal circuit breakers and programming logic blocks differ dramatically between their manual digital units and smart automation systems.
Whenever I audit a layout or help a homeowner select a replacement power pack, I use these seven core model specifications to ensure the new unit integrates perfectly without throwing early fault codes:
- 1. The SL-Series Digital Baseline: These classic, hard-wired units feature built-in push-button programming and simple digital displays, making them my top choice for basic, set-it-and-forget-it lighting runs.
- 2. The Hubspace WiFi Smart Architecture: Designed for modern automation loops, these units connect directly to local wireless networks, allowing you to split schedules and dim zones via phone apps without physical timer pins.
- 3. The 12V AC Output Standard: Both product lines output standard alternating current, which prevents polarity issues when wiring up mixed arrays of halogen or retrofit LED bulbs down the line.
- 4. Hidden Model Tracking Stamps: If your unit's outer retail packaging is gone, I always flip the heavy housing box over or check the direct underside of the casing to find the permanent model code sticker.
- 5. Circuit Breaker Reset Mechanisms: Digital models use internal auto-shutoff chips, while heavier smart units utilize dedicated manual reset toggles to guard the core transformer from high-resistance line drops.
- 6. Multi-Tap Terminal Limitations: Unlike commercial steel boxes, standard residential Hampton Bay units feature single-channel terminal lugs, meaning you must manage your line balance before stripping your main cables.
- 7. The 80% Core Balancing Rule: No matter which line you choose—whether it's a 45W, 120W, 200W, or 300W model—I never load the terminal lugs past 80% of their maximum capacity to stop heat build-up inside the housing.
⚠️ CRITICAL COMPATIBILITY RISK: Buying a low-wattage transformer and installing it onto an unverified legacy line run filled with high-draw bulbs will cause immediate terminal overheating. Overloading these specific digital boards triggers three permanent component failures detailed in our hardware directory below.
I’ve caught folks trying to guess their system totals by just matching the size of their old box, only to end up with a smart transformer that constantly drops offline or trips its safety loops. In practice, taking a second to locate that printed model sticker and auditing your total yard wattage beforehand is what keeps your installation running cleanly for years.
Every Hampton Bay Landscape Transformer Model — Specs and Status
Hampton Bay produces transformers under two distinct product lines — the SL-series standard digital transformers and the Hubspace WiFi smart transformer. Both lines use 12V AC output and are compatible with all standard low-voltage landscape fixtures. The model number is printed on a label on the back or bottom of the transformer housing.
| Model | Wattage | Safe Max (80%) | Dual Tap (12V/15V) | CR2032 Battery | Smart / WiFi | Status |
|---|---|---|---|---|---|---|
| SL-120-12A | 120W | 96W | Yes | No (post-2022) | No | Current |
| SL-200-12A | 200W | 160W | Yes | No (post-2022) | No | Current |
| SL-300-12A | 300W | 240W | Yes | No (post-2022) | No | Current |
| Hubspace 200W | 200W | 160W | 12V DC only | N/A | Yes (Hubspace) | Current |
| DIY-300PS | 300W | 240W | 12V only | Yes | No | Discontinued |
| 8201081015 (221-566) | 300W | 240W | 12V only | Some units | No | Older — E1 prone |
E1 Error Code: What It Means and How to Fix It
The E1 error code appears on Hampton Bay 300W digital transformers — most commonly on the model 8201081015 (also sold as Hampton Bay 221-566). It is the single most-searched Hampton Bay transformer problem and the most frequently misdiagnosed one. Here is the complete diagnosis and resolution sequence.
What E1 Means
E1 on a Hampton Bay landscape transformer indicates a photocell sensor fault. The transformer's control circuit is detecting that the photocell — the dusk-to-dawn light sensor — is returning an invalid, out-of-range, or fluctuating signal. The transformer cannot determine whether it is day or night and displays E1 as a safety state. The characteristic behavior is: system enters E1 → you cycle through menu options and reset to Auto-photocell mode → system operates normally for one to two days → E1 returns. This cycle confirms the photocell is failing rather than fully failed, which is why the reset works temporarily.
E1 Diagnosis Sequence — Exact Steps
The E1 error on the Hampton Bay 8201081015 is documented extensively in Home Depot product reviews and on electrical troubleshooting forums. The consistent pattern is: E1 appears after 2 to 3 years of service, temporarily resolves with reset, and recurs with increasing frequency until the photocell is replaced. In approximately 80% of cases the photocell replacement permanently resolves E1. In the remaining 20% the control board input circuit has failed alongside the photocell and transformer replacement is required. The test that distinguishes these two cases: install a replacement photocell and allow the system to run for 7 days. If E1 does not return, the photocell was the sole cause. If E1 returns within 7 days with the new photocell installed, the transformer needs replacement.
The Post-2022 CR2032 Battery Removal: Why Your Timer Resets After Every Power Outage
This is the most widespread undocumented Hampton Bay transformer problem — affecting every SL-series transformer manufactured after 2022. Home Depot product reviews document this extensively, including from professional landscape lighting installers who had to return units when they discovered the change.
What Changed and Why
Earlier Hampton Bay SL-series transformers (pre-2022) included a CR2032 coin cell battery on the digital logic board. This battery maintained the real-time clock and timer programming for weeks even when the transformer was completely unplugged. A power outage had no effect on the schedule — the transformer woke up after restoration and resumed normal operation with its programmed times intact.
Post-2022 units ship with an empty CR2032 battery slot on the same logic board. The battery holder is physically present but the battery is absent. This change was driven by regulatory requirements related to battery safety disclosure rules. Without the battery, the transformer loses all timer programming and clock settings the moment power is interrupted — even for a fraction of a second during a momentary grid fluctuation. The clock resets to 12:00 AM and all on/off schedules are cleared.
How to Identify Whether Your Unit Is Affected
Check the manufacture date on the label on the back or bottom of the transformer. Units manufactured after approximately mid-2022 are affected. If your unit resets after every power outage — even brief ones — it is a post-2022 unit without the battery. You can also open the transformer housing (unplugged) and look for the CR2032 holder on the logic board. An empty holder with no battery confirms the post-2022 configuration.
The Workaround: External Timer on the Outlet
The reliable solution is a mechanical or digital outlet timer installed between the wall outlet and the transformer's power plug. The outlet timer maintains the on/off schedule independently of the transformer's internal clock. Program the outlet timer to cut power to the transformer at your desired off time and restore it at your desired on time. The transformer's photocell handles the fine-tuned dusk detection within the window provided by the outlet timer. This combination fully restores the scheduling reliability of pre-2022 units at the cost of approximately $15 for a mechanical outlet timer.
Full Hampton Bay Transformer Troubleshooting Sequence
Hampton Bay transformer problems fall into four categories: the transformer produces no output voltage, the transformer activates and shuts off after 30 to 90 minutes, the timer or photocell does not operate correctly, or specific zones are not working while others function normally. Each category has a specific diagnostic sequence.
Category 1 — No Output Voltage (All Lights Dark)
Before diagnosing the transformer, press the reset button on the GFCI outlet the transformer plugs into. The reset button is on the outlet itself, not on the transformer. If the GFCI resets and the system activates, the fault was a ground fault in the landscape system — not the transformer. See the GFCI tripping guide for zone isolation to find the specific fault.
If the GFCI holds but the transformer shows no output: locate the internal circuit breaker reset button at the bottom of the transformer housing — this is a small pushbutton that protrudes when tripped. Press it firmly until it clicks. This internal breaker trips when the system is overloaded or when a short circuit exists in the wire runs. If the breaker trips again immediately after reset, disconnect all zone wire runs and test the transformer alone — a breaker that trips with no load connected indicates internal transformer failure. For the full diagnostic procedure see the transformer troubleshooting guide.
Category 2 — Activates Then Shuts Off (Thermal Cycling)
When a Hampton Bay transformer activates normally and then shuts off after 30 to 90 minutes, thermal protection has engaged. This is almost always an overload condition — total fixture wattage exceeds 80% of the transformer's rated capacity. The 200W transformer's practical maximum is approximately 120W to 160W depending on wire gauge, not the full 200W nameplate. Calculate your actual fixture load and compare to the 80% threshold. If load exceeds threshold, either remove fixtures or upgrade to a higher-capacity transformer. Use the sizing calculator below. For the underlying physics see the voltage drop guide.
Category 3 — Timer or Photocell Not Working Correctly
If the transformer does not activate at dusk: check whether the photocell is obstructed or oriented away from the sky. Check whether the internal timer has lost programming due to the post-2022 battery removal issue described above — the clock will show 12:00 if programming was lost. Reprogram the timer and add an external outlet timer as the permanent fix. If an E1 error appears, follow the E1 diagnosis sequence in the section above.
If the transformer activates at the correct time but does not shut off: this is the documented relay-sticking behavior on the legacy DIY-300PS model. On SL-series units it typically indicates a failed relay on the control board. Unplug completely, allow 5 minutes, replug and reprogram. If the problem persists the transformer requires replacement.
Category 4 — One Zone Dark, Other Zone Works
When one output zone produces no voltage but the other zone is functioning, the failure is typically at the transformer's output terminal for the dead zone. Check the wire connection at that specific terminal — loosen and retighten the terminal screw to ensure solid copper contact. Measure output voltage at both terminal sets with a multimeter; a functional terminal reads 12V AC, a failed terminal reads 0V. A terminal that reads 0V with the transformer powered and the timer active indicates internal relay or output circuit failure on that zone. At this point replace the transformer — individual zone circuits are not field-serviceable. For the testing procedure see how to test a landscape lighting transformer.
| Symptom | Most Likely Cause | First Fix Step | If First Fix Fails |
|---|---|---|---|
| All lights dark, no power | GFCI tripped or internal breaker tripped | Reset GFCI outlet first. Then press reset button at bottom of transformer. | Disconnect all zones, test transformer alone. No output = transformer failure. |
| Lights activate then shut off in 30–90 min | Transformer overloaded above 80% capacity | Calculate total fixture wattage vs transformer capacity. Reduce load. | Upgrade to higher-capacity transformer. Use sizing calculator below. |
| E1 error code displayed | Photocell sensor fault | Clean photocell lens. Reseat wiring connections at photocell. | Replace photocell sensor. If E1 persists with new sensor, replace transformer. |
| Timer resets after power outage | Post-2022 CR2032 battery removal | Add external outlet timer on wall outlet. Program outlet timer for desired schedule. | This is by design on post-2022 units — external timer is the permanent fix. |
| Lights never turn on automatically | Photocell obstruction or timer programming lost | Check photocell orientation and obstruction. Reprogram timer. | If photocell is clear and reprogramming doesn't hold, see E1 sequence above. |
| Transformer does not shut off at programmed time | Relay sticking (legacy models) or programming error | Unplug 5 min. Reprogram timer completely. | Persistent relay sticking requires transformer replacement. |
| One zone dark, other works | Loose terminal connection or internal zone circuit failure | Loosen and retighten terminal screw on dead zone. Measure 12V at terminal. | 0V on terminal = internal zone failure. Replace transformer. |
| Lights dim on far end of run | Voltage drop — wire gauge or run length | Switch to 15V output tap on transformer. Or upgrade to heavier gauge wire. | See voltage drop guide for wire gauge calculation. |
| Transformer buzzes | Pre-toroidal design hum (older models) or LED load incompatibility | Standard hum on older non-toroidal units is normal. New buzz after LED conversion indicates load issue. | SL-series toroidal units should be silent. Persistent buzz on SL = internal fault. |
Hampton Bay Replacement Transformer Sizing Calculator
Enter your fixture count and wattage to get the correct Hampton Bay transformer model for your system — accounting for the 80% safety rule and wire gauge practical limits.
Compatibility: Using Hampton Bay Transformers With Portfolio, Malibu, and Other Brands
One of the most-asked questions about Hampton Bay landscape transformers is whether they work with fixtures from other brands — particularly Portfolio (Lowe's) and Malibu. The short answer is yes for SL-series transformers. The Hubspace smart transformer requires additional qualification.
SL-Series (Standard) Transformer Compatibility
Hampton Bay SL-series transformers output 12V AC — the universal standard for consumer low-voltage landscape lighting. Every Portfolio, Malibu, Hampton Bay, Paradise, and generic consumer landscape fixture designed for 12V low-voltage operation is compatible. You can run Portfolio path lights, Malibu spotlights, and Hampton Bay deck lights all from the same Hampton Bay SL-series transformer on different zone wire runs without any modification. The wire connector formats (3-prong quick-connect) are also cross-compatible across all three brands for standard 12AWG and 14AWG wire.
| Fixture Brand | Compatible with SL-Series | Compatible with Hubspace | Wire Connector Compatible | Notes |
|---|---|---|---|---|
| Hampton Bay (standard) | Yes | Yes | Yes | Native pairing — full compatibility |
| Portfolio (Lowe's) | Yes | Most — verify 12V DC | Yes | All Portfolio 12V AC fixtures work. See Hubspace note below. |
| Malibu / Intermatic | Yes | Most — verify 12V DC | Yes | Standard 3-prong quick-connects are compatible |
| Paradise | Yes | Verify | Yes | 12V AC fixtures compatible with SL-series |
| Volt Lighting | Yes | Verify | Yes — screw terminal | Volt uses screw terminal connections — standard 12V AC compatible |
| Kichler | Yes | Verify | Different connector | Kichler uses proprietary connectors — wire connection required at terminal |
Hubspace Smart Transformer Compatibility Note
The Hubspace 200W smart transformer outputs 12V DC — not 12V AC like the SL-series. Most LED landscape fixtures are tolerant of both AC and DC at 12V, but not all are. Incandescent and halogen landscape bulbs designed for 12V AC will not operate on 12V DC. If you are replacing a standard SL-series transformer with the Hubspace unit while keeping existing fixtures, verify that your fixture specifications show compatibility with 12V DC before connecting. All current-production LED landscape fixtures from Hampton Bay, Portfolio, and Malibu are LED-based and tolerate 12V DC. Older halogen-based fixtures may not.
For the broader compatibility question across all consumer landscape lighting brands, see the brand compatibility guide and the low-voltage brand comparison guide.
Wiring a Hampton Bay Transformer to an Existing Landscape System
Connecting a replacement Hampton Bay SL-series transformer to an existing landscape lighting system — whether the existing system used a Hampton Bay, Portfolio, or Malibu transformer — is straightforward. The terminal layout is standardized: COM (common/neutral) and 12V or 15V (hot). All consumer low-voltage landscape wire connects the same way regardless of which brand's transformer it was originally connected to.
Exact Terminal Connection Procedure (From Hampton Bay DIY-300PS Manual)
Strip ½ inch (12.7mm) of insulation from both conductors of the landscape wire, twisting the bare copper ends. Do not leave exposed copper strands outside the terminal. Insert one wire under the COM terminal clamping plate and tighten the screw firmly. Insert the second wire under the 12V or 15V terminal clamping plate and tighten. Gently pull on the landscape wire to confirm a solid connection — a properly seated wire should not pull out. Leave a minimum of 10 feet of wire between the transformer and the first fixture on each zone run.
Choosing 12V vs 15V Output Terminal
The dual-tap output (12V and 15V) compensates for voltage drop on long wire runs. Use the 12V terminal for wire runs under 50 feet with 14AWG wire — fixtures at the far end will receive close to 12V. Use the 15V terminal for runs of 50 to 100 feet, or for any run where fixtures at the far end are noticeably dimmer than fixtures close to the transformer. The 15V terminal delivers voltage that drops to approximately 12V at the fixture after wire run losses. Never connect a fixture directly at the transformer to the 15V terminal — it will receive the full 15V and may be damaged or show reduced life. Use 15V only when voltage drop across a long run is the identified issue. See the voltage drop guide and the minimizing voltage drop energy waste guide for run-length calculations.
Mounting Requirements
Hampton Bay SL-series transformers must be mounted outdoors — they are not rated for indoor mounting. Mount on an exterior wall within 12 inches of the GFCI outlet, with the transformer oriented so rain cannot enter the wire terminal opening. The photocell sensor should be mounted on a separate bracket oriented toward the sky in a location that receives no artificial light from nearby fixtures or streetlights — light contamination on the photocell produces false daytime readings and E1 errors. Minimum mounting height is 12 inches above grade. For full electrical code requirements governing outdoor transformer mounting, see the transformer mounting code requirements guide and the electrical code and safety guide.
Hampton Bay Hubspace Smart Transformer: Complete Guide
The Hampton Bay Hubspace 200W smart transformer represents a fundamentally different product category from the SL-series — it is a WiFi-connected smart home device that happens to also be a landscape lighting transformer, rather than a standard transformer with added features. Understanding the key differences determines whether it is the right replacement for your specific situation.
What Makes It Different From the SL-Series
Three zones with independent control — each zone can be scheduled, activated, and dimmed independently through the Hubspace app. Astronomical timer — uses your GPS location to calculate exact local sunset and sunrise times, eliminating the photocell sensor entirely and with it the E1 photocell failure mode. This is significant: the Hubspace transformer has no photocell to fail. App-based control from anywhere — works over your home WiFi network. Voice control through Alexa and Google Home. At approximately $100 it costs $30 to $50 more than the equivalent SL-series unit.
Hubspace Setup Requirements and Known Issues
- 2.4GHz WiFi only: The Hubspace transformer does not support 5GHz WiFi networks. If your router uses a combined 2.4/5GHz network under one SSID, you may need to split the bands or use a 2.4GHz-specific SSID for setup. This is the most common Hubspace installation problem.
- Hubspace app required: Initial setup and scheduling require the Hubspace app. The transformer cannot be programmed from the device itself — there is no local control panel with the same functionality as the SL-series front-panel LCD.
- No offline programming: If your internet connection is interrupted the transformer continues its last-programmed schedule but cannot be reprogrammed until connectivity is restored. Unlike the SL-series local battery issue, Hubspace stores schedules on-device and does not lose them during power outages as long as the schedule was set before the outage.
- 12V DC output: As noted in the compatibility section, verify fixture compatibility with 12V DC before connecting non-Hampton Bay fixtures.
For the broader context on smart vs standard transformer tradeoffs see the AI outdoor lighting systems guide.
Hampton Bay vs Portfolio Transformer: Direct Comparison
Hampton Bay (Home Depot) and Portfolio (Lowe's) are the two dominant consumer landscape lighting transformer brands in North America. Both are private label brands — Hampton Bay is Home Depot's, Portfolio was Lowe's before it was discontinued. Their transformers share more in common than their branding suggests, but there are meaningful differences worth understanding before choosing one as a replacement for the other.
| Characteristic | Hampton Bay SL-Series | Portfolio SL-Series |
|---|---|---|
| Core design | Potted toroidal — silent operation | Older: magnetic-core (LTF series, buzzes); Current: toroidal (SL series) |
| DOE efficiency rating | Level VI (all current SL models) | Level VI (current generation); older LTF series: lower rated |
| Output voltage options | 12V AC and 15V AC (dual tap, all SL models) | 12V AC and 15V AC (dual tap, current generation) |
| CR2032 battery (post-2022) | Empty slot — no battery | Empty slot — no battery (same change, same period) |
| Availability (2026) | Current — sold at Home Depot | Discontinued from retail — secondary market only |
| Model numbers | SL-120-12A, SL-200-12A, SL-300-12A, Hubspace | SL-100-12, SL-200-12, LTF300WH, EE4859BK, 999928302 |
| Smart / WiFi option | Yes — Hubspace 200W (~$100) | No current-production smart option |
| Fixture compatibility | All 12V AC landscape fixtures | All 12V AC landscape fixtures |
| Wire connector compatibility | Standard 3-prong quick-connect | Standard 3-prong quick-connect |
| E1 error code | Yes — on 8201081015 / 300W models | No E1 code — different error handling |
| Price range (current) | $40–$100 (SL series); ~$100 (Hubspace) | Not available new — secondary market $20–$80 |
For a complete Portfolio transformer reference covering every Portfolio model — including the LTF300WH, EE4859BK, SL-100-12, and 999928302 — see the Portfolio transformer master guide. For the decision between repairing an existing Portfolio transformer and replacing it with a Hampton Bay unit, see the Portfolio transformer alternatives guide and the Volt vs Portfolio comparison.
The most common scenario I encounter involving Hampton Bay-to-Portfolio or Portfolio-to-Hampton Bay replacement is a homeowner who had a Portfolio LTF-series magnetic-core transformer fail after 15 or more years of service and wants to replace it with whatever is available at the nearest hardware store. The Hampton Bay SL-series is the most accessible direct replacement — the wiring is identical, the output is compatible with all existing Portfolio fixtures and wire runs, and the dual-tap (12V/15V) makes it easy to compensate for voltage drop on long runs that the old Portfolio transformer may have been running on its 15V tap. The only important check before connecting is verifying that the 80% rule is satisfied at the new transformer's capacity — a 300W SL replacing a 300W LTF is straightforward, but verify your fixture wattage total is under 240W before connecting.
Hampton Bay Landscape Transformer FAQ
What does the E1 error code mean on a Hampton Bay transformer?
E1 indicates a photocell sensor fault. The transformer's control board is detecting an invalid or out-of-range signal from the photocell sensor. The characteristic pattern is: E1 appears, you reset to Auto-photocell mode, the system works for one to two days, then E1 returns. This recurrence confirms the photocell is failing rather than fully failed. Clean the photocell lens and reseat the wiring connections first. If E1 recurs after cleaning, replace the photocell sensor. If E1 recurs after photocell replacement, the control board input circuit has failed and the transformer requires replacement.
Why does my Hampton Bay transformer lose programming after a power outage?
Hampton Bay SL-series transformers manufactured after 2022 no longer include the CR2032 battery that previously maintained clock and timer programming during power outages. This affects all current Hampton Bay SL-series transformers (SL-120-12A, SL-200-12A, SL-300-12A). The transformer loses all settings — including clock time and on/off schedule — the moment power is interrupted. The permanent fix is adding an external mechanical timer on the outlet upstream of the transformer, which keeps the schedule independent of the transformer's internal clock regardless of power interruptions.
Will a Hampton Bay transformer work with Portfolio or Malibu landscape fixtures?
Yes — Hampton Bay SL-series transformers output 12V AC, which is the universal standard for consumer low-voltage landscape fixtures including Portfolio, Malibu, Paradise, and generic brands. The 3-prong quick-connect wire connectors are also cross-compatible. The Hubspace smart transformer outputs 12V DC rather than 12V AC — most current-production LED fixtures tolerate 12V DC, but verify before connecting older halogen-based fixtures.
What is the practical maximum load of the Hampton Bay 200W transformer?
With 16-gauge wire the practical maximum is approximately 120W at runs up to 50 feet. With 12-gauge wire the practical maximum is approximately 160W at runs up to 100 feet. The 80% rule — keeping total fixture load at or below 160W — is the correct operating target regardless of wire gauge. Running at or near the full 200W nameplate rating produces excessive voltage drop on all but the shortest wire runs and stresses the transformer's thermal management. Use the sizing calculator on this page to verify your load against the 80% threshold before connecting fixtures.
Where is the reset button on a Hampton Bay transformer?
The internal circuit breaker reset button is located at the bottom of the transformer housing — it is a small pushbutton that protrudes when the breaker has tripped. Press it firmly until it clicks to reset. If the breaker trips again immediately after reset, disconnect all zone wire runs and test the transformer alone. A breaker that trips with no load connected indicates internal transformer failure. Note that this is the transformer's internal circuit breaker, not the GFCI reset button on the wall outlet — check the GFCI outlet reset button first before opening the transformer.
Should I replace my Hampton Bay transformer or repair it?
Repair is practical for E1 errors (photocell replacement, $10 to $25), programming loss (external timer, $15), and GFCI trips from landscape ground faults (zone isolation and connector replacement). Replacement is warranted when the transformer fails the no-load voltage test (plugged in with no wire runs connected, internal breaker holds, but output voltage measures 0V or below 10V), when one zone measures 0V with the other zone functional, when the transformer buzzes loudly on a toroidal SL-series unit (which should be silent), or when the internal breaker trips immediately after reset with no load connected. Hampton Bay SL-series current-production units range from approximately $40 to $70, making repair economically attractive only for well-defined, inexpensive component failures.