
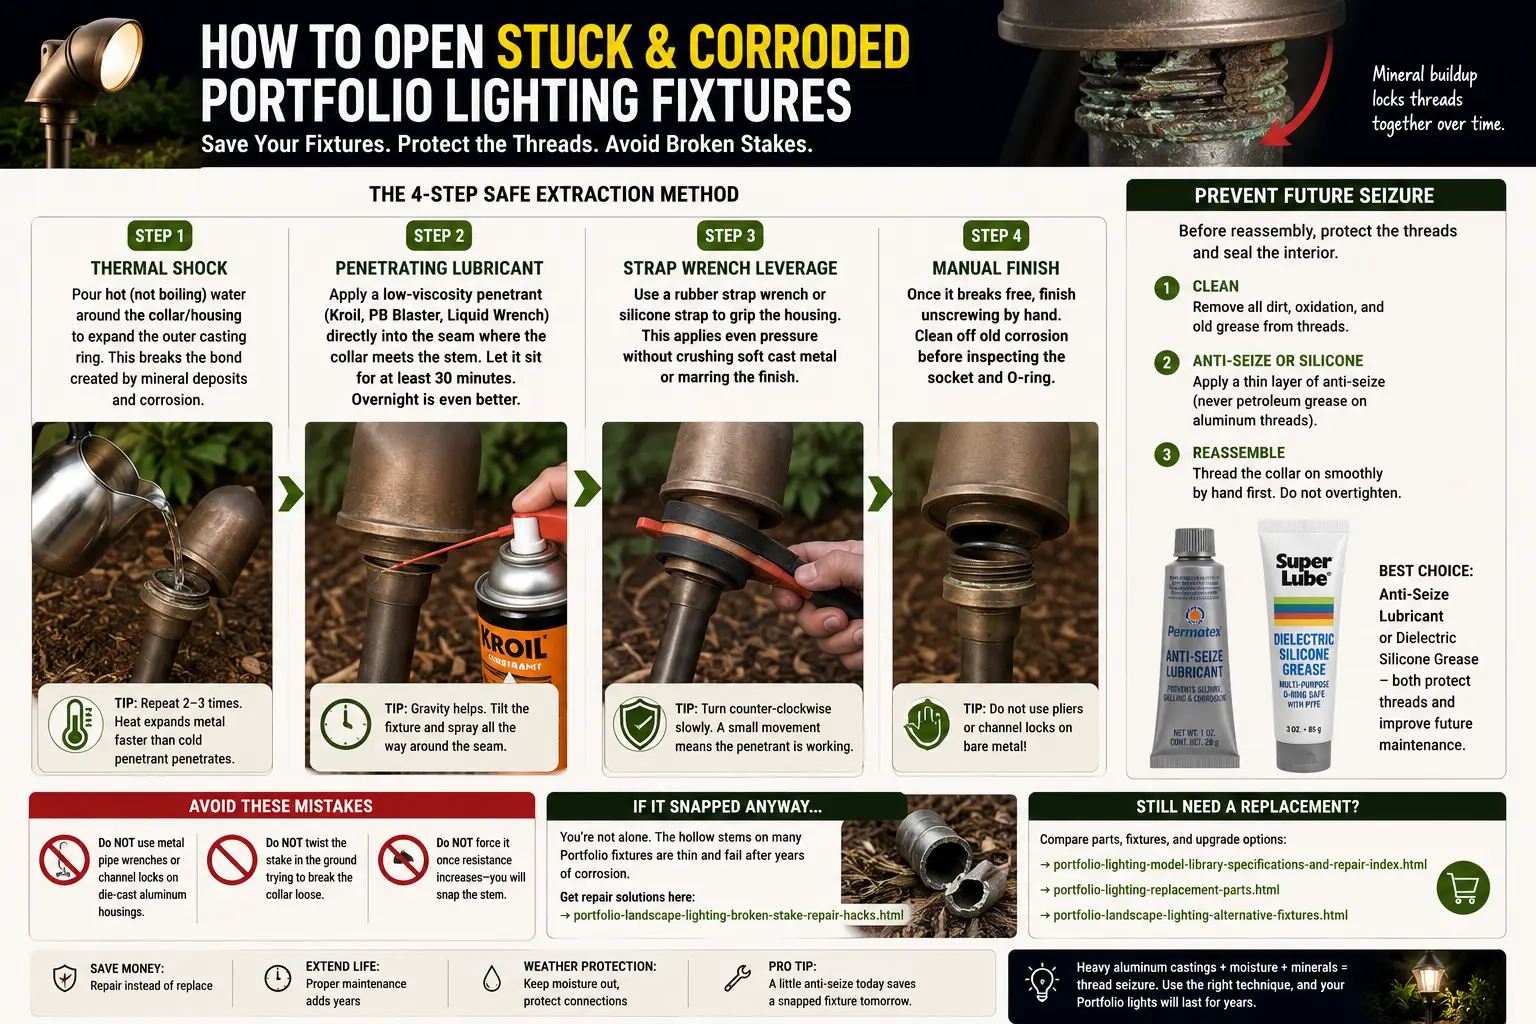
Quick Answer: How Do You Open a Stuck Portfolio Landscape Light?
To open a stuck Portfolio landscape light, do not crush the collar with channel locks. Warm the outer threaded ring with hot water, wick penetrating lubricant into the seam, wait at least 30 minutes, then use two rubber strap wrenches to apply slow opposing torque. Once the fixture opens, clean the threads and reassemble with a very thin film of anti-seize on the metal threads.
Logic Summary: What Kind of Stuck Fixture Do You Have?
| What You Feel | Most Likely Cause | Safest First Move | Danger Sign |
|---|---|---|---|
| Collar will not move at all | Oxidized metal threads, mineral scale, dried mud in seam | Hot water on outer ring, then penetrant at seam | Stem or stake rotates before collar moves |
| Collar turns a few degrees then binds | Grit packed into thread valley or cross-threaded collar | Work back and forth in tiny movements, add more penetrant | Grinding sound, metal flakes, collar tilting |
| Lens ring is stuck but fixture head wiggles | Loose knuckle or weakened riser below the head | Support the lamp body and oppose torque with second strap wrench | Knuckle teeth slip or hollow stem twists |
| Top cap is frozen on a spotlight | Thread galling, paint-to-paint bonding, corrosion under finish | Warm cap, use strap wrench around cap only | Cap starts to oval or paint splits around seam |
| Fixture opened but threads look chalky | Aluminum oxidation or corrosion powder | Clean threads, dry fully, apply anti-seize | Thread peaks are missing or crumbly |
Most online advice says to “change the bulb.” That does not help when the fixture will not open. Older Portfolio landscape lights often fail at the exact moment you try to do maintenance: the bulb is burned out, the lens is fogged, or the socket needs cleaning, but the threaded collar has bonded to the body after years in wet mulch, topsoil, fertilizer residue, and freeze-thaw cycles.
The failure is not random. It is a mechanical seizure problem. The homeowner grabs channel locks, twists harder, and the decorative head finally moves—but not where it should. The hollow stem below the fixture snaps, the ground stake breaks, or the adjustable knuckle strips. This page is built to prevent that exact failure.
Why Portfolio Landscape Light Collars Seize After 3 to 5 Years
Many Portfolio landscape path lights and spotlights live in one of the worst environments for threaded metal: wet soil, acidic mulch, fertilizer salts, sprinkler spray, insects, and repeated heating and cooling. The threaded lens collar may look clean from the outside, but the thread valley can become packed with oxidation powder, mineral scale, fine grit, and dried organic residue.
The fixture material matters. A lot of older outdoor fixtures use die-cast aluminum, cast metal, coated zinc alloy, brass-colored finish, stainless fasteners, steel stakes, and plastic insulators in the same assembly. When moisture bridges dissimilar metals, corrosion can build in tight seams. Even if the fixture is not visibly “rusty,” the threads can mechanically lock.
The Hidden Failure Pattern
The most common stuck-fixture pattern is not the lamp head breaking first. It is the hollow threaded tube or knuckle connection below the head failing. The collar stays frozen, the homeowner applies more torque, and the twisting load travels down the weakest part of the fixture. That weak point is often the threaded riser tube that joins the head to the stake or the adjustable knuckle.
What Not to Do: The Fastest Ways to Destroy the Fixture
When a Portfolio lens ring or collar will not move, the instinct is to grab bigger pliers. That is usually the mistake that turns a maintenance problem into a replacement problem.
Do Not Clamp Metal Jaws on Bare Painted Metal
Channel locks and pipe wrenches concentrate force into small tooth marks. On thin cast collars, that can oval the ring, chip the coating, and make the threads bind even harder.
Do Not Twist from the Stake
The ground stake is not a handle. If the stake moves while the head stays frozen, the riser tube can snap or the knuckle can strip.
Do Not Hammer the Lens Ring
Impacts can crack glass, break an acrylic lens, loosen socket mounts, or distort the retaining ring just enough that it never threads smoothly again.
Do Not Heat with a Torch Near Mulch
A torch can damage seals, blister paint, melt wire insulation, ignite dry mulch, or overheat a lens gasket. Hot water is the safer first thermal method.
If the fixture is part of a larger low-voltage system, also review low-voltage landscape lighting failure points. A seized housing is often accompanied by connector corrosion, socket oxidation, or water intrusion elsewhere on the same run.
Tools and Materials That Give You the Best Chance
One holds the fixture body while the other turns the collar. This prevents torque from traveling into the hollow stem.
The thinner the fluid, the better it creeps into the seam. Apply at the joint, not across the whole fixture.
Use heat to expand the outer collar without open flame near mulch, wiring, or plastic lenses.
Penetrants and corrosion residue should not be rubbed into skin or eyes.
Clean thread valleys after opening. Do not gouge soft aluminum threads.
Anti-seize protects metal threads. Dielectric grease helps moisture-prone electrical areas when used lightly.
Step-by-Step: How to Loosen a Frozen Portfolio Landscape Light Collar
This method is designed for stuck threaded lens collars, top caps, bezels, and metal housings. It works best when the fixture is still intact and you stop before applying destructive torque.
Step 1: Kill Power and Stabilize the Fixture
Turn the transformer off before handling the light. If the fixture is on a path light run, unplug or switch off the transformer and verify that nearby fixtures are off. Do not attempt to open a powered fixture, especially if the lens has moisture inside.
Hold the fixture at the strongest section of the body, not the stake. If the fixture is loose in the soil, remove it carefully and brace the body on a towel-covered work surface. If the wire has no slack, do not yank the fixture out of the ground. Use the landscape lighting cable guide if you need to understand how much buried cable movement is safe.
Step 2: Use Thermal Shock on the Outer Collar
Pour hot water over the stuck outer collar for 20 to 30 seconds. The goal is to expand the outer ring slightly before heat transfers into the inner threaded section. This tiny size change can break the corrosion bond enough for penetrant to enter.
Do not dunk the entire fixture in water. You are trying to warm the collar, not flood the socket. If the lens is cracked or the seal is already compromised, keep water away from the electrical cavity as much as possible.
Step 3: Apply Penetrating Lubricant into the Seam
Place a small amount of penetrating spray directly into the joint between the collar and the fixture body. Rotate the fixture so gravity helps the liquid creep around the seam. Let it sit for at least 30 minutes. For severe seizure, apply a second small dose and wait longer.
Step 4: Use Two Strap Wrenches, Not One
Wrap one strap wrench around the stationary fixture body and another around the collar. Apply slow opposing pressure. The stationary wrench matters because it prevents the twisting force from traveling down the riser tube or stake.
Do not jerk the wrench. Increase force slowly. If you feel the stem twist, stop. If the collar moves a few degrees and binds, reverse slightly, add penetrant, and work it back and forth. That small back-and-forth motion clears grit from thread valleys better than one hard turn.
Step 5: Open Only Far Enough to Relieve the Bind
Once the collar breaks loose, do not spin it off aggressively. Turn slowly, reverse occasionally, and watch for metal powder or thread fragments. If the threads are damaged, forcing the collar all the way off can destroy the remaining thread peaks.
The Dissimilar Metal Problem Most Homeowners Miss
Portfolio outdoor fixtures can contain several materials in a small space: cast aluminum housings, plated screws, steel stakes, brass-colored finishes, copper conductors, rubber seals, and stainless-looking hardware. In a dry indoor fixture, that mix may not matter much. In wet mulch or soil, it can matter a lot.
Moisture plus mineral salts can create a corrosion bridge. The corrosion does not need to cover the entire fixture. It only needs to grow inside the thread valleys enough to wedge the collar. The fixture still looks decent from a distance, but the first bulb change becomes impossible.
For connector-specific corrosion, see how to fix green dust in lighting connectors. For socket corrosion, use the Portfolio lighting corroded socket cleaning repair guide.
After the Fixture Opens: Clean the Threads Before You Touch the Bulb
Opening the stuck collar is only half the job. If you immediately replace the bulb and screw the dirty collar back on, it may seize again even harder. Clean the thread surfaces first.
- Wipe loose residue: Use a dry rag to remove grit, oxidation powder, and old seal debris from the male and female threads.
- Brush the thread valleys: Use a soft toothbrush first. Use a brass detail brush only if residue is packed tightly and the metal is not crumbling.
- Inspect thread shape: Look for flattened peaks, missing sections, or cross-thread scars. If the collar rocks side to side, threads may be too damaged for reliable sealing.
- Dry the assembly: Moisture trapped under lubricant can accelerate future corrosion.
- Inspect the gasket: A hardened or flattened O-ring allows water vapor and soil moisture back into the threaded area.
If the fixture lens is foggy, cracked, or trapping moisture, pair this repair with the Portfolio lighting foggy lens condensation fix before sealing everything again.
Preventative Reassembly: Stop the Threads from Welding Together Again
The most valuable part of this repair is what happens during reassembly. A clean fixture that is screwed back together dry may seize again after one wet season. A fixture reassembled with the right protective film has a much better chance of opening the next time a bulb or lens needs service.
Use Anti-Seize on Metal Threads
Apply a thin film of anti-seize to the metal threads only. Do not smear it across the lens, reflector, or socket. A tiny amount is enough. The goal is to fill microscopic thread contact points so the metals do not bond together again under moisture and heat cycles.
Use Dielectric Silicone Grease Sparingly Around Electrical Moisture Points
Dielectric silicone grease is useful around rubber seals, wire-entry grommets, and moisture-prone socket areas when used correctly. It should not be packed into a socket or used to compensate for a broken gasket. Too much grease attracts dirt and can make future service messy.
Reassembly Checklist
- Threads cleaned and dry
- O-ring inspected for flattening, cracking, or missing sections
- Anti-seize applied thinly to metal threads
- Socket area dry before bulb installation
- Lens seated evenly before final tightening
- Collar hand-tightened only, not wrench-tightened
For broader replacement part decisions, use the Portfolio lighting parts and accessories guide and the Portfolio lighting compatibility guide.
A stuck Portfolio fixture collar may be part of a path light, spotlight, deck light, or older cast-metal fixture family. Knowing the model family can help determine whether the lens twists off, lifts out, uses a retaining ring, or hides screws under corrosion. If the number on the fixture is unfamiliar, check the Portfolio Lighting Lost Models Archive before applying force to the housing.
Once a seized collar, stem, or knuckle has been opened, inspect the thread profile before reassembly. Missing crests, a tilted starting thread, metal flakes, uneven resistance, or a joint that tightens and loosens within the same turn can indicate corrosion damage or cross-threading rather than ordinary dirt. The landscape lighting thread measurement and repair guide shows how to identify the original thread family, measure pitch and taper, decide whether a thread chaser is appropriate, and recognize when the stem or housing has lost too much material to remain dependable.
Should You Keep Fighting the Collar or Replace the Fixture?
There is a point where more extraction effort stops making sense. If the housing is cracked, the threads are missing, the stem is bending, or the socket is badly corroded, opening the fixture may only reveal that the repair is not worth doing.
| Condition | Repair Outlook | Best Move |
|---|---|---|
| Collar stuck but body solid | Good | Use hot water, penetrant, and strap wrenches |
| Paint chipped but threads intact | Fair | Open carefully, clean, protect, and monitor for water intrusion |
| Threads crumble or shed metal flakes | Poor | Consider fixture replacement or compatible housing repair |
| Stem twists below the head | High break risk | Stop and switch to broken stake/stem repair planning |
| Socket green, burned, or loose | Depends on fixture value | Compare socket repair cost against replacement fixture |
If It Snapped Anyway: What to Do After the Hollow Stem Breaks
If the hollow threaded tube, ground stake, or knuckle breaks while you are trying to open the fixture, the repair changes. You are no longer just replacing a bulb. You are repairing the mechanical support system that holds the fixture head at the correct height and aim.
Start with the Portfolio landscape lighting broken stake repair hacks guide. That page covers stake substitutes, riser tube workarounds, thread-matching problems, and when a repair is unsafe or too unstable to keep using.
If the fixture is too damaged to save, compare options in replacement for Portfolio landscape lighting, best replacement for Portfolio landscape lighting, and Portfolio lighting alternatives.
Model-Specific Clues: Which Portfolio Fixtures Are Most at Risk?
Any outdoor fixture with a threaded collar can seize, but the risk is higher when the fixture sits close to mulch, has a narrow hollow stem, uses an adjustable knuckle, or has a lens ring that is only opened every few years. Spotlights and path lights are especially vulnerable because homeowners often leave them untouched until the bulb burns out or the lens clouds over.
If you are working on a known model, compare the construction style against model-specific pages such as the Portfolio Lighting Model 7133C replacement parts guide, Portfolio Lighting Model 0378225 cable connector guide, and Portfolio Lighting Model 7404280540 replacement parts guide.
Field Test: Is the Collar Stuck or Is the Whole Fixture Moving?
Before applying force, place one hand on the collar and one hand on the fixture body. Try a very small movement. Watch three points: the collar seam, the lamp head, and the stem below the head.
- If the seam opens slightly, the collar is moving correctly.
- If the lamp head moves but the seam does not, the fixture body is twisting.
- If the stake moves in the soil, the torque is traveling down the support.
- If the knuckle clicks, slips, or tilts, the aim joint is weaker than the seized collar.
This simple test prevents the classic mistake: thinking you are loosening the lens ring when you are actually preloading the weakest structural joint.
Opening the fixture is only the first step in determining whether it can be repaired. Once the housing is open, inspect the socket, driver, LED module, reflector, lens gasket, wiring, corrosion, and mounting hardware before purchasing replacement parts. The Portfolio Lighting Fixtures guide explains the construction of every major Portfolio fixture family and shows which components commonly fail first.
Stuck Portfolio Fixture FAQ
Why is my Portfolio landscape light collar frozen?
Usually because oxidation, mineral deposits, soil grit, and moisture have packed into the threads. The collar can look normal from the outside while the thread valley is effectively locked.
Can I use WD-40?
A light lubricant may help with minor sticking, but a true penetrating oil is better for a seized threaded collar. The key is letting the liquid creep into the seam before applying torque.
How long should I wait after applying penetrant?
Wait at least 30 minutes. For a fixture that has been stuck for years, longer is better. Reapply lightly at the seam and let gravity help carry the penetrant around the threads.
Should I use anti-seize on every outdoor fixture?
Use a very thin film on metal threads that are likely to be opened for future maintenance. Do not smear anti-seize on lenses, reflectors, bulbs, or electrical contacts.
What if the collar opens but will not tighten again?
The threads may be stripped, cross-threaded, or missing thread peaks from corrosion. If the collar cannot seat evenly, the fixture may no longer seal against water intrusion.
Safety and Affiliate Note
This guide is for low-voltage landscape fixture maintenance and general troubleshooting. Turn off the transformer before opening fixtures. For 120-volt outdoor lights, switches, junction boxes, or hardwired fixtures, use a licensed electrician. If affiliate links are added to this page, they should be placed only where the product directly supports the repair step being explained.