
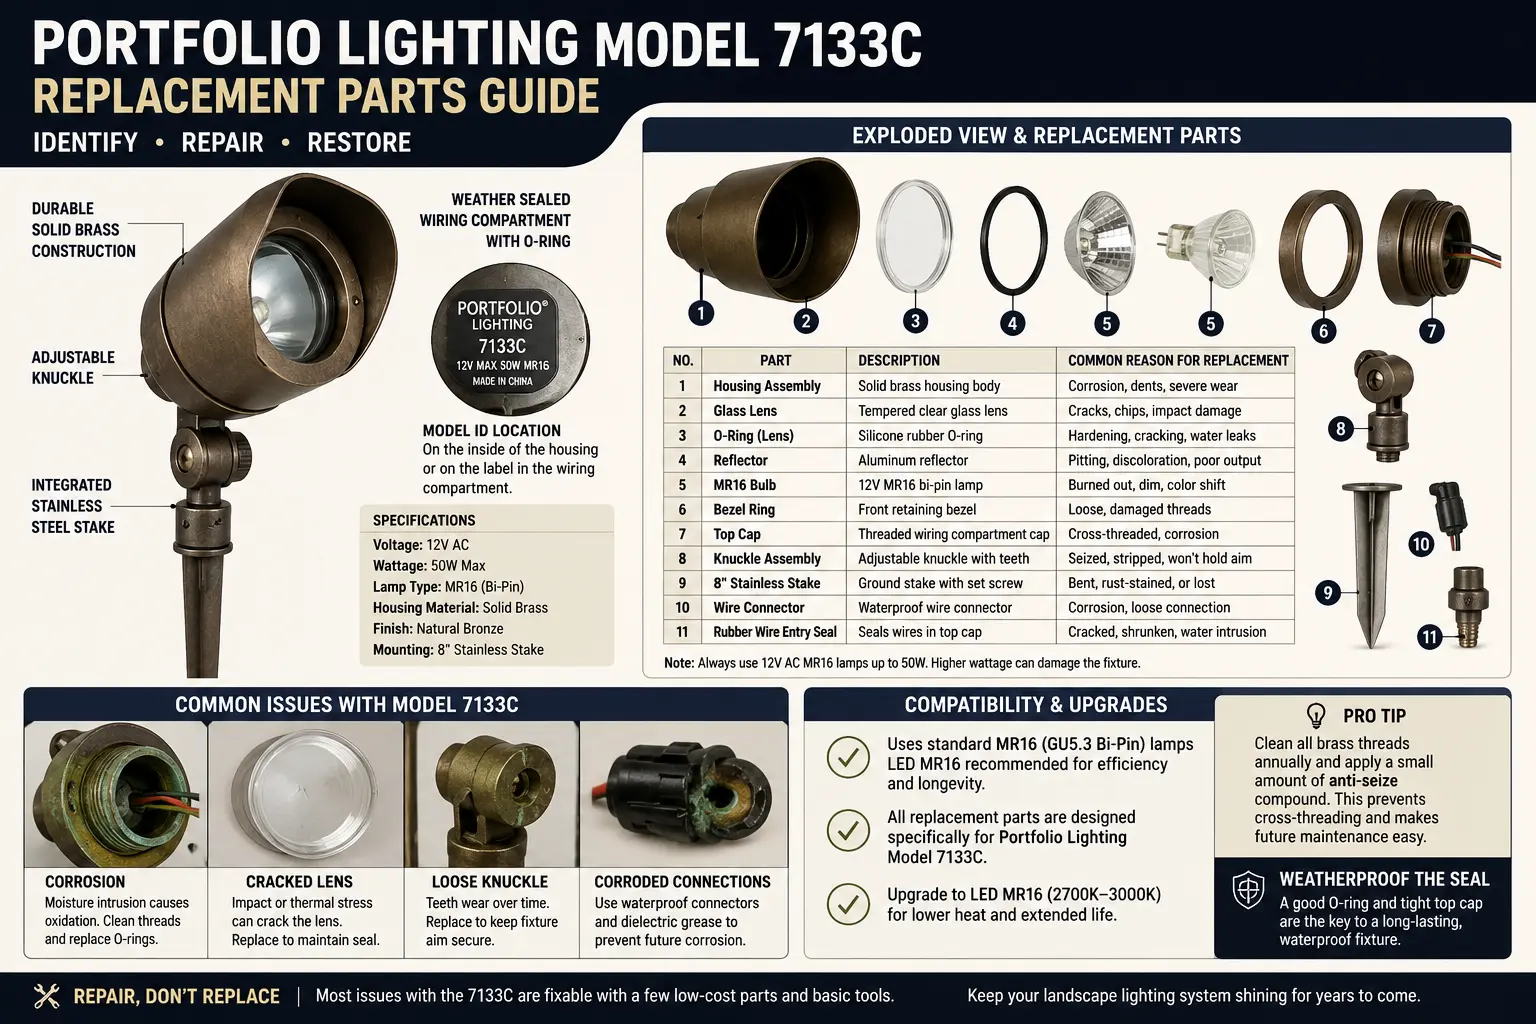
TL;DR: Portfolio 7133C Replacement Parts at a Glance
| Part Area | What Usually Fails | What to Match | Do This Before Ordering |
|---|---|---|---|
| Bulb or LED lamp | Burned filament, failed LED, wrong voltage lamp, heat-stressed base | Voltage, base, length, wattage, beam angle, wet/enclosed rating | Remove the old lamp and compare markings, not just shape |
| Socket | Green corrosion, weak spring contact, heat discoloration, cracked ceramic/plastic | Base style, wire leads, depth, contact shape, heat rating | Clean and tension-test before replacing the whole fixture |
| Lens or cover | Cracks, missing gasket pressure, cloudy plastic, water channel at rim | Diameter/width, thickness, retaining clip style, gasket contact | Measure the opening, not only the broken piece |
| Stake or mount | Thread split, ground impact crack, loose knuckle, stripped stem | Thread size, stem diameter, fixture weight, ground contact length | Check if the housing thread is damaged before buying a stake |
| Connector | Weak pierce point, oxidized bite, compressed cable jacket, intermittent contact | Wire gauge, cable shape, connector type, waterproof rating | Temporarily test with a fresh connection before blaming the fixture |
| Transformer side | Low output, overloaded run, loose terminal, timer issue | Wattage, voltage tap, terminal condition, total load | Check system voltage if several 7133C fixtures act up together |
The most useful way to troubleshoot Portfolio model 7133C is to treat it as a parts system, not as one object. A dead fixture can be caused by a bad bulb, but it can also be caused by the connector biting the cable poorly, a socket that lost spring pressure, a hairline crack in the lens seal, or voltage drop that only shows up at the far end of the run.
This guide is built around the part-matching decisions a homeowner actually has to make: what to measure, what to test, what can be replaced universally, and when a 7133C fixture should be replaced instead of repaired. For broader model lookup help, use the Portfolio Lighting model number lookup. For the complete parts hub, use Portfolio lighting parts and accessories.
7133C Repair Decision Tree: What Failed First?
Before buying a replacement part, identify which layer of the fixture failed. This is where many repairs go wrong: the most visible part is not always the failed part.
- If one fixture is out: swap the bulb with a known-good fixture first. If the problem moves, the bulb is bad. If it stays, continue testing the socket and connector.
- If the fixture works when moved closer to the transformer: the 7133C body may be fine. The likely cause is voltage drop, a weak cable bite, or a damaged branch connection.
- If the fixture works when the wire is flexed: suspect connector fatigue, broken conductor strands, or an internal lead wire fracture near the stem.
- If the lens fogs or fills with droplets: suspect lens seal compression loss, gasket flattening, or a small crack at the rim.
- If the stake is loose but the light works: repair the mounting system only. Do not replace electrical parts unless there are symptoms.
- If multiple 7133C fixtures are dim: move upstream to transformer sizing, cable gauge, voltage drop, and terminal condition.
Portfolio Model 7133C Replacement Parts Table
| Replacement Part | Symptoms It Solves | Compatibility Checks | Risk If Chosen Wrong |
|---|---|---|---|
| Replacement bulb or LED lamp | No light, dim output, flicker, color mismatch | Voltage, base, wattage, beam spread, physical length | Wrong base, overheating, poor beam, transformer mismatch |
| Socket or lamp holder | Works when wiggled, green corrosion, intermittent light | Base type, lead length, heat rating, housing depth | Loose contact or unsafe heat buildup |
| Lens or clear cover | Cracked lens, water entry, fogging, missing cover | Outer diameter, lip depth, clip style, gasket surface | Poor seal and recurring water intrusion |
| Gasket or O-ring | Condensation, water droplets, dirt inside lens | Cross-section thickness, compression fit, material | Over-compression, warped lens, continuing leak |
| Ground stake | Fixture leaning, broken mount, loose ground hold | Thread, stem diameter, soil depth, fixture weight | Fixture falls, wire strain, cracked housing |
| Low-voltage connector | Dead fixture, intermittent fixture, works when cable moved | Wire gauge, cable jacket thickness, waterproof rating | Weak bite, corrosion, repeat failure after rain |
| Lead wire splice | Broken internal lead, wire pulled from fixture stem | Outdoor rating, wire gauge, strain relief, waterproof splice | Moisture intrusion and hidden resistance |
The 7133C Socket Test Most People Skip
A model 7133C fixture can look dead even when the bulb and transformer are fine. The hidden failure is often the socket contact. Small low-voltage fixtures spend years heating, cooling, breathing moisture, and compressing metal contacts around a lamp base. Eventually the socket may still look intact but no longer presses firmly enough to maintain contact.
How to inspect the socket
- Look for green-blue copper corrosion near the contact points.
- Look for white powder, which can indicate mineral residue from repeated moisture entry.
- Check whether the bulb fits tightly or feels loose in the socket.
- Look for dark heat marks near the contact area.
- Check whether the light flickers when the bulb is gently moved.
If the socket is loose or oxidized, replacing the bulb alone may only work for a few days. For broader corrosion repair, use Portfolio lighting corroded socket cleaning repair. If the fixture is part of a dim run, also compare symptoms with Portfolio lighting too dim.
Connector Forensics: Why a Good 7133C Fixture Still Goes Dark
The connector is the part most homeowners underestimate. Many Portfolio landscape fixtures use a low-voltage connector that pierces or clamps onto the main cable. That connection can fail slowly without looking broken. The fixture may turn on after rain, fail when the ground dries, flicker when touched, or work only when the cable is bent a certain way.
What the old connector can tell you
- Green dust around the bite point: copper oxidation is interfering with contact.
- Flattened cable jacket: the connector was over-compressed and may have weakened the conductor.
- One clean pierce and one dull pierce: only one side may be making reliable contact.
- Blackened plastic: resistance heating may have occurred from poor contact.
- Fixture works with a new temporary splice: the old connector, not the fixture, was the failure.
For connector-specific repair, see low voltage wire connectors for landscape lighting, Portfolio model 0378225 cable connector guide, and how to fix green dust in lighting connectors.
Lens, Gasket, and Housing Seal Problems on 7133C
Water intrusion is rarely dramatic at first. A 7133C lens may only fog in the morning, clear by afternoon, and then slowly corrode the socket over several seasons. That cycle matters because it means the visible lens problem and the electrical socket problem are connected.
The “breathing lens” failure pattern
Outdoor fixtures heat up when the lamp is on and cool down after shutoff. That expansion and contraction moves tiny amounts of air through weak seals. If the lens gasket is flattened, cracked, dirty, or unevenly compressed, humid air can enter the fixture even when no standing water is visible.
For moisture-related troubleshooting, compare this page with Portfolio lighting foggy lens condensation fix, Portfolio lights not working after rain, and landscape lighting works in rain not when dry.
7133C Failure Point Map: Match the Symptom to the Part
Light completely dead
Start with bulb swap, connector bite, socket contact, and transformer output. A dead fixture is not automatically a dead fixture body.
Light flickers when touched
Suspect socket spring pressure, loose bulb base, weak connector bite, or broken lead wire near the stem.
Lens fogs inside
Inspect the gasket, lens rim, housing seam, and wire entry. Moisture will eventually reach the socket.
Fixture leans or spins
Check stake thread and knuckle damage before replacing the whole light. The electrical side may be fine.
Only end fixtures are dim
Suspect voltage drop or cable gauge, especially on long runs with many fixtures.
Several fixtures fail at once
Move upstream to transformer, timer, GFCI, main cable, and shared splice points.
Compatibility Rules Before Buying 7133C Parts
Model number compatibility is only one layer. For older Portfolio products, physical fit and electrical fit matter more than a seller listing that simply says “fits Portfolio.”
Bulbs
Match voltage first, then base, wattage, length, beam angle, and whether the fixture can safely handle the lamp style. If converting older halogen-style fixtures to LED, check the transformer load and dimming behavior. See Portfolio lighting bulb replacement and Portfolio MR16 LED replacement bulbs.
Stakes
A universal stake only works if the thread and stem fit correctly. A stake that almost fits can split the housing boss or leave the fixture leaning under cable tension. For related parts, see Portfolio lighting replacement stakes.
Lenses and covers
Measure the opening, lip, gasket surface, and retaining method. If the replacement lens is slightly smaller, it may install but leak. For lens help, use Portfolio lighting replacement lenses and replacement globes and covers.
Connectors
Connector compatibility depends on cable gauge, jacket thickness, installation method, and wet-location reliability. For more cable planning, use landscape lighting wire gauge and landscape lighting cable guide.
Repair vs Replace: When a 7133C Fixture Is No Longer Worth Saving
Repair makes sense when one replaceable part has failed and the housing is still sound. Replacement makes more sense when multiple failure layers stack together.
| Condition | Repair Makes Sense | Replace Makes Sense |
|---|---|---|
| Bulb failure | Yes, if socket is clean and lens is dry | No, unless socket and housing are also damaged |
| Cracked stake only | Yes, if mounting thread is intact | Yes, if housing boss is split |
| Foggy lens | Yes, if gasket/lens can be matched | Yes, if socket corrosion has advanced |
| Corroded socket | Maybe, if socket is replaceable and housing is dry | Yes, if leads are brittle or housing traps moisture |
| Repeated connector failure | Repair cable and connector first | Only replace fixture after proving the fixture is bad |
| Housing cracked | Usually no | Yes, especially if water enters near electrical parts |
If you need alternatives, compare replacement for Portfolio landscape lighting, best replacement for Portfolio landscape lighting, and whether other lighting brands work with Portfolio connectors.
System Checks If More Than One 7133C Fixture Is Failing
If multiple fixtures fail, do not buy multiple replacement parts yet. Work backward from the transformer and cable. Check the GFCI outlet, timer, transformer output terminals, main cable, voltage at the first fixture, and voltage at the farthest fixture.
- Use Portfolio lighting transformer troubleshooting if the transformer hums, trips, or has no output.
- Use landscape lighting voltage drop if the farthest fixtures are dim.
- Use how to test a landscape lighting transformer before replacing power equipment.
- Use landscape lighting keeps tripping GFCI if the system shuts off after rain or startup.
7133C Parts Shopping Checklist
Use this checklist before ordering anything. It prevents the most common legacy Portfolio parts mistake: buying by model number when the actual failure is a dimension, voltage, connector, or weather seal issue.
- Photo of fixture from front, side, stem, and connector.
- Photo of label or partial model marking.
- Bulb removed and base type identified.
- Lens measured across the actual housing opening.
- Stake thread and stem diameter measured.
- Connector inspected for green dust or weak bite marks.
- Voltage checked at fixture location if possible.
- Transformer wattage and output confirmed.
- Rain or condensation symptoms noted.
- Decision made: repair one part, replace fixture, or fix system wiring first.
Portfolio Lighting Model 7133C FAQ
What should I replace first on a dead Portfolio 7133C fixture?
Start with the bulb and connector, then inspect the socket. A dead 7133C fixture is often caused by a weak cable connection or corroded socket rather than a failed housing.
Can I replace the 7133C connector with a universal low-voltage connector?
Yes, in many cases, but match the connector to the cable gauge and outdoor conditions. A poor connector replacement can create the same intermittent failure again.
Why does my 7133C light flicker?
Flicker usually points to loose bulb contact, a weak socket, connector fatigue, low voltage at the fixture, or moisture inside the housing.
Should I replace the whole fixture if the lens is cracked?
Not always. If the lens and gasket can be matched and the socket is still clean, a lens repair may be enough. If water has corroded the socket or leads, replacement may be smarter.
Is model 7133C definitely a low-voltage landscape fixture?
Treat it as a low-voltage fixture lookup unless your label, wiring, or installation proves otherwise. Always confirm voltage and power source before buying parts.