
FIRST: The Wire-Twist Damage Trap — Read Before You Touch the Fixture
This is the single most important section on this page. The wire-twist trap converts a five-minute, $0 repair into a $15–25 fixture replacement, and it happens to thousands of homeowners every year because the instinct feels completely logical — it just causes invisible internal damage.
What the Wire-Twist Trap Is and Why It Happens
When a stake breaks at ground level, the fixture typically still sits on the stub of the broken stake or falls over nearby. The broken stake portion remains buried in the soil. The fixture's male threaded post is still screwed into the stake's buried female socket. Your instinct: grip the fixture and rotate it to unscrew it from the buried stake. Perfectly logical — and perfectly wrong.
Here is what happens inside the fixture when you do this. The landscape wire enters the bottom of the fixture, passes up through the hollow stake post and fixture body, and connects to the lamp socket inside the fixture head. The wire has no slack — it was pulled snug during installation. When you rotate the fixture clockwise or counter-clockwise, the wire rotates with the fixture body. The buried stake doesn't move — soil friction holds it in place. After two or three rotations, the wire is twisted tight inside the hollow fixture post. After four or five rotations, the wire either: (a) breaks the lamp socket connection inside the fixture, (b) frays or nicks the wire insulation at the point of maximum twist, creating a short circuit, or (c) pulls completely free of the socket, leaving a dead fixture with no electrical path. The light stops working. The stake was broken; now the fixture is too.
Step 1: Dig out the broken stake. Use a trowel, a garden hand fork, or even a flat-blade screwdriver to loosen and lift the broken stake out of the ground. This takes 60–90 seconds. Once the stake is free of soil, it spins freely when you rotate the fixture — because there's nothing holding it. Step 2: With the stake no longer anchored in soil, turn the fixture counter-clockwise to unscrew it from the stake. The wire cannot twist because both fixture and stake are rotating together. The lead wire stays completely undamaged. This sequence takes the same total time as trying to spin the fixture with the stake buried — but preserves the fixture. Never, under any circumstances, rotate a landscape lighting fixture while the stake is still in the ground.
I've seen this damage on service calls dozens of times. Homeowner tells me "I replaced the broken stake and now the light doesn't work." They replaced the stake, but before they could do that they had to get the fixture off the old one — and they did it by spinning the fixture. The first diagnostic step is always: remove the fixture head and check the lamp socket. If the wire has been twisted, you'll see the strand conductors wound around each other in the lower fixture body, usually with discoloration or nicks in the insulation at the tightest twist point. In bad cases the wire has actually pulled out of the push-in terminals at the socket. Replacement of the entire fixture is usually the only fix at that point — the wire is too short to reconnect and too damaged to safely use. The stake broke. The fixture could have been saved. One extra 60-second step — dig out the stake — would have prevented the whole thing.
Diagnose Your Failure Mode: Five Types, Five Different Root Causes
Before buying any replacement part, identify which failure mode broke your stake. Buying the identical replacement without fixing the root cause means you're scheduling your next repair call right now. Each failure mode has a specific fix — and several of them make the same plastic replacement stake a waste of money.
ABS and polypropylene stakes exposed to sunlight gradually lose their plasticizer and become brittle — the UV degradation is invisible until the first significant impact. Brittle stakes snap cleanly with very little force, often at the stress concentration point just below the female thread socket. If your stake broke cleanly, at the thread collar or just below it, with no visible cracking or deterioration leading up to the break — UV embrittlement is the cause. Fix: Same plastic replacement will fail again in 3–7 years. Upgrade to metal stake (aluminum or brass) with brass thread insert. UV has zero effect on metal stakes.
The most common failure after homeowner repositioning. Every time a path light is moved (for lawn care, landscaping, seasonal adjustment), it's unscrewed and re-driven, and the soft ABS or polypropylene female socket slowly loses thread definition. Eventually the fixture can no longer hold a positive lock and tilts. If you can spin the fixture on the stake without it tightening — thread strip is the cause. Fix: Replace the stake (the female thread socket is gone). Use a metal stake with a solid machined brass insert — these cannot strip in normal use. Do not re-drive a stripped-socket stake thinking the ground will hold it — it won't.
Impact failures break the stake at an angle rather than the clean horizontal snap of UV fracture. The break often leaves jagged edges. If you watched it happen or found the fixture lying next to a snapped stake — impact is the cause. Fix: For high-traffic areas with pets, consider whether a breakaway stake design is actually desirable (it sacrifices itself to protect the fixture). For areas where repeated impacts are unlikely, upgrade to a metal stake. For documented dog-traffic zones, consider relocating fixtures outside the traffic zone — no stake survives a determined large dog.
Freeze-thaw cycles in cold climates cause soil to expand and contract, pushing stakes progressively upward each winter. After 3–5 winters, a stake that was driven 8 inches deep may be anchored only 3–4 inches. One wind event, one nudge, and the inadequately anchored fixture topples. The stake didn't break — it was pushed out. Fix: Same-depth replacement will repeat the same cycle. Drive replacement stakes 12–16 inches deep (use a longer stake and cut to length above ground). In severe frost zones, use a PVC sleeve anchored deeper to hold the stake position through freeze-thaw cycles.
Consumer landscape lighting often ships with thin-wall stakes described as "metal" but actually made from zinc-coated iron. In acid soils (mulched beds, pine needle areas, high-rainfall regions), these corrode from the outside in and from the inside out (moisture trapping in the hollow core). The stake rusts through at the soil surface line — the same stress concentration zone as UV fracture. Fix: Inspect the break point. If you see rust, orange discoloration, or the metal crumbled rather than snapped cleanly — corrosion is the cause. Replace with solid aluminum or brass stakes, which do not corrode in any typical landscape soil environment. See the landscape lighting corrosion guide for the complete corrosion mitigation framework.
Stake pulled completely out of the ground without breaking. Happens in loose/sandy soil, after heavy rain that saturates soil, or through frost heave to the point of complete ejection. The stake is intact — it's just somewhere in the mulch or grass nearby. Fix: Find and inspect the stake. If undamaged, re-drive it at a deeper point (at least 12 inches) and tamp soil firmly around it. If the stake is intact but the hole is too loose, fill with dry play sand or crushed stone before re-driving for better anchoring.
Identify Your Thread Size: No Calipers Needed
The single biggest source of frustration in landscape light stake replacement is buying the wrong thread size. Most consumer landscape light guides skip this entirely and just say "buy a replacement stake" — which is useless if you don't know whether your fixture takes 1/2-inch or 3/4-inch thread. Here are three methods to identify yours without any measuring tools.
The Standard Portfolio Thread: 1/2-inch NPSM
The vast majority of Portfolio path lights, Malibu lights, Hampton Bay path lights, and most consumer landscape lighting sold at Lowe's and Home Depot from roughly 2000 onward use 1/2-inch NPSM (National Pipe Straight Mechanical) threads — also written as 1/2-14 NPSM. This is the standard for the industry. If you have a Portfolio path light from Lowe's and don't know the exact model, start with 1/2-inch NPSM. You have roughly a 90% chance of being correct.
A few heavier Portfolio fixtures and older designs (pre-2005, or heavy cast-aluminum models) used 3/4-inch NPSM threads. These feel noticeably larger — the post diameter at the fixture base is visibly bigger than a finger width.
| Thread Size | Outer Diameter (OD) of Male Post | How It Looks/Feels | Brands That Use It | What to Buy |
|---|---|---|---|---|
| 1/2-inch NPSM (1/2-14 NPSM) | 0.840 inches (~pencil-width) | Standard — narrower post, feels about as thick as a large thumb | Portfolio (most models), Malibu, Hampton Bay, many others | Stake marked "1/2-inch NPSM" or "1/2 NPT" or "1/2 pipe thread" — all compatible |
| 3/4-inch NPSM (3/4-14 NPSM) | 1.050 inches (~thick marker width) | Noticeably wider — looks and feels substantially thicker | Older Portfolio heavy models, GOODSMANN, some commercial fixtures | Stake marked "3/4-inch NPSM" or "3/4 pipe thread" |
| Proprietary plastic clip (no threads) | Varies — flat clip or friction fit | No threads visible at all — fixture pushes or clips onto stake | Budget solar lights, some Sterno Home, some Mainstays solar path lights | Brand-specific replacement only — universal stakes will not fit |
Three Field Methods to Confirm Thread Size Without Calipers
- The Lowe's plumbing aisle test (most reliable): Take the broken stake (or just the fixture base) to Lowe's. In the plumbing fittings aisle, find a 1/2-inch NPT female coupling and a 3/4-inch NPT female coupling — these cost about $1 each. Thread the fixture's male post into each fitting. The one that threads cleanly is your size. Note: NPSM (straight) and NPT (tapered) threads are close enough to test-fit but may not fully seat on each other. The fit that goes in most smoothly and doesn't cross-thread is your size. Buy the couplings if you want — they can be used as part of the PVC pipe hack described below.
- The quarter comparison (quick field test): The outer diameter of a US quarter is 0.955 inches. A 1/2-inch NPSM male post is visibly narrower than a quarter. A 3/4-inch NPSM male post is approximately equal to a quarter in width. Hold the quarter against the post: visibly narrower = 1/2-inch; approximately equal = 3/4-inch.
- The Portfolio model lookup: If you have the model number (typically on a sticker inside the fixture head or on the original packaging), look it up in the Portfolio model number lookup or the codes and identification decoder guide. Model numbers often decode the fixture family, which tells you the standard thread size for that generation of Portfolio products.
A hardware-store test fitting is useful only when diameter, pitch, taper, and seating depth are considered together. NPT and NPSM parts of the same nominal size may begin threading because they can share the same pitch, but one is tapered and the other is straight. That partial fit can stop before the fixture reaches its proper height or can damage soft aluminum and plastic threads. Use the landscape lighting screw thread identification guide before treating an initial two- or three-turn fit as proof that a replacement stake is compatible.
Four Repair Tiers: Free Field Hack to Permanent Metal Upgrade
Choose your repair tier based on how long you need it to last, what materials you have available, and whether you want to fix the root cause or just get the light working today. All four tiers start with the two-step removal procedure: dig out the stake, then unscrew the fixture.
FREE
NOW
Procedure: Dig out the broken stake. Find a 12–18 inch section of any stiff but flexible material: a hardwood stick, a piece of bamboo, a plastic tent stake, a wooden skewer, any rigid rod. Drive your improvised prop into the same hole at a 70-degree angle toward the fixture position. Reattach the fixture to whatever stub remains on the broken stake (or directly to your prop if compatible), lean the fixture against the prop, and tamp soil firmly around the base. This will hold for days to weeks in calm conditions. It is a placeholder while you buy a proper replacement — not a long-term fix.
Best for: Impact failures where the fixture still works and you need a visual placeholder tonight. Not appropriate for high-traffic areas or frost climates.
SAME
DAY
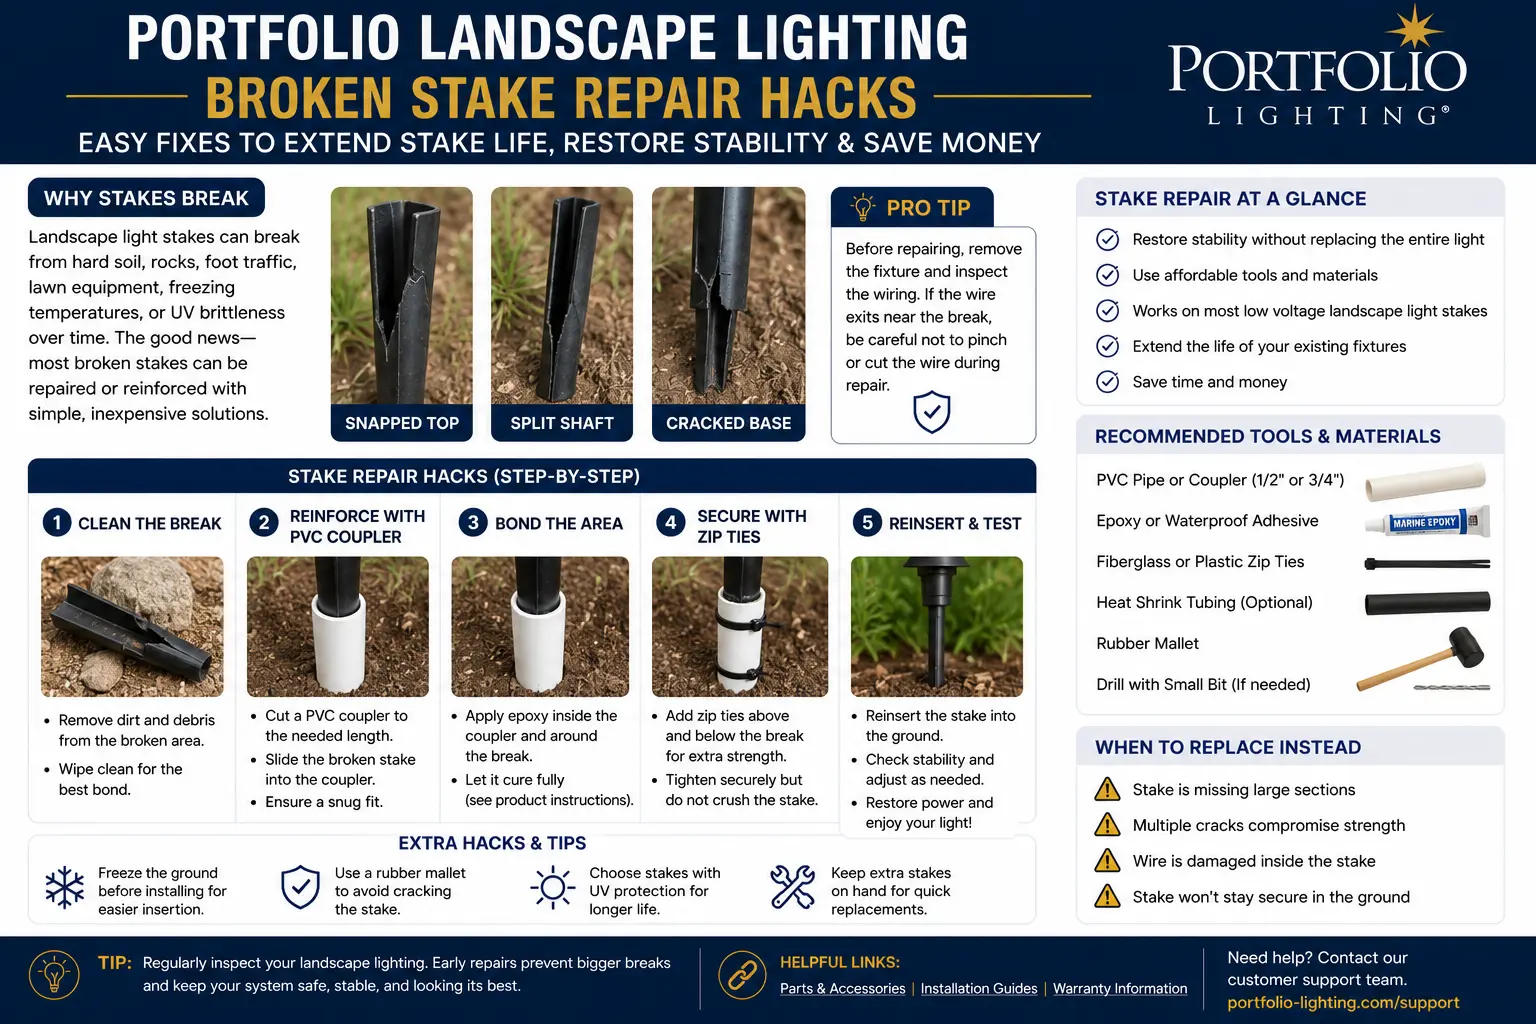
Materials: 1/2-inch Schedule 40 PVC pipe (sold in 10-foot sticks or precut lengths — buy 2 feet for multiple fixtures), plus a 1/2-inch female NPT coupling to thread onto the fixture base (optional — only needed if the existing stub won't work). About $3–4 total.
This is a time-proven DIY repair with a community of practitioners on Hometalk and DIY forums. See the complete step-by-step procedure in the next section.
Best for: UV brittle fracture (you're upgrading from the same plastic type), frost heave (you can make the PVC as long as you want), and multiple fixture repairs at once where per-unit cost matters.
1 WEEK
AMAZON
What to buy: 1/2-inch NPSM landscape lighting replacement stakes. Available in packs of 2, 4, or 6. Portfolio's own replacement stakes (2-pack aluminum, 1/2-inch thread) are available at Lowe's (model varies by year). Universal 1/2 NPT thread composite stakes from MarsLG, Makergroup, and Cheopha are available on Amazon for $6–10 per 4-pack.
One note: some "heavy duty" replacement stakes sold alongside standard ones are the same thin-wall hollow construction as the original — check the product description for "solid" vs "hollow" and for wall thickness. A thicker-wall solid-core stake lasts significantly longer. The Portfolio replacement aluminum stake sold at Lowe's (2-in x 5.83-in aluminum) is typically solid and a genuine improvement over original plastic stakes.
Best for: Thread strip failures (thread is gone, replacement is needed regardless of material), situations where the failure mode was a one-time event rather than UV or environmental stress.
PERM
UPGRADE
What to buy: Die-cast aluminum stakes with machined brass thread inserts — GOODSMANN makes a well-regarded 3/4-inch NPSM version (verify your thread size); the VOLT Hammer stake uses a large PVC body with a brass insert and lifetime warranty; solid brass stakes from professional landscape lighting suppliers will outlast the fixtures they support.
Why it works: Aluminum and brass do not UV-degrade. The machined brass thread insert cannot strip under normal torque. The die-cast body is 3–5x the wall thickness of thin-wall consumer stakes. Impact will still break these under sufficient force — but the force required is dramatically higher, and the fracture mechanism is plastic deformation rather than brittle snapping.
Cost: $8–15 per stake, available in multi-packs. The per-unit cost is 3–5x a plastic replacement but you buy it once. Highly recommended for UV brittle fracture repairs (where same plastic will fail again) and corrosion failures (where ferrous metal stakes will repeat the cycle).
The PVC Pipe Hack: Full Step-by-Step Procedure
This is the most popular field-proven DIY broken stake fix in the landscape lighting community, documented extensively on Hometalk and DIY forums since at least 2010. It costs $2–4, uses materials available at any Lowe's or Home Depot, takes 15 minutes, and produces a stake that is generally more impact-tolerant than the original thin-wall hollow consumer stakes.
The Concrete Sleeve Variation for Frost-Heave Areas: In climates with deep frost penetration, drive a larger PVC pipe (1-inch or 1.25-inch diameter) as a sleeve using a post driver, 18–24 inches deep. The sleeve is permanent — it goes in once. Your landscape lighting stake (PVC or metal) slides inside the sleeve and is protected from frost heave because the sleeve is anchored below the frost line. The fixture stake can be lifted out for winter storage and reinserted each spring with no re-driving. This is the professional approach for northern climates with chronic frost heave problems.
Metal Stake Upgrade: When to Do It and What to Look For
If your stakes are breaking due to UV brittle fracture or corrosion — the two failure modes where replacing with the same material guarantees a future repeat — a metal stake upgrade is the correct solution. Here's what actually matters when selecting one.
What Makes a Metal Landscape Stake Actually Good
Not all "metal" landscape stakes are created equal. Consumer landscape lighting ships with thin-wall hollow steel stakes that are superficially metal but corrode quickly and provide little additional impact resistance over thick plastic. A genuine quality upgrade has these characteristics:
- Material: Die-cast aluminum or solid brass — not galvanized steel or zinc-coated hollow steel. Aluminum won't rust. Brass won't rust and develops a natural patina that is aesthetically consistent with quality landscape fixtures. Galvanized steel will eventually rust through, especially in acidic mulch beds.
- Thread insert: Machined brass — the female thread socket into which the fixture screws must be brass or stainless steel for longevity. Plastic thread sockets, even in metal-bodied stakes, strip over time. A machined brass insert is effectively permanent.
- Wall thickness: 3mm minimum for the stake body — thin-wall consumer metal stakes at 1mm wall thickness are barely more impact-resistant than plastic. A stake with 3mm or greater wall thickness survives most landscaping-scale impacts.
- Cleated foot design: Not just a sharpened point — cleated or ridged foot profiles grip soil laterally as well as vertically, preventing pull-out in loose soil and reducing frost heave susceptibility.
The "Breakaway" Design Debate
Some landscape lighting professionals prefer plastic stakes specifically because they serve as a "crumple zone" — when a lawnmower, bicycle, or large dog applies force to a fixture, the plastic stake breaks rather than transmitting that force to the fixture body or to the underground wire connection. A metal stake that doesn't break may instead bend at the soil line, or it may transmit the impact force down the wire to the buried splice point, damaging a connection that's far harder to access than the stake.
This is a legitimate design philosophy — and it's worth knowing before doing a full metal upgrade. If your fixtures are in areas with regular lawnmower proximity, a breakaway plastic stake that sacrifices itself is arguably the correct choice. If your fixtures are in well-protected garden beds that are never equipment-maintained, the premium permanent metal stake is appropriate. The failure mode analysis in the previous section guides this decision: UV fracture and corrosion failures → metal upgrade; impact failures in equipment zones → consider whether breakaway plastic is the correct engineering choice.
Soil-Specific Stability Solutions: Clay, Sandy, and Freeze-Thaw Soils
The same stake length and installation technique produces dramatically different results in different soil types. Matching your stability approach to your soil is as important as the stake material choice.
If the stake broke while trying to open the fixture, the root problem may have been thread seizure rather than weak plastic or poor installation. Once corrosion locks the collar to the housing, all twisting force transfers into the stem and stake. Before repairing or replacing the broken mount, read the Portfolio stuck and corroded fixture opening guide so the same failure does not happen again during the next bulb, lens, or socket service.
Clay soil grips stakes tightly when dry — the stakes won't pull out. But when clay saturates with water, it expands and can push stakes upward, and when it dries it contracts, sometimes leaving stakes in a slightly different position. The bigger problem with clay: driving stakes in summer-dry clay is extremely difficult without creating microcracks around the stake that become water channels in wet seasons.
Solutions: Soak the stake area with water the day before installation to soften the clay. Drive stakes in a rotating motion rather than direct impact. Use a stake 2–3 inches longer than normal — extra depth in clay provides much stronger anchoring than in loose soil. After installation, tamp clay back tightly around the stake from multiple directions.
Sandy or loosely amended soils provide very little lateral grip on stake surfaces. A stake that drives in easily will pull out equally easily — especially after irrigation, rainfall, or root disturbance from adjacent plants. Stakes in sandy soils typically can't achieve adequate anchoring from depth alone.
Solutions: Fill the stake hole with dry play sand or crushed fine gravel before re-driving — these pack more tightly around the stake than native sandy soil. Tamp aggressively after driving. Consider a wider-body stake (like a PVC pipe stake) that presents more surface area to the soil. In extreme loose-soil situations, pour a small collar of fast-set concrete around the top 2 inches of the buried stake section — this creates a soil anchor that holds regardless of soil type.
Frost heave occurs because water in soil expands 9% when it freezes, pushing everything upward. Repeated cycles progressively reduce stake anchoring depth. After 3–5 winters, a stake driven 8 inches deep may be anchored only 3–4 inches — insufficient for any fixture stability. No stake material or installation technique prevents frost heave on short consumer stakes.
Solutions: Drive stakes below the frost line (typically 36–48 inches in USDA Zone 5 and colder — not practical for consumer path light stakes). Use the concrete sleeve approach: a 1-inch diameter PVC sleeve driven 24+ inches deep holds a removable stake in fixed position through any frost event. Or: accept annual re-leveling as a spring maintenance task (15 minutes for a full yard of path lights) using a dedicated leveling tool. See the landscape lighting maintenance guide for seasonal care procedures.
When to Replace the Fixture Instead of Just the Stake
A broken stake is almost always a $6 repair when caught correctly. But several situations indicate the fixture itself needs replacement — and continuing to repair stakes on a failing fixture is money wasted. Here's how to tell the difference.
Replace the Fixture When:
- The fixture was twist-damaged during stake removal: Wire inside the fixture is twisted, shorted, or pulled free of the socket. The wire inside most consumer landscape fixtures is too short and too fine-gauge to repair — replacement is the practical solution. See the wire-twist damage trap section above and the Portfolio landscape lights not working guide for diagnosis.
- The fixture body or lens is cracked: A cracked lens housing admits water to the LED driver, accelerating driver failure. A cracked housing that was caused by the same impact that broke the stake indicates the impact force was transmitted through the wire into the fixture body. Replace both stake and fixture.
- The fixture is more than 8–10 years old and has multiple issues: LED driver failure, lens yellowing, corroded socket, plus a broken stake — at this point the fixture has reached its practical service life. Portfolio replacement fixtures at Lowe's are typically $15–25 for standard path light styles, and alternatives from brands like VOLT offer significantly better build quality at competitive prices. See the best replacement for Portfolio landscape lighting guide for specific alternatives and the replacement guide for the complete part selection process.
- The fixture is in a discontinued line with no available stake replacement: If the fixture's thread size is non-standard (proprietary clip system, unusual diameter), and no compatible replacement stake exists, replacing the fixture with a current model that uses standard 1/2-inch NPSM threads future-proofs the installation. The Portfolio compatibility guide and model number lookup help identify whether replacement parts are still available for specific Portfolio models.
The Voltage Check Before Any Fixture Replacement
Before concluding that a non-working fixture needs replacement after a stake failure, check the voltage at the fixture connection point. A broken stake that was knocked over often disconnects or partially disconnects the low-voltage wire at the fixture's connection point — which looks like a dead fixture but is actually just a loose connector. Reconnect the wire to the fixture and check for voltage with a multimeter before purchasing a replacement. If you measure 10.8V–12.5V at the fixture connection point and the fixture still doesn't light, then the fixture itself has failed. See the voltage drop calculator for diagnosis and the lights not working guide for complete fault isolation procedure.
Broken Stake Repair FAQ
Can I use a metal electrical conduit nipple instead of buying a special replacement stake?
Yes — this is one of the most cost-effective and durable DIY replacement stake approaches. A 3/4-inch rigid metal conduit nipple (available in Lowe's electrical department for under $2) is solid metal, has threads that mate with most landscape fixture bases (1/2-inch NPT threads fit reasonably well), and is available in 6-inch and 8-inch lengths. It has no hollow center for a wire channel, so you'll need to route the wire up the outside of the nipple and into the fixture base — use a small zip-tie or adhesive cable clip to hold the wire against the nipple. This is not the most aesthetically refined solution but it is extremely robust and virtually free if you have a nipple in your parts bin. Confirmed compatible with most Portfolio and Malibu path light bases.
My path light tilts back upright after I straighten it, then tilts again a week later. Is this the stake or the soil?
If the stake appears intact and the fixture always tilts in the same direction, the most likely cause is one of two things: (1) The thread connection has stripped slightly — the fixture is no longer locking firmly on the stake and is rotating from its own weight and wind. Test by removing the fixture and checking whether the male post still threads tightly into the stake socket. If it spins freely without tightening, the thread is gone — replace the stake. (2) The stake is gradually heaving due to freeze-thaw action or irrigation disturbance — it's moving over weeks rather than all at once. If you notice fixtures tilting progressively over multiple seasons, frost heave is the likely cause. See the freeze-thaw solutions in the soil stability section above. For consistent one-direction tilting in a single season, check that the stake was driven straight — a stake driven at an angle always tilts the fixture in the direction of the lean. The landscape lighting troubleshooting guide covers systematic diagnosis of recurring instability issues.
My Portfolio landscape lights are no longer available at Lowe's. Where do I find compatible replacement stakes?
Portfolio-branded replacement stakes (Portfolio item number 1000108389, 2-count aluminum stakes, 1/2-inch thread) are still intermittently available at Lowe's and on the Lowe's website. When Portfolio branded stakes are unavailable, any 1/2-inch NPSM or 1/2-inch NPT landscape lighting stake is compatible with standard Portfolio path lights — the thread standard is universal across consumer landscape lighting brands. Cheopha, Makergroup, and MarsLG all make 1/2-inch NPT stakes available on Amazon in 4- and 6-packs for $6–12. For the permanent metal upgrade, GOODSMANN's 3/4-inch NPSM stakes work for Portfolio fixtures with that thread size. The Portfolio replacement stakes guide maintains current availability information for both Portfolio-branded and compatible third-party stakes. For fixtures that are discontinued and may not accept standard stakes, the discontinued Portfolio lighting guide covers sourcing options for older model parts.
My landscape lights are dim after I replaced a broken stake. Did I damage something?
Dimming after a stake repair is almost always a connection issue, not stake-related damage. When the fixture was detached from the broken stake and the wire was disturbed, the wire connection at the fixture body may have become loose — or the buried wire connector in the ground may have been partially pulled free. First check: measure voltage at the fixture with a multimeter (see the voltage drop guide and the voltage drop calculator). If you measure significantly less than 12V, the connection in the ground near the fixture has loosened. Second check: look at where the wire enters the fixture — is the push-in connection seated properly? If voltage is fine but the light is still dim, the LED driver may have been damaged by the same event that broke the stake. Driver failure produces dim output that gradually worsens. See the Portfolio lights too dim guide for complete dimming diagnosis.
Related Repair, Parts, and Troubleshooting Guides
- Portfolio Replacement Stakes Guide
- Landscape Lighting Replacement Parts
- Portfolio Replacement Fixtures
- Portfolio Landscape Lighting Troubleshooting
- Portfolio Landscape Lights Not Working
- Portfolio Lights Too Dim
- One Zone Not Working
- Lights Work Sometimes Guide
- Landscape Lighting Troubleshooting
- Portfolio Compatibility Guide
- Model Number Lookup
- Portfolio Codes Decoder Guide
- Discontinued Portfolio Lighting
- Best Portfolio Replacements
- Landscape Lighting Corrosion Guide
- Landscape Lighting Maintenance
- Landscape Lighting Connectors
- Splice & Connection Requirements
- Failure Points Guide
- Voltage Drop Guide
- Voltage Drop Calculator
- Portfolio MR16 LED Replacement Bulbs
- Portfolio Bulb Replacement Guide
- Portfolio Transformer Replacement