
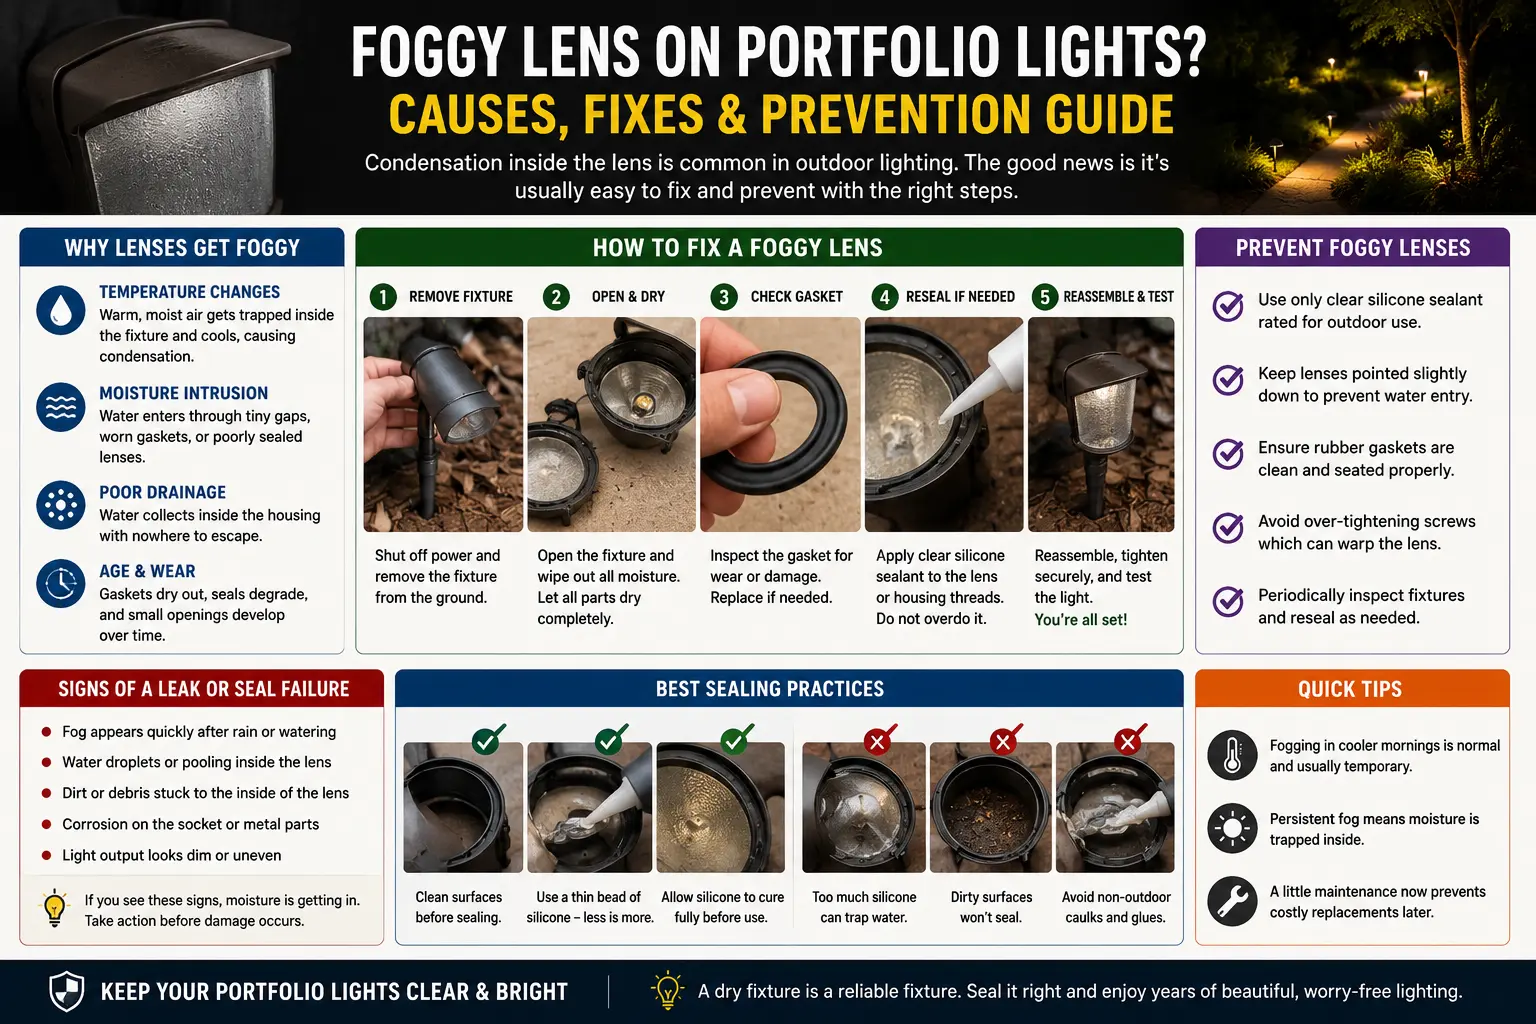
Three Types of Foggy Lens: Which One Is Yours?
Before touching anything, identify which of the three fogging types you have — because each requires a completely different approach. The wrong fix wastes time and money and may make the real problem worse.
Water droplets on the inside surface of the lens, or a light mist that reduces clarity. May appear as streaks where droplets have tracked downward on the inner lens surface.
Key identifying characteristic:It changes. The fogging is heavier in the morning or after rain events and clears partially or completely when the fixture warms up during the day or after the lamp has been on for 15–30 minutes. This is the defining test: if fogging clears with warmth, it is Type 1.
Cause:Thermal cycling pressure differential (the pump mechanism) drawing moist air through microscopic seal imperfections on every cooling cycle.
Fix:Desiccant inside the fixture to absorb moisture; address the seal; consider a pinhole vent if recurring. Not an emergency — does not immediately threaten electronics if minor.
Uniform milky, yellow, or cloudy appearance across the lens surface. May have a slightly rough texture when you run a finger across the outside of the lens. Yellowing or browning that is uniform and even.
Key identifying characteristic:It does not change with temperature. The fogging is identical at 6 AM as at noon. The haze is on the exterior surface (or through the lens material), not on the interior surface. Scratch the outside with a fingernail — if the haze is on the surface, the nail may catch on it very slightly.
Cause:UV radiation breaks down polycarbonate polymer chains. Structural damage to the plastic material itself — not surface contamination. Typical onset: 3–7 years of direct sun exposure in Florida, Texas, Arizona, California.
Fix:Mild-moderate: wet sand with 400–2000 grit progression, apply UV-protective clear coat. Severe or through-material yellowing: replace the lens entirely. Cleaning and wiping alone never works.
Standing water droplets visible inside the fixture body — not just on the lens but pooled at the lowest point of the housing. Possible white mineral deposits (calcium) at the waterline where water evaporated. May have brown staining from rust or soil contact.
Key identifying characteristic:Standing water visible inside the housing when you look through the lens. Fogging does not clear with warmth because liquid water is present, not just vapor. Worse after rain or irrigation events. Open the fixture — you will find actual water inside.
Cause:Failed gasket allowing liquid water ingress. Different from condensation — this is bulk water entering through a seal gap, not moisture vapor entering through microscopic imperfections.
Fix:Drain the housing, dry completely, replace the gasket with correct specification O-ring or flat gasket. Address any wicking in the supply wire. Inspect socket for corrosion.
The Thermal Pump: Why Properly Sealed Fixtures Still Get Condensation
This is the mechanism that produces the most common portfolio landscape lighting condensation scenario — and the one that makes people incorrectly conclude their gasket has failed when it hasn't. Understanding it prevents unnecessary gasket replacements and sets realistic expectations about what a sealed landscape fixture can and cannot prevent.
The Pressure Differential Pumping Mechanism
Per US Patent 11339951 (an LED fixture moisture management patent that specifically addresses outdoor landscape lighting): "A problem with LED outdoor landscape lighting fixtures is the LED device deteriorates if it has moisture in its atmosphere. This happens by the continued heating and cooling of the LED device as it is placed into the on and off states. If the LED device enclosure is located in a typical metal housing, the metal housing expands and contracts on every operation cycle."
The patent continues: "Once the seal is broken the heated atmosphere from operation will expel air from the LED light source enclosure to the outside atmosphere. When the LED and housing cool, air from the outside uncontrolled atmosphere will be drawn into the LED light source enclosure because of the negative pressure created in the LED light source enclosure. If it is a moist day, the cooling LED device will cause the LED light source enclosure to draw in moist air."
Even with an intact gasket, this pressure cycling works over months and years to fatigue the seal material, creating microscopic flow paths. The fixture doesn't need a visible crack or a failed gasket for this to happen — it needs only the accumulated effect of thousands of heating and cooling cycles.
Why This Is Especially Pronounced in Low-Voltage LED Landscape Fixtures
Portfolio landscape path lights and spotlights have a particularly high thermal delta between operating temperature and ambient. When lit, the interior warms significantly above ambient air temperature. When the transformer timer shuts off at a programmed time — often midnight or 1 AM — the fixture cools rapidly toward the now-cool nighttime air temperature. This rapid cooling creates a strong inward pressure differential precisely when the air is most humid (overnight humidity is typically highest). The landscape lighting fixture is essentially running a nightly humidity-pumping cycle: warm and dry during the lighting period, cooling rapidly and drawing in humid night air when the lights go off.
The LawnSite professional landscape lighting forum documents this precisely: "When it cools then heats and cools then heats it creates a vacuum, which sucks the moisture in but doesn't release any due to the water tight seal." This mechanism explains why condensation-type fogging is most visible in the early morning — the overnight cooling cycle has just completed its maximum moisture-ingestion event, and the fixture hasn't yet warmed from the morning sun to evaporate the interior moisture.
AGC Lighting's Solution: The Breathable Vent
Per AGC Lighting's published documentation on LED fixture design: "Adding vents to outdoor LED fixtures prevents moisture from damaging the electronics and prevents fogging of lenses. The expanding coefficient of air becomes higher by 10% with a 30°C temperature rise, and the pressure difference between inside and outside will be higher by 10%. A vent (waterproof breather valve) is waterproof and breathable — gas can go through freely when there is a differential pressure. This allows pressure equalization without allowing liquid water entry."
GORE's membrane technology documentation confirms: "These pores are large enough to allow molecules of air and gases — including humidity — to exit the enclosure. This not only reduces the chance of condensation build-up, but also equalizes pressures that could otherwise stress enclosure seals to fail and admit even more moisture."
Portfolio consumer landscape fixtures do not include breathable vents — they use conventional compression gaskets without pressure equalization. This is a cost-reduction design decision that makes condensation Type 1 physically inevitable in humid climates for fixtures installed for more than 2–3 years. It is not a manufacturing defect; it is a design choice with predictable consequences.
Diagnosis Without Opening the Fixture: The Three-Test Protocol
Run these observations before touching any hardware. In most cases, one of these three tests produces a definitive diagnosis and tells you exactly which fix section to read next.
| Observation | Type 1: Condensation | Type 2: UV Hazing | Type 3: Water Intrusion |
|---|---|---|---|
| Does fogging change with time of day or temperature? | YES — clears when warm, heavier in morning | NO — identical at all times of day | NO — constant; worse after rain |
| After running lamp 30 minutes: does fog clear? | YES — completely or substantially clears | NO — no change from lamp heat | NO — may reduce slightly but does not clear |
| Where is the fog/haze located? | INTERIOR surface of lens — droplets track down inside | EXTERIOR surface or through lens material — uniform milky layer | INSIDE the fixture body — visible pooling or droplet tracks on interior housing walls |
| Texture of exterior lens surface? | Clear or normal when wiped dry | Slightly rough or chalky feel — fingernail catches slightly | Clear on outside — problem is entirely inside the housing |
| Relationship to weather events? | Worse in high-humidity periods, especially at night; NOT specifically after rain | No relationship to weather — progressive over years | Notably worse immediately after rain or irrigation events |
| Appearance when opened | Interior is damp but no standing water; lens interior surface shows moisture film | Interior is dry; lens outside surface has uniform degraded appearance | Standing water visible in housing; possible mineral deposits or rust staining at water line |
The diagnosis I miss most often in the field is the mixed case: a fixture showing both Type 1 (condensation clearing when warm) and Type 3 (standing water at the housing base when I open it). Both types are present simultaneously — condensation from the thermal pump AND liquid water from a failed gasket at the lower seal point. The presence of the condensation obscures the liquid water problem because the condensation clears and people assume the problem is resolved. When both types coexist, fix the gasket first (stops the liquid water), then address any remaining condensation with desiccant and the pinhole vent solution. If you only address the condensation without fixing the gasket, you'll be back in six months with the same standing water and corrosion in the socket area.
Fixing condensation usually requires opening the lens, drying the housing, and inspecting the gasket. But if the lens collar is seized, forcing it can crack the lens seat, scrape the finish, or snap the stem. If the fixture has been in wet soil for several seasons, follow the Portfolio stuck fixture opening and anti-seize guide before removing the lens for condensation repair.
Fix Type 1: Condensation — Desiccant & Vent Procedure
Type 1 condensation does not require gasket replacement if the gasket is still in reasonable condition. The fix targets the moisture that has already entered and prevents future accumulation.
Condensation inside a lighting fixture is often caused by compromised weather protection. A worn gasket, damaged O-ring, or failed seal can allow moisture to enter while preventing proper ventilation. Learn how these components work in our outdoor lighting gaskets, O-rings, and seals guide.
Fix Type 2: UV Hazing — Why Cleaning Never Works and What Actually Does
UV hazing is the most mishandled fogging type because it looks like it should respond to cleaning — and every cleaning attempt fails completely. Understanding the chemistry explains why and points to the only two approaches that actually work.
The Chemistry of Why Cleaning Fails
Per SalesPlastics' polycarbonate material documentation: "Yellowing caused by UV degradation is largely irreversible because it results from structural changes in the polymer chains. While surface-level yellowing due to dirt or contaminants can be cleaned with mild polishing agents, permanent yellowing cannot be restored through cleaning alone."
UV radiation at wavelengths below 400nm breaks the molecular bonds in polycarbonate polymer chains — a process called photooxidation. The broken polymer chains scatter light instead of transmitting it, producing the milky, hazy appearance. This is not a coating on the surface of the polycarbonate; it is damage through the top layer of the polycarbonate material itself. No solvent, no cleaner, and no polish compound that doesn't remove material can reach inside the polymer structure to repair these broken bonds.
The outer layer of polycarbonate typically has a factory-applied UV-absorbing hard coat — a thin sacrificial layer that absorbs UV before it reaches the base polycarbonate. Once this hard coat is depleted by years of UV exposure (typically 3–7 years in high-UV environments), UV reaches the base material directly and begins breaking down its polymer chains. The hazing begins from the hard-coat-failure point forward and progresses with continued sun exposure.
Fix Option A: Wet-Sand and Recoat (Mild to Moderate Hazing)
This technique is identical to automotive headlight restoration — which uses the same polycarbonate lens material facing the same UV degradation problem. The principle: physically remove the degraded outer layer of polycarbonate through abrasive wet-sanding, exposing clear undamaged material underneath, then apply a new UV-protective coating to protect the fresh surface.
- Wet-sand the exterior lens surface with 400-grit wet/dry sandpaper, keeping the surface wet. Use circular motions. The lens will look scratched and worse — this is correct at this stage.
- Progress to 800-grit wet sand, then 1500-grit, then 2000-grit. Each finer grit removes the scratches from the previous stage. After 2000-grit, the lens should be uniformly hazy with fine sanding marks but no yellowing.
- Polish with plastic-specific polishing compound (Meguiar's PlastX or equivalent) using a microfiber cloth or polishing pad. This removes the 2000-grit sanding marks and restores transparency.
- Critical step: Apply two coats of UV-protective polycarbonate clear coat sealant (3M Headlight Lens Coating, Rust-Oleum 2X Spray Clear, or automotive headlight clear coat). Without this step, the new polycarbonate surface has no UV protection and will re-haze within 6–18 months. Per Carvira's automotive lens documentation: "UV sealant application after cleaning is critical to maintain clarity and prevent rapid re-oxidation."
Fix Option B: Lens Replacement (Severe Hazing or Through-Material Degradation)
When hazing has degraded through the full lens thickness or when the lens is cracked, the correct fix is lens replacement. Portfolio landscape fixture lenses are available through the Portfolio replacement lenses guide. Measure the lens diameter carefully before ordering — Portfolio used different lens styles across path lights, deck lights, and spotlights. Generic replacement lenses in standard diameters (1-inch, 1.5-inch, 2-inch, 2.5-inch, 3-inch) are available on Amazon for $5–15 per piece. When replacing a polycarbonate lens, consider upgrading to borosilicate glass — which does not UV-degrade at all. See the lens materials section below.
Fix Type 3: Liquid Water Intrusion — Gasket Replacement and Wicking Address
Type 3 water intrusion is the most important to fix promptly because standing water inside a fixture body accelerates corrosion of the socket and LED components. The fix has two parts: the primary seal (gasket) and the secondary source that most people miss (wicking through the supply wire).
The Gasket Replacement Procedure
Per Landscape Lighting Pro's published documentation: "Often times the solution to repairing a leaky fixture is replacing the gasket. The gasket is a rubber O-ring that fits over the fixture so that when the components are all pieced together, there is a barrier to help keep moisture out."
- Disconnect power and open the fixture completely. Drain any standing water by tilting the fixture body. Use a dry cloth or cotton swab to absorb water from the housing interior.
- Document water entry point. Before replacing anything, determine where the water entered. Common entry points: the lens ring gasket (most common); the wire entry point where the supply cable enters the fixture stake or housing; a cracked housing body. Water entry at the lens ring = gasket replacement fixes it. Water entry at the wire = address wicking (see below).
- Remove the old gasket. The gasket typically seats in a groove on the fixture body. Pry it out with a fingernail or plastic spudger. Measure the gasket: outside diameter, inside diameter, and cross-section diameter (the thickness of the rubber cord). Record all three dimensions.
- Source the replacement gasket. Standard O-rings at these dimensions are available at hardware stores in the O-ring drawer section ($0.50–$2 each) or in bulk O-ring assortment kits on Amazon ($8–15 for 400 pieces). The material should be EPDM rubber (best UV and ozone resistance for outdoor applications) or silicone (best temperature range). Avoid plain rubber or Buna-N for outdoor use — they UV-degrade and crack faster than EPDM.
- Install the new gasket and reassemble. Seat the new O-ring in the groove. Apply a very thin coat of dielectric grease to the gasket surface — this lubricates the gasket during assembly, prevents it from being pinched during tightening, and provides additional moisture sealing. Tighten the lens ring finger-tight plus a quarter turn. Do not over-tighten — this permanently deforms the gasket and accelerates future failure.
The Wicking Source: The Water Entry Nobody Checks
A replaced gasket fails to solve recurring water intrusion in a significant number of cases — because the water is not entering through the lens seal at all. It's entering through the supply wire. Per the LawnSite professional forum documentation: "I would look for the type of wire coming into the fixture, and whether the wire entry is sealed also. Some fixtures use a paper wrapped 3-conductor wire. The fixture can be completely sealed, but water can wick up the paper, causing the fixture to have water or moisture inside."
Standard 12/2 or 16/2 low-voltage landscape cable has two copper conductors with air space between the strands inside the insulation jacket. If the cable is damaged, spliced with a non-waterproof connector, or cut anywhere along its run, water can enter at that point and wick up through the conductor air space inside the insulation, emerging inside the fixture housing — completely bypassing the lens gasket. The fixture gasket can be brand new and perfect while water enters from below through the supply wire. See the complete wicking mechanism explanation in the corroded socket repair guide and the failure points guide for the wire inspection procedure.
After replacing the gasket: check the socket for corrosion from the water exposure. If green deposits are visible on the socket contacts, clean per the socket cleaning guide before reinstalling the lamp.
The Silicone Caulk Mistake That Makes Everything Worse
The most common DIY mistake for landscape lighting moisture problems is applying silicone caulk between the lens and housing. It feels logical — seal the gap. It produces four specific problems that make the fixture harder to service and often trap moisture more effectively than a worn gasket would.
Why Silicone Caulk Is the Wrong Fix
- It permanently bonds the lens to the housing. The landscape light gasket is designed to be a serviceable compression seal — removable for lamp replacement, socket cleaning, or gasket replacement. Silicone caulk forms a rigid adhesive bond. Removing a caulked lens requires breaking the bond, which almost always cracks the polycarbonate lens. You've just destroyed the component you were trying to protect.
- It doesn't compress like a gasket. A proper O-ring or flat gasket compresses to fill microscopic surface irregularities and then springs back on every thermal cycle, maintaining the seal as the fixture expands and contracts. Silicone caulk, once cured, is a rigid or semi-rigid material that cannot dynamically maintain a seal through thermal cycling. As the housing and lens ring expand and contract at different rates (different materials expand at different rates), the caulk joint cracks — often in the first season — creating gaps that are harder to seal than the original gasket joint was.
- It traps moisture inside. If any moisture is inside the fixture when you apply the caulk, you've sealed it in permanently. The condensation that you're trying to prevent now has no escape path even when the fixture is warm and the vapor would naturally diffuse out through the imperfect gasket.
- It hides the real problem. Applying caulk may temporarily reduce visible fogging by reducing liquid water entry — but it doesn't address the underlying cause (worn gasket or wicking wire) and fails within months, at which point the lens is now also damaged and the original problem remains.
Polycarbonate vs Glass: Why Material Determines Whether This Problem Recurs
When replacing a lens, the material choice determines whether you'll be back doing this repair in 3 years or never. Portfolio consumer landscape fixtures use polycarbonate lenses — the same material in car headlights that yellows with UV exposure. The alternative is borosilicate glass, which has no UV degradation mechanism at all.
Polycarbonate is 250 times more impact-resistant than glass, significantly lighter, and much cheaper to injection-mold into complex shapes. For consumer landscape fixtures that may be struck by lawn mowers, edgers, or foot traffic, the impact resistance is a genuine benefit.
The UV problem:Uncoated polycarbonate begins hazing within 2–3 years in high-UV environments. Even with the factory UV hard coat, the protective coating depletes within 5–7 years of direct outdoor sun exposure, after which photooxidation of the base material begins. Per Hyperlite's glass vs polycarbonate analysis: "Salt fog can etch uncoated polycarbonate surfaces within 18–24 months... resulting in a permanent 'milky haze' that scatters light and reduces effective lumen delivery by an estimated 15–20%."
Cleaning with wrong products:Never use ammonia-based cleaners (Windex), acetone, or alcohol concentrations above 70% on polycarbonate — these attack the material and cause crazing (fine surface cracking that is permanent).
Glass has no UV degradation mechanism. Borosilicate glass (the same material as Pyrex laboratory glass) can be exposed to direct sun for decades with no hazing, yellowing, or optical degradation. UV-type fogging is permanently eliminated by switching to a glass lens.
The impact tradeoff:Glass breaks if struck sharply. For path lights in high-traffic areas or near lawn equipment, the impact risk is real. For spotlights, in-grade well lights, or path lights in protected areas, the impact risk is minimal and the UV advantage is substantial.
Sourcing glass replacement lenses:Standard borosilicate glass tubes and discs in landscape fixture diameters (1-inch through 3.5-inch) are available as specialty landscape lighting parts from suppliers like Clarolux (clear borosilicate replacement tubes for path lights, installed with clear silicone — not caulk — around the rim). Amazon also stocks clear glass tubes and discs in standard lamp diameters. The Portfolio replacement lenses guide covers glass lens sourcing for specific Portfolio fixture types.
The One-Time Upgrade That Eliminates UV-Type Fogging Permanently: When replacing a hazing polycarbonate lens on a Portfolio path light or spotlight, spend $8–12 sourcing a clear borosilicate glass replacement tube of the same outer diameter and length. This is a one-time swap that eliminates UV hazing recurrence permanently. The glass lens will still get condensation (Type 1) if the fixture has a thermal cycling moisture issue — glass doesn't prevent the moisture pumping mechanism. But the UV-hazing problem (Type 2) — the one that makes cleaning futile — is permanently solved. For any fixture you're opening anyway for a gasket or socket repair, glass lens replacement at the same time is the highest-ROI maintenance step available.
IP65 vs IP67: What the Rating Actually Means for Condensation Expectations
Portfolio landscape fixtures often carry an IP65 or IP67 rating, and many homeowners assume these ratings mean the fixture is immune to moisture. The IP rating system means something more specific — and it doesn't address condensation at all.
What IP Ratings Actually Measure
The IP (Ingress Protection) rating system (IEC 60529) tests fixtures against liquid water entry from external sources under controlled conditions. IP65 means the fixture is protected against jets of water from any direction. IP67 means the fixture can be submerged in 1 meter of water for 30 minutes without water entry. These tests are conducted at a single temperature, at a single point in time, on a factory-fresh fixture with new gaskets.
What IP ratings do not measure or address: condensation forming inside the fixture from thermal cycling of trapped air humidity; gasket compression loss over years of operation; thermal cycling fatigue of seal materials; the pumping mechanism that draws humid air through microscopic seal imperfections; or moisture entering through the supply wire via wicking.
Why IP68 Can Actually Be Worse for Condensation
Per Alibaba's outdoor lighting documentation: "Over-engineering can backfire: fully sealed IP68 units trap heat and lack pressure relief, accelerating LED lumen depreciation." A fully IP68-sealed fixture with no pressure equalization mechanism is a maximally effective condensation pump — the strong seal means the thermal pressure differential cannot equalize at all, creating the strongest possible inward suction on every cooling cycle. Higher IP ratings can produce more condensation, not less, when the design lacks a breathable vent to equalize pressure.
Prevention After Repair: What Actually Stops These Problems from Returning
Each fogging type has specific prevention measures that address its underlying cause. Mix and match based on which types you've experienced.
Preventing Condensation Recurrence (Type 1)
- Fresh desiccant every season: At the start of each summer (or each spring before the humidity season begins in your climate), open fixtures and replace desiccant packets. This is the single most effective annual maintenance step for humid-climate condensation.
- Timer setting: Extending the landscape lighting timer to shut off later (after the dew point is reached and the outdoor air is already humid) doesn't help much — the fixture cools whenever it's off. But in very humid climates, keeping lights on until dawn and then off during the warmest part of the day (when humidity is lowest) minimizes the thermal cycling into the worst humidity periods. See the landscape lighting timer setup guide for timer configuration options.
- Breathable vent: The pinhole-plus-membrane solution described in the condensation fix section provides a permanent engineering solution.
Preventing UV Hazing Recurrence After Polycarbonate Lens Restoration (Type 2)
- UV-protective coating reapplication: After wet-sanding and polishing a polycarbonate lens, apply automotive-grade UV clear coat sealant. This new protective coat will last 1–2 years before needing reapplication (earlier in high-UV climates). Mark the date of application on the fixture stake with a permanent marker so you know when to renew it.
- Upgrade to glass at next replacement: The only permanent fix for UV hazing recurrence on polycarbonate is replacing the polycarbonate lens with a glass lens when the current lens reaches end of life.
Preventing Water Intrusion Recurrence (Type 3)
- Annual gasket inspection: Per landscape lighting maintenance documentation: "Every 3 months: inspect for gasket compression loss." At minimum, inspect gaskets annually and replace at the first sign of deformation or stiffness. Annual gasket replacement as a preventive measure costs $0.50–$2 per fixture — a trivial cost relative to the socket and LED board damage that sustained water intrusion causes.
- Dielectric grease on the gasket: A thin coat of dielectric grease on each gasket at installation significantly extends gasket service life by preventing UV and ozone attack on the rubber surface and lubricating the compression interface. See the landscape lighting maintenance guide for the complete annual maintenance sequence.
- Fix wire splices with waterproof connectors: Any non-waterproof pierce-point or wire nut connector within the landscape system is a potential wicking entry point. See the failure points guide for the wire connector replacement procedure.
Foggy Lens & Condensation FAQ
My Portfolio landscape light is foggy inside but the seal looks fine. How is moisture getting in?
Moisture enters through a physical mechanism called thermal cycling pressure differential — not through visible seal gaps. When your landscape light cools after shut-off, the fixture housing creates negative pressure (partial vacuum) as the air inside contracts. This inward suction draws microscopic amounts of moist air through any imperfection in the seal on every cooling cycle. US Patent 11339951 documents this mechanism explicitly for outdoor LED landscape fixtures. Even a new, undamaged gasket has microscopic surface imperfections that allow this vapor-phase moisture transfer under repeated thermal cycling. The fogging you see is the accumulated condensation from many such cycles. The test: if the fog clears when the fixture warms up, it is this condensation mechanism — not a failed seal admitting liquid water. The fix is desiccant inside the housing and, for persistent cases, a breathable pressure-equalization vent at the lowest point of the housing.
I cleaned my foggy lens with Windex and it looks worse. Why?
Windex and most glass cleaners contain ammonia. Ammonia attacks polycarbonate — the plastic most Portfolio landscape lenses are made from — causing a chemical reaction called crazing: fine surface cracking that creates permanent haze. If your lens is now worse after cleaning with Windex, the ammonia has caused crazing damage that is in addition to whatever UV hazing was already present. Minor ammonia crazing can sometimes be partially addressed by the wet-sanding procedure described in the Type 2 fix section — the sanding removes the crazed surface layer. Severe crazing through multiple layers of the lens requires lens replacement. For future cleaning: use only isopropyl alcohol at 70% or below, or plastic-specific cleaners, on polycarbonate lenses. Never use ammonia-based products, acetone, or solvents on polycarbonate.
Can I use silicone caulk to seal the lens and stop moisture from getting in?
No — silicone caulk is the wrong material for landscape light lens sealing and creates several new problems. It bonds the lens to the housing permanently, making future lamp replacement or socket servicing require breaking the bond and destroying the lens. Silicone caulk also doesn't compress dynamically like a proper gasket, so it cracks under thermal cycling and fails within a season. It traps any moisture already inside the fixture. The correct fix is replacing the gasket O-ring — a $0.50–$2 EPDM rubber O-ring of the correct dimensions, available at any hardware store. Apply a thin coat of dielectric grease to the gasket before installation. This is the serviceable, code-appropriate, effective seal repair — not silicone caulk.
My Portfolio path light lens is yellowed and uniform — will polishing it clear it up?
If the yellowing is uniform, clears slightly when you wipe the exterior, and the interior is completely dry and clear, this is UV hazing of the polycarbonate. Polishing with a cloth does not fix it — UV hazing is structural damage to the polymer chains inside the outer layer of the plastic, not surface contamination. Wet-sanding is the correct approach: work through progressively finer grits (400 → 800 → 1500 → 2000 wet sand), then polish with plastic compound, then apply UV-protective clear coat. Without the clear coat step, the hazing returns within 6–18 months because the newly exposed polycarbonate has no UV protection. If the yellowing appears the same from inside the lens as outside (you can see the yellow color through the lens), the degradation has gone through the full material thickness and lens replacement is the only fix. Consider upgrading to a borosilicate glass replacement lens to permanently eliminate UV hazing recurrence.
I replaced the gasket but my landscape light keeps filling with water. What am I missing?
Persistent water intrusion after gasket replacement almost always means the water is not entering through the lens seal — it is wicking through the supply wire. Low-voltage landscape wire has air space between the copper strands inside the insulation jacket. Water entering at any nick, damaged section, or non-waterproof connector splice anywhere along the run can wick up through the conductor air space and emerge inside the fixture housing — completely bypassing the lens gasket. The gasket can be brand-new and perfect while water enters from inside the fixture stake from below. Inspect the supply wire at the point it enters the fixture housing for darkened insulation or green deposits indicating moisture travel. Check every wire connector within 10 feet of the fixture — any pierce-point connector showing green corrosion is a wicking entry point. Replace non-waterproof connectors with direct-burial waterproof connectors. See the socket repair guide for the wicking mechanism and the failure points guide for the connector inspection procedure.
Related Troubleshooting, Repair & Maintenance Guides
- Portfolio Lighting Troubleshooting
- Portfolio Landscape Troubleshooting
- Portfolio Lights Not Working After Rain
- Lights Work Sometimes Guide
- Landscape Lighting Maintenance Guide
- Landscape Lighting Corrosion Guide
- Corroded Socket Cleaning & Repair
- Portfolio Replacement Lenses Guide
- Landscape Lighting Replacement Parts
- Path Light Replacement Guide
- Failure Points Guide
- Portfolio Landscape Lights Not Working
- Portfolio Lights Not Working After Rain
- General Landscape Troubleshooting
- Integrated LED Bypass Testing
- Portfolio Lighting Too Dim
- Replacement Parts Guide
- Portfolio Replacement Fixtures
- Landscape Lighting Timer Setup
- Low-Voltage Wire Connectors
- Landscape Lighting Wire Gauge
- Voltage Drop Guide
- Transformer Troubleshooting
- How to Test a Transformer