
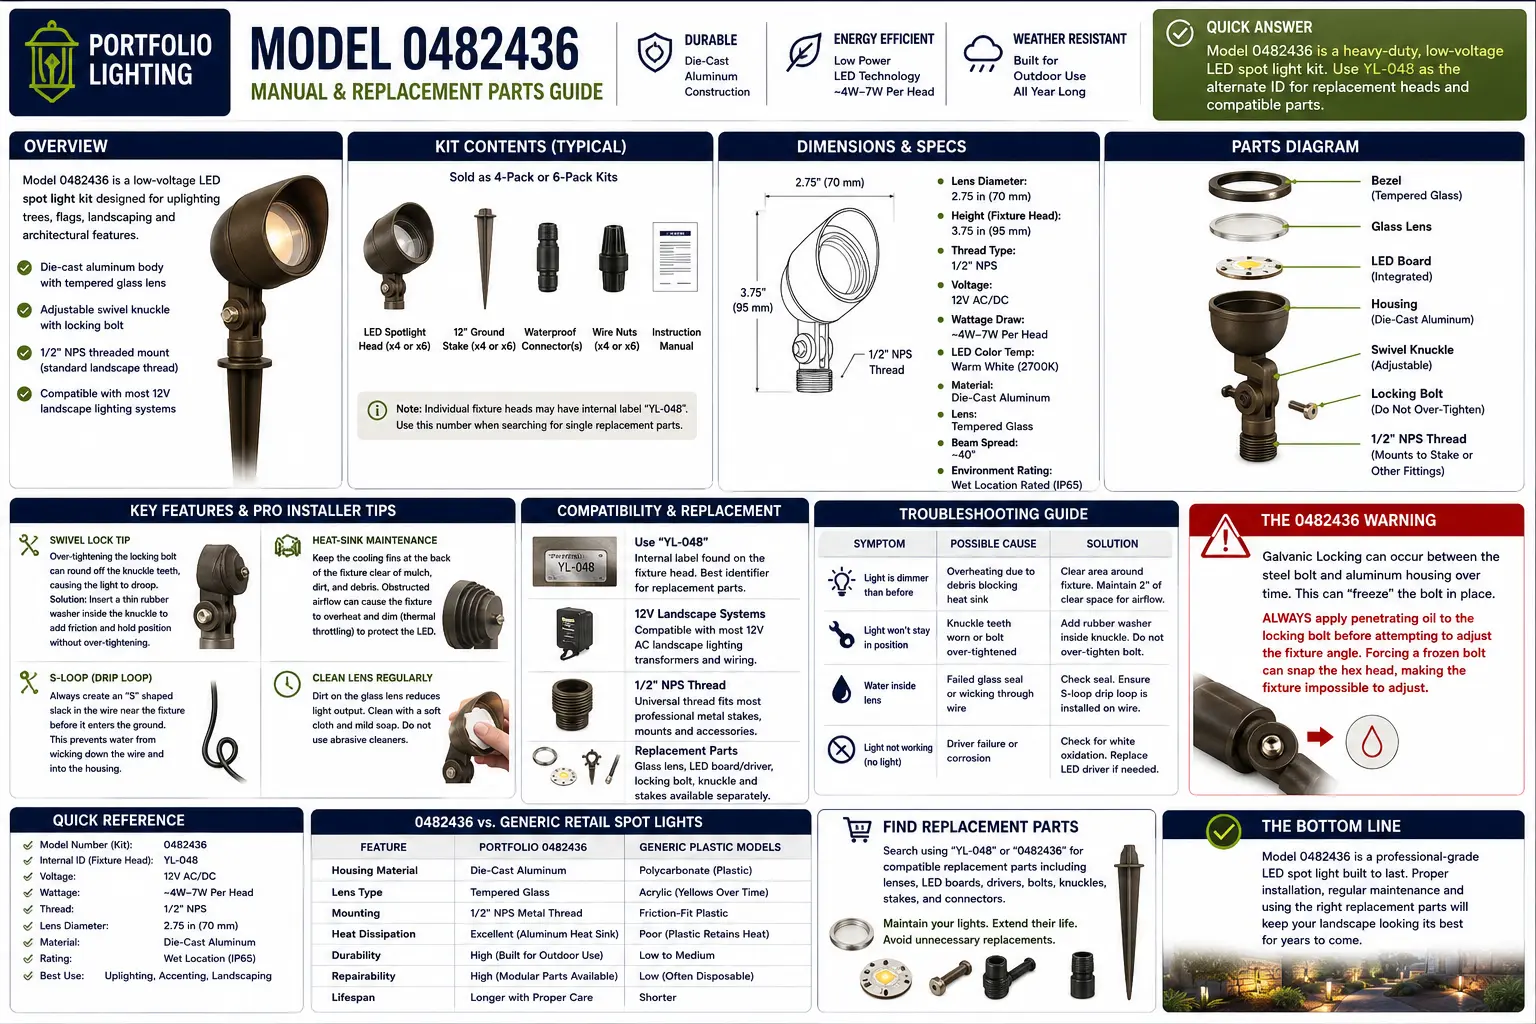
Quick Answer: What Portfolio Model 0482436 Owners Should Know First
Portfolio model 0482436 is best treated as a heavy-duty die-cast aluminum low-voltage LED spotlight or uplight kit, not a simple disposable plastic path light. It is often used for trees, flags, walls and accent lighting, which means it faces extra heat, aiming, water, and mechanical stress.
The most important repair clues are the swivel knuckle, heat-sink body, tempered-glass lens seal, 1/2 inch NPS-style stake thread, integrated LED driver, and wire-entry drip loop. If one fixture fails, you may need a single head, driver, stake, lens seal, or connector—not a whole new kit.
Logic Summary: Why 0482436 Fails Differently Than Plastic Spotlights
Model 0482436 usually fails from environmental stress around a stronger fixture body. The aluminum housing lasts longer than plastic, but the aiming joint, heat-sink airflow, glass seal, driver board, and steel fasteners become the weak points.
- If the light droops: inspect the swivel-lock teeth and knuckle bolt before replacing the fixture.
- If the beam is dim: clear mulch and debris from the heat-sink area before blaming the LED.
- If the glass is foggy: suspect lens seal failure or an upward-facing water path.
- If the bolt will not move: stop before snapping it; steel and aluminum can galvanically lock together.
- If the head is dead: test wiring first, then inspect the internal LED driver and circuit board for white aluminum oxidation.
What You Will Learn
Kit vs. Solo: Why 0482436 May Not Be the Number on the Fixture Head
Model 0482436 is often the item number for a boxed multi-pack kit. The individual die-cast aluminum spotlight heads inside the kit may have a secondary internal sticker or small part number that does not match the box.
If you are looking for one replacement head, searching only for “0482436” can limit your results. Look for any secondary sticker inside the wiring compartment or near the fixture lead. A shorter internal code can be more useful for finding the actual fixture head.
| Number Location | What It Identifies | Replacement Search Risk | Best Next Step |
|---|---|---|---|
| Box or manual | Kit-level item number | May return full kits only | Search kit plus spotlight head |
| Fixture wiring compartment | Individual head or production code | Easy to miss if dirty or painted | Photograph any YL-style sticker |
| Transformer label | Kit power supply | Does not identify the spotlight head | Use for load calculations |
| Stake or knuckle | Mounting hardware style | May not match electrical part | Measure thread and bolt size |
| Lens/bezel area | Optical and seal geometry | Wrong lens may leak | Compare diameter and gasket seat |
On mobile, swipe the table horizontally to view all diagnostic columns.
The 0482436 Swivel-Lock Failure Point
Because model 0482436 is commonly used as an uplight, the swivel knuckle is one of the hardest-working parts on the fixture. It has to hold the heavy aluminum head at an angle while soil movement, rain, heat, and repeated aiming changes work against it.
The teeth inside the knuckle are often softer than the bolt. If the hex bolt is over-tightened, the teeth can round off. Once that happens, the light may slowly droop toward the ground even after tightening.
| Swivel Symptom | Likely Cause | Hidden Damage | Repair Logic |
|---|---|---|---|
| Head slowly droops | Rounded knuckle teeth | Soft alloy no longer locks firmly | Add rubber washer or replace knuckle/head |
| Bolt spins but angle changes | Stripped internal grip | Over-tightening has flattened teeth | Stop forcing and add friction washer |
| Bolt frozen in place | Steel/aluminum galvanic locking | Bolt may snap if forced | Use penetrating oil first |
| Fixture points wrong after winter | Freeze/thaw movement shifted stake and knuckle | Mechanical angle stress | Reset stake and aim gently |
On mobile, swipe the table horizontally to view all diagnostic columns.
Heat-Sink Maintenance: Why a Buried 0482436 Gets Dimmer
The aluminum body on model 0482436 is not just a shell. It acts as a heat sink for the integrated LED and driver. When mulch, soil, leaves or debris build up around the back of the fixture, the heat sink cannot shed heat properly.
If the driver gets too hot, it may reduce LED output to protect the circuit. This can look like a dying LED, but the real issue may be airflow.
| Heat Clue | What It Means | Why It Happens | Best Fix |
|---|---|---|---|
| Light dims after 30–60 minutes | Thermal throttling | Driver is reducing output to protect LED | Clear airflow around fixture |
| Fixture buried in mulch | Heat sink blocked | Aluminum cannot shed heat | Expose cooling fins/body |
| Only one uplight is dim | Local airflow or moisture issue | That fixture is buried or sealed poorly | Inspect that head only |
| LED fails after hot season | Repeated heat stress | Driver board aged faster | Improve clearance and replace head/driver |
On mobile, swipe the table horizontally to view all diagnostic columns.
Technical Specs for Finding 0482436 Replacement Parts
When the original part is discontinued or hard to find, search by the physical compatibility specs instead of only the item number. Always measure your own fixture before ordering.
| Component | Likely Metric / Spec | Why It Matters | Search Phrase |
|---|---|---|---|
| Lens diameter | About 2.75 inches on many heads | Helps find replacement glass or gasket | 2.75 inch landscape spotlight lens |
| Thread type | Usually 1/2 inch NPS style | Universal key for pro-grade brass or aluminum stakes | 1/2 inch NPS spotlight stake |
| Wattage draw | Often about 4W to 7W per head | Needed for transformer load math | 12V 5W LED landscape spotlight |
| Housing | Die-cast aluminum | Repairable and heat-sinking, unlike plastic heads | die-cast aluminum 12V LED spotlight |
| Lens type | Tempered glass | Resists yellowing better than acrylic | tempered glass landscape spotlight lens |
On mobile, swipe the table horizontally to view all diagnostic columns.
Integrated Driver and Mirror Test: When the 0482436 Head Is Dead
Like many Portfolio LED fixtures, 0482436 usually uses an integrated LED board and internal driver. There may not be a simple replaceable bulb. When the light is dead, separate wiring failure from internal driver failure before buying anything.
The lens can also reveal moisture failure. Unscrew the bezel and look at the inside of the glass. A rainbow film, haze, or white powder near the circuit board usually means the seal failed and moisture reached the electronics.
| Inspection Result | Likely Diagnosis | Repair Path | Search Term |
|---|---|---|---|
| Lights on direct 12V | Fixture head is good | Repair connector or yard wire | waterproof low voltage connector |
| Dead on direct 12V | Driver or LED board failed | Replace head or internal driver if accessible | universal 12V LED driver |
| Rainbow film on glass | Moisture entered through lens seal | Replace gasket and dry housing | spotlight lens gasket |
| White powder on board | Aluminum oxidation from water | Driver likely failed | 12V LED landscape driver |
| Burnt smell inside head | Driver overheated or shorted | Replace driver/head | 12V LED spotlight replacement head |
On mobile, swipe the table horizontally to view all diagnostic columns.
The Pro-Installer S-Loop: Stop Water From Following the Wire Into the Fixture
Uplights often aim upward, which means water can collect around the lens and run down the body. But water can also follow the wire path. If the fixture is angled so the neck and wire entry are exposed, gravity can pull water along the wire into the housing.
The pro move is to leave about 6 inches of slack wire tucked into the ground in an S shape before the wire enters the fixture neck. This creates a drip point so water falls off the bottom of the loop instead of traveling directly into the fixture.
Portfolio 0482436 vs. Generic Retail Spotlights
This model deserves a deeper repair guide because it is built differently than cheap plastic spotlights. The aluminum body, glass lens, threaded stake connection and modular repair potential make it worth diagnosing before discarding.
| Feature | Portfolio 0482436 | Generic Plastic Spot | Why It Matters |
|---|---|---|---|
| Housing material | Die-cast aluminum | Polycarbonate plastic | Aluminum sheds heat and lasts longer |
| Lens type | Tempered glass | Acrylic lens | Glass resists yellowing and heat better |
| Mounting | 1/2 inch NPS-style metal thread | Friction-fit plastic stake | Allows pro-grade stake upgrades |
| Repairability | High if driver, lens, stake or connector can be matched | Low; often disposable | Better candidate for component repair |
| Heat behavior | Body acts as heat sink | Plastic traps heat differently | Airflow matters for brightness and life |
On mobile, swipe the table horizontally to view all diagnostic columns.
The 0482436 Frozen Bolt Warning
The hex bolts on this aluminum model are prone to galvanic locking. Because the bolt is steel and the housing is aluminum, they can effectively weld together over time. Never attempt to force-adjust the angle of your 0482436 without first applying a small drop of penetrating oil to the bolt. If you force it, the hex head can snap off and the fixture may be permanently stuck in its current position.
Related Existing Portfolio Lighting Help
- Portfolio Lighting Parts and Accessories
- Portfolio Lighting Replacement Parts
- Where to Buy Portfolio Replacement Parts
- Portfolio Lighting Model Number Lookup
- Portfolio Lighting Model Parts Directory
- Portfolio Lighting Master Model Technical Database
- Model Library, Specifications and Repair Index
- Portfolio Lighting Compatibility Guide
- Portfolio Replacement Stakes
- Portfolio Replacement Lenses
- Portfolio Replacement LED Modules and Drivers
- Portfolio Lighting Wire Replacement
- Low Voltage Wire Connectors
- Landscape Lighting Voltage Drop
- Low Voltage Failure Points Guide
- Portfolio Lighting Troubleshooting
FAQ: Portfolio Lighting Model 0482436
What is Portfolio Lighting model 0482436?
Portfolio Lighting model 0482436 is best treated as a boxed kit item number for a die-cast aluminum low-voltage LED spotlight or uplight kit, not always the individual part number on one fixture head.
Why does my 0482436 spotlight droop after aiming?
The swivel knuckle teeth may be rounded or the bolt may have been over-tightened. A thin rubber washer can sometimes restore friction without forcing the soft alloy teeth harder.
Why is my 0482436 light dimmer than it used to be?
If the fixture is buried in mulch or debris, the aluminum body cannot shed heat properly. The internal driver may throttle output to protect the LED board.
Can I replace the stake on Portfolio 0482436?
Usually yes if the fixture uses a 1/2 inch NPS-style thread. Confirm the thread by hand before forcing a brass, aluminum, or pro-grade stake.
Can the LED be replaced in model 0482436?
The LED is usually integrated. If the fixture is dead, test the wiring first, then inspect the internal driver and board for moisture damage or aluminum oxidation.
Why does water get inside an upward-facing spotlight?
Uplights often catch water at the lens seal and can also wick moisture along the wire into the neck. A drip loop or S-loop prevents water from following the wire into the housing.
Use and Safety Note
This page is an independent model-specific guide for Portfolio lighting owners. Always verify the label on your own fixture, confirm transformer output before replacing parts, and consult a qualified electrician for damaged wiring, unsafe outlets, water intrusion, hardwired power or line-voltage transformer issues.