
Quick Answer: How to Use These Portfolio Wiring Diagrams
Match the item number, identify whether the part is low-voltage or 120V, then follow the wiring path exactly. Low-voltage landscape parts usually involve 12V cable, connectors, and transformer output. Socket kits, cord switches, swag kits, and track feeds may involve 120V wiring and require much more caution.
- 12V accessory: check conductor contact, moisture protection, polarity only where the product requires it.
- 120V accessory: identify hot, neutral, and ground before cutting or connecting anything.
- Mounting hardware: match box spacing, thread type, canopy fit, and fixture weight.
- Decorative parts: confirm size, finish, and clearance before installation.
For general repair navigation, use Portfolio lighting troubleshooting and Portfolio lighting parts and accessories.
Based on my experience, the best way to use a wiring diagram is to trace power from the source outward. I’ve found that starting at the transformer and moving through each connection makes everything easier to understand.
When I put my multimeter on each point shown in the diagram, I’ve been able to confirm exactly where power stops. That’s something I rely on instead of guessing, especially when systems don’t match expectations.
Follow the power, not the picture.
If your issue involves transformer wiring or system power, use the Portfolio transformer master guide for voltage, load, and wiring diagnostics.
Portfolio Technical Manual Logic Summary
| If You Have... | Do This First | Then Check |
|---|---|---|
| Item number | Use jump grid | Match specs and wiring notes |
| Part in hand | Identify function (switch, connector, bracket) | Compare to module photos and specs |
| Wiring issue | Confirm voltage (12V vs 120V) | Follow diagram exactly |
| Mounting problem | Check spacing and thread type | Verify canopy and crossbar fit |
Technical Manual Jump Grid
Each item below is structured like a technical module with specs, wiring notes, common mistakes, pro tips, and related troubleshooting paths.
Mini Inline Connectors 0338719
Ceiling Medallion 041052
All-Purpose Crossbar 120823
Track Power Cord 0040957
4-inch Crossbar 0338730
E26 Socket Ring 0059667
3-Way Socket Kit 040899
Feed-Through Switch 075297
Swag Light Kit 0046797
Threaded Nipples
If you already have the manual but still aren’t sure what failed, use the Portfolio lighting model parts directory to connect your model to real-world failure patterns and repair solutions.
If you are searching for **Portfolio lighting technical manuals and wiring diagrams**, this guide provides exact specifications for high-volume units including transformers 0805279, 0010915, 0010916, and 010915, as well as specialized accessories like 0242293, 120823, 040899, and 075297. Whether you are troubleshooting landscape kits 0092288 and 0448063, motion sensors 0100755, or hardware components like 0345091, 0313575, 0244738, 0338719, 041052, 0040957, 0338730, 0059667, and 0046797, this directory ensures you match the correct wiring layouts and load ratings for a safer repair.
It took me awhile to find the right models, but I focused on major items first and plan to expand as I find additional resources. Portfolio had many items, but more and more of these products are being researched and added to my guides.
- Identify Portfolio parts by item number
- Understand wiring diagrams and polarity
- Fix connectors, switches, and socket kits
- Match mounting hardware and thread sizes
- Avoid common installation mistakes
If you can’t find a matching manual and are seeing newer Origin21 listings instead, that usually ties into the brand shift. I explain that in the Portfolio to Origin21 rebrand guide.
I’ve worked with technical manuals that looked overwhelming at first, and in my experience, breaking them into sections makes them much easier to use. I’ve learned to focus on the exact part of the diagram that applies to the problem instead of trying to understand everything at once.
I’ve tested this approach on real systems, and it saved time immediately. When I stopped jumping around and followed one section at a time, the wiring made sense and the issue became clear.
One section at a time works best.
For complete indoor wiring context, see Portfolio indoor lighting for fixture wiring, polarity, and installation guidance.
How Portfolio Lighting Parts Work Together (Wiring Diagram Explained)
Understanding how mounting hardware, connectors, switches, and wiring components interact is the key to fixing or installing Portfolio lighting systems correctly. The diagram below breaks down both 120V indoor systems and 12V landscape lighting systems so you can visually identify how power flows through each component.
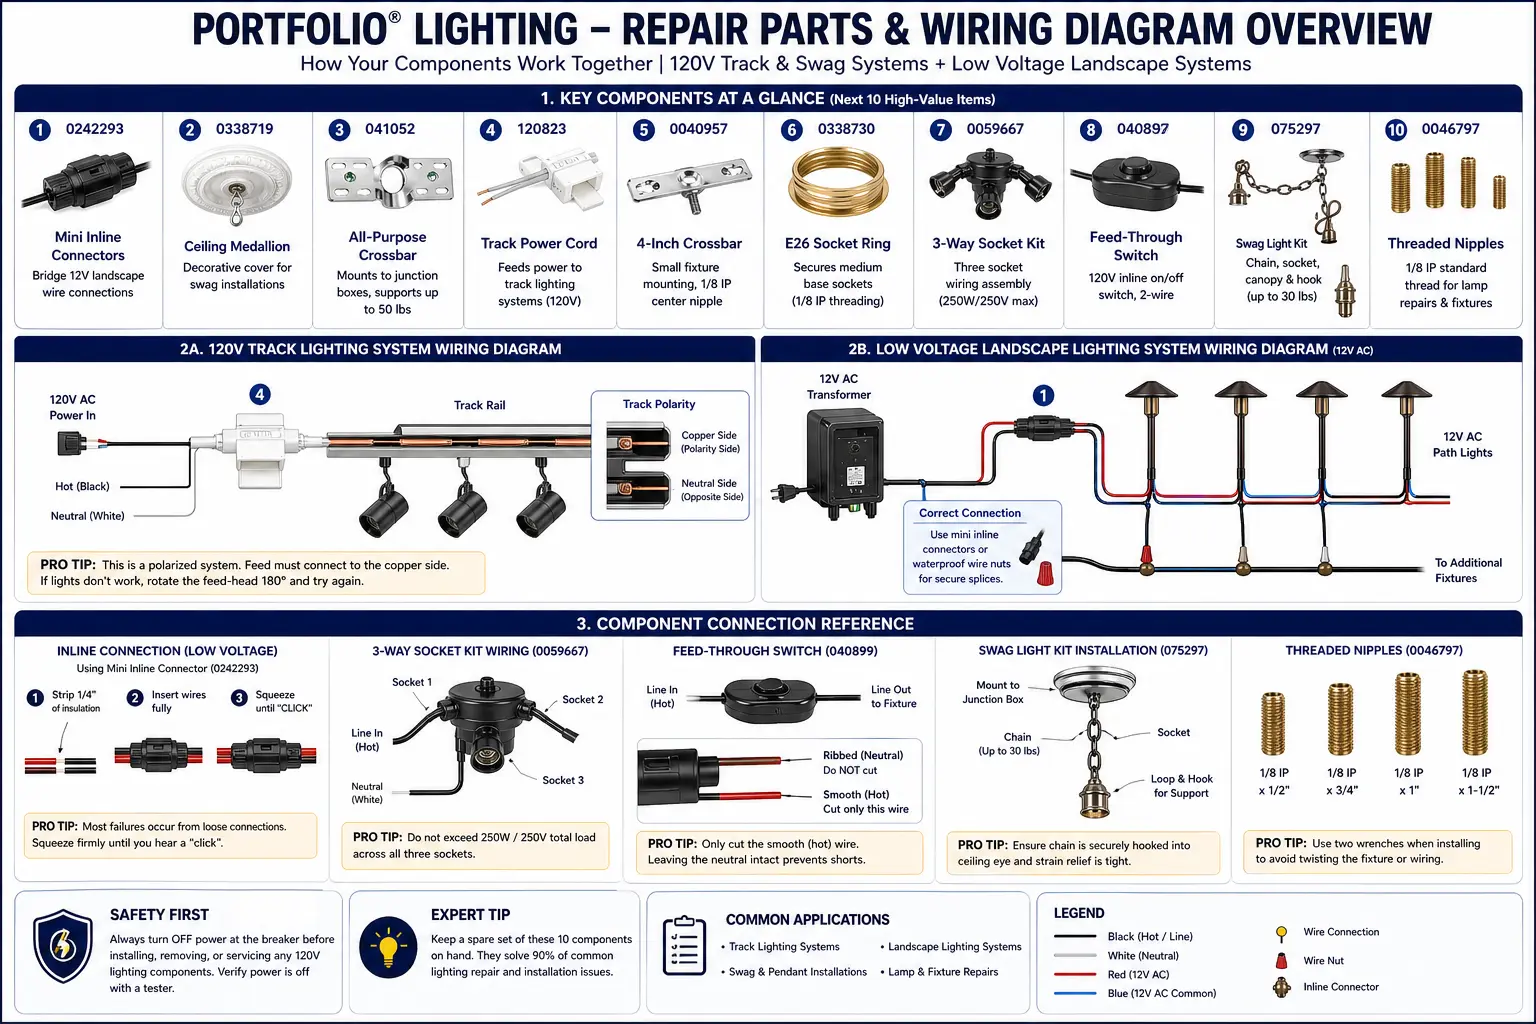
Key System Breakdown
- 120V Track & Swag Systems: Power flows from a wall outlet → through a feed connector → into track or socket assemblies → to the light fixture.
- Low Voltage (12V) Systems: A transformer reduces 120V power → sends 12V through landscape wire → connectors distribute power to each fixture.
- Inline Components: Switches and connectors control or extend power but are also the most common failure points.
- Mounting Hardware: Crossbars, threaded nipples, and medallions provide structural support—not electrical function—but are critical for safe installation.
Common Failure Points Identified in the Diagram
| Component | Failure Cause | Fix |
|---|---|---|
| Inline Connectors | Poor insulation piercing or loose clamp | Re-crimp firmly or upgrade to waterproof connectors |
| Feed-Through Switch | Wrong wire cut (neutral instead of hot) | Reconnect switch to the hot (smooth) wire only |
| Socket Kits | Overloaded wattage or loose terminals | Reduce load and tighten all connections |
| Track Power Feed | Reversed polarity orientation | Rotate connector 180° and reinstall |
| Transformer Output | Loose screws or corrosion buildup | Clean contacts and tighten terminal screws |
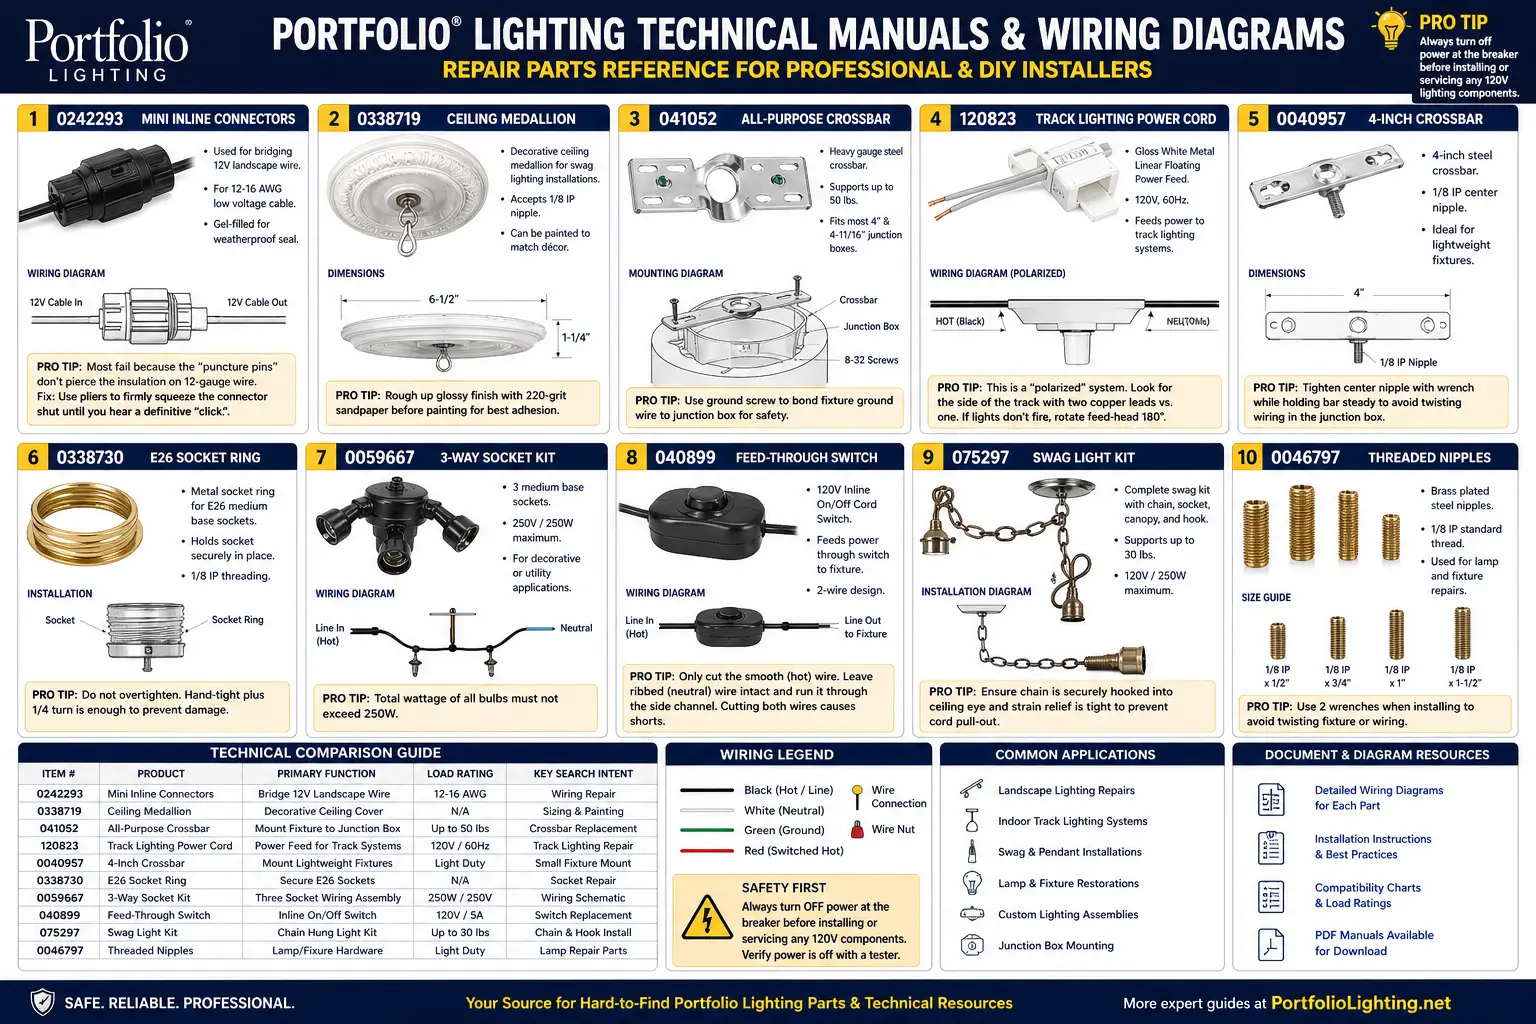
Portfolio 0242293 Mini Inline Connectors
Primary function: Mini inline connectors bridge or tap low-voltage landscape lighting cable without stripping the main run.
For full system wiring and layout, see Portfolio low voltage lighting systems for cable routing and transformer setup.
For model-level details beyond wiring diagrams, review the Portfolio lighting model specs guide to match each fixture or transformer with its likely parts and repair notes.
- Technical Spec
- Used for bridging 12V landscape wire on compatible low-voltage systems.
- Common Failure
- Puncture pins do not pierce the insulation deeply enough, especially on thicker 12-gauge cable.
- Best Fix
- Squeeze the connector fully with pliers until it locks with a definitive click.
- Search Intent
- Portfolio inline connector not working, low voltage connector wiring, snap connector failure.
| Symptom | Likely Cause | Exact Fix |
|---|---|---|
| Fixture never turns on | Pins missed conductor | Re-seat connector and squeeze fully with pliers. |
| Light flickers when wire moves | Weak puncture contact | Replace with silicone-filled direct-burial connector. |
| Connector corroded | Moisture entered splice | Cut out connector and use waterproof grease nut. |
Related guides: low voltage wire connectors landscape lighting, landscape lights not working after rain, and Portfolio landscape lighting.
Portfolio 0338719 Ceiling Medallion
Primary function: A ceiling medallion covers ceiling imperfections, oversized fixture holes, old canopy marks, or cosmetic gaps around a ceiling light.
- Technical Spec
- Decorative ceiling trim; not a structural mounting bracket.
- Load Rating
- N/A decorative only. The junction box and mounting bracket carry the fixture weight.
- Common Mistake
- Using the medallion to hide a loose box or unsupported fixture.
- Search Intent
- Ceiling medallion sizing, painting, canopy coverage, fixture gap repair.
Related guides: Portfolio lighting mounting hardware and bracket replacement, Portfolio lighting installation and instructions, and outdoor lighting junction box requirements.
Portfolio 041052 All-Purpose Crossbar
Primary function: An all-purpose crossbar connects a fixture canopy to a ceiling or wall junction box using standard fixture screws and a center threaded nipple.
- Technical Spec
- Universal-style mounting strap for ceiling and wall fixtures.
- Common Threading
- Often works with standard 8-32 box screws and 1/8-IP threaded nipples, depending on fixture.
- Common Failure
- Crossbar holes line up with the box, but decorative finials or nipple length do not fit.
- Search Intent
- Portfolio crossbar replacement, fixture bracket, canopy mounting hardware.
Related guides: Portfolio lighting mounting hardware and bracket replacement, Portfolio lighting parts and accessories, and Portfolio lighting installation and instructions.
Portfolio 120823 Track Lighting Power Cord
Primary function: Track lighting power cord or floating feed used to bring power into a compatible linear track section.
- Technical Spec
- Gloss white metal linear floating power feed for compatible track lighting systems.
- Polarity Detail
- Polarized track layout: one side of the track may have two copper leads and the other may have one.
- Common Failure
- Feed head installed 180 degrees backward, preventing contact alignment.
- Search Intent
- Portfolio 120823 not fitting track, track feed orientation, track lighting power cord wiring.
| Symptom | Likely Cause | Exact Fix |
|---|---|---|
| Track lights do not turn on | Feed head reversed | Turn feed head 180 degrees and align contacts with track conductors. |
| Feed does not lock into track | Wrong track family | Match power feed to exact track series. |
| Lights flicker when moved | Loose track contact | Turn off power and inspect seating/contact pressure. |
Related guides: Portfolio track lighting, Portfolio lighting installation and instructions, and Portfolio LED lights flickering.
Portfolio 0040957 4-inch Crossbar
Primary function: A 4-inch crossbar is used where the fixture canopy, junction box, or mounting screw pattern requires wider standard box spacing.
- Technical Spec
- 4-inch mounting crossbar for fixture canopy support and alignment.
- Common Hardware
- Often pairs with 8-32 box screws and fixture-specific decorative nuts.
- Common Failure
- Fixture canopy will not sit flush because nipple length or screw spacing is wrong.
- Search Intent
- Portfolio 4 inch crossbar replacement, ceiling bracket, fixture will not mount.
Related guides: Portfolio lighting mounting hardware and bracket replacement, Portfolio lighting parts and accessories, and Portfolio lighting installation and instructions.
Portfolio 0338730 E26 Socket Ring
Primary function: An E26 socket ring secures a shade, glass cup, or retaining collar around a standard medium-base lampholder.
- Technical Spec
- E26 medium-base socket ring for compatible shades and fixture assemblies.
- Common Failure
- Ring cross-threads, cracks, or will not match the socket thread diameter.
- Repair Note
- Replace with matching thread profile and diameter. Do not force a mismatched ring.
- Search Intent
- Portfolio socket ring replacement, E26 shade ring, glass retaining ring.
Related guides: Portfolio lighting bulb replacement, Portfolio lighting parts and accessories, and Portfolio indoor lighting.
Portfolio 0059667 3-Way Socket Kit
Primary function: A 3-way socket kit allows a compatible lamp to operate with a 3-way bulb and multiple brightness levels.
- Technical Spec
- 3-way socket kit for compatible lamp repair or restoration.
- Load Rating
- Commonly associated with 250W / 250V style socket kit ratings. Always verify the label on the actual part.
- Common Failure
- Wrong conductor placement or incorrect 3-way bulb/socket compatibility.
- Search Intent
- 3-way socket kit wiring schematic, Portfolio lamp repair, socket replacement.
Related guides: Portfolio lighting installation and instructions, Portfolio lighting parts and accessories, and Portfolio indoor lighting.
Portfolio 040899 Feed-Through Switch
Primary function: A feed-through switch is an inline 120V on/off cord switch used in lamp or cord repairs.
- Technical Spec
- 120V inline on/off cord switch for compatible lamp cord applications.
- Wiring Rule
- Switch only the smooth hot conductor. Leave the ribbed neutral conductor intact.
- Common Failure
- Both conductors are cut, causing shorts, open circuits, or unsafe wiring.
- Search Intent
- Portfolio feed-through switch wiring, inline cord switch repair, smooth vs ribbed wire.
| Symptom | Likely Cause | Exact Fix |
|---|---|---|
| Lamp will not turn on | Wrong conductor switched | Rewire so only the hot conductor is interrupted. |
| Breaker trips or spark occurs | Both conductors cut or shorted | Unplug immediately and replace or rewire correctly. |
| Switch feels hot | Overloaded switch or loose contact | Stop using it and match switch rating to load. |
Related guides: Portfolio lighting installation and instructions, Portfolio lighting parts and accessories, and Portfolio indoor lighting.
Portfolio 075297 Swag Light Kit
Primary function: A swag light kit lets a fixture hang from a ceiling hook and chain where a hardwired ceiling box is not positioned directly above the desired location.
- Technical Spec
- Swag light kit with chain and hook installation hardware.
- Load Rating
- Up to 30 lbs when installed into proper structure. Always verify actual kit label and ceiling support.
- Common Failure
- Hook installed only into drywall instead of framing or rated anchor.
- Search Intent
- Swag light kit installation, chain and hook lighting, ceiling hook load rating.
Related guides: Portfolio lighting installation and instructions, Portfolio lighting mounting hardware and bracket replacement, and Portfolio pendant lighting.
Portfolio 0046797 Threaded Nipples
Primary function: Threaded nipples are short threaded tubes used in lamp repair and fixture mounting. Wires often pass through the center while the nipple holds the canopy, socket, stem, or bracket assembly together.
- Technical Spec
- Standard 1/8-IP style lamp repair hardware where compatible.
- Primary Use
- Fixture stem, canopy, hickey, socket, or crossbar connection.
- Common Failure
- Wrong length or thread type prevents cap nuts and canopies from seating flush.
- Search Intent
- Portfolio threaded nipple replacement, 1/8-IP lamp repair hardware, fixture canopy threaded tube.
Related guides: Portfolio lighting mounting hardware and bracket replacement, Portfolio lighting parts and accessories, and Portfolio lighting installation and instructions.
Portfolio Technical Comparison Table
| Item # | Primary Function | Load Rating | Key Search Intent |
|---|---|---|---|
| 0242293 | Mini inline connectors | Low-voltage landscape wire connection | Connector not piercing wire / low voltage splice |
| 0338719 | Ceiling medallion | N/A decorative | Sizing, painting, ceiling gap coverage |
| 041052 | All-purpose crossbar | Fixture-dependent | Canopy mounting and bracket replacement |
| 120823 | Track lighting power cord | Track-system dependent | Track feed orientation and polarity |
| 0040957 | 4-inch crossbar | Fixture-dependent | Ceiling bracket spacing and box alignment |
| 0338730 | E26 socket ring | Shade-retaining hardware | Socket ring replacement and shade fit |
| 0059667 | 3-way socket kit | 250W / 250V style rating; verify label | Wiring schematic and lamp repair |
| 040899 | Feed-through switch | 120V inline cord switch; verify label | Smooth hot wire vs ribbed neutral wire |
| 075297 | Swag light kit | Up to 30 lbs where properly anchored | Chain, hook, and ceiling support installation |
| 0046797 | Threaded nipples | Standard 1/8-IP style lamp hardware | Lamp repair and canopy/thread length |
120V Wiring Safety Box for Switches, Sockets, Swag Kits, and Track Feeds
Several parts on this page are not low-voltage landscape accessories. Feed-through switches, 3-way socket kits, track power cords, and swag light kits can involve household voltage, hot/neutral polarity, grounding, strain relief, and load ratings.
For code-heavy outdoor work, see landscape lighting electrical code safety guide and outdoor lighting junction box requirements.
Manual Preview Image Strategy for Better Dwell Time
For each Portfolio item, add a close-up manual preview image showing the part diagram, wiring path, screw spacing, load rating, or conductor orientation. These images help users match the part in their hand without leaving the page.
For a larger model-based reference page, use Portfolio technical archive.
Portfolio Hardware Cross-Reference Table
| Part Category | Related Items | Compatibility Issue | Best Supporting Guide |
|---|---|---|---|
| Low-voltage connectors | 0242293 | Wire gauge and puncture-pin contact | Low voltage wire connectors |
| Mounting crossbars | 041052, 0040957 | Box screw spacing, threaded nipple length, canopy fit | Mounting hardware guide |
| Socket and shade hardware | 0338730, 0059667 | Thread size, socket rating, hot/neutral wiring | Bulb replacement guide |
| Cord and inline controls | 040899, 120823 | Hot/neutral polarity and track orientation | Installation guide |
| Hanging hardware | 075297, 0046797 | Weight rating, thread length, structural support | Pendant lighting guide |
For model-based troubleshooting, transformers, and archived fixtures, use the Portfolio technical archive to compare older models and repair paths.
Portfolio Technical Manuals & Wiring Diagrams FAQ
I’ve seen wiring diagrams confuse people because they look more complicated than they actually are. In my experience, most diagrams are just showing how power flows from one point to another.
I remember tracing a line on a diagram and then physically following that same wire in the system. When I tested it with my meter, I could see exactly where voltage was present and where it stopped.
Where can I find wiring diagrams for Portfolio lighting accessories?
Start with the item number on the package, manual, fixture label, socket, switch, or connector. This page organizes hard-to-find accessory wiring notes by item number and links to deeper Portfolio troubleshooting and manual pages.
Why does my Portfolio inline connector not power the light?
The most common cause is that the puncture pins did not pierce the copper conductor inside the low-voltage wire. Re-seat the connector and squeeze it fully closed with pliers until it clicks.
Why does the Portfolio 120823 not fit my track?
It may be the wrong track family, or the polarized feed head may be rotated 180 degrees backward. Match the feed to the side of the track with the correct copper conductor layout.
Which wire do I cut on a Portfolio feed-through switch?
On a typical lamp cord switch, only the smooth hot conductor is cut and switched. The ribbed neutral conductor stays intact and passes through the side channel of the switch housing.
Can a ceiling medallion hold fixture weight?
No. A medallion is decorative trim. The junction box, crossbar, screws, and structural support carry the fixture weight.
In conclusion, when researching diagrams, diagrams show flow, not complexity so definitely start with the item number first to make sure you are going in the right direction and not researching the wrong diagram model.
More Portfolio Manual and Repair Resources
Portfolio Lighting Manuals
Use this hub to find broader manual and instruction resources by model number.
Manuals hubModel Number Lookup
Start here if you only have a label, item number, or partial model number.
Model lookupParts and Accessories
Find replacement parts, connectors, sockets, brackets, rings, stakes, and lenses.
Parts guideTechnical Archive
Use the deeper model archive for transformers, path lights, power packs, and LED fixtures.
Technical archiveTechnical Manual Safety Note
This page is an independent technical reference for Portfolio Lighting parts and accessories. Always verify the exact item number, manufacturer label, load rating, voltage rating, and wiring instructions before replacing any part.
For 120V switches, socket kits, swag kits, track feeds, and hardwired fixtures, disconnect power and use a licensed electrician when wiring conditions are unclear, damaged, or unsafe.
Recommended for You: