
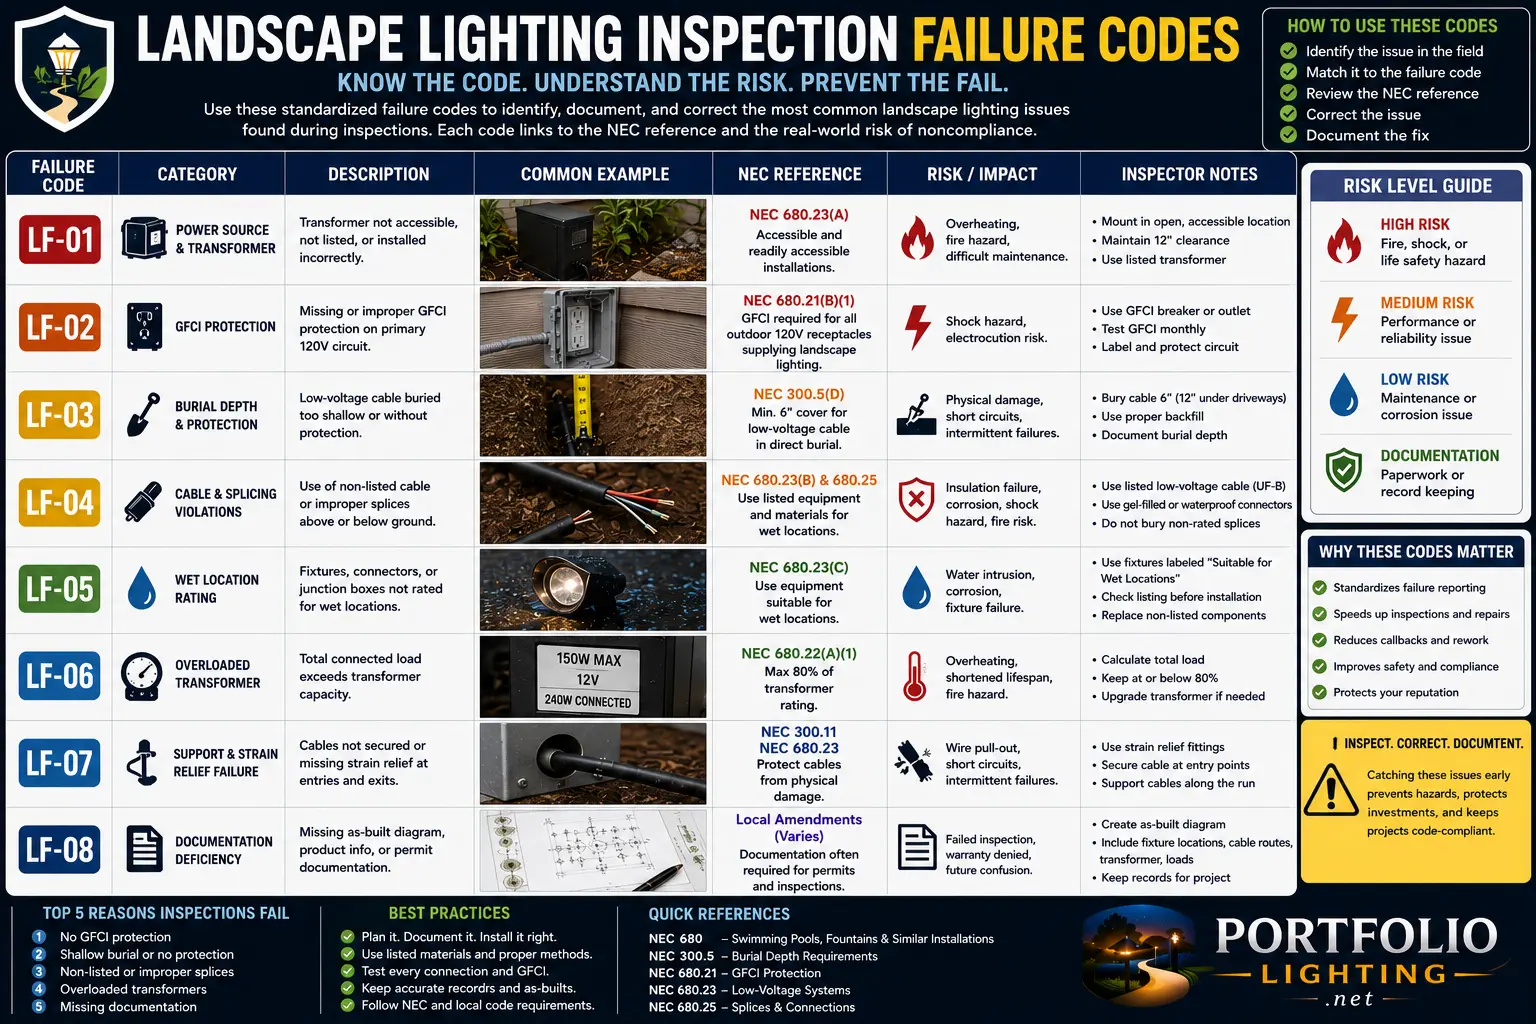
What a Correction Notice Actually Contains — and How to Read It
A correction notice is a formal written document. Understanding its structure tells you immediately what you need to do, what the inspector found, and what your options are. Here is what each section contains.
How to Read the Notice: Key Elements
- The NEC section number (e.g., "NEC Table 300.5 Column 5") is the anchor for your response. If you believe the section doesn't apply to your installation, this is what you cite in your appeal. If you agree, this tells you exactly what to fix.
- The specific condition found is the factual basis for the violation — it describes what the inspector observed. If the condition description is factually wrong (the inspector probed at the mulch surface, not the soil surface), this is the basis for your appeal or clarification request.
- The required correction is what the inspector expects to see at re-inspection. Do exactly this — not a variation of it, not something arguably equivalent — unless you have obtained prior written approval from the Building Official for an alternative approach.
- The compliance deadline matters: if corrections cannot be made within the stated period, contact the building department and request an extension in writing before the deadline passes. Oregon Administrative Rules OAR 918-271-0030 (typical of most states) specifically allows extension requests when corrections "cannot reasonably be made within the specified time."
- The re-inspection fee is typically separate from the original permit fee and is charged each time the inspector returns after a failure. In some jurisdictions the first re-inspection is free; most charge $50–200 per re-inspection visit. Multiple failures multiply this cost.
Correction Notice vs Stop Work Order: The Critical Procedural Difference
These two enforcement actions look similar on a form but have entirely different legal consequences and procedural requirements. Confusing them — treating a stop work order like a correction notice, or panicking about a correction notice as if it were a stop work order — creates unnecessary problems.
Correction Notice: The Normal Outcome of a Failed Inspection
A correction notice (also called a notice of non-compliance, failed inspection notice, or deficiency notice) is the standard outcome when an inspection reveals work that doesn't meet code. Per Engineer Fix's electrical inspection documentation: "A correction notice means specific deficiencies were found. The notice will detail the exact code sections violated, providing guidance on what needs to be remedied. Remedying deficiencies requires the installer to correct the identified violations and then schedule a re-inspection; a new permit is not required for these corrections."
Key facts about a correction notice:
- Work may continue on portions of the project not cited in the notice
- The permit remains open and valid
- A new permit is not required — corrections are covered under the original permit
- Re-inspection must be requested and completed before final permit sign-off
- The permit remains open until all corrections are verified at re-inspection
Stop Work Order: A Separate and More Severe Action
A stop work order (SWO) requires immediate cessation of ALL work on the project. It is issued in distinct circumstances from a correction notice and carries significantly greater consequences:
- When it's issued: Work proceeding without a required permit; an immediate safety hazard discovered; work materially deviating from approved plans; failure to comply with a prior correction notice within the stated deadline
- What it requires to lift: The SWO can only be lifted by the issuing AHJ — typically after the violating condition is corrected, any required fees are paid, and a re-inspection confirms compliance
- Consequences of ignoring it: Continuing work in violation of a posted stop work order is a separate violation with its own penalties — typically fines per day of continued work, possible permit revocation, and in severe cases, criminal referral
- For landscape lighting specifically: Stop work orders in landscape lighting almost always arise from working without a permit (when a permit was required), not from failed inspections of permitted work
A common landscape lighting stop work order scenario: a homeowner or contractor begins a landscape lighting installation that requires a permit (because it involves a new outdoor circuit), doesn't pull the permit, and is discovered during a routine property inspection for an unrelated project. The unpermitted electrical work — even though low-voltage — generates a stop work order on the entire property until the permit situation is resolved. This is particularly common in jurisdictions like California where a building inspector who observes any electrical work in progress has authority to require a permit verification. Resolving this requires retroactively pulling the permit (if the AHJ permits retroactive permitting), paying applicable penalties, having the work inspected (which may require excavating buried cable), and in some jurisdictions, paying double permit fees. The cost of retroactive permitting and the associated re-inspection of buried work consistently exceeds the cost of pulling the permit in advance.
All Landscape Lighting Inspection Failure Codes by NEC Section
Each failure code below shows the NEC section number as it appears on a correction notice, the frequency with which it's cited in landscape lighting inspections, what the inspector specifically looked for, the most common condition that generates the violation, and the exact required correction.
Column 5 Insufficient Burial Depth — Low-Voltage Landscape Cable Highest Frequency
210.8(A)(3) Missing GFCI Protection at Outdoor Transformer Receptacle High Frequency
411.4 Unlisted Components — Missing UL Mark or Unverifiable Listing High Frequency
411.4(2) Pool Setback Violation — Landscape Luminaire Within 10 Feet of Pool Edge High Frequency in Pool-Adjacent Installs
110.3(B) Equipment Not Installed Per Listing and Labeling Instructions Medium Frequency
300.3(C)(1) Voltage Class Separation Violation — LV Cable Sharing Conduit with Line-Voltage Conductors Medium Frequency
411.6 Branch Circuit Exceeds 20-Ampere Maximum for 30V-or-Less Lighting System Lower Frequency
411.3 Reconditioning of Listed Low-Voltage Lighting System Lower Frequency — Increasingly Cited
680.22(B)(4) No Secondary-Side GFCI for Pool-Adjacent Luminaires Within 5–10 Feet Medium Frequency — Pool Projects
406.9(B)(1) No "While-In-Use" Weatherproof Cover at Transformer Outlet Medium Frequency
The Buried-Before-Inspection Problem: The Single Greatest Source of Re-Inspection Failures
When a permitted landscape lighting installation's cable is buried before the required underground inspection, the inspector cannot verify burial depth, cable type, connector ratings, or any other underground element without excavating the work. This situation generates more re-inspection failures, more re-inspection fees, and more contractor-owner disputes than any other single landscape lighting compliance issue.
The Regulatory Basis: Inspection Before Covering
Building codes in all permit-requiring jurisdictions require that underground work be inspected before it is covered. Washington State L&I's documentation states explicitly: inspection must be requested "no later than 3 business days after completing the work or 1 business day after any part of the installation has been energized." Oregon Administrative Rules OAR 918-271-0020 (representative of most states) establishes that the inspection must occur while the work is visible and accessible — before backfilling.
When an inspector arrives for an underground inspection and finds the trench has already been backfilled, the standard outcome is:
- The inspector fails the inspection because they cannot verify compliance with what they cannot see
- The correction notice requires: excavate representative sections of the cable run (inspector may specify locations), allow inspection of those exposed sections, and re-request inspection before re-covering
- If excavated sections show non-compliant depth or cable type, the entire run must be re-excavated, corrected, and re-inspected
- If excavated sections show compliance, the inspector may approve the un-excavated sections based on representative sampling — this is at inspector discretion
The "Photograph Evidence" Defense — and Its Limits
Some contractors photograph the open trench with a tape measure at multiple points before backfilling, intending to use the photographs as evidence of depth compliance if inspected after backfilling. This approach has value — it demonstrates good-faith compliance intent and provides factual evidence for any dispute — but it does not substitute for the required inspection.
Per the Mike Holt forum discussion among licensed inspectors: inspectors are not obligated to accept photographs as equivalent to field inspection even when the photographs appear to show compliant depth. The inspection requirement exists precisely because the inspector cannot verify conditions from photographs — the photograph shows one point in time at one location, not the full run. A contractor who relies solely on photographs rather than requesting the required underground inspection before backfilling is taking a significant risk. Use photographs as supplemental documentation, not as a substitute for the required inspection.
The Correct Protocol to Prevent the Buried-Before-Inspection Failure: Request the underground inspection immediately upon completing the cable installation — before doing any backfilling. Schedule the inspection to occur on the same day or the day after installation. Keep the trench open until the inspector has visited and approved. If the inspector cannot come before weather or project timing requires backfilling: take time-stamped photographs at multiple points along the run showing measurement from soil surface to cable jacket; leave inspection access points (short unbackfilled sections at regular intervals) if possible; and document that you attempted to schedule timely inspection through the jurisdiction's scheduling system. This documentation won't prevent a failure notice, but it establishes your good faith and may affect how aggressively the inspector requires re-excavation.
Plan Review Failures: The Five Rejection Patterns Before Any Field Inspection
In jurisdictions that require plan submittal before issuing a landscape lighting permit, a plan examiner reviews the submitted drawings against code requirements before any permit is issued. Deficiencies at this stage generate a correction list that must be resolved before the permit is issued. These are not the same as field inspection failures — they happen at the desk before work begins.
Per Florida Electrical Authority's documented process: "Permit application review: A building department plan examiner reviews submitted electrical drawings against NEC and FBC requirements before any permit is issued. Deficiencies identified at this stage generate a correction list, not a formal violation notice."
Plan Rejection 1: Missing Load Calculation
The submitted plan shows fixture locations and wire routing but does not include a load calculation demonstrating that the transformer's rated output (in watts) is not exceeded by the connected load. Required: list each fixture with its wattage, total per zone, show zone total as a percentage of transformer zone capacity. See the load calculation guide for the calculation format.
Plan Rejection 2: Photometric Plan Not Submitted or Incomplete
For commercial landscape lighting projects and some residential projects in jurisdictions with outdoor lighting ordinances, a photometric plan is required showing calculated illuminance levels. Common rejection reasons: calculation grid does not extend to property lines; wrong measurement plane (horizontal only when vertical is also required); wrong BUG rating shown for the luminaire type specified; fixture schedule doesn't match the photometric calculation. See the photometric plan reading guide.
Plan Rejection 3: Pool Setback Not Shown or Not Measured Correctly
Plan shows landscape fixtures near a pool but does not include measurement from pool edge to nearest fixture, or the measurement is shown from the coping rather than the inside of the pool wall. Plan examiner cannot approve pool-adjacent landscape lighting without documented setback measurements from the correct reference point (inside pool shell edge, not coping). Add dimension lines from pool edge to each nearby fixture.
Plan Rejection 4: Listing Documentation Not Provided
Some jurisdictions require that listing documentation (UL product pages, cut sheets showing the listing mark and applicable standards) be included with the permit submittal for commercial landscape lighting. Consumer-grade products may have limited published documentation. Solution: download the UL product listing page from productiq.ulprospector.com and include it with the submittal as listing documentation.
Plan Rejection 5: Branch Circuit Not Shown or Non-Compliant
Plan does not show the branch circuit that will supply the transformer, or the circuit shown is a 30A circuit (violating NEC 411.6's 20A maximum). Plan examiner requires the supply circuit to be identified on the plan with its breaker size and the GFCI protection method documented. Solution: add a note to the plan showing the branch circuit number, breaker size (15A or 20A), and GFCI protection method (GFCI outlet or GFCI breaker at the panel).
Pool Setback Measurement Disputes: How They Arise and How to Resolve Them
The 10-foot pool setback for landscape luminaires generates more measurement disputes than any other landscape lighting code requirement because the measurement reference point is ambiguous to most people and because the consequences of being wrong are significant.
The Three Measurement Points That Create Disputes
The NEC 411.4(2) setback is measured from the pool — but "the pool" has multiple measurable points, and which one applies determines compliance for fixtures 8–12 feet away:
- Inside edge of the pool shell (correct): the structural wall of the pool itself — the inside face of the concrete, fiberglass, or vinyl shell. This is the correct reference point per NEC 411.4(2).
- Coping edge (incorrect but commonly used): the decorative tile or stone that caps the pool shell. The coping extends 2–6 inches beyond the shell. Using the coping edge as the reference point produces a measurement that is 2–6 inches less than the correct measurement — enough to make a borderline installation appear non-compliant when it's actually compliant from the correct reference.
- Deck or patio edge (incorrect): the edge of the surrounding hardscape. Using this reference can produce a measurement 2–4 feet less than the correct measurement.
When an Inspector and Contractor Disagree on the Measurement
If an inspector has issued a violation citing NEC 411.4(2) and you believe the measurement was taken from the wrong reference point (coping or deck rather than pool shell), the resolution procedure is:
- Request a meeting with the inspector at the site with a tape measure
- Bring the NEC text for 411.4 and ask the inspector to confirm the correct reference point
- Measure together from the inside face of the pool shell to the fixture in question
- If the correct measurement shows 10 feet or more, ask the inspector to withdraw the violation and provide the corrected measurement in writing
- If the inspector disagrees with the reference point interpretation, escalate to the Building Official (not the inspector's supervisor — the Building Official is the AHJ for code interpretations)
Pool setback disputes are the most technically arguable inspection failures I see in pool-adjacent landscape lighting. In three out of five disputed cases where I've been called in, the inspector was measuring from the coping or deck edge rather than the pool shell — which was producing a measurement 3–4 inches short of the correct figure. In every one of those cases, the correct measurement from the pool shell showed compliance. The fix is simple: bring the NEC text, request a joint measurement from the correct reference, and document the result. Don't argue about whether the fixture is "close enough" — argue about which measurement point is correct. That's a code interpretation question with a correct answer, not an aesthetic judgment.
AHJ Discretion: What Inspectors Can and Cannot Do Under NEC 90.4
Understanding what the AHJ can and cannot do — and the difference between an inspector acting within their authority and exceeding it — is essential for working constructively through any inspection dispute.
What NEC 90.4 Authorizes the AHJ to Do
NEC 90.4 (Enforcement) states: "The authority having jurisdiction for enforcement of the Code has the responsibility for making interpretations of the rules, for deciding on the approval of equipment and materials, and for granting the special permission contemplated in a number of the rules." The AHJ has broad authority, and this authority is real — but it has specific scope. The AHJ can:
- Interpret code provisions — when the code is ambiguous, the AHJ's interpretation governs in their jurisdiction
- Approve alternate methods — NEC 90.4 continues: "by special permission, the authority having jurisdiction may waive specific requirements in this Code or permit alternative methods where it is assured that equivalent safety is assured." An AHJ can approve an alternative if you demonstrate equivalent safety — this is an underused path for genuinely difficult compliance situations
- Require disclosure of equipment listings — if listing documentation is not visible, the AHJ can require it before approving the installation
- Fail an inspection for non-compliant work — this is core authority
What the AHJ Cannot Do
- Require more than the NEC requires — unless the local jurisdiction has adopted specific amendments that go beyond the NEC, an inspector cannot require more than the adopted code. If an inspector is requiring something not in the code, ask for the specific code section basis. Per the Mike Holt forum: "If it is not a code violation, it should not be written up." An inspector who cannot cite a code basis for a requirement is exceeding their authority.
- Apply a code edition not adopted by their jurisdiction — if your jurisdiction is on the 2020 NEC and an inspector is citing a 2023 NEC section that doesn't exist in the 2020 edition, the requirement may not apply
- Create new requirements through personal preference — personal preference, common sense, or "how we do it here" are not code requirements. If it's not in the adopted code, it's not an enforceable requirement — though, as the Mike Holt forum notes, "overturning his decision through channels may be difficult to impossible depending on how the chain of command above him is organized"
The Three-Level Appeal Process for Inspection Failures
When you disagree with an inspection failure — because you believe the code section doesn't apply to your installation, the section was applied incorrectly, or the inspector's factual finding is wrong — the appeal process has three levels. Start at level one; escalate only if necessary.
Re-Inspection: Process, Fees, and Timeline After a Correction Notice
After receiving a correction notice and completing all required corrections, the re-inspection process follows a specific sequence that varies by jurisdiction but follows a common framework.
What Re-Inspection Requires
Per Engineer Fix's electrical inspection documentation: "Remedying deficiencies requires the installer to correct the identified violations and then schedule a re-inspection; a new permit is not required for these corrections. Once the corrections are verified by the inspector during the follow-up visit, the permit will be signed off."
Three important facts about re-inspection:
- A new permit is not required for corrections to work under an existing permit — corrections are part of the original permit scope
- Only the cited violations need re-inspection — unless the corrections required additional work that wasn't part of the original scope, the re-inspection focuses specifically on the items cited in the correction notice
- The inspector may notice new violations at re-inspection that weren't cited in the original failure. Per the Networx guide: "Be aware that if the inspector is called in to inspect a specific upgrade, he may notice — and write up — a violation in other, already existing work." This is legal and proper — an inspector is not prohibited from citing new violations during a re-inspection visit.
Re-Inspection Fees
Re-inspection fees are charged by most jurisdictions for each failed inspection that requires a return visit. Per Networx: "There might or might not be a fee for re-inspection. In some regions, a third party performs re-inspection." Typical re-inspection fees: $50–250 per re-inspection visit, depending on jurisdiction. Some jurisdictions provide one free re-inspection; subsequent failures incur escalating fees. For a landscape lighting installation that fails multiple times, re-inspection fees alone can total $200–600+ — a significant cost that reinforces the value of pre-inspection compliance verification using the inspection checklist.
Re-Inspection Timeline
Re-inspection is typically scheduled through the same system as the original inspection — usually the jurisdiction's online portal or phone scheduling line. Standard scheduling lead time: 3–10 business days in most jurisdictions, potentially longer in high-activity areas during busy construction seasons. If the corrections involve significant excavation (full cable re-burial for depth violations), budget adequate time for the excavation work plus the scheduling lead time before the permit expires. If the permit expiration date is approaching before re-inspection can be completed, contact the building department and request a permit extension — most jurisdictions grant extensions for work in progress when requested before permit expiration.
Pre-Inspection Prevention: The 12 Checks That Prevent Every Common Failure
Every failure code documented in this guide is preventable. This pre-inspection sequence — run before calling for any inspection — addresses the most common causes of landscape lighting inspection failures in order of their frequency.
- Probe cable depth at 10-foot intervals from the soil surface (not mulch). Minimum 6 inches. Under hardscapes without conduit: 18 inches. Document with time-stamped photographs before calling for underground inspection. Do not backfill until the underground inspection is completed and approved.
- Verify the transformer outlet is GFCI-protected. Press TEST — outlet should lose power. Press RESET — power restores. If the outlet doesn't have a TEST/RESET button, it is not GFCI-protected. Replace before inspection.
- Read the transformer's listing mark. It must be legible and show a recognized listing mark. If degraded, locate the model number and retrieve listing documentation from productiq.ulprospector.com before inspection.
- Verify transformer mounting height matches the label's requirement (typically 12 inches above grade minimum). Check that it's wall-mounted or post-mounted per the listing instructions — not ground-staked unless the listing specifically permits that.
- Verify the outlet cover is a "while-in-use" bubble type that closes with the transformer plug inserted. Replace flat covers with bubble covers ($8–15 at any hardware store).
- Measure from the inside pool shell edge to every luminaire near the pool. 10 feet minimum. If any fixture is closer, either relocate it or ensure the Article 680 compliance path is properly implemented with secondary-side GFCI protection.
- Inspect all underground cable connectors. They must be direct-burial rated — gel-filled or heat-shrink. Standard wire nuts are not rated for underground use. See the connector guide.
- Verify no landscape cable shares a conduit with 120V conductors. Check every conduit sleeve under hardscapes.
- Check the transformer's supply circuit breaker size. Must be 20 amperes or less per NEC 411.6. Open the panel and verify the breaker amperage.
- Complete the load calculation and verify the transformer isn't overloaded. Total connected wattage per zone must not exceed 80% of the transformer's rated capacity. See the load calculation guide.
- Review the entire pre-inspection checklist from the NEC inspection checklist guide. The complete inspection checklist covers every item the inspector will verify, organized in the same sequence inspectors typically use.
- Photograph everything before calling for inspection. Open trench with depth measurement, transformer mounting with height measurement, GFCI outlet with TEST button visible, connector types, pool setback measurements. These photographs are your documentation if any factual dispute arises at re-inspection.
Landscape Lighting Inspection Failure FAQ
I received a correction notice for NEC Table 300.5 Column 5. The cable is already buried — do I have to dig up the entire run?
Possibly — but not necessarily the entire run. When cable has been buried at insufficient depth, the correction notice will typically require that the cable be re-installed at compliant depth. Whether this requires full excavation of the entire run depends on how the inspector confirmed the violation. If the inspector probed at multiple points and found non-compliant depth throughout the run, the entire run will likely need to be re-excavated. If the inspector found violations only at specific probe points, the correction may focus on those specific sections — especially if you can demonstrate that the rest of the run is compliant through excavation of representative sections. Before beginning any excavation, request a pre-correction conference with the inspector to understand exactly which sections are required to be re-excavated. The inspector has discretion to accept representative sampling in some cases — this is worth asking about before starting expensive re-excavation work. After re-installation, leave all re-excavated sections open until the underground re-inspection is completed and approved. Do not backfill again before inspection.
My landscape lighting was installed years ago without a permit and I just discovered I needed one. What do I do now?
The process for resolving unpermitted work is called "retroactive permitting" or "permit after the fact" and is available in most jurisdictions. The procedure: contact the building department, explain that work was performed without a required permit, and ask about the retroactive permit process. Most jurisdictions will issue a retroactive permit, but typically charge a penalty fee (commonly 1.5–3 times the normal permit fee) for unpermitted work. You will then be required to have the installation inspected, which may require exposing underground cable at representative points for depth verification. If the installation is compliant with current code, the permit will be signed off after successful inspection. If it's not compliant, you'll receive a correction notice and go through the normal correction process. The two situations where retroactive permitting is most complicated: (1) significant pool setback violations that require fixture relocation, and (2) substantial burial depth violations that require re-excavation of the entire cable run. For specific guidance on your jurisdiction's retroactive permit process, contact the building department directly. See the state permit requirements guide and the permit requirements guide.
The inspector failed my installation for something that wasn't in the original approved plan submittal. Is that allowed?
Yes — inspectors are authorized to cite code violations they observe during any inspection, whether or not those conditions were reviewed at plan submittal. Per the Networx guide: "Be aware that if the inspector is called in to inspect a specific upgrade, he may notice — and write up — a violation in other, already existing work." The plan approval at submittal does not immunize the installation against field inspection findings. The inspector's obligation is to verify code compliance with what was actually installed, not just what was in the submitted plan. If the inspector cited something that was specifically shown in the approved plan and approved by the plan examiner, that creates a genuine grounds for a Level 1 appeal to the Building Official — the plan examiner approved a condition that the field inspector is now failing. Bring the approved plan showing the condition to the Building Official discussion. However, if the inspector is citing something that the plan simply didn't address (not explicitly shown or approved), the violation is proper regardless of the plan approval.
Related Code, Compliance & Inspection Guides
- Electrical Code Safety Guide
- NEC Inspection Checklist
- Permit Requirements Guide
- State Permit Requirements
- Contractor Licensing
- Wire Burial Depth Code
- GFCI Requirements Guide
- Arc Fault & GFCI Code
- Transformer Mounting Code
- Splice Connection Code
- Load Calculation Code
- Grounding & Bonding
- Pool Lighting Clearance
- Wet Location Listing
- NEC 2026 Code Updates
- Voltage Drop Code
- NEC 300.5 Calculators
- Photometric Plan Reading
- As-Built Diagram Requirements
- Junction Box Requirements
- Insurance & Liability Guide
- Low-Voltage Connectors
- Portfolio Model Number Lookup
- Landscape Lighting Guide