
Three Inspection Stages: What Each Covers and When to Call
Calling for the wrong inspection at the wrong stage — or missing a stage entirely — is one of the most common permit management errors for landscape lighting. Each stage has a specific window when it must be called, and missing the window can require expensive re-work to create access for the inspector.
After cable is installed in the trench and all buried connectors are in place — but BEFORE any backfilling. This is the only opportunity to verify underground elements. Once the trench is closed, the inspector cannot verify compliance without excavation.
What the inspector checks:- Burial depth: probe at 10-15 foot intervals from soil surface (not mulch). Minimum 6 inches per NEC Table 300.5 Column 5
- Cable type: must be direct-burial rated with visible marking on jacket
- Cable separation: low-voltage cable not sharing conduit with 120V conductors
- Connector type: buried splice connectors must be direct-burial rated (gel-filled or heat-shrink)
- Conduit under hardscapes: Schedule 40 PVC or equivalent, proper depth and entry/exit protection
- Warning tape: orange direct-burial warning tape 2 inches above cable is best practice in some jurisdictions
Do not backfill until the underground inspection is approved. If you backfill before inspection, the inspector cannot approve what they cannot see and may require re-excavation. See the inspection failure codes guide for the buried-before-inspection problem.
After wiring is installed but before connections are enclosed or concealed. For landscape lighting, this typically covers the transformer mounting and primary-side electrical work. For plug-in transformer systems without a new circuit, the rough-in inspection may be combined with the underground inspection or waived entirely by some AHJs.
What the inspector checks:- Transformer mounting height above grade (per listing label requirements)
- Primary circuit connection method and conductor sizing
- GFCI protection at the supply outlet (TEST/RESET function verified)
- While-in-use outlet cover if transformer is plugged in at this stage
- Any conduit runs from the transformer mounting to the primary supply
- Junction box installations if any hardwired connections are made above grade
For simple plug-in landscape lighting systems, many AHJs allow the underground and rough-in stages to be combined into a single site visit. Confirm with your AHJ before calling for the first inspection whether both stages can be covered in one visit or require separate scheduling.
After all work is completely finished — every fixture installed, transformer fully operational, all covers and housing elements in place, all connections made, system energized and all zones functional. Do not call for final when partial work remains.
What the inspector checks:- All fixtures lit and operational during the inspection visit
- Installed system matches the approved permit drawings
- All required documentation is on-site (see documentation section)
- GFCI outlet function verified by TEST/RESET procedure
- Transformer mounted at correct height and per listing instructions
- Pool setback measurements for any pool-adjacent fixtures
- Load calculation confirming transformer not overloaded
- All listing marks legible on transformer and fixtures
- While-in-use cover at transformer outlet
- Wire routing visible above grade (conduit) properly secured and protected
Final is the stage where the inspector compares as-installed against the approved plan. Any fixture added during installation that wasn't on the approved plan is scope creep that must be resolved before final inspection — see the scope creep section below.
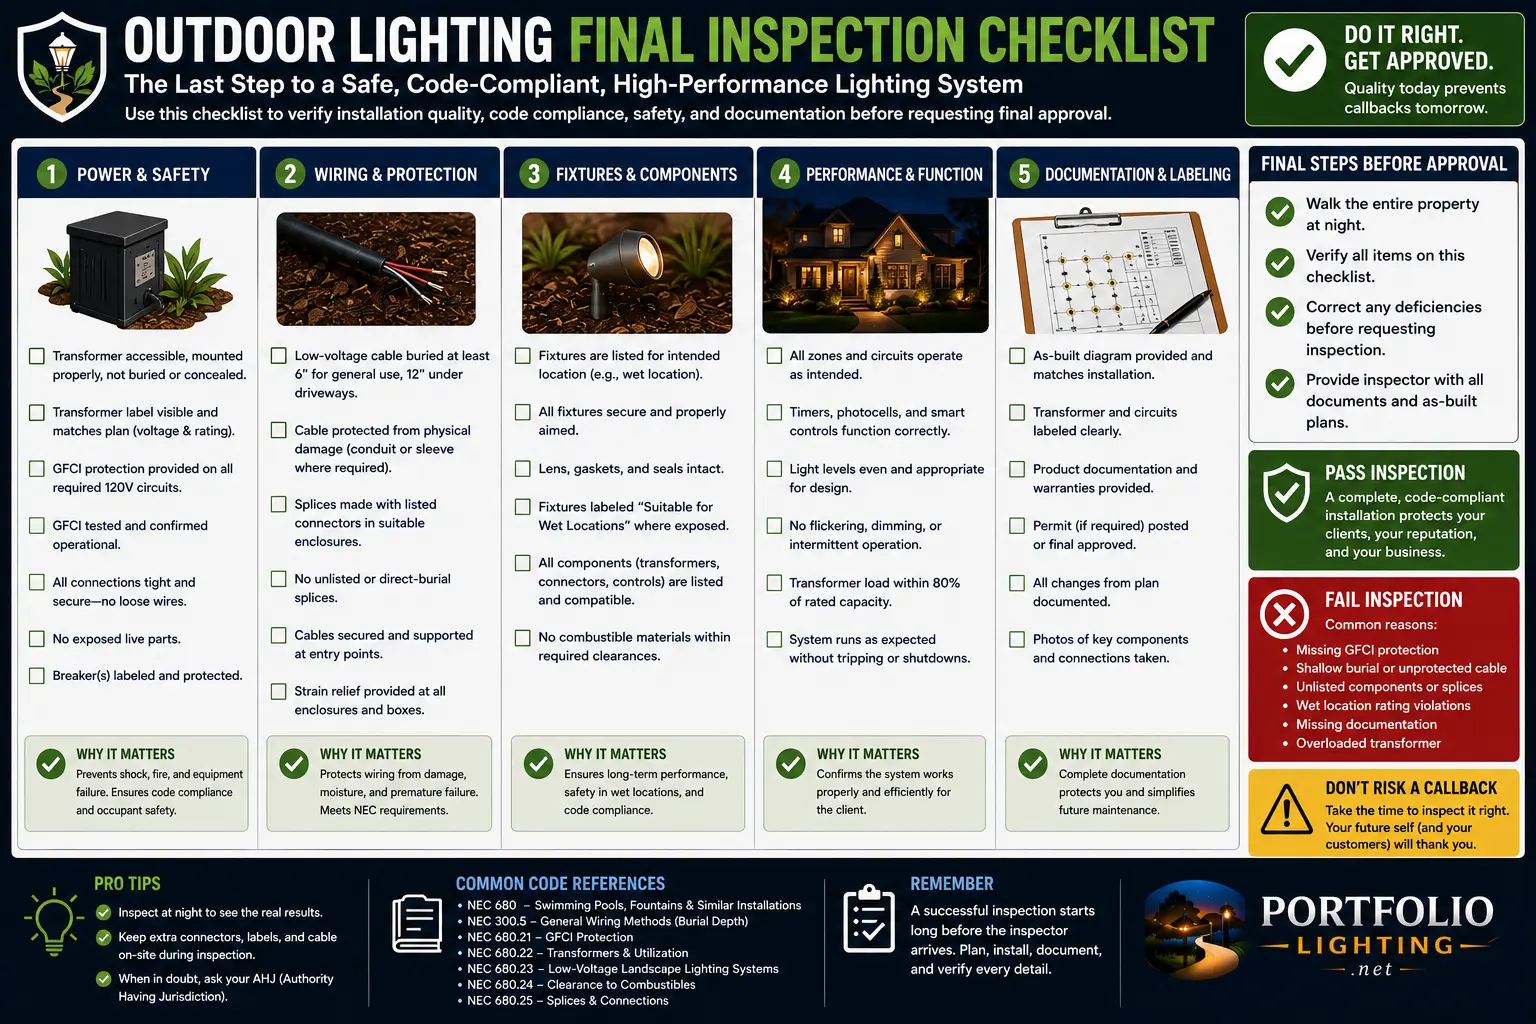
A final inspection checklist should do more than confirm that every fixture turns on. It should verify that the installation can be understood by someone who did not install it: where power enters, how the transformer is mounted, where the cable runs, which connectors are buried, which fixtures are wet-location suitable, and what documentation proves the work. Use the electrical inspector landscape lighting checklist as a companion review before asking for final approval.
The Inspector's Physical Walk Sequence at Final Inspection
Understanding the order in which an inspector walks a landscape lighting final inspection helps you prepare in the same sequence — so your pre-final self-inspection mirrors exactly what the inspector will do.
Per Miami-Dade County's documented inspection guidelines (representative of most AHJ inspection procedures): "Building permit on the card is the same as on the route. If this is not the first inspection, read inspection records and notes on permit card." The inspector begins with administrative verification before touching any hardware — then walks the site methodically.
Final inspections often involve more than verifying that lights turn on properly. Depending on the property type, inspectors may review emergency illumination systems, pathway visibility, backup power provisions, and safe exit-route lighting intended to function during outages. Our emergency backup lighting requirements guide explains the code concepts commonly associated with egress pathways and emergency lighting systems.
Documentation Required On-Site at Final Inspection
The inspector does not bring copies of your permit or approved plans — you are responsible for having them on-site. Missing documentation is a separate failure from any code violation, and it causes an otherwise compliant installation to fail inspection simply because the paperwork isn't there.
The Scope Creep Problem: When Added Work Requires a Revised Permit Before Final
Scope creep — changes made during installation that go beyond the approved permit drawings — is the most common cause of final inspection delays for landscape lighting projects. Understanding when a change requires a revised permit and when it doesn't prevents expensive last-minute discoveries.
Why Changes During Installation Happen — and Why They Create Problems
During landscape lighting installation, changes from the approved plan are almost universal: the homeowner asks for two more path lights "while you're here," a spotlight location shifts to avoid a tree root, a wire route changes to avoid an irrigation line discovered during digging. Per the Mike Holt forum discussion among licensed electrical inspectors about plan changes: "I think it would be pretty standard that anything that increases the load will require a plan check revision to be approved by the AHJ." And per the Houzz guide: "Sometimes a new permit will need to be pulled, or a change to the existing permit will need to be officially submitted. In any event, deviations to the plan will need to meet both planning and building codes."
Minor position shifts: A fixture that moved 1–3 feet from its planned position due to a tree root, irrigation line, or terrain obstacle — when the shift doesn't affect pool setback compliance or bring the fixture near a new hazard.
Wire routing changes: A wire run that takes a different path through the property (around an obstacle) but connects the same fixtures to the same transformer zones shown on the plan.
Fixture substitution with identical specification: Replacing a planned fixture with a different model that has identical wattage, type, and wet-location listing. The fixture schedule changes but the load calculation doesn't. Best practice: document the substitution in writing.
Depth of burial adjustment: Burying cable deeper than planned (10 inches instead of 6 inches) is over-compliant and doesn't require plan revision.
Adding fixtures beyond the approved count: Any fixture added during installation that was not on the approved plan increases the connected load and changes the as-built condition from the approved permit. The Mike Holt CA perspective: "anything that increases the load will require a plan check revision." Contact the building department and submit a plan revision before the final inspection.
Fixture locations near pool: Any fixture repositioned to within 15 feet of a pool, spa, or fountain when the approved plan showed it farther away requires pool setback verification — which may require plan revision if the original plan didn't address pool proximity.
Adding a transformer zone or second transformer: New circuit not shown on approved plan.
Wire route crossing a utility easement not shown on plan: Requires disclosure to the easement holder and potential plan revision.
Commercial Outdoor Lighting Finals: Additional Requirements Beyond Residential
Commercial landscape and outdoor lighting installations face final inspection requirements that residential installations don't — primarily through state energy codes and the Certificate of Installation/Acceptance framework. California's Title 24 is the most documented example, but similar frameworks exist in other states that have adopted energy codes for commercial buildings.
California Title 24 — Certificate of Installation (CEC-NRCI-LTO-E)
For nonresidential outdoor lighting in California (commercial, industrial, multi-family over 3 stories, hotel/motel), the California Energy Commission requires documentation demonstrating that the installed system matches the permitted design. The Certificate of Installation (form CEC-NRCI-LTO-E) must be:
- Completed and signed by the person with an approved license responsible for the installation
- Posted at the building site for review by the enforcement agency at final inspection
- Submitted to the enforcement agency after installation and before receiving the final occupancy approval
The CEC documentation distinguishes between: (1) "Installed features exactly match design on permitted Certificate of Compliance" — if true, the standard installation certificate suffices; and (2) conditions where the as-built set differs from the permit set — in which case "the Certificate of Compliance should be revised to confirm as-built conditions comply." This distinction makes the California Title 24 documentation framework the most explicit codification of the scope-creep problem for commercial outdoor lighting.
Certificate of Acceptance for Lighting Controls
Per the CEC: "Before an occupancy permit is granted for a new building or space, or a new lighting system serving a building, space, or site is operated for normal use, all outdoor lighting controls serving the site shall be certified as meeting the Acceptance Requirements for Code Compliance. A Certificate of Acceptance shall be submitted to the enforcement agency." For commercial landscape lighting with automated controls (timers, photocells, occupancy sensors), the acceptance testing must be completed and documented before the final occupancy approval.
Commercial vs Residential Final: What's Different
| Requirement | Residential Landscape Lighting | Commercial Outdoor Lighting |
|---|---|---|
| Certificate of Installation | Not required (CA residential exemption) | Required (CA CEC-NRCI-LTO-E) — must be on site at final |
| Certificate of Acceptance | Not required for residential | Required for all lighting controls (timers, photocells, sensors) |
| Energy code compliance documentation | Not required for standard residential | Required — photometric plan showing compliance with energy code wattage limits |
| Photometric plan at final | Required if permit submittal included photometric plan; inspector compares as-built positions to calculated values | Required — inspector may verify illuminance levels with a light meter for commercial projects |
| Licensed contractor at final | Not typically required if homeowner pulled permit; contractor license verification if contractor pulled permit | Required — contractor's license must be verified; in CA the Certificate of Installation requires signed certification by licensed person |
Pool-Adjacent Lighting Final: Additional Documentation and Measurements Required
Pool-adjacent landscape lighting finals require specific additional documentation and measurements that residential landscape lighting finals without pools don't. Prepare these before calling for final — they take 30 minutes on-site but prevent the most common pool-adjacent final failure.
Pre-Final Documentation for Pool-Adjacent Installations
- Horizontal distance measurement from inside pool shell to each nearby fixture. Measure from the inside face of the pool shell (not the coping, not the deck edge) to the centerline of each fixture that is within 15 feet of the pool. Document on a diagram showing the pool outline, each fixture's position, and the measurement to each from the pool edge. Minimum: 10 feet for standard landscape luminaires per NEC 411.4(2). Photograph the measurement with a tape measure visible between the pool edge and the fixture. This photo documentation is your defense if the inspector measures differently.
- Transformer listing verification for pool-adjacent systems. Standard Portfolio or Hampton Bay landscape transformers are NOT listed for pool and spa use. If any fixture is within 5–10 feet of the pool and is being approved under the Article 680 compliance path, the transformer must be listed for pool/spa use with secondary-side GFCI protection. Document the transformer's specific listing designation and confirm it covers pool-area use. See the pool lighting clearance guide.
- Secondary-side GFCI documentation for 5–10 foot fixtures. For any fixture within the 5–10 foot zone that is permitted under the Article 680 path, document the secondary-side GFCI protection method. The GFCI at the primary transformer outlet does NOT satisfy this requirement — the isolation transformer electrically separates the circuits. See the GFCI requirements guide.
- Photometric plan showing fixture positions relative to pool. For commercial pool-adjacent lighting, have the photometric plan updated to show as-built fixture positions relative to the pool boundary with the setback measurements annotated.
The Simplest Pool-Adjacent Final Strategy: The 10-Foot Rule. If you keep every standard landscape luminaire at least 10 feet from the inside edge of every pool, spa, and fountain, you avoid the entire Article 680 compliance path complexity. No secondary-side GFCI required. No special transformer listing required. No pool-area compliance documentation beyond the measurement confirmation. The additional documentation and engineering required for fixtures within the 5–10 foot zone consistently costs more in design, specialty equipment, and inspection time than simply designing the landscape lighting layout to maintain the 10-foot clearance everywhere. When the homeowner wants path lights "right next to the pool," the correct answer is "here's what the 10-foot line looks like" — then design beautifully within that boundary.
Complete 18-Item Pre-Final Checklist Organized by Inspector Walk Sequence
Run through this checklist in the 24 hours before calling for final inspection. Items are in the same order the inspector will check them — so your pre-inspection walk mirrors exactly what happens during the inspection. Check every box before scheduling.
Five Failures Discovered at Final That Were Clean at Rough-In
These are the conditions that consistently pass rough-in inspection but fail final — because they either didn't exist at rough-in, weren't the focus of the rough-in inspection, or developed between rough-in and final.
1. Dead Lamps at Final Inspection
A fixture that was operational at rough-in may have a burned lamp by the time final inspection is called — if weeks or months elapsed between installation and final. The inspector finds a non-illuminating fixture, documents it as a deficient installation item, and the permit remains open. Fix: walk the full installation with all zones on before the inspector arrives. Replace every dead lamp. This is a $5–20 fix that takes 3 minutes per fixture when identified before inspection and creates a correction notice when found by the inspector.
2. GFCI Outlet Failure After Months of Outdoor Exposure
GFCI outlets that test correctly at rough-in sometimes fail their test function after months of outdoor exposure — moisture ingress into the mechanism can cause the GFCI to stop tripping on the TEST button even though it continues to pass power. The inspector tests the GFCI at final: presses TEST, outlet doesn't lose power — immediate failure. Fix: test the GFCI the day before calling for final inspection using the TEST/RESET procedure. If it doesn't trip on TEST, replace the outlet before calling for final.
3. Scope Creep Discovered When Plan Is Compared to Installation
Fixtures added "while the crew was there" that weren't on the approved plan are clean at rough-in (the rough-in inspection doesn't compare fixture positions to the plan in the same detail) but become a problem at final when the inspector walks the property with the plan and counts fixtures. Per the Mike Holt forum: "It is on the plans, then many inspectors will require it's presence based on that." The reverse is equally true — a fixture that isn't on the plan will be flagged. Fix: resolve all scope creep with the building department before calling for final.
4. Pool Setback Violation Added After Rough-In
The pool setback zone is typically not the focus of rough-in inspection for the primary landscape lighting work. A fixture moved during installation to a position within 10 feet of the pool — or a fixture added near the pool that wasn't on the original plan — appears at final when the inspector measures the pool setback for the first time in the inspection process.
5. Missing or Incorrect While-In-Use Cover at Transformer Outlet
The while-in-use cover at the transformer outlet is frequently overlooked between rough-in and final — installers sometimes remove it temporarily and forget to reinstall it, or the original outlet cover was standard (not while-in-use) and the violation was missed at rough-in. At final, with the transformer plugged in, the inspector tries to close the cover and finds it won't close — immediate failure. Fix: install the correct while-in-use bubble cover before calling for final and confirm it closes completely with the transformer plug inserted.
The dead lamp at final is the one that frustrates me most because it is genuinely a two-minute fix that becomes a correction notice because nobody walked the installation before calling for final. I have seen landscaping contractors call for final on a 22-fixture system, have the inspector show up, and get three correction notice items for three dead lamps that burned out during the two months between installation and inspection. Two months of accruing re-inspection fees and permit-open status — for three $8 lamps. Walk the installation with all zones on the day before you call for final inspection. Every time. Without exception. It is the single cheapest and most productive pre-final step available.
After Final Sign-Off: Permit Closeout and Record Keeping
The inspector's signature on the permit card is not the end of the process — it's the beginning of a record-keeping step that protects you at property sale, future permit applications, and insurance claims for years to come.
Immediately After Final Approval
- Obtain a copy of the signed permit card or electronic approval confirmation. Ask the inspector before they leave for a signed copy or confirm you can obtain one at the building department office. Some jurisdictions email a digital approval confirmation automatically; others require you to visit the office or download from their portal.
- Verify the permit status in the building department's records. Check the jurisdiction's online permit tracking system (if available) to confirm the permit shows "Closed" or "Final" status. Some systems update immediately; others take 1–5 business days. If the status still shows "Open" after a week, call the building department to request a status update.
- Create the as-built documentation package. After final approval, document the actual installed system using the methods described in the as-built diagram requirements guide. The as-built documents what was installed — which may differ from the approved plan in minor ways that were accepted at final. The as-built is what future contractors, future owners, and insurers will rely on to understand the system.
Long-Term Record Keeping
Maintain a permanent property documentation file containing: the final approved permit card (copy); the as-built diagram; all listing documentation for major components; any HOA approval letters; and the final inspection approval confirmation. Per the guidance documented in the correction notices guide: this documentation package is what prevents open permit discoveries at property sale, supports insurance claims, and enables future contractors to work safely around existing buried infrastructure. Store it with your home's other critical documents — not in the garage or attic where it may be lost.
Outdoor Lighting Final Inspection FAQ
I missed the underground inspection window and the trench is already backfilled. Can I still get a final inspection?
Not directly — the underground inspection must be passed before final can be approved. If the underground trench was backfilled before inspection, the building department will typically require re-excavation of representative sections to verify burial depth and cable type before approving the underground stage, which then allows the final inspection to proceed. The standard outcome: you contact the building department, explain that the trench was backfilled before inspection, and ask what sections they need to see excavated for the underground inspection. They will direct you to re-excavate specific points (often every 30–50 feet and at each fixture location) and call for underground inspection on the open sections. After the underground stage is approved on those sections, you can backfill and proceed to final. This is significantly more expensive than having the underground inspection done before backfilling — typically $200–500 in additional labor for re-excavation on a typical residential landscape lighting run. The prevention is simple: call for underground inspection before the trench is closed. For the complete buried-before-inspection discussion, see the inspection failure codes guide.
I added four more path lights after the permit was issued because the homeowner wanted them. What do I do before calling for final?
Contact the building department before calling for final and describe the scope change: "We added four path lights to the installation not shown on the approved plan, total added wattage X watts, all fixtures are [same model as other approved fixtures] with identical listing." Ask whether a plan revision is required or whether the addition can be approved as a field change at final inspection. The answer depends on: (1) whether the added load brings the system above the approved transformer capacity; (2) whether the added fixtures are near the pool and change any setback calculations; and (3) your jurisdiction's policy on minor additions — some AHJs accept minor additions as long as total load remains within the approved transformer rating and no special locations are affected. If a plan revision is required, submit it and wait for approval before calling for final — calling for final with unapproved scope additions is the most common source of plan-comparison failures at final inspection. The addition almost certainly won't cause a compliance problem, but it must be documented properly.
My landscape lighting permit was issued eight months ago and I'm just now calling for final. Will there be a problem?
Potentially yes — most permits have an expiration clause based on time without inspection activity. Many jurisdictions expire permits after 6–12 months without a final inspection being completed. Contact the building department before calling for final and ask whether the permit is still active. If the permit is still active (some jurisdictions have longer windows or have been liberal about expiration enforcement), call for final as normal. If the permit has expired, you will need to go through the permit renewal process — typically paying a renewal fee and possibly requiring re-inspection of prior stages. For buried cable on an expired permit, the inspector at final may require re-verification of underground work (probe testing) even if the underground inspection was completed months ago. The cost of permit renewal (typically 25–100% of the original permit fee) and potential re-inspection is the cost of allowing a permit to expire. Contact the building department and get the current permit status before scheduling any inspection after an 8-month gap. See the correction notices guide for the permit expiration timeline and consequences.
Related Code, Compliance & Inspection Guides
- Electrical Code Safety Guide
- NEC Inspection Checklist
- Inspection Failure Codes
- Correction Notices Guide
- Permit Requirements Guide
- State Permit Requirements
- As-Built Diagram Requirements
- Wire Burial Depth Code
- GFCI Requirements Guide
- Transformer Mounting Code
- Load Calculation Code
- Splice Connection Code
- Pool Lighting Clearance
- Wet Location Listing
- Contractor Licensing
- NEC 2026 Code Updates
- Insurance & Liability Guide
- Grounding & Bonding
- NEC 300.5 Calculators
- Junction Box Requirements
- Photometric Plan Reading
- Portfolio Model Number Lookup
- Landscape Lighting Guide
- Maintenance Guide