
Quick Answer: Portfolio Lighting Placement Basics
The best Portfolio lighting placement creates useful coverage without glare, dark gaps, or over-lighting. Placement matters more than simply adding more fixtures.
- Path and walkway lights: space for guidance, not runway-style brightness
- Accent fixtures: place to highlight focal points, not wash everything equally
- Work and task lighting: position light over the actual work zone
- Outdoor systems: place fixtures first, then confirm transformer and wire planning
Use the sections below to match placement strategy to the space you are lighting.
Quick Fix: Why Landscape Lighting Looks Bad at Night
- Too bright or harsh? Lights are too close together
- Uneven or patchy? Fixtures are spaced inconsistently
- Blinding glare? Lights are aimed at eye level
- Flat or boring look? Everything is lit the same way
- Some lights dim? Transformer placement or voltage drop issue
Fixing placement usually improves the entire system without replacing fixtures.
When landscape lighting is placed correctly, it can transform the look of your home at night. Pathways feel safer, architectural features stand out, and the yard develops depth and character after dark. But when fixtures are placed poorly, even high-quality lights can create glare, uneven brightness, or lighting that simply feels awkward.
This guide focuses on the most common lighting placement mistakes homeowners make. You will learn where path lights are often spaced incorrectly, how uplights can be positioned better, and why beam direction and fixture placement matter more than many people expect. Understanding these issues before installation can save time, prevent unnecessary rewiring, and help your lighting system look more balanced once everything is installed.
If you are still planning the overall lighting design for your yard, start with the Portfolio Lighting Guide, Plan and Placement page. That guide walks through the full planning process. If you already have a basic layout and want to make sure your fixture placement is correct, this page will help you avoid the most common mistakes.
How to Fix Landscape Lighting Placement
- Step 1: Check spacing between fixtures
- Step 2: Adjust beam direction and angle
- Step 3: Remove glare from eye-level view
- Step 4: Match fixture type to the area
- Step 5: Test the layout at night
Why lighting placement matters more than many homeowners expect
Landscape lighting is not just about putting fixtures around the yard. It requires a strategy so the light highlights the right features without creating glare, dark spots, awkward shadows, or visual clutter. Even high-quality fixtures can look disappointing if they are positioned incorrectly.
Correct placement improves nighttime safety, curb appeal, visibility, and overall design balance. Poor placement, on the other hand, often leads to bright hot spots, wasted fixtures, uncomfortable glare, and lighting patterns that make the yard feel less polished instead of more attractive.
The full planning side of that process lives on Portfolio Lighting Guide, Plan and Placement. This page focuses on the most common placement errors so you can fix them before they become part of the permanent installation.
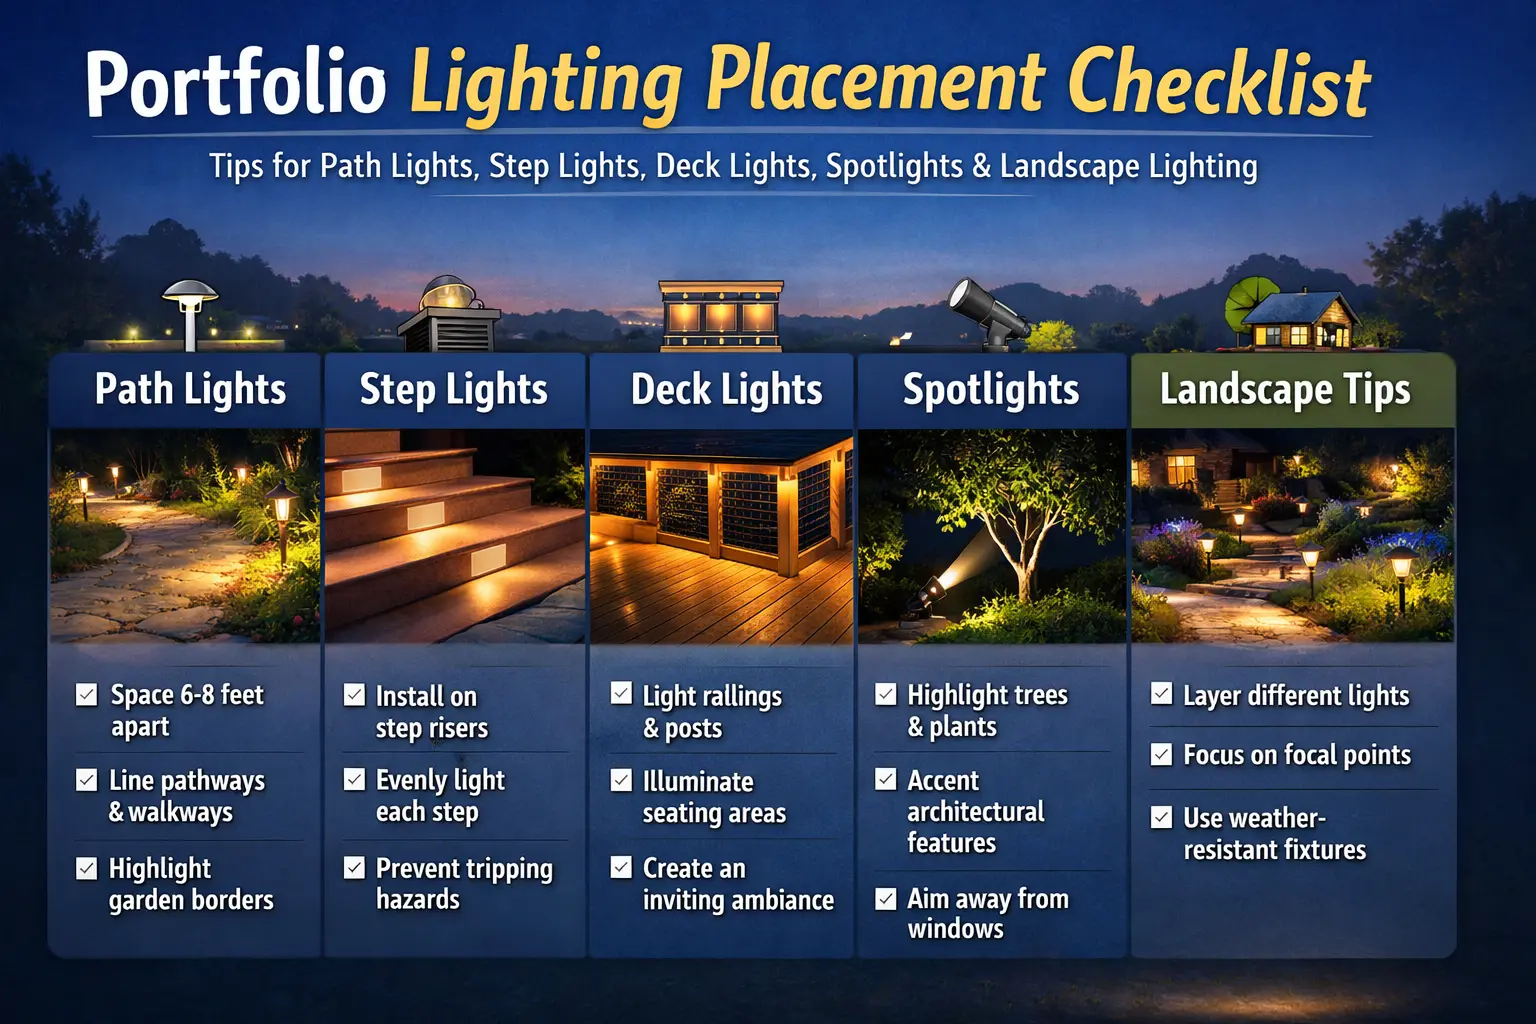
Path light placement mistakes
1. Path lights placed too close together
One of the most common placement mistakes is clustering path lights too tightly. Homeowners often assume closer spacing creates better illumination, but it usually creates bright hot spots and a cluttered line of light instead. In many layouts, softer overlapping pools of light look much better.
Many path lights work well around six to eight feet apart on standard walkways, while wider areas may push closer to eight to ten feet depending on brightness and beam spread. For deeper spacing guidance, use path light placement and landscape lighting spacing.
2. Path lights installed in perfectly straight lines
Another common mistake is lining fixtures up with rigid symmetry when the space would look better with a slightly more natural rhythm. Straight rows can create the “airport runway” effect, especially when both sides of a path are lit too evenly. Slight variation and staggered placement often look more residential and less artificial.
3. Using path lights where another fixture type would work better
Not every area needs path lights. Some spots need a bollard, an accent fixture, or a softer transition light instead. That is where supporting pages like Portfolio path lights, Portfolio bollard lighting, and Portfolio bollard landscape lighting help narrow the right choice.
Uplight placement mistakes
4. Uplights placed too close to walls
Uplights are often used on walls, columns, and architectural features, but placing them too close to the surface can create harsh beams and unflattering glare. A common starting point is around twelve to twenty-four inches away from the wall, though the final distance depends on beam spread, output, and the texture of the surface.
5. Uplighting trees incorrectly
Tree uplighting is one of the most dramatic outdoor lighting techniques, but it is easy to overdo. Common mistakes include putting the fixture too far from the trunk, blasting the tree with light that is too bright, or aiming straight up the trunk instead of into the structure of the canopy. For the more specific version of this topic, see tree uplighting guide.
6. Ignoring the scale of the feature
A small shrub and a large mature tree do not need the same fixture placement. Likewise, a narrow column does not need the same beam pattern as a broad stone wall. Many uneven results come from treating all focal points like they should be lit the same way.
If your larger layout still needs structure, go back to landscape lighting design guide and landscape lighting layout to make sure the placement supports the bigger design.
Beam angle and fixture-match mistakes
Not all landscape lighting fixtures produce the same beam pattern. Some create narrow spot beams while others produce a wide wash. Ignoring beam angle is one of the biggest reasons a lighting plan looks uneven or awkward after dark.
| Mistake | What goes wrong | Better approach | Supporting page |
|---|---|---|---|
| Using a narrow beam on a wide surface | Creates an overly bright strip or hot spot | Use a wider wash approach for broad areas | Outdoor wall spotlights |
| Using a wide beam on a tall feature | Light spreads too much and loses focus | Choose a tighter beam for taller focal points | Landscape spotlights |
| Ignoring path width | Walkway lighting feels uneven or too harsh | Adjust spacing and fixture position to the path itself | Path light placement |
| Using the same fixture everywhere | Yard loses visual depth and function | Match fixture type to the job of the zone | Main planning hub |
Glare mistakes that ruin an outdoor lighting design
Glare is one of the fastest ways to ruin landscape lighting. It often happens when fixtures are placed where the beam shines directly into someone’s eyes while walking, sitting on a patio, driving into the driveway, or approaching the front entry.
7. Placing lights where they shine into eyes
This usually happens when fixtures are aimed at eye level, set too close to the walking path, or placed where the bulb itself is visible instead of the illuminated surface. A better approach is to aim lights away from direct sight lines and hide fixtures behind landscaping or structure whenever possible.
8. Forgetting to test the layout at night
Landscape lighting always looks different after dark than it does during the day. Many placement mistakes happen because fixtures are installed in daylight and never adjusted once the real nighttime effect is visible. Before wires are buried permanently, test the layout after sunset and adjust beam direction, spacing, and fixture position.
Transformer placement and full-layout mistakes
9. Poor transformer placement
The transformer powers the full low-voltage lighting system, but many homeowners install it without considering wire distance, accessibility, or future expansion. A poorly located transformer can create long runs, harder maintenance, and more voltage drop problems than necessary.
If your lighting layout looks uneven or some fixtures appear dim, the issue may not be placement alone. Review the Portfolio lighting transformer help to check power distribution, load limits, and system setup.
A strong general rule is to install the transformer near a GFCI outlet, in a location that supports cleaner wire runs, and where it can still be accessed for maintenance. For the electrical side of this, use How to Wire Landscape Lighting, Portfolio landscape lighting wiring, and landscape lighting voltage drop.
10. Not planning the entire lighting layout first
One of the biggest mistakes is installing lights randomly without a complete plan. Before placing fixtures, you should think through focal points, paths, driveway edges, architectural highlights, and overall yard depth. That broader planning step belongs on Portfolio Lighting Guide, Plan and Placement, which is why this page should now support that hub instead of competing with it.
Main Planning Hub
Use the broader guide when you need a full layout strategy, not just fixes for placement errors.
View planning hubInstallation Support
Move into installation after the layout and placement mistakes have been corrected.
View installation guideLayout Support
Use a broader outdoor layout guide if the whole yard still feels disconnected.
View layout guideSystem Troubleshooting
If the lighting still performs poorly after fixing placement, move into system-level troubleshooting.
View troubleshootingFix Your Lighting Fast (Problem → Solution)
| If you see this | It usually means | What to do |
|---|---|---|
| Runway-style path lights | Lights too close together | Space fixtures 6–10 feet apart |
| Harsh glare in eyes | Fixtures aimed too high | Lower angle and hide light source |
| Bright spots + dark gaps | Uneven spacing | Adjust spacing for overlap |
| Lights look weak or dim | Voltage drop or long runs | Check transformer location and wiring |
Simple lighting placement checklist
Before finalizing the installation, run through this simple checklist:
- Path lights spaced so they overlap softly instead of clustering into hot spots
- Fixtures staggered or positioned naturally rather than creating a runway look
- Uplights placed far enough away from walls and trunks for a natural spread
- Beams aimed away from eye level
- Key features highlighted selectively rather than over-lighting the whole yard
- Layout tested at night before final burial and permanent placement
That short review catches a surprising number of outdoor lighting mistakes before they become permanent.
Frequently asked questions
What is the most common landscape lighting placement mistake?
One of the most common mistakes is placing path lights too close together. That often creates hot spots, glare, and a cluttered runway look instead of a softer, more natural lighting pattern.
How far apart should path lights usually be placed?
Many path lights are spaced about six to eight feet apart on standard walkways, though wider areas may use eight to ten feet depending on brightness, beam spread, and the shape of the space.
How far should uplights be placed from a wall?
A common starting point is about twelve to twenty-four inches away from the wall, but the right distance depends on the beam angle, fixture brightness, and the effect you want on the surface.
Why do landscape lights create glare?
Glare usually happens when fixtures are aimed toward eye level, placed too close to sight lines, or installed without considering shielded angles and nighttime viewing positions.
Final takeaway
This page now works best as a supporting SEO article, not the main pillar page. Its job is to rank for common lighting placement mistakes, path light spacing mistakes, uplight placement mistakes, and outdoor lighting design errors while sending broader planning intent back to Portfolio Lighting Guide, Plan and Placement.
That cleaner structure reduces cannibalization, strengthens the authority of the main guide, and gives visitors a more logical next step depending on whether they need full-yard planning or just help fixing placement errors.
Expert-Verified Troubleshooting
Every technical guide on PortfolioLighting.net is reviewed for accuracy at the time of writing. Our troubleshooting procedures are based on 25+ years of field experience and are maintained by Philip Meyer to ensure accuracy and electrical safety compliance.