
How Does Low Voltage Landscape Lighting Work? (Quick Answer)
A low voltage landscape lighting system uses a transformer to convert household power into 12 volts, then sends that power through underground cable to each light fixture. Each fixture taps into the main cable and receives power independently.
- Transformer: creates usable low voltage power
- Cable: carries power through the yard
- Connectors: tap fixtures into the system
- Fixtures: turn power into light
Landscape Lighting System Diagnosis Guide
| What You See | Most Likely Cause | Where to Check First |
|---|---|---|
| Entire lighting system is off | No power reaching the transformer | Verify the transformer, GFCI outlet, breaker, and timer settings. |
| One section of lights is out | Broken cable, failed splice, or damaged connector | Begin at the first fixture that is not working and inspect every connection downstream. |
| Lights become dim farther from the transformer | Excessive voltage drop | Measure voltage at the first and last fixture, then review wire gauge and total cable length. |
| Lights flicker or randomly turn off | Loose wiring connection or moisture intrusion | Inspect wire connectors, fixture sockets, and underground splices for corrosion. |
| Only some fixtures operate normally | Partial circuit failure or overloaded wiring run | Inspect mid-run splice points and verify the transformer is not overloaded. |
Following the electrical path from the transformer to the last fixture is usually the fastest way to isolate a landscape lighting problem. Most failures occur at wire connections, underground splices, or areas where voltage has dropped below the operating range of the fixtures.
This diagnosis guide shows where power typically fails, but overall system performance also depends on reducing electrical losses. For a detailed explanation of why long cable runs waste energy and how better wiring layouts improve efficiency, read our guide to minimizing voltage drop and energy waste.
Start Here: What Problem Are You Solving?
- Lights not working → check transformer and wiring
- Only some lights work → inspect connectors
- Lights dim far away → check voltage drop
- Planning a new system → follow diagram layout
Use the diagram to follow power from source to fixture and identify where the issue begins.
If your system uses a multi-tap transformer, wiring will include both a COM terminal and a selected voltage tap. This Portfolio 200W transformer guide shows how that setup works in real installations.
A low voltage lighting system is much easier to understand when you can see the full picture. Instead of guessing how the transformer, cable, connectors, and fixtures all relate to each other, a diagram shows the system in one view. That makes it easier to plan a project correctly and avoid mistakes that lead to dim lights, overloaded transformers, messy wire runs, and frustrating troubleshooting later.
Think of this page like a classroom lesson built around one clear visual and quick answers. First, you will see the whole system. Then you will learn the job of each part. After that, you will look at common wiring layouts, the mistakes people make, and how the same diagram can help you troubleshoot when the lights stop working the way they should.
If you want to see how advanced control logic fits into the broader outdoor lighting system, visit predictive arrival lighting behavior patterns. That page explains how AI uses learned routines, location signals, and environmental conditions to make pre-arrival lighting decisions.
If you want to understand how advanced balancing fits into the larger low-voltage system, read AI transformer voltage load balancing. It shows how AI adds a control layer above the transformer to monitor load, reduce dimming, and improve electrical efficiency across multiple lighting zones.
A modern outdoor lighting system includes more than a transformer and fixtures. Our holiday lighting automation guide explains how scheduling, triggers, and zone-based control fit into the larger low-voltage system when seasonal themes are added.
Simple landscape lighting system diagram
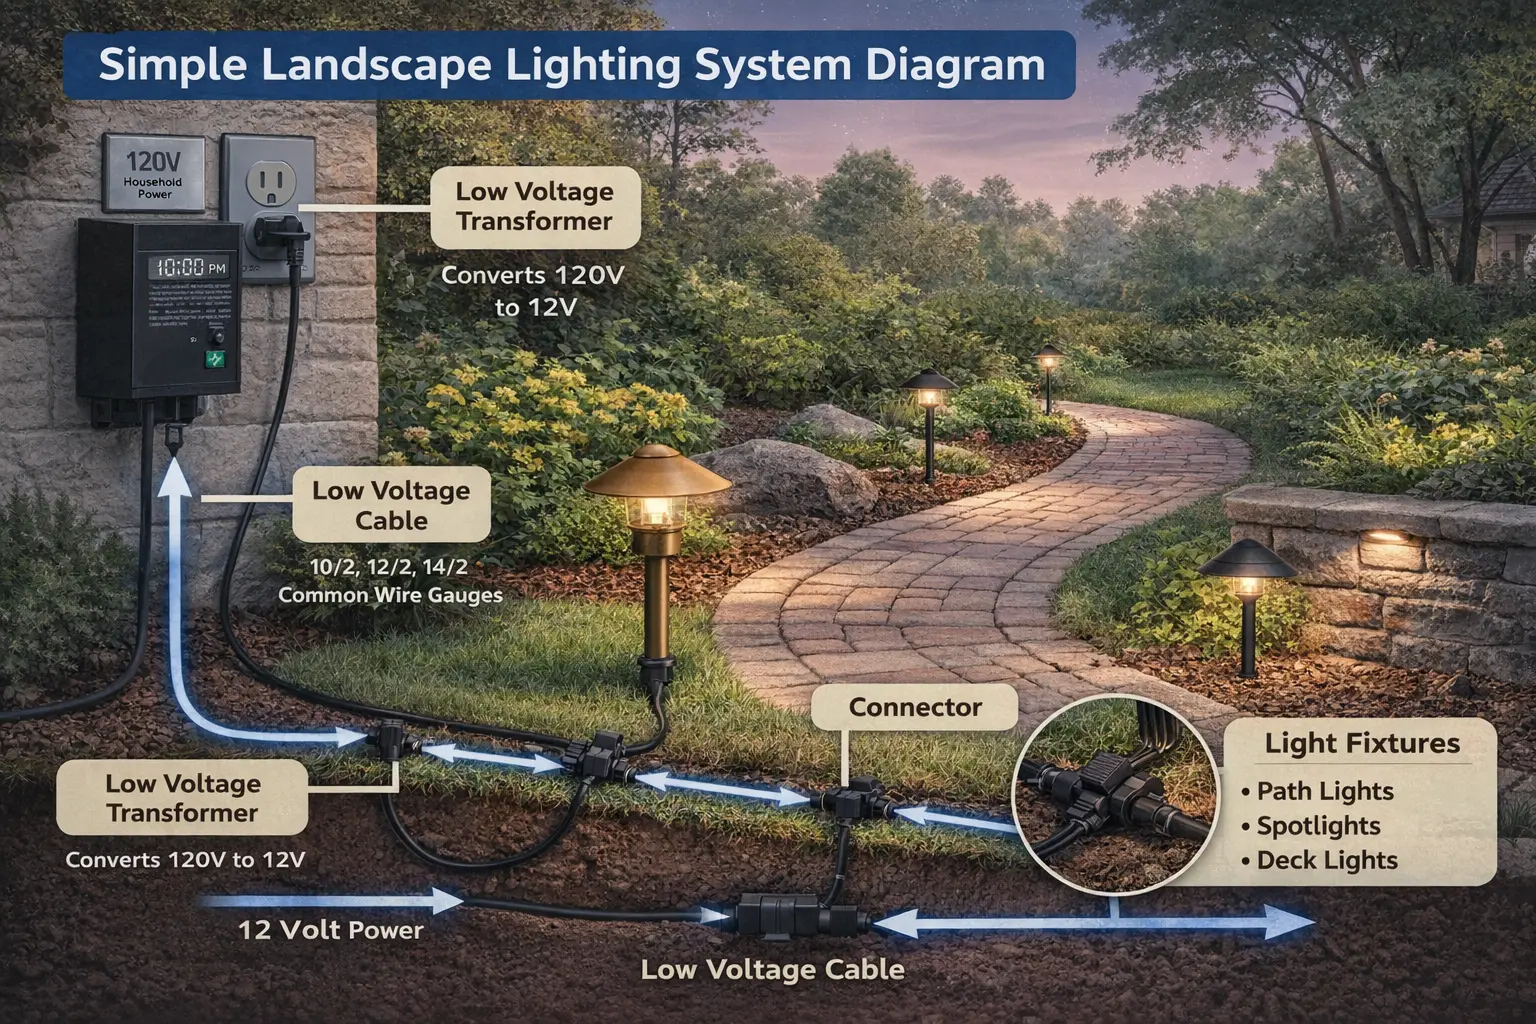
Example of a low voltage landscape lighting system diagram showing how the transformer, 12-volt cable, connectors, and fixtures connect in a typical outdoor lighting installation.
This diagram shows the basic structure of a low voltage landscape lighting system. The system begins at the transformer. The transformer converts normal household 120-volt electricity into safer 12-volt power that can be used for outdoor lighting. From there, the low voltage cable runs through the yard and carries that power to the light fixtures.
Each fixture taps into the main cable using outdoor-rated connectors. Those connectors let the light receive power without every fixture needing its own direct cable from the transformer. That is why low voltage lighting systems are flexible. You can light paths, driveways, beds, walls, patios, and gathering spaces from the same general system as long as the transformer, wiring, and fixture load are planned correctly.
If you are new to the topic, this is the one idea to remember: the transformer creates the power, the cable carries it, the connectors tap into it, and the fixtures turn it into usable light. Pages like Portfolio low voltage lighting and Portfolio lighting transformer timer not working help reinforce that same idea from different angles.
A complete outdoor lighting system now includes more than transformer, cable, and fixtures. Our Matter and Thread connectivity guide explains how hubs, Border Routers, and mesh-connected outdoor devices fit into a modern low-voltage system.
One-zone failures become much easier to diagnose when you understand how low-voltage branch circuits are physically divided across the property. The landscape lighting one-zone repair guide explains how to follow power flow through the system, isolate dead branches, and determine whether the problem is located at the transformer, splice, cable run, or fixture group.
Parts of a low voltage landscape lighting system
Once you understand the diagram as a whole, the next step is understanding the job of each part. Think of the system as a team. Each part has one important role. If one part is missing, undersized, or damaged, the full system may not work the way you expect.
Transformer
The transformer is the starting point. It takes household power and reduces it from 120 volts to 12 volts. That lower voltage is what makes outdoor landscape lighting safer and easier to expand. If the transformer is undersized or failing, the whole system can suffer. For deeper help, see Portfolio lighting transformer sizing guide, and Portfolio lighting transformer wattage guide.
Understanding the main electrical path through a low-voltage lighting system is critical when every fixture suddenly goes dark. The landscape lighting all lights out at once guide explains how transformer shutdowns, main-feed cable faults, overloaded branches, and shared connector failures interrupt power flow to the entire landscape lighting system simultaneously.
Low voltage cable
The cable carries 12-volt power through the yard. This is usually direct-burial low voltage cable, often in sizes such as 10/2, 12/2, or 14/2. The right size depends on run length and total load. Long runs with undersized cable can lead to voltage drop, which is one reason the farthest lights sometimes look dimmer. Related pages include landscape lighting wire gauge and landscape lighting voltage drop.
A low-voltage system diagram shows how power travels through the landscape, but it does not explain where systems physically fail after years outdoors. Moisture migration, oxidized connectors, thermal stress, and cable punctures can all interrupt the electrical path in ways that are invisible from the surface. The low-voltage landscape lighting failure points guide explains the hidden breakdown patterns that commonly affect outdoor lighting systems.
Transformer buzzing often reveals hidden problems elsewhere in the low-voltage lighting system, including overloaded cable runs, unstable branch circuits, poor connectors, and voltage imbalance between lighting zones. The landscape lights buzzing diagnostic guide explains how transformer noise relates to overall system behavior and electrical load distribution.
Connectors
Connectors join each fixture to the main cable. They need to be secure and weather resistant. A bad connector can cause flickering, intermittent power, or total failure on one part of the run. That is why landscape lighting connectors is such an important support page.
Light fixtures
Fixtures turn the electrical power into useful light. Depending on the zone, this may include path lights, spotlights, deck lights, step lights, or accent fixtures. To see common fixture types, compare Portfolio path lights, Portfolio landscape spotlights, and Portfolio deck lighting.
How electricity flows through the system
This part is important because many homeowners imagine landscape lights as a chain of fixtures passing power from one to the next. In reality, most low voltage landscape lighting systems are wired in parallel. That means each light taps into the main cable and receives power from that main run rather than depending completely on the previous fixture.
Step 1: The transformer creates usable low voltage power
The transformer plugs into normal household power. It reduces that voltage to a level the lighting system is designed to use.
Step 2: The cable distributes that power through the yard
The cable becomes the delivery path. It routes power to the different lighting zones.
Step 3: Connectors tap into the main cable
Each light fixture connects to the cable and pulls power from it. That makes the system modular and expandable.
Step 4: Fixtures illuminate
Once the power reaches each fixture, the bulb or LED module turns that electricity into light.
If you want the step-by-step installation version of this same lesson, go next to How to Wire Landscape Lighting.
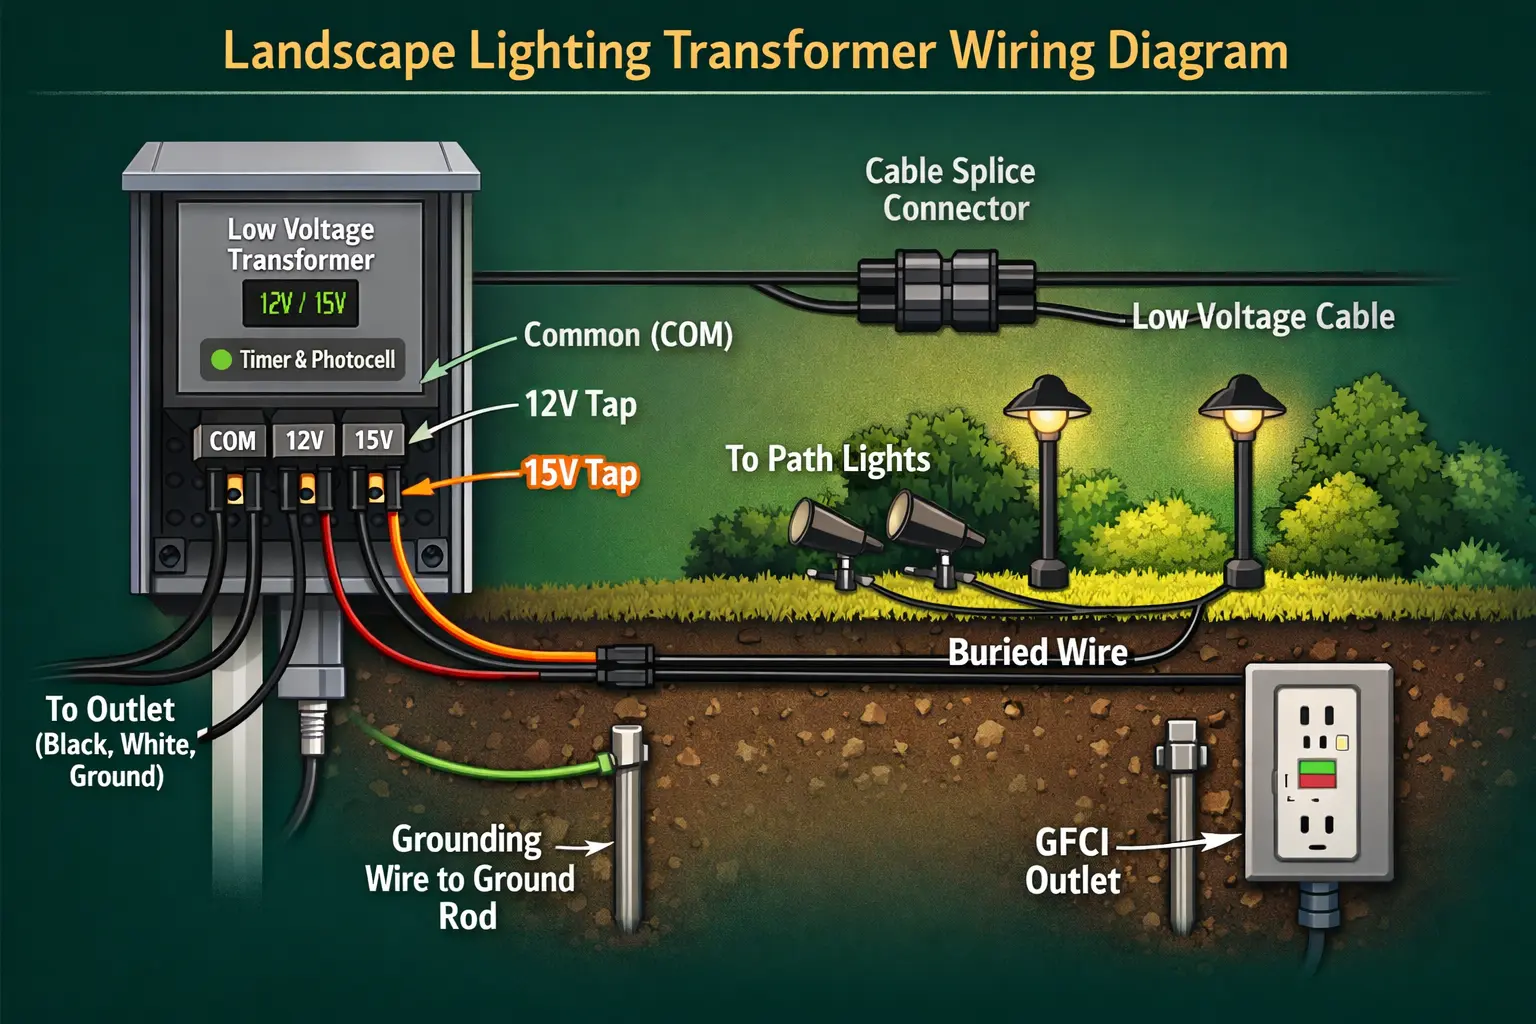
This transformer wiring diagram shows how household power enters the transformer, how 12-volt output leaves the unit, and how that low voltage power continues to the cable and landscape fixtures.
A low-voltage lighting diagram only works properly when the electrical load is balanced correctly across the system. The load calculation and landscape lighting code guide explains how fixture wattage totals, transformer capacity, cable resistance, and NEC safety considerations determine whether a system performs reliably over time or develops dimming and overheating issues.
Landscape lighting wiring layout options
Not every yard uses the same wiring layout. That is why a diagram page should also teach the most common system shapes. The layout you choose affects brightness balance, cable length, future expansion, and troubleshooting ease.
Daisy chain layout
This is one of the simplest layouts. The main cable runs from one area to the next in a straightforward line. It is simple, but longer daisy-chain runs can show more voltage drop at the far end.
T method layout
A T layout branches power in more than one direction. This is useful when one transformer needs to support separate yard sections, such as a path and a bed.
Hub layout
In a hub-style setup, several shorter runs extend outward from a more central point. This can help keep loads balanced and make the system easier to manage in certain layouts.
Loop layout
A loop or near-loop approach can sometimes help with balance, though it must still be planned correctly to make sense electrically and physically in the yard.
If you want the more detailed page on wiring routes, use Portfolio landscape lighting wiring. If you are trying to understand why one layout performs better than another, compare it with landscape lighting voltage drop.
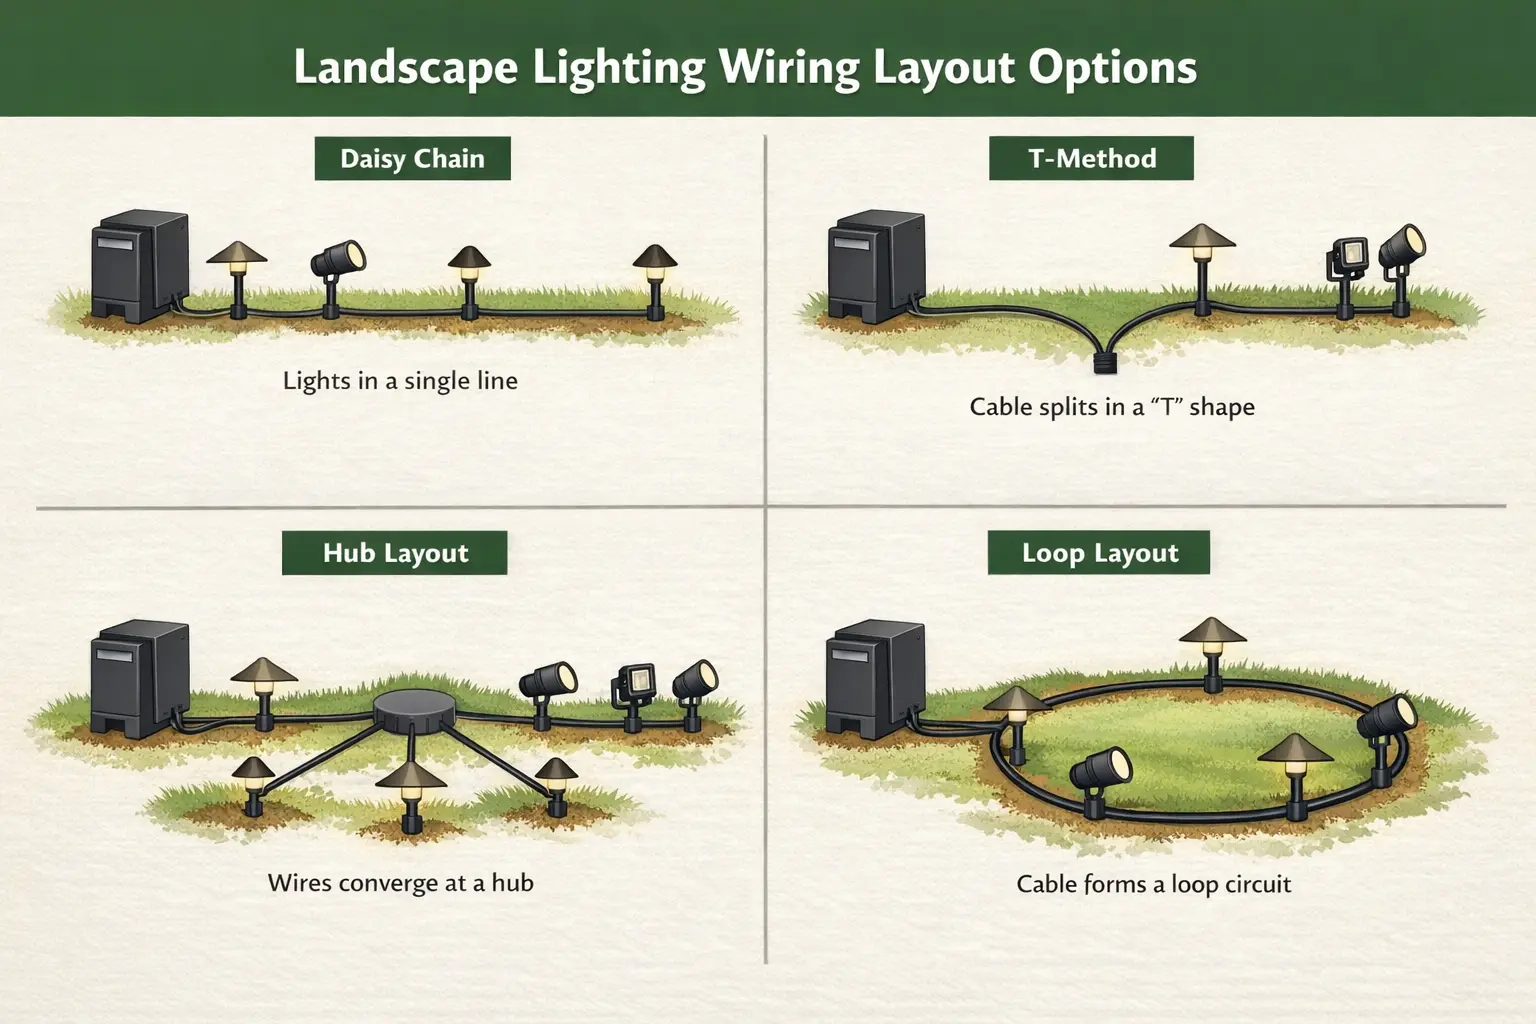
This diagram compares common landscape lighting wiring layouts and shows how transformer wiring connects to the low voltage cable and fixtures.
Common wiring layouts compared
| Layout type | Best use | Common strength | Common weakness |
|---|---|---|---|
| Daisy chain | Simple straight runs | Easy to understand and install | Can show more voltage drop on long runs |
| T method | One transformer feeding multiple directions | Supports branching zones | Needs thoughtful load planning |
| Hub layout | More centralized systems | Can balance multiple shorter runs | Needs good transformer placement |
| Loop style | Selective advanced layouts | Can improve system balance in some cases | Often misunderstood or overcomplicated |
Common mistakes in landscape lighting wiring
One of the best things about a diagram page is that it teaches what not to do. Many outdoor lighting problems come from only a few repeated mistakes, and most of them are easier to understand once you look at the system as a diagram instead of a pile of parts.
Too many lights on one run
Homeowners often keep adding fixtures to a single cable run because it seems convenient. The result can be a dim far end, overload at the transformer, or a layout that works poorly as the system grows.
Wire gauge too small
A small wire size may work on a short path with few fixtures, but it can become a problem on longer runs. That is why landscape lighting wire gauge matters so much.
Poor connectors
Bad connections are one of the biggest real-world failures in low voltage lighting. A poorly seated or moisture-damaged connector can cause flicker, weak output, or total failure.
Transformer undersized
If the transformer is too small for the total load, the whole system may become unreliable. That is why transformer sizing should happen before installation, not after problems begin.
Use Portfolio lighting transformer sizing guide and Portfolio lighting transformer wattage guide to prevent those issues.
Planning a landscape lighting system with the diagram in mind
A diagram is not only for installation. It is also a planning tool. When you can picture the full system, it becomes easier to decide where to place the transformer, how to group the yard into lighting zones, and how to route cable in a way that supports both performance and maintenance.
Think in lighting zones
Your front walk, driveway, patio, side yard, and garden accents may not all belong on the same run. Breaking the yard into zones helps the system stay organized and easier to expand later.
Choose transformer placement early
A transformer placed in the wrong location can create unnecessary cable distance and make the system harder to service.
Sketch cable routes before digging
A simple sketch prevents a lot of confusion later. It also helps you estimate load and wire needs more accurately.
For the broader yard planning side of the project, go next to Portfolio Lighting Guide, Plan and Placement and landscape lighting layout.
Installation Planning
Use a full installation guide once the system diagram makes sense.
View installation guideLayout Planning
Use a yard-wide planning guide to connect the diagram to the full design.
View planning hubLow Voltage Basics
Review the core parts of a low voltage system in a more general guide.
View low voltage basicsTroubleshooting system problems with the diagram
One of the smartest ways to use a system diagram is for troubleshooting. When the lights are not behaving correctly, the diagram helps you think logically about where the failure may be happening.
If the whole system is dark
Start at the transformer and power source. Check the outlet, GFCI, breaker, timer, and transformer output.
If only one section is dark
That usually points to a damaged wire, a failed connector, or a problem at the first fixture in the dead section.
If the far end is dim
Think voltage drop, wire gauge, excessive distance, or too many fixtures on one run.
If the lights flicker
Check for loose connectors, unstable power, water intrusion, or a failing LED or socket.
For symptom-based help, compare this page with Portfolio landscape lights not working and Portfolio lighting troubleshooting.
Frequently asked questions about low voltage landscape lighting system diagrams
What is a low voltage landscape lighting system?
A low voltage landscape lighting system is an outdoor lighting setup that uses a transformer to reduce household 120-volt power to 12 volts for safer operation around paths, beds, patios, and driveways.
How does a landscape lighting transformer work?
A landscape lighting transformer takes standard household power and converts it to low voltage power that can be sent through landscape lighting cable to outdoor fixtures.
What cable is used for landscape lighting?
Low voltage landscape lighting usually uses direct-burial cable such as 10/2, 12/2, or 14/2 wire, depending on the fixture load and the length of the run.
How are landscape lights connected?
Landscape lights connect to the main low voltage cable using waterproof connectors. Each fixture taps into the cable and receives 12-volt power from the transformer.
How many lights can run on one transformer?
The number of lights depends on the total wattage of the fixtures, the size of the transformer, and the length of the wire runs. The system should always be sized with some extra capacity instead of being loaded right to the edge.
Do landscape lights run in series or parallel?
Most low voltage landscape lighting systems are wired in parallel so each fixture receives power from the main cable rather than depending on the previous fixture in a series chain.
Final thoughts
Once you understand the system diagram, landscape lighting stops feeling mysterious. You can see how power moves through the yard, how fixtures connect, and why planning the layout correctly matters just as much as buying the right parts.
That understanding helps with every part of the project. It helps when you are choosing cable size. It helps when you are deciding where the transformer should go. It helps when one section of lights suddenly goes dark and you need to think through where the problem is most likely hiding. In other words, this one diagram supports planning, installation, and troubleshooting all at once.