
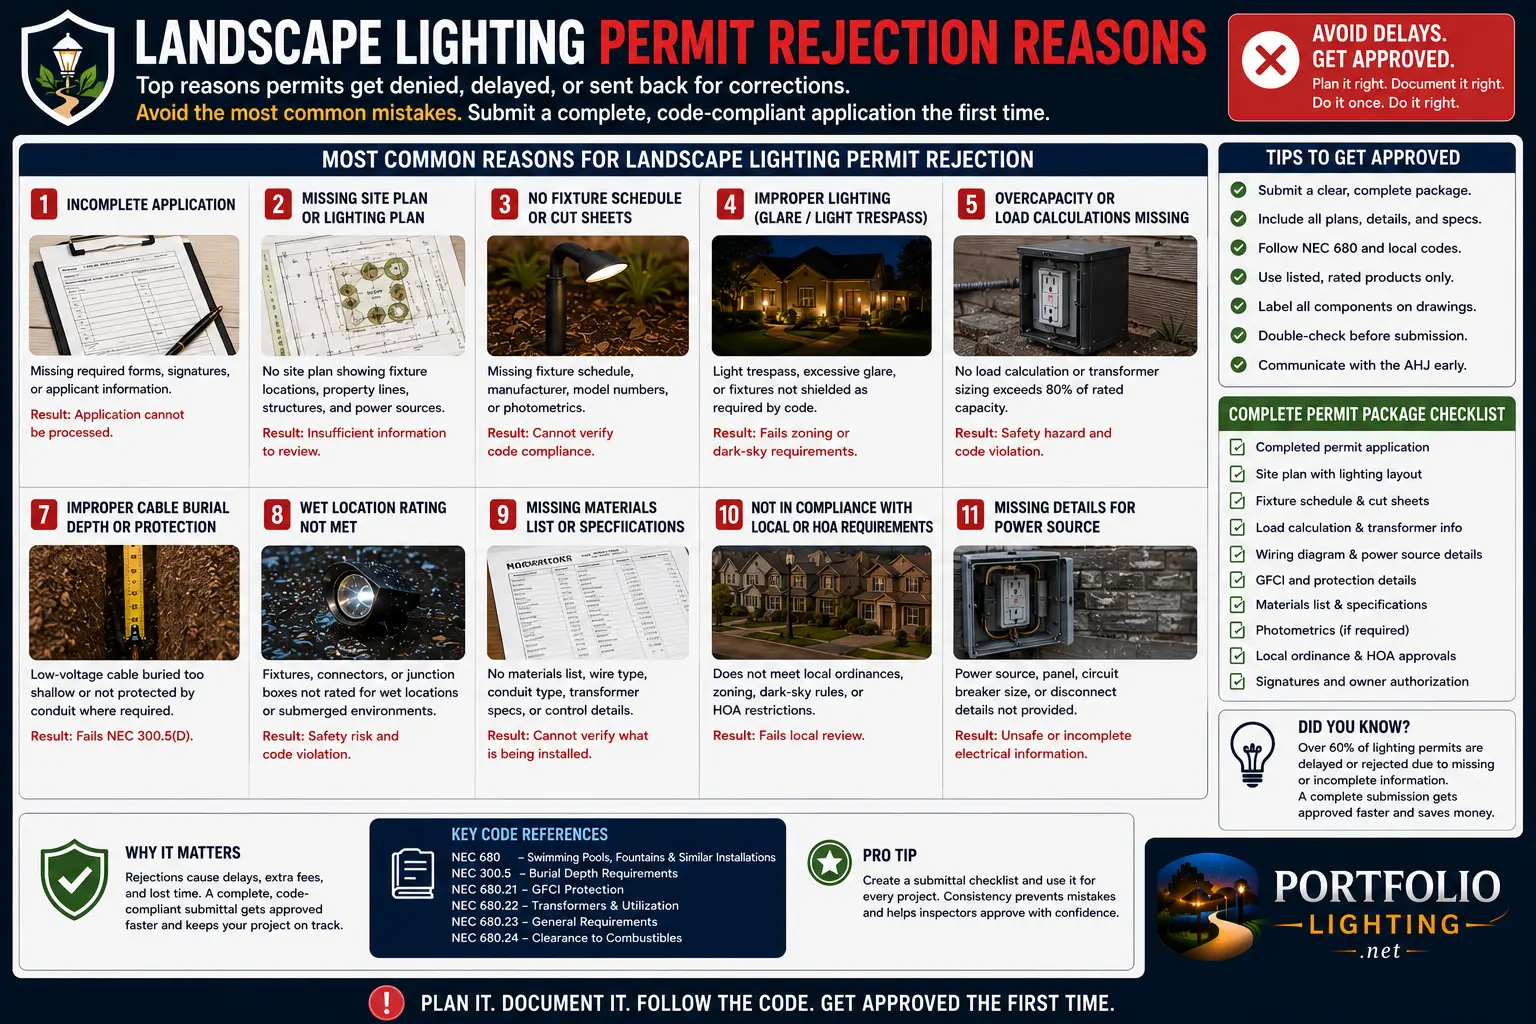
The Two-Tier Rejection System: Administrative vs Technical
Most applicants think of permit rejection as a single event — you submit, you get rejected, you fix it, you resubmit. In reality there are two entirely different stages where an outdoor lighting permit application can be returned, with different causes, different remedies, and different cost implications.
Before plan review begins. The intake counter staff reviews the application for completeness — do all required elements exist? This review doesn't evaluate whether the design is code-compliant; it only checks whether the application is complete enough to enter the review queue.
What it looks like:The application is returned the same day or within 1–3 business days with a deficiency checklist noting what's missing. No plan review has occurred. No permit fee is typically charged until the application is accepted as complete (some jurisdictions charge at submission regardless).
Causes:- Missing required application form fields
- Wrong or insufficient permit fee submitted
- Missing required signature (applicant, contractor, design professional)
- Plan set doesn't meet format requirements (wrong sheet size, unreadable scale)
- Missing north arrow or scale on site plan
- Fixture schedule absent
- Contractor license number not provided (where required)
- Application filed for wrong permit type
Per permit processing documentation: "The average permit application that requires a request for additional information or explanation takes twice as long (average of 46 days) to process than the average application that is initially complete and correct (average of 23 days)." An administrative rejection adds the round-trip time plus a restart of the review queue.
After the application is accepted as administratively complete and enters the plan review queue. A plan reviewer (usually a building official, plan examiner, or electrical plan checker) evaluates the design and documentation against applicable codes and ordinances.
What it looks like:A correction letter or plan check comment letter is issued citing specific code sections and required corrections. The application remains in the system but cannot proceed to permit issuance until all comments are resolved. A resubmission is required.
Causes:- Load calculation incomplete or wrong format
- Wrong NEC edition cited (mismatch with AHJ's adopted edition)
- Photometric plan missing required elements or wrong grid spacing
- Light trespass calculation absent or exceeds ordinance limit
- BUG rating not specified for fixtures in dark sky ordinance jurisdiction
- Pool setback not documented on plan
- Fixture cut sheets inadequate or missing
- Equipment specifications inconsistent between plan and cut sheets
- Licensed design professional stamp required but absent
Each review cycle adds the full plan review timeline to the project. In major jurisdictions: 2–6 weeks per cycle. Florida law imposes a 4× plan review fee penalty when the same deficiency is rejected three or more times. Per the Building Code Forum: "Our record is 9 [resubmissions]." Each additional cycle compounds the delay.
Tier 1 Administrative Rejection Causes — The Complete List
Administrative rejections happen before a single line of your design is reviewed. Every item in this section is a documentation or paperwork issue with no design content whatsoever — and every one is preventable.
Per BuyASitePlan: "Incomplete application form — missing fields, unsigned sections, or missing contractor information" is the most common administrative rejection trigger. Building department application forms typically require: owner name and address; contractor name, address, license number, and license type; description of work; valuation of work (for fee calculation); applicant signature; contractor signature (in most jurisdictions); and acknowledgment that the work will comply with applicable codes. Every field must be completed. Unsigned applications are almost universally returned without review.
Landscape and outdoor lighting permits may require more than one permit type depending on the project and jurisdiction. A commercial outdoor lighting project may require: an electrical permit (for the wiring and fixtures); a zoning/planning review (for photometric compliance with outdoor lighting ordinances); and possibly a building permit (if structural elements like light poles are involved). Submitting only the electrical permit application when the zoning review is also required results in administrative rejection of the electrical application — the jurisdiction requires both to be submitted together or sequentially.
Building departments specify required plan set formats, and submitting plans that don't meet format requirements results in administrative rejection. Standard requirements include: paper size (typically 18×24 inches minimum for commercial; 11×17 acceptable for residential in many jurisdictions); plans drawn to a stated scale with a scale bar (hand-sketched plans without proper dimensions are routinely rejected per BuyASitePlan); a north arrow on all site plan sheets; title block on each sheet showing project address, applicant name, designer name, date, sheet title, and sheet number; and legible line weight — photocopies so dark or light that dimensions can't be read are rejected.
A fixture schedule (equipment schedule) lists every luminaire, transformer, and control device in the installation: manufacturer, model number, catalog description, wattage, lumen output (where required by ordinance), color temperature (where required by dark sky ordinance), BUG rating (where required by outdoor lighting ordinance), and listing designation. The fixture schedule is required as part of the permit submittal for any commercial outdoor lighting project and for residential projects in jurisdictions with outdoor lighting ordinances. Missing or incomplete fixture schedules are a common administrative rejection trigger because without them the plan reviewer cannot evaluate listing compliance or photometric compliance.
Permit fees are typically calculated based on project valuation (cost of materials and labor) or by a flat fee schedule for specific project types. Submitting a permit fee that is less than the calculated amount, submitting in the wrong payment form (cash only, check only, no credit cards, etc.), or calculating the valuation incorrectly are all administrative rejection triggers. Per All Florida Permits: "Clerical or administrative errors — simple mistakes like signatures, fees, or outdated forms" cause administrative rejection. For landscape lighting, the valuation calculation should include: transformer cost, fixture costs, wire and materials cost, and labor cost. Using only materials cost without labor is the most common undervaluation error.
Tier 2 Technical Plan Review Rejections — Design and Documentation Failures
Technical rejections happen during plan review when a qualified examiner finds that the design doesn't comply with applicable codes, or when required technical documentation is missing or inadequate. Unlike administrative rejections, these require either a design change or a more detailed compliance demonstration — not just adding a missing field.
When any fixture is within 15 feet of a pool, spa, or fountain, the plan must show the measured distance from the inside pool shell edge to the nearest fixture, with the dimension clearly labeled. Plan reviewers check pool setback compliance as part of technical review per NEC 411.4(2)'s 10-foot minimum. The three errors that cause rejection: (1) pool is shown on the site plan but no setback dimension is shown for any fixture near it; (2) the setback dimension is measured from the coping or deck rather than the inside pool shell — producing a compliant-appearing measurement that may actually fail; (3) a fixture is shown within the 10-foot setback with no notation explaining how Article 680 compliance is achieved.
Per MHL Consulting's permit rejection analysis: "Equipment specification mismatches between the diagram and the cut sheets" are a guaranteed rejection trigger. Fixture cut sheets must: match the model numbers listed in the fixture schedule exactly; show the listing designation (UL or ETL with wet-location rating); show wattage matching the fixture schedule; show lumen output (where required by photometric or energy code requirements); and for dark sky ordinance jurisdictions, show the BUG rating. Submitting a cut sheet for a "similar" fixture or a generic product brochure rather than the specific model's technical data sheet is a rejection trigger.
Some jurisdictions require that landscape lighting plans for commercial projects (and in some states, any project above a dollar threshold) be prepared, signed, and stamped by a licensed professional engineer or licensed lighting designer. Louisiana DOTD's documented requirement is typical: "Plan sheets with electrical design elements (new service points, new wiring, etc.) shall be developed, stamped, and signed by an Electrical Engineer licensed in the State." The IDA/IES Model Lighting Ordinance and several adopting jurisdictions require that photometric plans be "sealed by a Professional Engineer licensed in the state and with demonstrable expertise in lighting design." Submitting an unsealed plan where a PE stamp is required is a guaranteed technical rejection.
NEC 411.4 requires that all landscape lighting system components be listed. When the permit submittal specifies a transformer or fixture whose listing cannot be verified from the submitted cut sheets, the plan reviewer will flag it as a technical rejection. The most common causes: generic "LED landscape light" specified without a manufacturer or model number; a product listed by a brand the reviewer doesn't recognize with no NRTL mark visible on the cut sheet; or a product whose cut sheet shows a CE mark rather than UL or ETL listing (CE is self-certification for EU market access — not equivalent to NRTL listing for US AHJ review). See the solar lighting standards page for the complete listing verification framework.
Load Calculation Errors That Cause Rejection Even When the Math Is Right
The load calculation is the single most cited rejection trigger in electrical plan review, and for landscape lighting it has a specific failure mode that surprises experienced installers: the math is often correct, but the format is wrong — and plan reviewers reject for format failures even when the underlying design is compliant.
What Plan Reviewers Expect to See — and What Gets Submitted
Per MHL Consulting's analysis: "Incomplete load calculations are the single most common rejection trigger. This is especially problematic when firms rely on software to auto-generate demand calculations without verifying that the format plan reviewers expect is produced. The fix is simple: always present load calculations with explicit breakdowns by load category, not just a bottom-line number."
For landscape lighting, the compliant load calculation format shows:
- Fixture-by-fixture listing: Each fixture type listed by name, quantity, and individual wattage
- Zone subtotals: The total wattage for each transformer zone, calculated from the fixture list
- Transformer capacity: The transformer's rated output in watts
- Loading percentage: Zone total ÷ transformer capacity × 100%, showing the system is within the 80% recommended loading threshold
- Total system load: All zones combined, confirming the primary circuit is within NEC 411.6's 20-ampere maximum
What commonly gets submitted instead: a single-line total ("Total load: 240W, Transformer: 300W, compliant") with no itemization. This tells the reviewer a number but doesn't allow them to verify the calculation or check individual fixture compliance. Single-line totals without itemization are rejected by most commercial plan reviewers.
The Five Load Calculation Format Errors
- Bottom-line total only. Shows "240W total" without listing which fixtures contribute that total. Reviewer cannot verify the calculation or check that any individual fixture is actually what the cut sheet says it is.
- Wattage mismatch with cut sheets. The load calculation uses a different wattage for a fixture than the cut sheet shows. Plan reviewer flags every mismatch as an internal inconsistency. Per MHL Consulting: "When your single-line diagram shows a 200A main breaker but the panel schedule says 225A, or when equipment specs don't match what's on the one-line, you're guaranteed a correction." Same principle applies to landscape lighting calculations.
- Missing zone breakdown. Total system load is correct but not broken down by transformer zone, so the reviewer cannot verify that any individual zone is within the transformer's rated output.
- No loading percentage shown. Some plan reviewers specifically require the loading percentage to be shown to confirm the transformer isn't loaded above its rated capacity.
- Primary circuit amperage not calculated. NEC 411.6 requires the branch circuit to be 20 amperes maximum. The load calculation must show the calculated primary-side amperage (total watts ÷ 120V = amperes) and confirm it doesn't exceed the breaker rating and NEC 411.6's limit. See the load calculation guide for the complete calculation framework.
Nine Photometric Plan Rejection Causes from Real Ordinance Requirements
The photometric plan is the most technically complex element of a commercial outdoor lighting permit submittal, and the most frequent source of technical plan review rejections. These nine rejection causes are drawn from documented requirements in real US outdoor lighting ordinances — Madison WI, San Bernardino County CA, Malibu CA, Henrico County VA, the Law Insider database of outdoor lighting ordinance text, and the IDA/IES Model Lighting Ordinance.
◀ Photometric 1: Calculation Grid Too Coarse
The footcandle calculation grid spacing exceeds the maximum allowed by the ordinance. Most outdoor lighting ordinances require a grid no coarser than 10 feet × 10 feet for parking lots and pedestrian areas; the USGBC and MLO require calculation points no more than 5 feet apart for light trespass calculations at the property boundary vertical plane. Submitting a 20-foot or 25-foot grid produces calculation points that miss the hotspots the ordinance is designed to catch. The plan reviewer will reject for inadequate grid spacing and require resubmission with a finer grid. Fix: always use a 10-foot maximum grid for commercial sites, and a 5-foot maximum for vertical property boundary calculations.
◀ Photometric 2: Light Trespass Not Shown at Property Line
The photometric plan shows horizontal footcandle values on the site but does not show the footcandle values at or beyond the property line. Most outdoor lighting ordinances specifically require property-line trespass values. Madison WI (effective July 2025): "light trespass levels at ten feet beyond the property line — light trespass cannot exceed 0.5 footcandles at 10' past the property line." San Bernardino County CA: 0.1 fc maximum trespass in mountain/desert regions. A photometric plan without the property-line trespass calculation is rejected at plan review in any jurisdiction that has an outdoor lighting ordinance with trespass limits.
◀ Photometric 3: Wrong Measurement Plane — Horizontal Only When Vertical Also Required
Standard photometric plans show horizontal illuminance (light falling on a horizontal surface — the ground). But light trespass at a property boundary often requires vertical illuminance (light hitting a vertical plane — the boundary itself or an adjacent building facade). The USGBC's light pollution guide is specific: "Measuring vertical illuminance is helpful for understanding how much light is hitting a building façade, a human face, or the vertical plane at a property boundary." A photometric plan that shows only horizontal illuminance when the ordinance requires vertical boundary measurements will be rejected.
◀ Photometric 4: Calculation Extends to Property Line but Not 10 Feet Beyond
Some photometric plans show footcandle values up to the property line but stop there. Many ordinances require the calculation to extend a specified distance beyond the property line — typically 10 feet — to demonstrate that the trespass limit is met in the neighbor's zone, not just at the legal boundary. A calculation that ends exactly at the property line, where the footcandle value is still 0.3 fc (above a 0.1 fc limit that applies in the neighbor's zone), misrepresents compliance. Extend the calculation grid at least 10 feet beyond every property line.
◀ Photometric 5: Fixture Positions on Photometric Plan Don't Match Site Plan
A common rejection trigger occurs when the photometric analysis is performed and plotted, then the site plan is revised, but the photometric plan is not updated to match. The plan reviewer compares the fixture positions on the photometric plan to the fixture positions on the site plan — any discrepancy is a rejection. The photometric plan and site plan must show identical fixture locations. Per the emfsurvey.com photometric design documentation: "I find that there is an increasing difference between the submitted photometric plan and what is found in a field survey of the exterior lighting." Prevent this by running the final photometric analysis after the site plan is finalized, not before.
◀ Photometric 6: Maximum-to-Minimum Uniformity Ratio Not Shown for Required Areas
For parking lots, pedestrian areas, and other regulated use areas, outdoor lighting ordinances often specify maximum-to-minimum uniformity ratio requirements (e.g., max/min ≤ 6:1 for parking, ≤ 4:1 for pedestrian paths). The photometric plan must show the average, maximum, minimum, and uniformity ratio for each regulated area. Missing the uniformity calculation for any required use area is a technical rejection. Per Law Insider's outdoor lighting ordinance text: the calculation must show "maximum to minimum uniformities for each specific use area such as parking and circulation areas, pedestrian areas, and other common public areas."
◀ Photometric 7: No Luminaire Schedule on Photometric Plan
The photometric plan must include a luminaire schedule showing which fixtures were modeled, their IES photometric file names, their mounting heights, and their aiming angles (for directed fixtures). A photometric plan that shows the calculated footcandle grid but doesn't show which fixtures produced those calculations is not verifiable — the reviewer cannot confirm that the analysis was performed with the same fixtures specified on the permit. The luminaire schedule on the photometric plan must match the fixture schedule on the site plan exactly.
◀ Photometric 8: Energy Star or DLC Qualification Not Demonstrated for Energy Code Jurisdictions
In California (Title 24), New York, and other states with energy codes for commercial outdoor lighting, permit submittals must demonstrate that fixtures meet energy efficiency requirements — typically Energy Star or DesignLights Consortium (DLC) qualification. The Henrico County VA landscape, lighting, and fence plan checklist requires: "Outdoor light fixtures must meet DOE Energy Star requirements or be in the top 25 percent of efficiency for similar" products. If the fixture schedule specifies a fixture that is not Energy Star or DLC qualified and the project is subject to an energy code requiring qualification, the plan reviewer will reject the fixture specification.
◀ Photometric 9: As-Built Illuminance Levels Exceed Calculated Permit Values
This is a unique rejection cause that occurs not at initial plan review but during post-installation photometric survey (which some jurisdictions require for commercial projects). Per emfsurvey.com: "I find that there is an increasing difference between the submitted photometric plan and what is found in a field survey of the exterior lighting. The as-built illumination levels are almost ALWAYS brighter than what is calculated." This happens because photometric software models ideal conditions; field installations have higher-than-modeled reflectances from light-colored paving and building surfaces. If post-installation survey values exceed permitted levels, a plan revision and system modification may be required. Designing to 80% of the ordinance's maximum limit provides headroom for this effect. See the photometric plan reading guide.
Dark Sky Ordinances and BUG Rating Rejections
Dark sky ordinances are now in place in more than 2,000 US municipalities, counties, and states — and they introduce a fixture certification requirement (BUG rating) that most landscape lighting installers and even many designers aren't familiar with.
What BUG Rating Is and Where It Comes From
BUG stands for Backlight, Uplight, and Glare. The IDA/IES Model Lighting Ordinance (MLO), published in 2011, established the BUG rating system for evaluating outdoor luminaires in dark sky compliance applications. Each luminaire receives a three-part rating: B0-B5 (backlight control), U0-U5 (uplight control), and G0-G5 (glare control). Lower numbers indicate better control — B0/U0/G0 means no backlight, uplight, or glare; B5/U5/G5 means maximum backlight, uplight, and glare.
Jurisdictions that have adopted dark sky ordinances or the MLO framework specify maximum BUG ratings for each outdoor lighting zone (typically LZ0 through LZ4, from darkest rural to brightest commercial). A fixture that exceeds any component of the maximum BUG rating for its zone fails the ordinance and causes permit rejection.
How BUG Rating Rejections Occur for Landscape Lighting
The most common BUG-related rejection causes for landscape lighting:
- Fixture not photometrically tested — no BUG rating exists. Per the IDA/IES MLO: "BUG typically cannot be used for residential luminaires unless they have been photometrically tested. For non-photometrically tested residential luminaires, shielding description is used instead." Consumer landscape path lights are frequently not photometrically tested and have no published BUG rating. In jurisdictions using BUG rating for compliance review, specifying an unrated fixture creates a plan review question. Solution: use the shielding description alternative that some jurisdictions allow for unrated residential fixtures, or specify a fixture with published BUG data.
- BUG rating exceeds zone maximum. A fixture with U2 uplight rating specified in a zone where U1 maximum is required fails the ordinance. Malibu CA's dark sky ordinance (California Title 24 Lighting Zone LZ1) specifies strict uplight limits. San Bernardino County specifies 0.1 fc maximum light trespass in mountain and desert regions. A fixture whose uplight produces calculation values that exceed the zone limit causes both a BUG rating rejection and a photometric trespass calculation failure.
- Color temperature exceeds ordinance maximum. Multiple dark sky ordinances now specify a maximum correlated color temperature (CCT) — often 3,000K. Malibu CA specifies "the correlated color temperature of any outdoor lighting fixture shall not exceed three thousand (3,000) Kelvin." Specifying 4,000K or 5,000K fixtures in a 3,000K maximum jurisdiction causes technical rejection. The fixture schedule's CCT must be reviewed against the applicable ordinance's limit. See the dark sky compliance guide and IDA certification guide.
The BUG Rating Lookup Process: To find a fixture's BUG rating, search the manufacturer's photometric data or the DesignLights Consortium (DLC) database at designlights.org. The DLC database provides BUG ratings for all DLC-listed products. The IES LM-79 photometric report file (downloadable for most commercially rated fixtures) contains the data from which BUG ratings are calculated. For consumer landscape path lights without published photometric data: contact the manufacturer and request the BUG rating or IES file. If the manufacturer cannot provide a BUG rating, the fixture may not be testable to the standard and the alternative shielding description path should be used instead.
The Wrong NEC Edition Problem — A Rejection Cause Nobody Talks About
This is the permit rejection cause that catches first-time submitters and experienced professionals equally, because it requires knowing not just the NEC but which specific edition your specific AHJ has adopted — and citing that edition on your plans.
Why the NEC Edition Matters on Permit Plans
Per MHL Consulting's permit rejection analysis: "Designing to the wrong NEC edition" is a recurring rejection cause. When permit plans specify code compliance by citing NEC sections, the plan reviewer checks whether those sections exist in the NEC edition the jurisdiction has adopted. The 2023 NEC reorganized several sections that existed in the 2020 NEC; the 2020 NEC added requirements that didn't exist in the 2017 NEC. When a plan submitted to a jurisdiction on the 2017 NEC cites a 2023 NEC section number, the plan reviewer may not recognize the section reference — or may recognize it as applying to a code not yet adopted in their jurisdiction.
The Specific Landscape Lighting NEC Edition Issue
NEC Article 411 has changed across editions in ways that affect permit submittals. The 2017 NEC restructured Article 411 significantly, removing most Class 2 references. The 2020 NEC added the reconditioning prohibition in Article 411.3. Section numbering within Article 411 differs between editions. A submittal for a jurisdiction on the 2017 NEC that cites "NEC 411.3 — Reconditioning Prohibited" is citing a requirement that doesn't exist in the 2017 NEC — that specific prohibition was added in 2020. The plan reviewer may return the submittal with a comment noting the cited section doesn't exist in the adopted code.
Three methods to confirm the applicable NEC edition for your jurisdiction: (1) Check the building department's website — most list the currently adopted codes; (2) Call the building department and ask: "Which edition of the National Electrical Code is currently adopted in your jurisdiction?"; (3) Check the Jade Learning NEC Adoption by State database (jadelearning.com/nec-code-adoptions-by-state) for state-level adoption status, then confirm whether local amendments apply.
Once confirmed: on all plan sheets that cite NEC sections, include the adopted edition in the title block or general notes: "This plan prepared in compliance with the [Year] National Electrical Code as adopted by [Jurisdiction Name]." This is the single-line addition that prevents edition-mismatch rejections. See the NEC 2026 code updates guide and the state permit requirements guide for NEC adoption status by state.
Site Plan Errors That Trigger Technical Rejection
The site plan is the foundational document of any outdoor lighting permit submittal — the physical reference that ties every other document to a specific location. Site plan errors that cause technical rejection are usually clarity failures: the plan contains the information but the reviewer can't use it.
The Seven Site Plan Technical Rejection Causes
- Property line not shown. Without the property line, the reviewer cannot verify setbacks to pool, property-line light trespass, or compliance with any distance-based requirement. Property lines must be shown on the site plan with dimensions and the north arrow establishing orientation.
- Pool not shown when fixtures are near a pool. A site plan that shows fixtures but omits a nearby pool is a rejection trigger because the reviewer cannot evaluate pool setback compliance. All pools, spas, and fountains must be shown on the site plan within the extent of the plan view.
- Fixture locations vague or positioned "approximately." Per BuyASitePlan: "Vague location descriptions cause confusion." Fixtures must be dimensioned from fixed reference points — the house corner, the property line, or a permanent hardscape feature. "Near the driveway" is not a dimension. "12 feet from the northwest corner of the house" is a dimension.
- Fixture type not identified. The site plan must use symbols to identify fixture types, and those symbols must be keyed to the fixture schedule. An unlabeled fixture on the site plan creates a review question about which fixture type applies at that location.
- Wire routing not shown. In jurisdictions that require permit submittal for landscape lighting work, the wire routing must be shown on the site plan — including the transformer location, the wire run paths, any hardscape crossings, and the connection to the primary supply outlet. Missing wire routing creates a question about how the system connects and whether the installation will comply with burial depth and separation requirements.
- Setback violations showing on the plan. Per BuyASitePlan's documented real example: "A Phoenix homeowner's pool permit was rejected three times because the site plan failed to account for different setback requirements: 10 feet from property lines, 25 feet from septic systems, and 15 feet from wells. Each submission addressed only one requirement while violating others." For outdoor lighting: check pool setback, utility easement clearances, and any local setback requirements before submitting.
- Utility easements and underground utilities not shown. Per BuyASitePlan: "Permits get rejected when site plans don't show existing utility lines, easements, or fail to demonstrate adequate clearance for new construction around utilities." 811 utility location records should be consulted and shown on the plan where they cross the planned wire routing.
Resubmission Strategy and the Penalty Fee Structure You Need to Know
When a permit application is rejected — whether administratively or technically — the resubmission process must address every item in the rejection or correction letter. Addressing some items but not others guarantees a second rejection, which costs time and potentially money.
How to Respond to a Correction Letter
A technical plan review correction letter lists each deficiency with the code section it violates. The resubmission must address each item individually. Per All Florida Permits: "The goal isn't just to fix the problems, but to create a strong resubmission plan." A resubmission package should include:
- A response letter listing each correction item from the original review, with a brief statement of how each was addressed in the resubmission: "Item 1 (Load Calculation Format) — Load calculation has been reformatted to show each fixture individually by zone with subtotals. See Sheet E-2, revised."
- Revised plan sheets with cloud markings (revision bubbles) around every change so the plan reviewer can quickly find what changed from the prior submission
- Any new supporting documents (updated cut sheets, revised photometric analysis) required to resolve the comments
The Florida Penalty Fee Structure — A Warning for Any State
Florida Building Code statute documents a penalty structure that applies when the same deficiency is rejected repeatedly: "If a local government finds it necessary to reject design documents required by the code three or more times for failure to correct a code violation specifically and continuously noted in each rejection, the local government shall impose, each time after the third such review the plans are rejected for that code violation, a fee of four times the amount of the proportion of the permit fee attributed to plans review."
The practical meaning: if a plan reviewer flags the same photometric grid spacing deficiency in submission 1, submission 2, and submission 3, starting with submission 4 the jurisdiction charges 4× the normal plan review fee for each additional review of that same deficiency. Per the Building Code Forum: "Our record is 9" resubmissions — which under this penalty structure would mean fees of 4× the plan review fee for resubmissions 4 through 9. This penalty structure makes persistent submission of the same uncorrected deficiency dramatically more expensive than resolving it correctly the first time. Address every item in every correction letter. If you disagree with a correction item, request a pre-submission meeting with the plan reviewer to resolve the interpretation before resubmitting — not a process of submitting unchanged and hoping the reviewer accepts it the second time.
| Submission Round | Typical Timeline Per Round | Fee Structure | Risk Level |
|---|---|---|---|
| Initial Submission | 1–30 business days (residential 1–5; commercial 10–30) | Standard permit fee | Baseline |
| Resubmission 1 (after 1st rejection) | Same as initial; add 3–10 days resubmission preparation | Resubmission fee varies by jurisdiction (often $50–200) | Low if all items addressed |
| Resubmission 2 (after 2nd rejection) | Same timeline; additional preparation time | Second resubmission fee; still standard in most states | Moderate — same items recurring signal a design dispute |
| Resubmission 3+ (after 3rd+ rejection for SAME deficiency) | Same timeline; schedule may deteriorate as reviewer prioritizes fresher applications | Florida: 4× plan review fee per additional review of same deficiency. Other states: escalating fees vary; request pre-submission meeting | High — resolve the interpretation dispute before submitting again |
Complete Pre-Submission Checklist — Organized by Rejection Category
Run through this checklist before submitting any landscape lighting permit application. Items are organized by the rejection category they prevent. Twenty minutes before submission prevents weeks of delay.
The load calculation format rejection is the one that surprises contractors who have been doing this for years — because they know the load is within spec. The transformer is 300W, the total connected load is 220W, 73% loaded, everything is fine. But the plan reviewer gets a sheet that says "Load: 220W, Transformer: 300W, OK" and sends it back because they can't verify the 220W — what fixtures? Which zones? How many of what type? Twenty seconds of additional formatting in the submittal eliminates this rejection entirely. A table: Path lights (12) × 3W = 36W, Spotlights (4) × 5W = 20W, Well lights (2) × 7W = 14W. Zone 1 total: 70W (23% of 300W). That's the format. It takes three minutes to create. It prevents a three-week round-trip review cycle.
Permit rejections often happen because the application does not show enough detail for the reviewer to understand the power source, equipment, fixture locations, cable routing, voltage drop, product ratings, or inspection sequence. Before submitting or resubmitting a landscape lighting permit package, use the electrical inspector landscape lighting checklist to identify missing details that could delay approval or trigger correction comments later in the project.
Permit Rejection FAQ
I submitted my landscape lighting permit application and it was returned the same day with a deficiency list. What do I do?
A same-day or 1–3 day return is an administrative rejection — the application was returned before plan review began because required elements were missing. This is the most common permit submission outcome for first-time submitters and is completely fixable. Read the deficiency list carefully — it will list every missing element by name. Work through the list systematically, obtaining every missing item (filling in blank fields, preparing the missing plan sheets, calculating and correcting the permit fee). Before resubmitting, run through the pre-submission checklist in this guide to confirm that every item is addressed. Administrative rejections do not count against you in any permanent way — the application simply re-enters the queue when resubmitted with all required elements. The timeline cost: the round-trip time (typically 1–2 weeks for preparation and delivery) plus waiting for the application to work through the queue again. Per documented permit processing data: applications requiring additional information take on average twice as long as complete initial submissions.
My commercial outdoor lighting permit has been rejected twice for the same photometric grid spacing issue. The reviewer keeps citing the ordinance but I disagree with their interpretation. What do I do?
A persistent rejection on the same item, where you disagree with the interpretation, should be resolved through a pre-submission meeting with the plan reviewer or their supervisor — not through repeated resubmissions of the same design. Per the Building Code Forum, the record is nine resubmissions; under Florida's penalty structure (and similar provisions in other states), repeated rejection of the same item becomes progressively more expensive. Request a meeting or phone conference with the plan reviewer and bring the following: the ordinance text with the specific section being cited; your calculation demonstrating compliance with your interpretation; any technical documentation supporting your interpretation (IESNA publications, MLO user guide, or equivalent). Most plan review disputes about photometric calculation methodology are resolved at this level without requiring formal appeal. If the meeting doesn't resolve it, escalate to the Building Official — not for confrontational purposes, but to get a definitive code interpretation that either confirms the reviewer's position or establishes that your interpretation is correct. See the inspection failure codes guide and correction notices guide for the formal appeal process if the Building Official level doesn't resolve it.
My jurisdiction has a dark sky ordinance but I can't find BUG ratings for my specified landscape path lights. Can I still get the permit?
Yes — but you need to use the alternative compliance path for non-photometrically tested fixtures that most dark sky ordinances allow. The IDA/IES Model Lighting Ordinance specifies: "BUG typically cannot be used for residential luminaires unless they have been photometrically tested. For non-photometrically tested residential luminaires, shielding description is used instead." Check your jurisdiction's specific ordinance for the shielding description alternative — it typically requires demonstrating that: (1) all light is directed downward (full cutoff or fully shielded fixture design); (2) no uplight is produced (confirmed by fixture design, not photometric test); and (3) the fixture style conforms to any prohibited fixture list (globe shapes, drop lens designs, and similar non-cutoff designs are often prohibited in dark sky zones even with shielding claims). The alternative: specify fixtures from the DLC SSL Qualified Products List or similar photometrically-tested product databases that do have documented BUG ratings, and use those ratings for the compliant fixture specification. See the IDA certification guide and dark sky compliance guide.
Related Code, Permit & Compliance Guides
- Electrical Code Safety Guide
- Permit Requirements Guide
- State Permit Requirements
- Final Inspection Checklist
- Inspection Failure Codes
- Correction Notices Guide
- NEC Inspection Checklist
- As-Built Diagram Requirements
- Load Calculation Code
- Photometric Plan Reading
- Light Trespass Laws
- Wet Location Listing
- Contractor Licensing
- Pool Lighting Clearance
- GFCI Requirements
- Wire Burial Depth Code
- NEC 2026 Code Updates
- Dark Sky Compliance Guide
- IDA Certification Guide
- Solar Lighting Standards
- Insurance & Liability Guide
- ADA Pathway Rules
- Landscape Lighting Guide
- Landscape Lighting Design Guide