
Quick Answer: Portfolio Transformer Wiring Diagram Explained
A Portfolio lighting transformer wiring diagram shows how power flows from your outlet into the transformer, then out to your low voltage cable and fixtures. To wire it correctly, connect household power to the transformer input, then run low voltage cable from the output terminals to your lights. If your system is not working, the issue is usually power supply, wiring connections, overload, or timer settings—not the diagram itself.
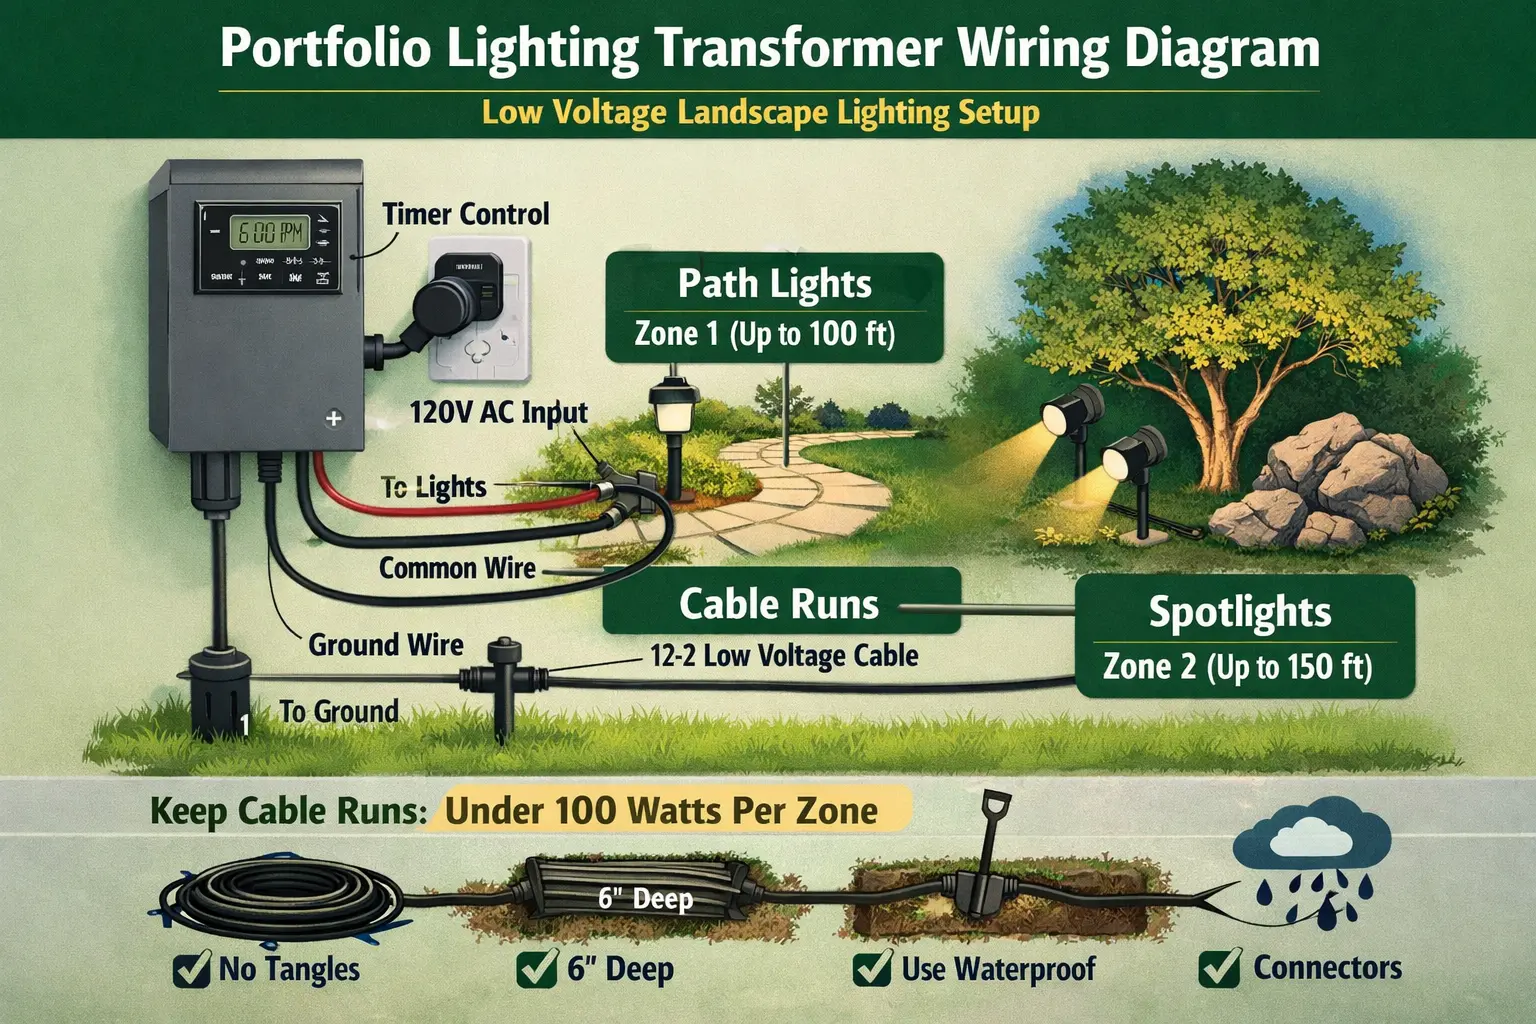
Before wiring your system, it helps to understand the full layout. Use this low voltage landscape lighting guide to see how transformers, wiring, and fixtures work together as a complete system.
If your system still is not working, go to transformer not working or full transformer troubleshooting.
The most useful thing about a transformer wiring diagram is that it turns a confusing low voltage system into something easier to follow. Once you understand where power enters, where the low voltage side leaves, and how the run feeds the fixtures, troubleshooting gets much more manageable.
This page fits naturally with Portfolio lighting transformer wiring diagram, Portfolio lighting wiring diagram, Portfolio landscape lighting wiring, how to wire landscape lighting, and landscape lighting transformer guide and Portfolio lighting transformer reset.
What a Portfolio Lighting Transformer Wiring Diagram Should Show
A good Portfolio lighting transformer wiring diagram should make one thing clear: how power moves through the system. That means it should help you see the power source feeding the transformer, the transformer controls or timer section if one is involved, and the low voltage side leaving the transformer to feed the outdoor cable run and fixtures.
In other words, the diagram is not just about the transformer box itself. It is about the transformer’s place in the full low voltage landscape lighting system. That is what makes it useful. Once you understand where the transformer sits in the chain, you can start asking the right troubleshooting questions. Is power reaching the transformer? Is the timer interfering? Is the low voltage side sending power out? Is the cable run still intact beyond that point?
This also helps explain why a transformer diagram page belongs inside a larger cluster of transformer and wiring pages. The diagram is the visual logic page. It supports troubleshooting, but it does not replace the pages that focus on resets, timer problems, bad transformers, or broader landscape-lighting wiring issues.
Correct wiring is critical for proper photocell operation. If your dusk-to-dawn sensor is wired incorrectly or has a loose connection, your lights may not respond normally. Our Portfolio lighting photocell troubleshooting page explains the most common sensor and wiring-related failures.
If you need help beyond wiring layout, including model identification and troubleshooting, use the Portfolio lighting transformer master guide to connect wiring issues with real-world performance problems.
Basic System Flow From Power Source to Outdoor Fixtures
Most Portfolio low voltage lighting systems follow the same basic flow. Household power feeds the transformer. The transformer reduces the voltage. The low voltage side then sends power into outdoor cable that feeds the landscape-lighting fixtures. If the transformer has a timer or photocell, that control section influences when the system turns on and off.
That basic flow usually looks like this:
- Standard household power reaches the transformer.
- The transformer receives that input and converts it to lower voltage.
- A timer, dial, photocell, or control section may affect operation.
- Low voltage output leaves the transformer.
- Cable runs carry that power to path lights, spotlights, deck lights, or other fixtures.
- The layout of the run affects consistency, voltage drop, and troubleshooting ease.
This is why a transformer diagram is often the best starting point when a homeowner says, “I’m not sure where the problem is.” It gives you the structure first. Once you know the structure, you can test each part more logically.
If your system layout is causing uneven lighting or failures, review voltage drop in landscape lighting to understand how cable length and load affect performance.
If you want the broader wiring side of this topic, your next best pages are Portfolio landscape lighting wiring, Portfolio lighting wiring diagram, and how to wire landscape lighting.
Simple Portfolio Transformer Wiring Diagram Example
This is a simplified example meant to show the basic logic of a low voltage transformer wiring diagram. It is not tied to every exact Portfolio model, but it reflects how homeowners should think about the system layout when troubleshooting or planning.
House Power / Outlet
        |
        v
+--------------------+
| Portfolio          |
| Transformer        |
|  - Timer / Control |
|  - Low Voltage Out |
+--------------------+
        |
        v
Low Voltage Cable Run
        |
   +----+----+----+----+
   |         |         |
Path Light  Spotlight  Deck/Step Light
   |         |         |
 More fixtures on the same or split run
In practical terms, that diagram helps you break the system into three sections:
- the power-input side
- the transformer and timer/control section
- the low-voltage-output and fixture side
That separation is what makes troubleshooting easier. If one section is working, you move to the next. If one section fails, you narrow your attention there first instead of guessing across the whole yard.
How to Read a Low Voltage Transformer Wiring Diagram Without Overcomplicating It
The easiest way to read a transformer wiring diagram is to follow the power path. Start at the power source. Then move to the transformer. Then move out through the low voltage side toward the fixtures. That is it. You do not need to turn the page into an engineering project. You just need to follow the flow.
That approach is especially helpful for troubleshooting because it matches the way real system problems usually show up. If the transformer has no power at all, the problem may be upstream. If the transformer has power but the system does not activate correctly, the timer or control section becomes more suspicious. If the transformer seems to be on but the fixtures do not work, the low voltage side and the outdoor cable run deserve more attention.
Use the diagram to ask these questions:
- Is household power reaching the transformer?
- Is the timer or control section set and behaving correctly?
- Is low voltage leaving the transformer?
- Does the wiring layout beyond the transformer still look intact?
- Is the issue one fixture, one branch, or the full system?
Power but no lights → check wiring connections
Lights flicker or dim → check voltage drop or overload
That is why this page works so well with Portfolio lighting transformer not working, Portfolio lighting transformer timer not working, and Portfolio landscape lights not working. Those pages answer the symptom questions. This page helps you understand the structure behind them.
Common Transformer Wiring Mistakes
Most transformer wiring mistakes are not dramatic. They are usually small logic problems that create bigger performance issues later. Sometimes the transformer is connected, but the cable layout beyond it is weak. Sometimes the timer settings confuse the situation. Sometimes the transformer is overloaded because the system expanded without rethinking the load and cable run.
| Common Mistake | What It Often Leads To | Best Next Page |
|---|---|---|
| Ignoring the full cable layout | Uneven light output and harder troubleshooting later | Landscape Lighting Wiring |
| Overloading the transformer | Trips, shutdowns, or weak system performance | Transformer Replacement |
| Focusing only on one fixture failure | Missing a broader branch or transformer issue | Landscape Lights Not Working |
| Bad timer or control assumptions | Lights seem dead when the problem is actually schedule-related | Timer Not Working |
| Poor connection quality | Intermittent outages or weather-related failure | Wire Connectors |
If the diagram makes sense but the system still misbehaves, the problem may be less about understanding the wiring and more about diagnosing the real failure point. That is where the transformer troubleshooting cluster becomes more useful than the diagram itself.
If you suspect connection issues, use this landscape lighting cable guide to make sure your wiring type and layout match your system requirements.
When the Diagram Is Not Enough
A transformer wiring diagram is helpful, but it is not magic. It helps you understand the system structure, but it does not automatically tell you which component has failed. That is why diagrams work best as part of a bigger troubleshooting process, not as a replacement for one.
For example, a diagram can help you understand that the timer sits between the power-input logic and the low voltage output. But if the timer is actually malfunctioning, you still need the timer-specific troubleshooting page. A diagram can show that the low voltage side runs into a cable layout feeding the yard, but if the real issue is a damaged section of cable or voltage drop, you still need those deeper pages too.
This is exactly why your site structure is strong when these pages support each other rather than trying to do the same job. This page should own the diagram intent. The symptom pages should own the troubleshooting intent. The installation and wiring pages should own the execution side.
After identifying the correct terminals, the next step is selecting the right voltage tap. Use the voltage tap calculator to determine which output (12V–15V) will give you balanced brightness across your lighting system.
Portfolio Lighting Transformer Wiring Diagram FAQ
What does a Portfolio lighting transformer wiring diagram show?
A Portfolio lighting transformer wiring diagram usually shows how power reaches the transformer, how the low voltage side leaves the transformer, and how cable runs feed path lights, spotlights, or other outdoor fixtures.
Why is a transformer wiring diagram useful?
A wiring diagram is useful because it helps you understand the basic system layout, narrow down wiring mistakes, and troubleshoot power, timer, or low voltage connection problems more clearly.
What is the most common mistake when wiring a low voltage transformer?
A common mistake is focusing only on connecting the transformer without thinking about the full cable layout, transformer load, connector quality, and voltage drop across the rest of the system.
What page should you use if the transformer wiring seems correct but the lights still do not work?
If the transformer wiring seems correct but the lights still fail, the next best pages are Portfolio lighting transformer troubleshooting, Portfolio lighting transformer not working, and Portfolio landscape lights not working.