
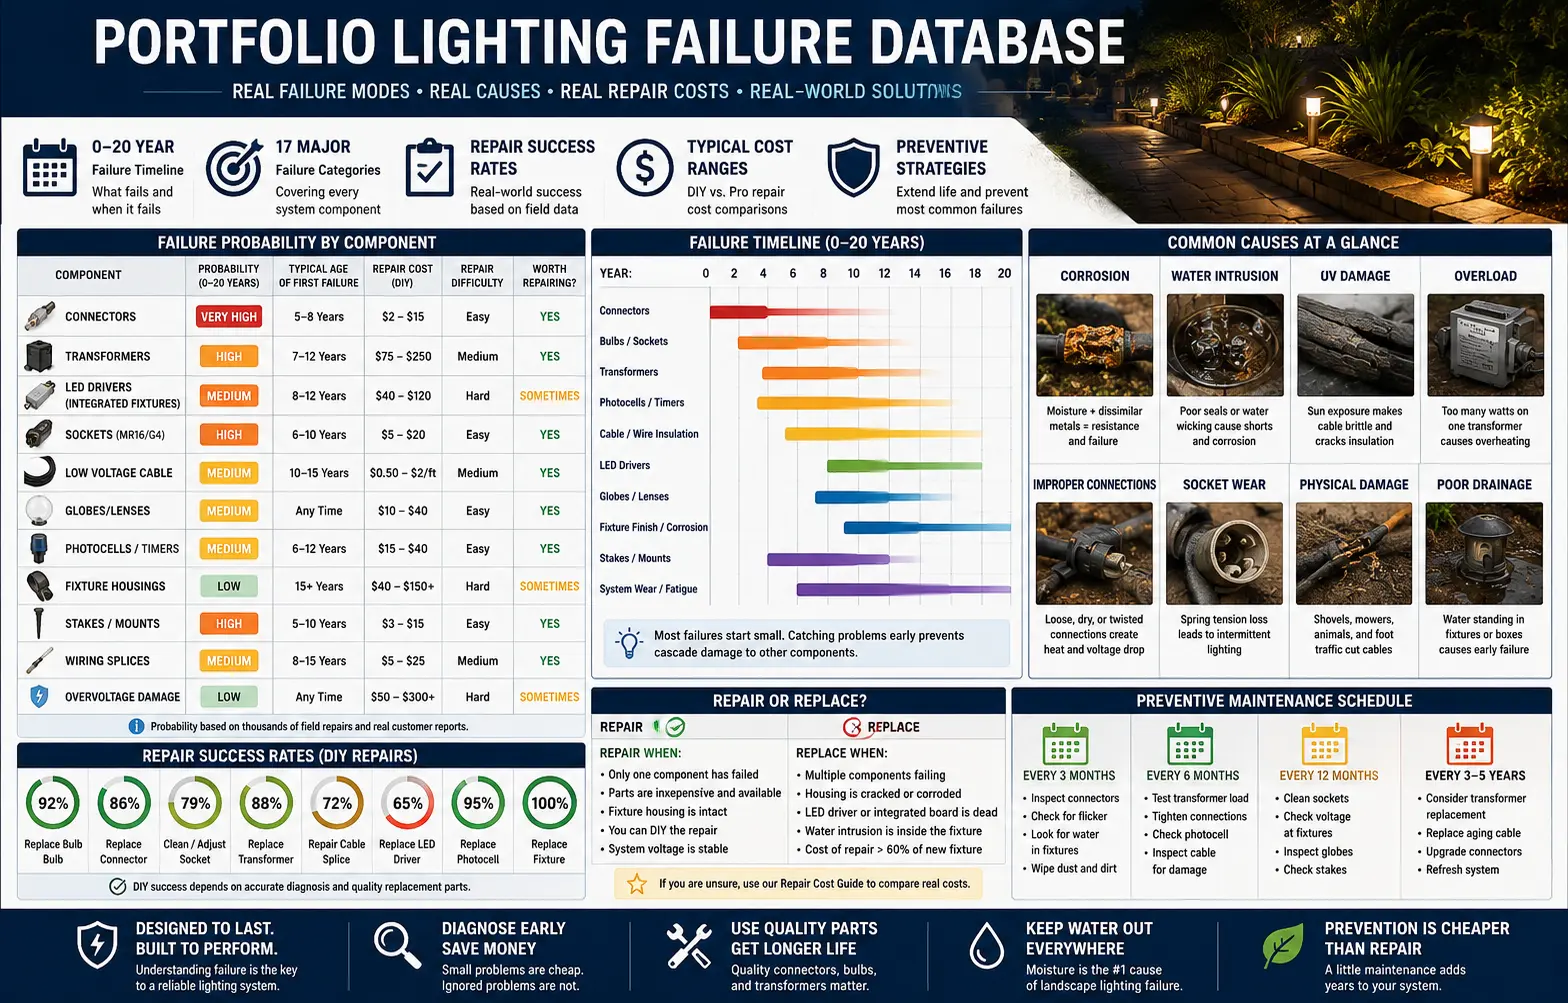
Quick Answer: What Usually Fails First?
In most older Portfolio low-voltage systems, the failed part is smaller and cheaper than the homeowner expects.
The first part to fail is usually not the entire fixture. On a single dark light, start with the bulb, connector, socket tension, and fixture lead. On a whole system outage, start with the GFCI outlet, transformer reset, timer, photocell, terminal screws, and total wattage load. On a system that works in dry weather but trips or flickers after rain, suspect moisture inside a connector, splice, socket, or fixture body before blaming the transformer.
The mistake that costs the most money is treating every dark fixture as a dead fixture. A $5 bulb, $8 connector, $15 stake, or $60 transformer can be the real fix. Before you buy anything, match your symptom to the failure mode below, then use the Portfolio Lighting repair cost guide and Portfolio Lighting parts and accessories guide to decide what to buy.
One light is out
Usually bulb, connector, socket corrosion, or a broken fixture lead.
Troubleshoot one light →All lights are out
Usually transformer, GFCI, timer, photocell, outlet, or main terminal issue.
Check transformer path →Fails only in rain
Usually water intrusion, ground leakage, buried connector, or damaged insulation.
Diagnose GFCI trips →Philip Meyer’s Field Note: Stop Diagnosing by Part Name
When homeowners describe a Portfolio system, they often start with the part they think they need: “I need a new transformer,” “I need a new light,” or “I need a new fixture.” Philip Meyer’s diagnostic approach starts differently. He looks first at the failure pattern: one fixture versus all fixtures, dry weather versus wet weather, immediate failure versus delayed shutdown, steady dimming versus flicker, and whether the problem follows a bulb, connector, wire run, or transformer zone.
That pattern tells you more than the product label. A Portfolio fixture that works for ten minutes and then shuts off is not the same failure as a fixture that never turns on. A path light that flickers after mulch work is not the same as a system that trips a GFCI during rain. A transformer that hums quietly every night is not necessarily failing; a transformer that gets hot and cycles off under load probably is. This database is built around those field patterns because that is how repairs actually get solved.
Portfolio Lighting Failure Matrix
Use this matrix as the starting point. The probability and cost ranges are practical diagnostic estimates, not manufacturer guarantees, because Portfolio systems vary by model, age, climate, installation quality, and previous repairs.
| Failure Mode | Probability | Typical Age | First Symptom | Likely Cost | Repair Difficulty | Worth Repairing? |
|---|---|---|---|---|---|---|
| Corroded wire connector | Very High | 3–8 years | One fixture out, intermittent flicker, works when wire is moved | $4–$15 | Easy | Yes. Replace connector before replacing fixture. |
| Bulb failure | Very High | Any age | One light out while nearby lights work | $5–$20 | Easy | Yes. Test bulb first. |
| Transformer overload | High | Any age after expansion | All lights turn on then shut off after 30–90 minutes | $0–$150 | Easy to medium | Yes if load can be reduced or transformer replaced. |
| Voltage drop | High | Any long run | Far-end fixtures dimmer than near fixtures | $0–$150+ | Medium | Yes if wiring can be rebalanced. |
| Photocell or timer failure | Medium | 5–12 years | System will not turn on automatically | $10–$60 | Easy to medium | Usually. Often cheaper than full transformer. |
| Water intrusion | High | Any wet system | GFCI trips during rain or after irrigation | $5–$80 | Medium | Yes if isolated early. |
| Socket corrosion | Medium | 6–12 years | Bulb tests good but fixture stays dark | $0–$40 | Medium | Sometimes. Depends on housing condition. |
| Broken ground stake | High | 4–10 years | Fixture leans or falls over | $6–$25 | Easy | Yes. Replace stake only. |
| Cracked globe or shade | Medium | Any age | Broken glass, missing lens, water entering fixture | $8–$45 | Easy | Yes if common dimensions exist. |
| Integrated LED module failure | Medium | 6–12 years | Fixture dark with no replaceable bulb | $40–$120+ | Hard | Sometimes. Often replace fixture. |
| Damaged buried cable | Medium | Any age after digging | Zone outage after planting, edging, or trenching | $10–$150+ | Medium | Yes if fault location is found. |
| Housing corrosion or cracking | Watch | 10–20 years | Body loose, water entry, finish failure, unstable mounting | $30–$150+ | Medium | Often replace fixture. |
Mobile note: scroll the matrix sideways if needed. For a buying-focused version of this decision process, use the Buy Portfolio Lighting parts guide.
Portfolio Lighting Failure Timeline by System Age
The age of the system does not prove the failure, but it changes what should be inspected first.
Installation and setup failures dominate
Early problems usually come from installation rather than worn parts. Look for poor connector bite, overloaded transformer sizing, wrong bulb voltage, timer programming mistakes, bad outlet location, and shallow cable damage from landscaping. If a brand-new system is dim at the far end, do not assume the fixtures are low quality. Check wire gauge, run length, total wattage, and transformer tap selection with the voltage drop guide.
Connectors, bulbs, and photocells begin showing patterns
By this stage, the weak points are usually exposed to weather: pierce-point connectors, socket contacts, photocells, and older halogen bulbs. A single dead light is still usually a small repair. This is also when mulch, irrigation, fertilizer, and freeze-thaw movement start stressing low-quality connections. The landscape lighting connector guide becomes more useful than a fixture replacement search.
Moisture, oxidation, and mechanical fatigue take over
At this age, fixtures may still be serviceable, but seals, sockets, stakes, and transformer controls deserve attention. A fixture that worked for years and now trips the GFCI only during rain is probably telling you about water entry, not a random electrical mystery. Outdoor systems in clay soil, sprinkler-heavy yards, or low drainage beds often show problems earlier than fixtures mounted in dry beds.
Transformer terminals, cable insulation, and housings matter more
Older Portfolio systems often remain repairable, but the decision becomes more selective. Replacing a connector on a clean fixture body still makes sense. Replacing a connector on a fixture with cracked housing, a loose socket, a corroded stake socket, and a yellowed globe may not. Use the repair cost guide to compare the stacked cost of small parts against full replacement.
System-level restoration becomes smarter than random repairs
After fifteen years, many systems have a mixture of old wire, replacement bulbs, mismatched connectors, aging transformer controls, and weathered fixtures. Random one-part repairs can still work, but a zone-by-zone restoration is usually smarter: replace weak connectors, verify transformer load, inspect cable, upgrade bulbs consistently, and replace only the fixture bodies that are structurally finished. Start with the model number lookup guide if you are trying to preserve exact discontinued fixtures.
Weather and Condition Patterns: The Clue Most People Ignore
A Portfolio lighting failure should never be diagnosed only by the failed part. Diagnose it by the conditions that make it fail. Weather, temperature, irrigation, and operating time tell you which system layer is breaking down.
Fails during rain
Suspect moisture intrusion, ground leakage, cracked insulation, low fixture placement, buried splices, or water inside a socket. Use the GFCI tripping guide.
Fails after 30–90 minutes
Suspect transformer thermal cycling, overload, undersized unit, blocked ventilation, or LED load incompatibility. Use the transformer master guide.
Fails after yard work
Suspect cut cable, loosened connector, pinched wire, damaged stake, or connector pulled out of alignment. Start with the last area that was disturbed.
Fails when cold
Suspect contraction at loose terminals, brittle insulation, poor connector bite, or older photocell/timer electronics becoming unreliable in temperature swings.
Flickers in wind
Suspect loose fixture leads, connector movement, poor pierce contact, socket spring tension, or a stake allowing the fixture to rock.
Only far lights are dim
Suspect voltage drop, wire gauge, run length, overloaded zone, or wrong transformer tap. Use the wire gauge guide.
Failure Progression: How a Cheap Problem Becomes an Expensive One
Most outdoor lighting failures do not start as major failures. They become major because moisture, resistance, heat, and movement compound over time. The most expensive Portfolio repairs usually begin as small ignored symptoms.
That sequence is why Philip Meyer recommends replacing a suspect connector before it destroys trust in the whole fixture. The same logic applies to transformer terminal oxidation, missing globe seals, loose stakes, and sockets with weak spring tension. A system that is repaired early can often keep the original fixture body in service. A system ignored until corrosion spreads usually becomes a replacement project.
Repair Cost and Success Rate Database
These are practical planning ranges. Your exact cost depends on part availability, whether you do the work yourself, and whether a discontinued exact-match part is required.
| Repair | Typical DIY Cost | Estimated Success Rate | Best First Test | When It Fails |
|---|---|---|---|---|
| Replace bulb | $5–$20 | Very high when only one fixture is dark | Swap with a known working bulb | Socket, connector, or fixture lead is the real issue |
| Replace connector | $4–$15 | High for one-fixture failures | Move wire gently and inspect corrosion | Wire is damaged farther back or socket is corroded |
| Clean or retension socket | $0–$15 | Moderate | Test known bulb and inspect contacts | Socket is too corroded or integrated LED has failed |
| Replace transformer | $45–$180 | High for whole-system power failures | Verify outlet/GFCI and transformer output first | Cable fault or overloaded zone remains |
| Replace photocell | $10–$60 | Moderate to high | Bypass or test manual mode | Timer board or transformer electronics have failed |
| Replace globe | $8–$45 | High if dimensions match | Measure opening diameter and mounting lip | Shape is discontinued and exact match is rare |
| Repair buried cable | $10–$150+ | High if fault is located | Zone isolation and visual inspection after digging | Damage location is unknown or multiple faults exist |
For a deeper dollar-by-dollar breakdown, use the full Portfolio Lighting repair cost guide. This database focuses on which failures are likely; that page focuses on what each repair usually costs.
Transformer Failure Database
Transformer problems can look dramatic because the whole system may go dark, but the transformer itself is not always dead. Before buying a new power pack, separate outlet problems, GFCI trips, timer settings, photocell conflicts, terminal oxidation, overload, and actual transformer failure.
Transformer overload pattern
The classic overload pattern is simple: the lights turn on normally, run for a while, then shut off after the transformer warms up. That points to load and heat, not a mysterious intermittent fixture failure. The fix may be reducing wattage with LED bulbs, splitting zones, using a larger transformer, or correcting a too-long run. The Portfolio transformer master guide explains the 80% load rule and replacement path.
Terminal oxidation pattern
Older transformers can show voltage at the screws but still fail under load because the wire connection is oxidized, loose, or compressed poorly. This is especially common when cable strands have been moved multiple times. Remove power before touching terminals, then inspect for green dust, blackened copper, loose strands, and melted insulation. If the conductor end is damaged, cut back to clean copper and reconnect securely.
Timer and photocell confusion
Many “dead transformer” searches are really programming issues. A digital clock may reset after a power outage. A photocell may hold the system off during a bright porch light exposure. Manual mode may work while automatic mode fails. Always test manual operation before replacing the transformer. If you have a model-specific unit, check the Portfolio Lighting manuals page for instructions.
Connector, Wire, and Cable Failure Database
Connector failures are one of the strongest reasons this page exists. They are common, cheap, and often misdiagnosed as fixture failure. Portfolio low-voltage systems used consumer-friendly quick connectors that worked well when new, but outdoor soil, water, mulch, fertilizer, wire movement, and shallow burial can weaken contact over time.
Wire failures behave differently. A cut cable usually affects a section or zone after digging, edging, planting, aeration, or animal activity. Voltage drop usually affects the far end of a long run gradually rather than causing a clean outage. Bad splices often appear as rain-related problems or intermittent flicker. When the failure follows a physical event, investigate the location of that event before buying any fixture.
Fixture, Globe, Socket, and LED Failure Database
Fixture failures fall into two groups: serviceable fixtures and end-of-life fixtures. A serviceable fixture has a usable housing, stable stake or mount, intact wiring lead, and replaceable failed component. An end-of-life fixture has structural corrosion, cracked body, failed integrated LED module, missing proprietary parts, or several failures stacked together.
Socketed fixtures are usually more repairable
If the fixture uses a standard bulb base such as MR16, G4, GU10, E26, or wedge style, repair odds are better. A bulb can be swapped, the socket can be inspected, and compatible LED upgrades can extend life. The important details are voltage, base type, wattage, beam spread, and color temperature. The MR16 LED replacement guide and landscape lighting lumen guide help match output instead of guessing.
Integrated LED fixtures are harder
Integrated LED fixtures can be efficient and clean-looking, but they reduce repair flexibility. When the LED board or driver fails, you may not have a standard bulb to swap. Some boards can be matched by electrical markings, but many homeowners are better off replacing the fixture when the module is sealed, proprietary, or unavailable. This is where the integrated LED vs socketed lifespan comparison becomes useful.
Globes and shades should be measured, not guessed
For broken glass, do not search only by “Portfolio globe.” Measure the opening diameter, height, mounting lip, shape, and finish. Common round globes are often replaceable generically. Unusual shapes may require secondary-market searching. The discontinued Portfolio Lighting guide explains how to search when exact OEM parts are not available.
Fix or Replace Decision Framework
Use this rule before spending money: repair the system when the failed part is isolated, low-cost, and compatible replacements exist. Replace the fixture when the body is no longer structurally sound or the failed component cannot be serviced. Replace the system or zone when many fixtures, wires, connectors, and transformer controls are failing at the same time.
Fix it
Bulb failure, connector corrosion, broken stake, cracked common globe, photocell issue, timer reset, or transformer sizing problem.
Find parts →Replace fixture
Cracked housing, corrosion through metal, failed sealed LED board, missing proprietary lens, or fixture with multiple simultaneous failures.
Compare alternatives →Restore zone
Multiple failures across the same run: old connectors, voltage drop, cable damage, mixed bulbs, and overloaded transformer output.
See failure points →Preventive Maintenance Schedule for Older Portfolio Systems
Aging Portfolio systems do not need constant work, but they do benefit from a seasonal inspection rhythm. The goal is not to replace everything. The goal is to catch the cheap failures before they damage expensive parts.
| Interval | Inspection | Why It Matters | Related Guide |
|---|---|---|---|
| Spring startup | Check all fixtures at night, note dim or dark locations | Reveals winter movement, failed bulbs, and connector problems | Troubleshooting |
| After heavy rain | Watch for GFCI trips, flicker, or moisture inside lenses | Identifies water intrusion before corrosion spreads | GFCI guide |
| After mulch or planting | Inspect cable path and connector positions | Landscape work is a common cable and connector damage trigger | Wiring guide |
| Every 2–3 years | Check transformer load, terminals, timer, and photocell | Prevents overload and control failures from being mistaken for fixture failure | Transformer guide |
| Every 5 years | Replace weak connectors, inspect stakes, clean lenses | Extends fixture life and maintains consistent brightness | Repair cost guide |
Model-Specific Failure Research
Some Portfolio failures require model-specific research because the fixture shape, driver board, transformer controls, or replacement hardware differs by product. If you have a model number, use it. If you do not, use fixture shape, label fragments, transformer model, bulb base, and old manuals.
For exact-match research, start with the Portfolio model number lookup. For technical manuals, use the Portfolio Lighting manuals archive. For individual discontinued pages, examples include the Portfolio Model 0157561 flood-light guide, Portfolio Model 0062582 manual and parts guide, Portfolio Model 0394866 compatibility guide, and Portfolio Model 0482436 repair resource.
The model number matters most when you need a globe, bracket, integrated LED module, proprietary shade, or exact fixture match. It matters less for standardized parts like 12V transformers, many bulbs, generic stakes, wire connectors, and low-voltage cable.
Portfolio Lighting Failure FAQ
What is the first thing to check when Portfolio lights stop working?
If all lights are out, check the outlet, GFCI, transformer reset, timer, photocell, and terminals. If one light is out, check the bulb first, then connector, socket, and fixture lead.
Why do my Portfolio lights keep shutting off after they turn on?
A delayed shutoff usually points to transformer overload or thermal protection. Total fixture wattage may be too close to the transformer capacity, especially after adding fixtures or using high-wattage bulbs.
Why do my lights only trip the GFCI when it rains?
Rain-related trips usually mean moisture is entering a fixture, connector, splice, socket, or damaged cable. Start with the lowest fixtures, buried connectors, and areas that collect water.
Are generic parts safe to use with Portfolio lighting?
Many generic parts are compatible when the specifications match. Transformers must match voltage and capacity. Bulbs must match base, voltage, and wattage. Stakes and globes must match dimensions. Connectors must match wire and connection style.
When should I stop repairing an old Portfolio fixture?
Stop repairing when the housing is cracked, corrosion has compromised the body, the integrated LED module has failed and no replacement exists, or several parts on the same fixture have failed together.
Important Safety and Accuracy Note
This database is designed for practical troubleshooting and buying decisions. Always shut off power before inspecting wiring, transformer terminals, sockets, or fixtures. Line-voltage indoor fixtures and hardwired outdoor work may require a qualified electrician. For code-sensitive outdoor installations, review the landscape lighting electrical code safety guide, outdoor lighting GFCI requirements, and outdoor junction box requirements before modifying wiring.