
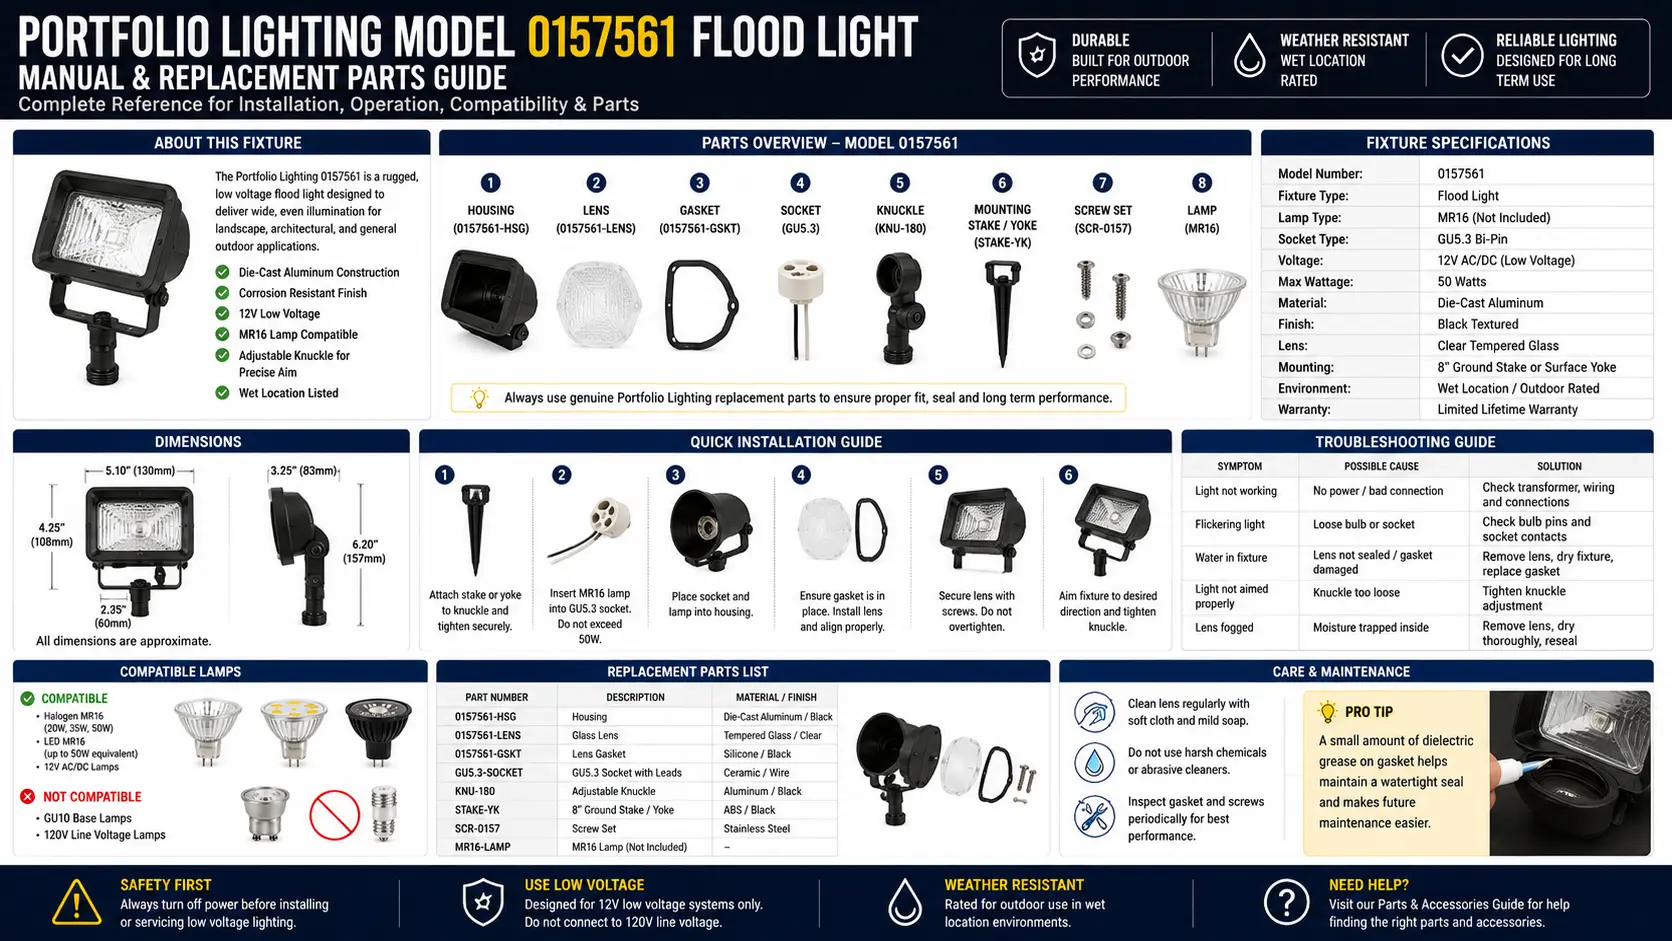
Portfolio 0157561: Model Identification and Context
The number 0157561 is a Lowe's item number — not the fixture's model number in the traditional sense. Portfolio Outdoor's LV-series fixtures used LV-prefixed model numbers (LV11017, LV11219, LV11318, and so on) with item numbers assigned by Lowe's at the SKU level. ManualsLib catalogs this item number under the Portfolio Flood Light category with a dedicated manual, confirming it is a distinct fixture product rather than a variant of another model.
The Portfolio 0157561 belongs to the LV-series cast-aluminum low-voltage landscape flood light family. All fixtures in this family share the same design platform: a die-cast aluminum body with a black powder-coat finish, a clear glass lens secured by a screw-in lens cover with rubber gasket, an adjustable lamp head on a knuckle joint, a ground spike for soil installation, an adjusting screw to lock the head angle, and a three-thumbscrew twist connector box for wire connection. The fundamental design of this fixture was produced under the Portfolio Outdoor brand (a registered trademark of LF, LLC) and manufactured by Northern International Inc., headquartered in Burnaby, British Columbia, Canada. Customer service for active Portfolio products was reached at 1-800-643-0067. This number is no longer active for Portfolio warranty purposes, as the brand has been discontinued.
Portfolio Outdoor is distinct from the Portfolio brand used for indoor lighting — the "Outdoor" designation indicated the landscape lighting subsidiary line. Both are Lowe's house brands registered to LF, LLC. For a full account of Portfolio's discontinuation, see the why Portfolio lighting was discontinued guide and the discontinued Portfolio lighting guide. For the complete Portfolio model number system, see the model number lookup.
Confirmed Specifications: Portfolio 0157561 Flood Light
The following specifications are confirmed from official Portfolio Outdoor LV-series manual documentation on ManualsLib, cross-referenced with Lowe's product listings for the LV-series flood light family, and verified against the physical platform characteristics consistent across all LV-series Portfolio Outdoor landscape flood lights.
| Specification | Value | Source / Notes |
|---|---|---|
| Item Number | 0157561 | Lowe's item number / ManualsLib catalog identifier |
| Product Category | Landscape Flood Light | ManualsLib — Portfolio Flood Light category |
| Voltage | 12V AC (low-voltage) | Max transformer: 15V, 300W per secondary — confirmed from LV-series official manual |
| Power System | Hardwired 12V landscape system — transformer required (not included) | Connects via twist connector box to existing landscape wire run |
| Bulb Type | Halogen (replaceable) — see bulb section for wattage variants | Specific wattage marked on fixture body and inside connector box per UL requirement |
| Fixture Material | Cast aluminum (die-cast) | Black powder-coat finish — confirmed LV11219BK Lowe's listing: "black cast-aluminum fixture" |
| Lens Type | Clear glass lens | Secured by screw-in lens cover with rubber gasket (Part A in parts list) |
| Head Adjustment | Yes — knuckle joint with adjusting screw | Allows beam angle adjustment in all directions once installed |
| Mount Type | Ground spike | Press or drive into soil; fixture body mounts to spike via body/post assembly |
| Wire Connection | Twist connector box — fits 12, 14, and 16 AWG landscape wire | Three-thumbscrew design; no wire cutting required for mid-run connections |
| Finish | Black — UV-protected powder coat | Confirmed from LV11219BK: "UV-protected finish resists fading" |
| Safety Listing | UL and CSA listed | Confirmed from LV11219BK Lowe's listing; all LV-series Portfolio Outdoor floodlights carry UL/CSA |
| Assembly Time | Estimated 2 minutes | From official LV-series manual — no tools required for assembly |
| Tools Required | None for assembly; flat-head screwdriver optional for connector box | Thumbscrews close by hand; screwdriver may be needed for tight fit |
| Pool/Water Clearance | Do not install within 10 feet (3m) of pool, spa, or fountain | NEC requirement for low-voltage landscape lighting — confirmed from official manual |
| Warranty — Fixture | Lifetime limited (excluding electrical parts) | Confirmed from LV-series official manual warranty section |
| Warranty — Finish | 2 years against peeling | Confirmed from LV-series official manual warranty section |
| Warranty — Electrical | 1 year | Confirmed from LV-series official manual warranty section |
| Manufacturer | Northern International Inc., P.O. Box 82327, Burnaby, BC, Canada V5C 5P8 | Confirmed from official LV-series manual warranty section |
| Customer Service (historical) | 1-800-643-0067 (no longer active for Portfolio) | From official manual — 8am–6pm EST M–Th; 8am–5pm EST Fri |
| Brand / Trademark | Portfolio Outdoor® — registered trademark of LF, LLC | Confirmed from all LV-series manual title pages |
| Country of Manufacture | China | Printed in China — confirmed on all LV-series manuals |
Official 7-Part Parts List: Every Component in the Portfolio 0157561
The following parts list is sourced directly from the official Portfolio Outdoor LV-series landscape flood light manual (confirmed from ManualsLib, cross-referenced against multiple LV-series documents including LV11017, LV11318, and LV11219). The parts list is identical across all LV-series Portfolio flood lights — the same seven parts in the same configuration. Part letters A through G are used in the manual's assembly diagram.
Bulb Identification, Replacement, and LED Upgrade
The halogen bulb in the Portfolio 0157561 is the primary consumable part. The specific wattage and base type varies across the LV-series — your fixture's exact bulb is marked on the label inside the lens body or connector box area, as required by UL. The three most common configurations in Portfolio's LV-series landscape flood lights are documented below.
Output: approximately 230 lumens. Length: 35mm (1.38 inches). Used in compact floodlight configurations. The G4 bi-pin base has two parallel pins 4mm apart. LED replacement: G4 LED 12V, 1.5–3W, same base — produces equivalent lumens at 85–90% less wattage. Confirm "12V" on the LED replacement — 120V G4 LEDs are physically identical but will fail or not light at all on a 12V landscape system.
Output: approximately 450 lumens. The GU5.3 bi-pin has two pins 5.3mm apart (wider than G4). Lowe's description of the LV11219BK confirms "35-watt halogen bulb included." LED replacement: MR16 GU5.3 LED 12V, 5–7W — produces 350–450 lumens at 80% wattage savings. Verify the bulb diameter (50mm for standard MR16) fits inside your fixture's reflector housing.
Output: approximately 835 lumens. Confirmed from Lowe's 50W model description. Used in the larger LV11318 and equivalent models. LED replacement: PAR36 LED 12V, 8–10W — produces comparable lumens. The PAR36 format uses a push-in screw-terminal base rather than a bi-pin. Some PAR36 LED replacements use a two-wire lead rather than a base — these work identically but require wire-nut connection inside the housing.
How to Confirm Your Exact Bulb Type Before Ordering
Do not guess the bulb type from the information above — confirm it directly from your fixture before ordering. Three confirmation methods, in order of reliability:
- Check the label inside the connector box: UL requires the maximum wattage and base type to be printed on the fixture. Open the connector box (3 thumbscrews) and look at the inside surface of the housing near the wiring.
- Remove the existing bulb and read the base markings: All halogen bulbs print their wattage and base type on the ceramic or glass base. With the transformer powered off, remove the lens cover (Part A), unscrew the lens, and remove the bulb. The base will be labeled — G4, GU5.3, or PAR36.
- Measure the pin spacing: G4 = 4mm pin-to-pin. GU5.3 = 5.3mm pin-to-pin. PAR36 = screw-terminal base with no pins.
LED Upgrade: Why You Should Convert Now
The halogen bulb in the Portfolio 0157561 is the fixture's biggest maintenance burden and the primary cause of system failures in aging Portfolio landscape installations. Converting to LED replacement bulbs at the same base type eliminates most of that maintenance while delivering better light quality and dramatically lower energy consumption. The math is straightforward: a 35W halogen in a Portfolio flood light running 6 hours per night draws 35 × 6 = 210 watt-hours per night. A 5W LED MR16 replacement draws 5 × 6 = 30 watt-hours — a 85.7% reduction. On a 120W transformer running ten such fixtures, halogen loads the transformer to 350W (over capacity). LED loads it to 50W — freeing enormous headroom to add fixtures or downsize to a smaller transformer. For the transformer sizing calculation, see the transformer size calculator and the transformer sizing guide.
Installation: Assembly Procedure (Official Manual Steps)
Assembly time is estimated at 2 minutes per fixture. No tools are required for assembly. The following steps are drawn directly from the LV-series Portfolio Outdoor official installation manual sequence.
Connector Box Wiring: Complete Procedure
The twist connector box (Part G) is the interface between the Portfolio 0157561 and your landscape wire run. Getting this connection right is the single most important installation step — a poorly made connection produces intermittent operation, dimming over time as oxidation increases resistance, or complete failure. The official manual's connector box procedure is reproduced here with additional field-tested detail not present in the original.
The Wire Gauge Channel Selection — Critical Detail
The Portfolio connector box has two wire channels marked on the housing: 16G and 12G. This selection is the step most commonly done incorrectly. The "16G" channel accepts 16-gauge and 18-gauge wire. The "12G" channel accepts 12-gauge wire. Using the wrong channel means the piercing contacts do not fully engage the wire conductors, producing high-resistance connections that cause voltage drop and flickering. Verify your wire gauge before selecting a channel. Standard Portfolio landscape lighting wire is 16AWG or 18AWG (use 16G channel). If you upgraded to 12AWG for voltage drop management, use the 12G channel. For wire gauge selection guidance, see the wire gauge guide.
Step-by-Step Connector Box Procedure (From Official Manual)
- Step 1: Run the landscape wire from the transformer to each fixture without cutting the wire mid-run. The wire runs continuously through each connector box — you are tapping into it, not splicing it.
- Step 2: Remove the rubber plug from the channel marked 16G (for 16 or 18 gauge wire) or 12G (for 12 gauge wire). Note: each channel has one rubber plug — remove only the plug for the channel you are using. Leave the other plug in place to maintain weatherproofing.
- Step 3: Press the landscape wire into the proper slot — the wire should seat fully into the channel groove. The connector box's internal piercing contacts will penetrate the insulation when the lid is closed.
- Step 4: Replace the lid on the connector box and close it tightly using the three thumbscrews. Tighten all three thumbscrews evenly. If extra force is required to make the top and bottom fit tightly together, use a flat-head screwdriver on the thumbscrew slots. The lid must close completely for the piercing contacts to make full electrical contact — a partially closed lid produces intermittent connections.
- Step 5 (last fixture only): After the final fixture in the run, cut the landscape wire with wire cutters and wrap the exposed end with electrical tape. This prevents short circuits at the wire end.
- Step 6: Turn on the power unit (transformer). If the fixture does not turn on, repeat steps 2–4 — the wire was likely not fully seated before closing the lid.
Full Troubleshooting Sequence: Portfolio 0157561 Not Working
The following troubleshooting sequence begins with the steps from the official Portfolio LV-series manual and extends into field-tested diagnostics that cover every common failure mode for this fixture type. Work through these steps in order — most failures resolve at steps 1 through 4.
In 25 years of landscape lighting service, the overwhelmingly most common failure mode in halogen Portfolio LV-series flood lights is a burned-out bulb — by a large margin. Second is the connector box losing contact from corrosion. Third is water intrusion through a failed lens gasket that then causes the bulb to fail prematurely. The fixture body itself almost never fails first. If someone hands you a non-functional Portfolio 0157561, before any other diagnosis: replace the bulb. If that does not fix it, clean or replace the connector box. Between those two steps you will resolve about 90% of all failures in this product family without spending more than $10.
Warranty Terms: Exactly What the Official Manual States
The following warranty language is reproduced from the official Portfolio Outdoor LV-series landscape flood light manual, confirmed from ManualsLib document 952606 (LV11318). The warranty structure is identical across all LV-series Portfolio Outdoor flood lights and applies to the Portfolio 0157561.
| Component | Warranty Period | What Is Covered | What Is NOT Covered |
|---|---|---|---|
| Fixture Body (mechanical) | Lifetime limited | Defects in material and workmanship — excludes electronic and/or electrical parts | Normal wear and tear; damage from improper installation; acts of God |
| Fixture Finish | 2 years | Guaranteed against peeling | Fading, discoloration from UV or chemicals; physical abrasion damage |
| Electronic / Electrical Parts | 1 year | Defects in electronic and electrical components | Damage from incorrect voltage; damage from water intrusion; normal bulb burnout |
| Halogen Bulb | Not warranted separately | Bulb is a consumable — expected to wear out in normal use | All bulb failures; touching glass with bare skin voids any implied bulb coverage |
The official warranty also states: "Our policy does not include liability for incidental or consequential damages. Some states or provinces do not allow the exclusion or limitation of consequential damages; therefore, the above exclusion may not apply to you. This warranty gives you specific legal rights and you may also have other rights that vary from place to place." Warranty claims were to be directed to Northern International Inc., P.O. Box 82327, Burnaby, B.C., Canada V5C 5P8 — this warranty is no longer active as Portfolio has been discontinued. For context on what this means for existing installations, see the discontinued landscape lighting guide.
The LV-Series Family: Portfolio Outdoor Flood Lights on the Same Platform
The Portfolio 0157561 is one fixture in a consistent LV-series product family. Understanding the siblings helps identify cross-compatible bulbs, gaskets, and connector boxes, and locates related manuals on ManualsLib.
The 20W, 35W, and 50W LV-series flood lights share Parts A, C, D, E, F, and G (all parts except the bulb itself). If you have a functioning 35W fixture and need the lens cover gasket from a 50W, they are interchangeable. The connector box (Part G) is universal across the entire LV-series and across all Portfolio, Malibu, Hampton Bay, and generic 12V landscape lighting connector systems. For the complete Portfolio model library, see the Portfolio model library index and the model parts directory.
Current Replacement Options for the Discontinued Portfolio 0157561
The Portfolio 0157561 is discontinued. If the fixture cannot be repaired by bulb replacement or connector box service, a current-production replacement is needed. The following options use the same 12V AC system, the same spike installation method, and the same wire connector format — making them direct drop-in replacements at existing Portfolio 0157561 installation locations.
| Model | Brand | Watts | Lumens | Light Source | Material | Where to Buy | Notes |
|---|---|---|---|---|---|---|---|
| Harbor Breeze LV flood equivalents | Harbor Breeze (Lowe's) | 5–13W LED | 296–1000lm | Integrated LED | Aluminum | Lowe's | Direct successor line. Same spike installation, same connector box wiring. No bulb replacement needed — LED is integrated. 296lm model confirmed from Lowe's: 8.5W, bronze finish. |
| Portfolio 296-Lumen LED Flood | Portfolio (closeout) | 8.5W | 296lm | Integrated LED | Aluminum (textured bronze) | Lowe's clearance / eBay | Same brand, LED technology. "Easy twist connector for easy installation... no bulbs to replace." 12V compatible. May still be available as new-old-stock. |
| VOLT LED landscape flood lights | VOLT | 5–10W | 300–700lm | LED (MR16 replaceable) | Brass or copper | voltlighting.com | Premium upgrade path. Lifetime warranty on brass fixtures. Replaceable MR16 LED bulb — no full fixture replacement when bulb dims. Higher upfront cost but 25+ year fixture life. See the VOLT review. |
| Kichler low-voltage LED flood | Kichler | 4–8W | 250–500lm | Integrated LED or MR16 | Aluminum | Online, electrical suppliers | 7-year fixture warranty, 6-year LED warranty. Mid-tier upgrade. See the Kichler parts guide. |
For a comprehensive comparison of all current landscape lighting brands at every price tier, see the brand comparison guide. For the full Portfolio replacement path, see the best Portfolio replacement guide and the Portfolio alternatives hub. For transformer sizing when upgrading from halogen to LED fixtures, see the transformer sizing guide — LED conversion typically reduces total system wattage by 75–85%, often allowing a smaller replacement transformer or enabling significant fixture count expansion.
Portfolio 0157561 Flood Light FAQ
What bulb does the Portfolio 0157561 use and can I upgrade to LED?
The exact bulb type is marked inside your specific fixture (UL requirement). LV-series Portfolio flood lights used 20W halogen (G4 bi-pin, MR11 format), 35W halogen (GU5.3/MR16 format), or 50W halogen (PAR36 or large MR16 format) depending on the specific model. All three formats have 12V LED replacement bulbs available. For the 20W/G4: a 12V G4 LED 1.5–3W works. For the 35W/MR16/GU5.3: a 12V MR16 LED 5–7W works. For the 50W/PAR36: a 12V PAR36 LED 8–10W works. Always verify the LED is rated for 12V — 120V versions in the same base format will not work. See the bulb replacement guide.
What transformer does the Portfolio 0157561 require?
Any standard 12V AC low-voltage landscape transformer with a maximum output of 15V and 300W per secondary. This includes all Portfolio transformers and all compatible consumer brands — Hampton Bay SL-120-12A, Hampton Bay SL-200-12A, Malibu, Paradise GL-series, Moonrays, and generic 12V landscape transformers. The 0157561 does not require a dedicated Portfolio transformer. Count this fixture's wattage toward your total system load when sizing the transformer. For sizing calculations, see the transformer size calculator. For transformer comparison, see the transformer alternatives guide.
How do I connect the Portfolio 0157561 to my existing landscape wire run?
Through the connector box (Part G). Remove the rubber plug from the 16G channel (for 16 or 18 AWG wire) or 12G channel (for 12 AWG wire). Press the wire into the channel. Replace the lid and close all three thumbscrews firmly — the lid must be completely closed for the piercing contacts to make full electrical connection. Do not cut the main wire run — the connector box taps into it mid-run. For the last fixture only, cut the wire and tape the end. If the fixture does not light after connection, the wire was not fully seated — reopen and reseat. See the connectors guide for full detail.
What is the warranty on the Portfolio 0157561?
The official Portfolio Outdoor LV-series warranty provides: lifetime limited warranty on the fixture body (excluding electrical parts), 2-year warranty against finish peeling, and 1-year warranty on electrical components. The halogen bulb is not covered — it is a consumable. However, this warranty cannot currently be exercised: Portfolio has been discontinued and Northern International Inc. (the original manufacturer at P.O. Box 82327, Burnaby, BC, Canada V5C 5P8) no longer processes Portfolio warranty claims. The historical customer service number 1-800-643-0067 is no longer active for this purpose.
My Portfolio 0157561 worked fine for years and suddenly stopped — what happened?
In order of likelihood for an older halogen Portfolio landscape flood light that has suddenly stopped: (1) bulb burnout — halogen landscape bulbs have 500–3,000 hour service lives; 6 hours/night = 83–500 nights maximum. If the fixture is more than 2–3 years old, bulb burnout is almost certainly the answer. Replace the bulb first. (2) Connector box corrosion — pierce-point connectors develop galvanic corrosion over 5–10 years. Clean or replace the connector box. (3) GFCI outlet tripped — check the outlet powering the transformer. For the complete diagnostic path, see the troubleshooting section above and the landscape lighting works sometimes guide.
Can I use the Portfolio 0157561 with a Hampton Bay or Malibu transformer?
Yes. The 12V AC standard is universal across all consumer landscape lighting brands. The Portfolio 0157561 connects to any 12V AC transformer via its connector box, regardless of brand. Hampton Bay SL-series, Malibu, Paradise, Moonrays, VOLT, and generic 12V transformers all power this fixture without modification. For complete cross-brand transformer compatibility, see the brand connector compatibility guide.
Related Guides: Portfolio Models, Parts, Troubleshooting & Alternatives
- Portfolio Model Number Lookup
- Portfolio Model Library Index
- Portfolio Model Parts Directory
- Portfolio Lighting Manuals
- Portfolio Outdoor Manuals
- Discontinued Portfolio Lighting
- Why Portfolio Was Discontinued
- Discontinued Parts Guide
- Replacement Parts Guide
- Portfolio Bulb Replacement Guide
- MR16 LED Replacement Guide
- LED vs Halogen Guide
- Portfolio Transformer Troubleshooting
- How to Test a Transformer
- Transformer Replacement Guide
- Transformer Sizing Guide
- Transformer Size Calculator
- Connectors Guide
- Low-Voltage Connector Guide
- Voltage Drop Guide
- Voltage Drop Calculator
- Wire Gauge Guide
- Tree Uplighting Guide
- Landscape Lighting Layout Guide
- Best Portfolio Replacements
- Portfolio Alternatives Hub
- Brand Comparison Guide
- VOLT Landscape Lighting Review
- Brand Connector Compatibility
- Lights Work Sometimes Guide