
Logic Summary: How to Avoid Buying the Wrong Pool Light Part
- Start with the fixture label or model number, not the bulb shape.
- Confirm whether the light fits a pool niche, spa niche, or specialty housing.
- Measure lens diameter before buying gaskets, rings, or replacement lights.
- Never assume a shorter cord can be spliced underwater.
- Check transformer output under load before blaming the light.
- If the gasket is chalky, flattened, cracked, or brittle, treat it as a leak risk.
Real Underwater Pool Light Beam Example
Underwater pool lighting performance depends on more than just bulb brightness. Beam spread, lens clarity, fixture angle, niche depth, and voltage stability all affect how the light actually looks in the water.
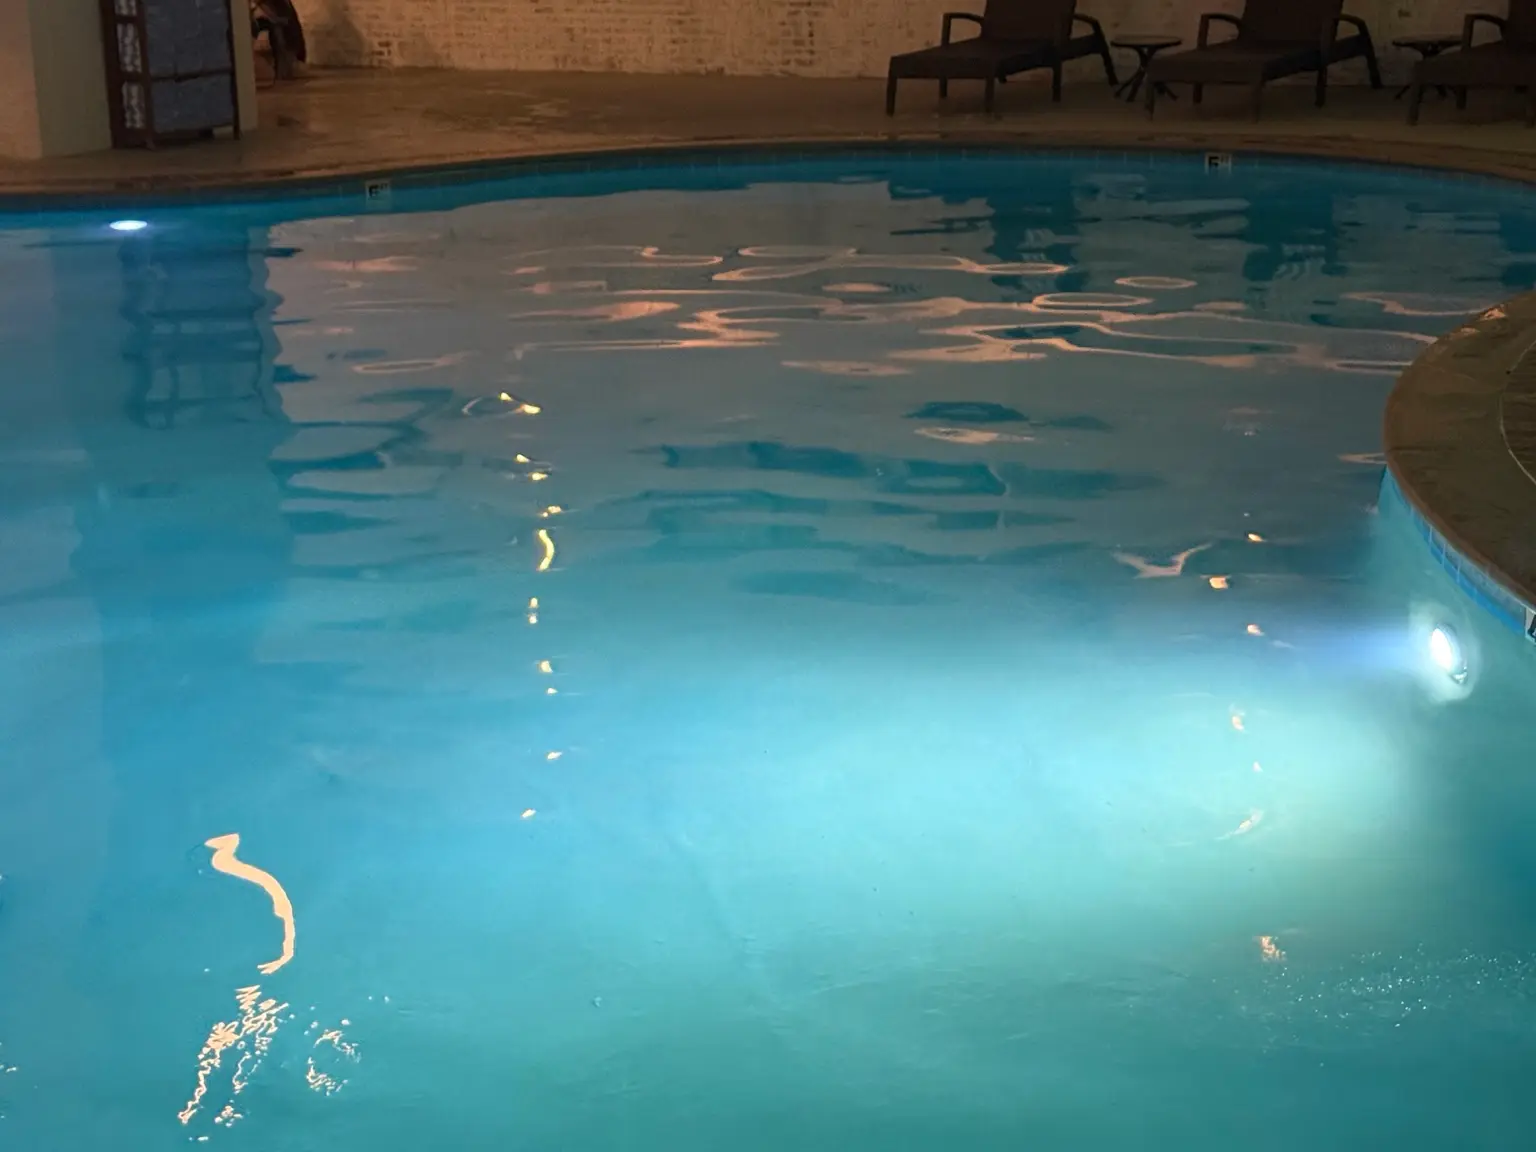
In older Portfolio wet niche pool lighting systems, cloudy lenses, aging gaskets, voltage drop, and mineral buildup can reduce brightness dramatically even when the fixture still powers on. This is why visual inspection matters before replacing bulbs or transformers.
Notice how the underwater beam spreads outward across the pool floor and water surface. Uneven lighting patterns, dim zones, or yellow-tinted output are often signs of aging components or electrical loss somewhere in the lighting circuit.
A pool light is one of the worst places to guess. Water, metal, electricity, long cable runs, old seals, and discontinued fixture parts all meet in one small housing. That is why this page does not give the usual shallow advice of “replace the bulb.” It walks through the whole failure chain.
If you are trying to identify an older fixture, start with the Portfolio Lighting Model Number Lookup and the Portfolio Lighting Model Library. If you need part matching, the Portfolio Lighting Master Model & Replacement Handbook is the money section because pool fixtures often fail when owners buy a replacement by appearance instead of by niche, gasket, voltage, and cord requirements.
Why Portfolio Pool Lighting Is Different From Landscape Lighting
Portfolio is best known for outdoor fixtures, low-voltage transformers, path lights, wall lanterns, and landscape lighting systems. Pool lighting sits in a much stricter category because the fixture can be below the waterline or directly connected to a wet niche, conduit, and deck-side junction box.
That changes everything. A cracked path light lens usually means poor light output. A cracked pool light lens can mean water intrusion, current leakage, a tripping GFCI, corroded conductors, and unsafe bonding conditions.
The Three-Part Pool Light System
The repair strategy depends on where the failure starts. Use Portfolio Lighting Transformer Troubleshooting when the system is dead, buzzing, overheating, or producing unstable voltage. Use Portfolio Replacement LED Modules and Drivers when the fixture is electrically sound but the light engine is failing.
Pool Lighting Real World Results
A strong pool lighting guide should not be built around glossy blue-water photos. The best E-E-A-T images are the ones that show what really fails on site.
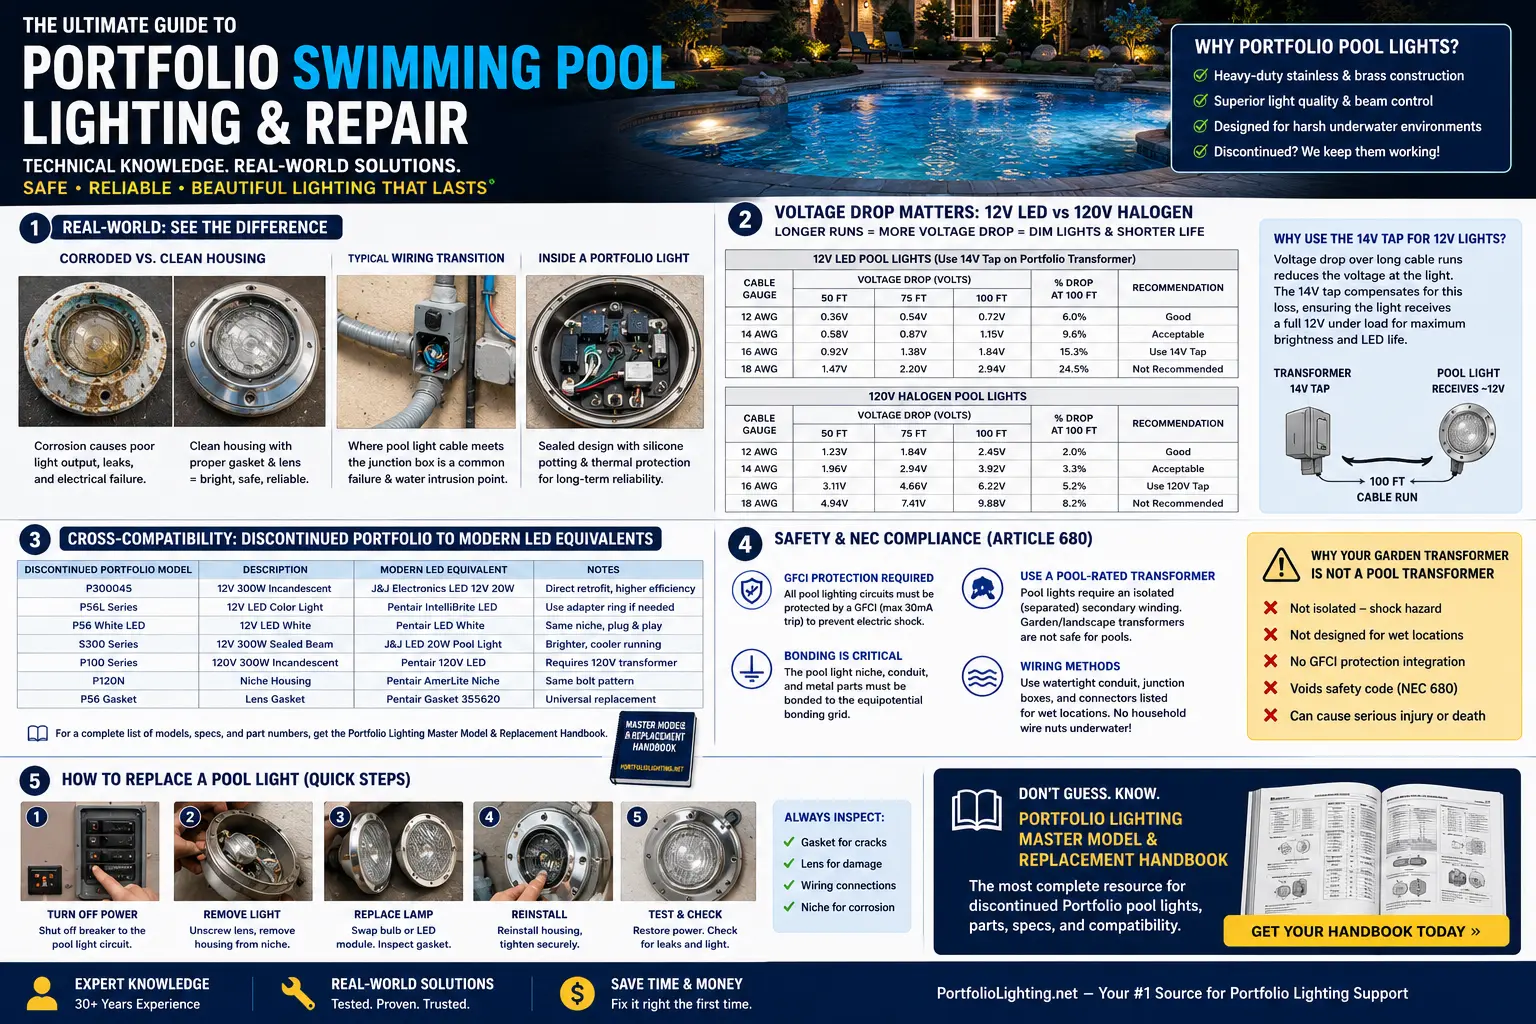
1. Corroded Pool Light Housing
Show a close photo of the internal fixture body after the lens is removed. Look for green/white corrosion, rust stains, mineral deposits, brittle insulation, burnt lamp bases, or water marks.
Alt text idea: “Corroded Portfolio pool light housing showing gasket failure and water intrusion inside the fixture.”
2. Clean Housing After Repair
A second image should show a clean housing, new gasket, intact lens, and dry fixture cavity. This creates a clear before/after repair story.
Alt text idea: “Clean Portfolio swimming pool light housing with new gasket and dry fixture interior before reinstallation.”
3. Conduit to Junction Box Transition
This is the pain point most DIY guides skip. Photograph the place where the pool light cord transitions into the deck-side junction box or conduit run.
Alt text idea: “Pool light conduit transition into junction box showing wiring path for Portfolio underwater light repair.”
4. Transformer Label Close-Up
Show the transformer nameplate, voltage output, pool/spa listing language if present, and any 12V/13V/14V output taps. This helps users stop guessing.
Alt text idea: “Pool-rated transformer label showing output voltage taps for long Portfolio pool light cable runs.”
For waterproof fixture context, connect this page with Portfolio Waterproof Lighting. For lens, gasket, and hardware replacement logic, see Portfolio Replacement Glass, Portfolio Replacement Lenses, and Portfolio Replacement Hardware.
Portfolio Pool Light Voltage Drop Table: 12V LED vs. 120V Halogen
Pool lights often have longer cable runs than people expect. The transformer may be at the equipment pad, garage wall, or service area while the light is across the deck. That extra distance matters more at 12V than at 120V because the same resistance consumes a larger percentage of available voltage.
| Run Length From Transformer to Pool Light | 12V LED Pool Light Behavior | 120V Halogen Pool Light Behavior | Technical Meaning | Repair Decision |
|---|---|---|---|---|
| 50 ft | Usually acceptable if wire size is correct and connections are clean. | Usually less affected by voltage percentage loss. | Small voltage loss can still shift LED color or dim output if the driver has low tolerance. | Measure voltage under load before replacing the lamp. |
| 75 ft | May become visibly dim if cable is undersized or old connections are corroded. | May still light, but old halogen load can stress wiring and heat at weak connections. | 12V systems are entering the range where transformer tap selection matters. | Check for a listed pool transformer with approved higher-voltage taps. |
| 100 ft | High risk of dimming, color shift, flicker, or driver instability on 12V LED retrofits. | Voltage loss is less visible by percentage, but safety and conductor condition still matter. | A 14V tap may be needed to deliver usable voltage at the fixture end, only if allowed by the listed equipment instructions. | Use voltage-drop math, not guesswork. Confirm cable gauge, load, tap, and fixture rating. |
This is the same electrical logic behind Landscape Lighting Voltage Drop and the Landscape Lighting Voltage Drop Calculator, but the pool environment raises the safety standard. In landscape lighting, a dim path light is annoying. In pool lighting, the wrong transformer, wrong splice, wrong GFCI setup, or wet junction box can become dangerous.
Pool Light Voltage Drop: Quick Field Reference
Pool lights often have longer cable runs than standard path lights. If the transformer output is correct but the light is dim, flickering, or unstable, test voltage at the fixture side under real load.
| Cable Run Length | Likely 12V Output at Light | 13V Tap Recommended? | 14V Tap Recommended? |
|---|---|---|---|
| 0–30 feet | About 11.6V to 12V | No, unless load is unusually high | No |
| 31–60 feet | About 10.8V to 11.4V | Often yes | Usually no |
| 60–100 feet | About 9.5V to 10.8V | Yes, check transformer rating | Possibly, only if the light and transformer support it |
Discontinued Portfolio Pool Light Compatibility Options
This is where many Portfolio pool light owners get stuck. The older fixture may no longer appear in current retailer listings, but the original housing is still installed in the pool. Instead of matching the light by a newer product photo, you need to identify it by the lens size, niche type, mounting pattern, voltage, and cord length.
| Older Portfolio Pool Light Clue | What to Measure Before Buying | Modern Replacement Direction | What Can Go Wrong | Where to Check Next |
|---|---|---|---|---|
| 12V LED replacement-style pool light | Fixture voltage, niche diameter, cord length, gasket profile, lens diameter. | Pool-rated 12V LED assembly or approved LED module matched to the existing niche. | Landscape LED modules may fit physically but fail listing, sealing, or thermal requirements. | LED Modules and Drivers |
| Older halogen sealed fixture | Lamp base, wattage, lens gasket, cord condition, heat markings, niche screws. | Listed LED conversion only when approved for the housing and wet niche. | Heat damage can harden gaskets and create leaks after relamping. | Portfolio Bulb Replacement |
| Missing model label or faded cord tag | Housing diameter, screw pattern, lens size, cord length, transformer voltage. | Use model library and parts directory to narrow the family before ordering. | Buying by appearance alone often leads to wrong gasket or wrong cord length. | Model Parts Directory |
| Old fixture with water inside lens | Lens crack, gasket flattening, screw corrosion, cord strain relief, niche corrosion. | Replace gasket/lens if allowed; replace full fixture if cord or body is compromised. | Reusing a distorted gasket can immediately recreate the failure. | Replacement Parts |
| Transformer hum after LED conversion | Load wattage, transformer type, output tap, LED driver compatibility, GFCI behavior. | Pool-rated transformer or driver matched to the LED load and distance. | Old magnetic behavior, low load, or wrong driver can cause hum or flicker. | Transformer Replacement |
The safest replacement workflow is: identify the model family, confirm voltage, confirm niche and gasket, confirm cord length, confirm transformer listing, then buy parts. For broader matching logic, use the Portfolio Lighting Compatibility Guide and Where to Buy Portfolio Lighting Replacement Parts.
NEC Article 680 Safety Logic: Why Pool Lighting Has Its Own Rules You Need To Be Aware Of
Swimming pool electrical work is governed by stricter rules than ordinary yard lighting because people are in contact with water while electrical equipment operates nearby. That is why pool lighting repair must focus on GFCI protection, listed equipment, junction box location, bonding, transformer isolation, and wet-niche integrity.
Why Your Garden Transformer Is Not a Pool Transformer
A normal landscape transformer may be fine for path lights, deck lights, and accent lighting, but underwater pool luminaires require a power source listed and identified for swimming pool use. Pool transformers are designed around isolation, barrier, grounding, and listing requirements that standard garden transformers are not built to satisfy.
If you are diagnosing a transformer issue, pair this pool-specific guidance with Portfolio Transformer Wiring Diagram and Portfolio Transformer Buzzing. Those pages help with general symptoms, while this page explains why pool use requires a higher safety standard.
GFCI Protection Is Not Optional
A pool light that trips the GFCI is giving you information. It may be detecting leakage current caused by water intrusion, damaged insulation, a compromised cord, a wet junction box, a failing transformer, or incorrect wiring.
Bonding and the Metal Niche
Bonding is not the same as normal grounding. Around pools, metallic parts are bonded together to reduce voltage differences that can be felt in wet environments. A metal light niche, conduit system, ladder, handrail, equipment pad, and reinforcing steel may all be part of the bonding conversation depending on the installation.
For deeper code context, connect this page to Landscape Lighting Electrical Code Safety and Outdoor Lighting Junction Box Requirements. The pool environment is more restrictive, but the inspection mindset is similar: listed equipment, dry enclosures, correct conductor routing, GFCI protection, and no improvised splices.
How to Safely Diagnose a Portfolio Pool Light Before Replacing Parts
I researched this diagnosis to prevent the most expensive mistake: buying a bulb, gasket, transformer, or fixture before you know which part of the system failed.
- Turn off power at the breaker. Do not rely only on a wall switch, timer, or automation control.
- Test and reset the GFCI. If it will not reset, stop and treat the system as faulted.
- Inspect the junction box. Look for corrosion, water, brittle insulation, loose wire nuts, or signs of a previous improper splice.
- Confirm transformer type. Low-voltage underwater lighting should be supplied by a listed pool/spa transformer or power supply, not a random landscape unit.
- Measure voltage under load. A no-load reading can look normal while the light still fails under real load.
- Inspect the fixture cavity. Water inside the lens means the seal system failed. Do not assume the lamp alone caused the outage.
- Match the replacement by specs. Voltage, niche, gasket, lens, cord, listing, and thermal environment matter more than appearance.
If the lights are dim, unstable, or blinking, compare the symptoms with Portfolio LED Lights Flickering and Portfolio Lighting Too Dim. If the issue started after rain or water exposure, also review Portfolio Lights Not Working After Rain.
The Smart Replacement Strategy: Bulb, Gasket, Module, or Full Fixture?
The right repair depends on how far the failure traveled into the system. I divide Portfolio pool light repairs into four levels.
| Repair Level | When It Makes Sense | Do Not Use This Repair If | Key Matching Detail |
|---|---|---|---|
| Bulb / lamp replacement | The fixture is dry, gasket is healthy, lens is intact, and voltage is stable. | There is water inside the lens, melted insulation, or repeated GFCI trips. | Voltage, wattage, base type, heat rating, listing. |
| Gasket and lens repair | The fixture body is sound, but the seal has flattened, cracked, or leaked. | The cord, strain relief, or housing itself is damaged. | Exact gasket profile and lens diameter. |
| LED module / driver retrofit | The fixture can accept a listed retrofit and has adequate thermal path. | The module is not pool-rated or the housing cannot dissipate heat. | Driver compatibility, thermal contact, voltage range. |
| Full fixture replacement | The cord is damaged, housing is corroded, niche is compromised, or no safe parts exist. | You are only trying to solve a simple dry-lamp failure. | Niche fit, cord length, transformer/GFCI compatibility. |
For normal outdoor repair parts, the main hub is Portfolio Lighting Parts and Accessories. Pool lights are more specialized, so use that hub as a parts-research starting point, not as permission to install non-pool-rated parts underwater.
Wet Niche Compatibility Checklist
Pool light compatibility is mainly about the niche, not just the brand name. A light can look similar online and still fail to fit the housing in the pool wall.
- Lens diameter: Confirm whether the light is closer to a spa-size lens or a larger pool-size lens before buying a gasket or face ring.
- Niche material: Check whether the housing is stainless steel, plastic, PVC, or another niche type.
- Cord length: Confirm whether the replacement requires 30, 50, or 100 feet of cord. Never plan on splicing an underwater cord.
- Mounting bolt pattern: Match the top pilot screw, tab style, face ring, or multi-bolt pattern.
- Voltage: Confirm 12V or 120V before ordering any replacement lamp, module, or fixture.
- Gasket profile: Match thickness, diameter, compression style, and material condition.
Real-World Pool Light Inspection Points
The most useful photos for identifying a discontinued pool light are not glamour shots. They are closeups of the fixture face ring, lens diameter, gasket edge, niche opening, cord exit, and transformer label.
Face Ring and Lens
Photograph the screw pattern, lens size, trim ring, and gasket edge before removing the fixture.
Transformer Label
Capture voltage, wattage, model number, and output taps so replacement parts are matched correctly.
Identify the Fixture Before You Buy Anything To Save Money
If you have an older Portfolio pool fixture, the most expensive mistake is buying a replacement that looks right in a product photo but fails on voltage, gasket, cord length, niche fit, or transformer requirements.
Use the Portfolio Lighting Master Model & Replacement Handbook as the technical parts catalog before you order. For discontinued hardware, model-family clues and physical measurements matter more than retailer product names.
Portfolio Pool Light Inspection Checklist
Use this checklist before calling a pool light repair complete.
- Power verified off: Breaker off, circuit tested, no reliance on switch-only shutoff.
- GFCI confirmed: Device tested, reset behavior observed, no bypassing or nuisance-trip guessing.
- Transformer verified: Listed for pool/spa use when supplying underwater luminaires.
- Voltage measured under load: End-of-line voltage checked, not just transformer no-load output.
- Junction box dry: No standing water, corrosion, brittle insulation, or unsafe conductor mixing.
- Fixture cavity dry: No water line, mineral residue, rust, burnt socket, or cracked lens.
- Gasket matched: Correct profile, not stretched, flattened, pinched, or reused after distortion.
- Bonding reviewed: Metallic niche and related conductive parts evaluated by a qualified professional.
- Replacement listed: Pool-rated lamp, module, or fixture used; no household or garden substitute.
- Final test performed: GFCI test, brightness check, flicker check, and water-intrusion observation after operation.
Frequently Asked Questions About Portfolio Pool Transformers and Lights
Can I use a regular landscape lighting transformer for a pool light?
No. A standard garden or landscape transformer is not automatically pool-safe. Underwater pool luminaires require equipment listed and identified for swimming pool use, with the correct isolation and safety requirements.
Why does my Portfolio pool light keep tripping the GFCI?
The most common reasons are water inside the fixture, a failed gasket, damaged cord insulation, moisture in the junction box, leakage current from an old lamp assembly, or a transformer/power supply problem.
Can I replace an old halogen Portfolio pool light with LED?
Sometimes, but only with a replacement that matches the voltage, niche, cord length, gasket, lens, thermal environment, and pool-use listing. A generic LED bulb is not the same as a pool-rated LED conversion.
Why is my 12V pool light dim at the far end of the pool?
Long cable runs create voltage drop. A 12V LED may dim, flicker, or shift color if the fixture receives too little voltage under load. The fix may involve wire sizing, clean connections, or a pool-rated transformer tap approved for that system.
Recommended for You: