
Quick Answer: What Makes Outdoor Lighting Safer for Seniors?
Senior-safe outdoor lighting is not simply brighter lighting. It is warm, shielded, predictable, and contrast-aware lighting that helps older eyes identify walking edges, steps, wet surfaces, and obstacles without causing glare.
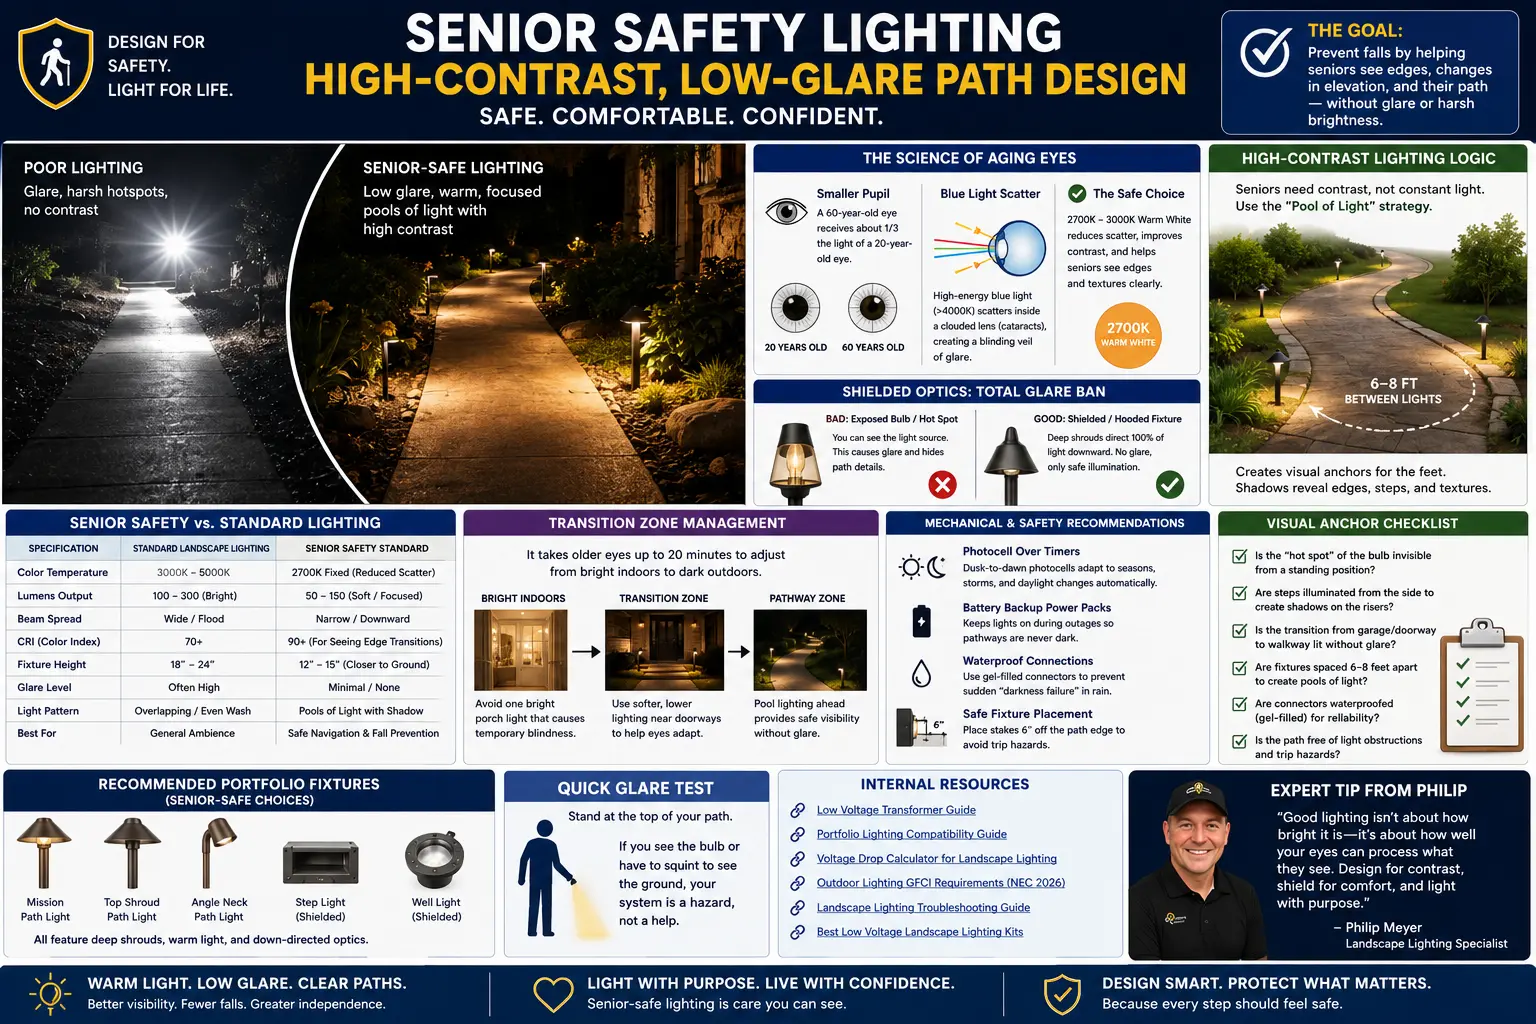
A good senior path design uses 2700K to 3000K warm white, hides the LED chip or bulb from direct view, creates separated pools of light at walking rhythm, and uses reliable low-voltage power so the path does not suddenly go dark during rain. Start with safe fixture selection, then confirm system reliability using the Portfolio low-voltage lighting guide, transformer sizing guide, and landscape lighting voltage drop calculator.
The Visual Aging Technical Brief: Why Older Eyes Need Different Lighting
Senior path lighting must account for real changes in the eye. The pupil gets smaller with age, the lens yellows and clouds, contrast sensitivity drops, and recovery from glare becomes slower. A lighting layout that feels “bright enough” to a 30-year-old may still leave a senior with weak edge definition or a blinding glare source.
The Pupil Factor
A commonly used field explanation is that a 60-year-old eye may receive roughly one-third the retinal light of a young adult eye under similar conditions. That does not mean you should triple the lumens. It means you should place usable light on the walking surface while preventing direct glare from entering the eye.
Blue Light Scatter and Cataracts
Very cool 5000K “daylight” lamps can be harsh for seniors with cataracts or cloudy lenses because short-wavelength blue-rich light scatters more inside the eye. That scattering can create a veiling glare effect: the light is technically bright, but the ground detail looks washed out.
For a broader comparison of warm white, neutral white, and daylight outdoor lighting, see the landscape lighting color temperature guide. Senior walking paths usually benefit from warmer light because it is easier on aging eyes and less harsh than blue-white daylight lamps.
Wet Surface Reflection: The Rainstorm Glare Problem
Wet concrete, asphalt, stone, and pavers can act like a mirror at night. When rain hits a sidewalk, an exposed LED hot spot can reflect directly into the eyes of a person walking toward it.
This is especially risky for seniors because glare recovery is slower with age. A path that looks safe on a dry evening can become harder to read during rain if the fixture throws a bright reflection across the walking surface.
The safest layout lights the surface without turning the surface into a mirror. If a wet walkway reflects the bulb back at standing eye level, reduce output, change the angle, add shielding, or use a lower-glare fixture.
The Senior Path Glare Test
Stand at the top of the path, garage threshold, porch step, or patio door. Look down the walking route exactly the way a senior would when leaving the house.
The Shielded Optics Requirement: The Bulb Hot Spot Must Be Invisible
A fixture fails senior-safety design if the person walking can see the LED chip, lamp filament, or bare bulb from normal standing height. That point source creates discomfort glare, reduces contrast, and can hide the very step edge the light was supposed to reveal.
Senior-safe lighting and dark-sky lighting often overlap because both rely on shielded fixtures, controlled beam direction, and reduced upward glare. Use the dark-sky compliance guide when choosing fixtures that light the path without wasting light into the sky.
Senior-safe fixtures should use deep shrouds, hooded caps, louvered faces, frosted lenses, or full cut-off optics that aim light downward. Portfolio-style mission path lights, top-shroud path lights, and downward-facing step lights are usually better candidates than clear-lens lanterns or exposed bullet lights aimed toward the walking line.
Shielding also helps prevent glare from spilling into neighboring windows or across property lines. The fix light trespass guide explains how to aim and shield outdoor fixtures so they improve safety without creating nuisance glare.
If you are comparing fixture families, use the Portfolio lighting compatibility guide, parts and accessories guide, and model number lookup to identify hooded, shrouded, or downward-facing options.
High-Contrast Spacing Logic: Why Seniors Need Pools of Light
Many landscape guides recommend overlapping beams until the path looks uniformly bright. For senior safety, that can backfire. Uniform flat lighting can wash out texture, erase step shadows, and make the path look like one smooth plane.
A safer approach is the pool-of-light strategy: place warm, shielded fixtures every 6 to 8 feet so each pool becomes a visual anchor for foot placement. The goal is not harsh alternating stripes. The goal is enough separation that the eyes can read texture, edges, and distance.
For more placement examples, use the path light placement guide to compare fixture distance, edge setback, beam direction, and spacing before finalizing a senior-safe walking route.
If you are adjusting the 6-to-8-foot senior safety pattern for a wider walkway, curved path, or long driveway approach, the landscape lighting spacing guide can help you avoid both dark gaps and overlit glare zones.
Luminance Contrast Ratios: The Measurable Standard Behind Senior-Safe Path Lighting
The “pool of light” strategy works because it creates usable luminance contrast. Luminance contrast is the measurable difference between a walking surface, its edge, and the object beside it. For senior safety, this matters more than simply adding more lumens.
A sidewalk can be technically bright and still unsafe if the step edge, curb, leaf pile, hose, or change in surface texture blends into the background. The safer goal is to make the walking edge visibly different from the surrounding ground without exposing the eye to glare.
| Walking Condition | Low-Contrast Problem | Senior-Safe Lighting Goal | Best Fixture Strategy |
|---|---|---|---|
| Concrete path beside grass | Gray edge disappears in flat lighting | Make the path edge brighter than the surrounding grass without glare | Shielded path lights aimed across the walking surface |
| Step down from porch or patio | Tread and riser blend together | Create a visible shadow line at the edge | Side-mounted or downward step lighting |
| Wet sidewalk or pavers | Surface reflects the bulb hot spot | Preserve edge contrast without mirror glare | Frosted, louvered, or deep-shielded fixtures |
| Mulch, leaves, or dark landscape beds | Trip hazards disappear into dark background | Reveal texture and objects near the walking route | Low-angle light with controlled spill |
Professional senior-living lighting guidance, including ANSI/IES RP-28, focuses on the visual environment for older adults and low-vision users, not just fixture brightness. That is why this page treats contrast, glare control, and transition zones as safety requirements rather than decoration. :contentReference[oaicite:0]{index=0}
Visual Anchor Pattern: Pool of Light vs. Flat Floodlighting
A senior-safe path should not be blasted with one flat wash of light. The walking surface needs enough contrast for the eye to read texture, direction, step edges, cracks, wet spots, leaves, and elevation changes.
Technical Specs Table: Standard Landscape Lighting vs Senior Safety Lighting
| Specification | Standard Landscape Lighting | Senior Safety Standard | Why It Matters |
|---|---|---|---|
| Color Temperature | 3000K to 5000K | 2700K fixed or warm 2700K to 3000K | Warmer light reduces harsh blue-white scatter and visual discomfort. |
| Lumens | 100 to 300+ per fixture | 50 to 150 focused lumens | Controlled light is safer than raw brightness. |
| Beam Spread | Wide flood or decorative glow | Narrow, downward, shielded output | Downward light reveals ground without shining into the eye. |
| CRI | 70+ | 90+ preferred | Higher color rendering helps seniors distinguish edges, leaves, mulch, stone and step transitions. |
| Fixture Height | 18 to 24 inches | 12 to 15 inches where layout allows | Lower placement brings light closer to the walking surface and reduces eye-level glare. |
| Spacing | Continuous overlapping beams | 6 to 8 foot visual anchor pools | Soft contrast helps define walking rhythm and step placement. |
| Control | Timer or manual switch | Dusk-to-dawn photocell plus reliable transformer | Senior-safe paths should respond to darkness, not just clock time. |
Color quality also matters for safety. The CRI 95 vs CRI 80 lighting guide explains why higher color rendering helps people distinguish grass, mulch, concrete, leaves, and step edges more clearly.
Transition Zone Management: The Bright-Room-to-Dark-Path Problem
The transition zone is the area where a person moves from a bright interior space to a darker porch, step, garage apron, patio, driveway, or walkway. For seniors, this zone is often the most dangerous part of the route because the eyes need more time to adjust after leaving a bright room.
Older adults commonly have more difficulty seeing under low illumination and at night, and research on dark adaptation shows that older eyes recover light sensitivity more slowly after exposure to bright light. That means a path can be “lit” but still unsafe during the first moments after someone steps outside. :contentReference[oaicite:1]{index=1}
For homes using smart controls or timed scenes, the circadian outdoor lighting guide explains how warmer evening light can support comfort while still keeping walking routes visible and usable.
Practical Threshold Lighting Targets
Exact illuminance targets depend on the site, fixture optics, surface colors, and local code, but the design goal is a gradual visual step-down rather than an abrupt bright-to-dark jump. For aging-in-place paths, I would rather see several gentle layers of light than one bright porch fixture and a dark sidewalk.
| Zone | Practical Target | Best Fixture Types | Design Purpose |
|---|---|---|---|
| Interior doorway / garage threshold | Soft transition light; avoid direct glare at eye level | Shielded wall sconce, warm ceiling fixture, indirect entry light | Prevents the eye from jumping from bright interior light to darkness. |
| Exterior landing or porch slab | Moderate, even light with no exposed bulb | Full-cutoff wall light, recessed soffit light, shielded porch fixture | Lets the person identify the landing, door swing, mat, and first step. |
| First step or elevation change | Higher contrast at the edge, not higher glare | Side-mounted step light, under-rail light, low-glare riser light | Creates a visible shadow line so the tread and riser do not blend together. |
| First 10–15 feet of path | Warm visual anchor pools every 6–8 feet | Shielded path lights, low bollards, louvered fixtures | Gives the eye time to adapt while maintaining walking rhythm. |
Why One Bright Porch Light Is Not Enough
A single bright porch light can make the doorway look safe while making the path beyond it harder to read. When the fixture is too bright or unshielded, the senior’s eye adapts to the bright source instead of the ground. The result is a visible doorway but a poorly defined first step, walkway edge, or driveway transition.
A better aging-in-place layout uses a sequence: soft threshold light, low-glare landing light, clear step-edge light, then warm path-light anchors. This sequence gives the eyes time to adjust while still showing where the feet should go next.
The CDC notes that vision impairment increases fall risk in older adults, and home safety changes are part of fall prevention. For outdoor lighting, that means the path needs more than brightness — it needs visible edges, low glare, and a transition route that older eyes can process safely. :contentReference[oaicite:2]{index=2}
Mechanical Hardware Recommendations for Senior-Safe Reliability
Photocell Over Timer
Timers are convenient, but they do not account for storms, early dusk, seasonal sunset changes, or heavy cloud cover. For senior safety, dusk-to-dawn photocell control is usually safer because the lights respond to actual darkness. If you use a transformer timer, combine it with a photocell or check the seasonal schedule often.
Battery Backup and Transformer Reliability
A senior safety path should not go dark because a weak connector trips a transformer or a timer loses programming. Use correctly sized power packs, check transformer wattage, and avoid overloading the system. Start with the transformer wattage guide, transformer troubleshooting guide, and outdoor transformer mounting code requirements.
For higher-reliability systems, the AI predictive maintenance guide explains how smart monitoring can help catch weak transformers, unstable loads, and failing outdoor lighting zones before the path goes dark.
Non-Slip Fixture Placement
A path light can become a trip hazard if the stake sits too close to the walking edge. As a practical rule, keep stakes about 6 inches off the path edge when space allows, angle the light toward the walking surface, and avoid placing fixtures where walkers, canes, wheelchairs, or garden hoses will catch them.
Waterproof Connectors
Sudden darkness during rain is a serious safety failure. Use gel-filled connectors, proper low-voltage splices, and clean transformer terminals. For connector reliability, use the low-voltage wire connectors guide, limited-energy connector guide, and outdoor GFCI requirements guide.
Step and Edge Lighting: Side Light Creates Safer Shadows
Steps should not be blasted from straight ahead with a bright floodlight. That flattens the riser and tread into one surface. Safer step lighting uses side-mounted or downward shielded light that creates a small shadow line on each riser so the edge is visible.
For seniors, shadow is not always the enemy. Controlled shadow is how the eye detects depth. The danger is uncontrolled darkness, glare, or a bright fixture that washes out the contrast between the step and the landing.
For deeper stair-specific layout help, see the outdoor stair lighting guide. Step lighting is especially important for seniors because the riser edge needs visible contrast without a bright fixture shining directly into the eyes.
The Senior Safe Path Visual Anchor Checklist
- [ ] Is the hot spot of the bulb or LED invisible from standing eye level?
- [ ] Are path lights warm white, preferably 2700K to 3000K?
- [ ] Are fixtures spaced to create visual anchors about every 6 to 8 feet?
- [ ] Are steps illuminated from the side or above to define the edge?
- [ ] Is the garage-to-walkway or porch-to-path transition lit without glare?
- [ ] Are stakes placed far enough from the path edge to avoid becoming trip hazards?
- [ ] Are connectors waterproofed with gel-filled or direct-burial rated connections?
- [ ] Has voltage drop been checked so far-end lights do not flicker or dim?
- [ ] Does the system use dusk-responsive control rather than only a fixed timer?
- [ ] Can the transformer, GFCI, photocell and connectors be serviced easily?
After the senior-safe layout is installed, use the landscape lighting maintenance guide to keep lenses clean, connectors dry, stakes upright, and path lights working reliably through rain, mulch movement, and seasonal changes.
Senior Safety Lighting FAQ
What is the best light color for seniors with cataracts?
Warm white light around 2700K to 3000K is usually best for outdoor walking paths because it avoids the harsh blue-white glare that can scatter inside cataract-clouded or aging lenses.
How many lumens do seniors need for walking?
For path lights, seniors usually need controlled light more than high lumens. A shielded 50 to 150 lumen fixture placed correctly is often safer than a bright unshielded 300 lumen fixture.
Are daylight 5000K bulbs good for senior outdoor safety?
Usually no. Daylight lamps can feel crisp to younger eyes, but they can create glare and scatter for seniors, especially when the LED chip or bulb is visible.
How far apart should senior path lights be?
A practical spacing pattern is 6 to 8 feet between shielded fixtures. This creates walking anchors while preserving enough shadow and contrast to reveal texture and edges.
Should senior path lights use a timer or photocell?
A photocell or dusk-responsive control is usually safer because it reacts to actual darkness. A fixed timer may miss storm-darkened afternoons or seasonal sunset shifts.
Why does CRI matter for senior outdoor lighting?
CRI matters because seniors need to distinguish subtle surface changes at night. A high CRI light, preferably 90 or higher, helps colors look more natural so grass, concrete, mulch, leaves, step edges, and trip hazards are easier to tell apart.
Technical References for Senior Lighting Design
This guide is based on practical outdoor lighting design principles and supported by professional lighting and public-health references related to aging vision, low vision, glare recovery, contrast sensitivity, and fall prevention.
- ANSI/IES RP-28: Recommended Practice for lighting and the visual environment for older adults and visually impaired users. This is the professional lighting reference behind the emphasis on glare control, visual comfort, contrast, and age-aware lighting design. :contentReference[oaicite:3]{index=3}
- NIH / PubMed dark adaptation research: Older adults can have serious difficulty seeing under low illumination and at night, and dark adaptation slows with age. This supports the transition-zone design approach. :contentReference[oaicite:4]{index=4}
- CDC fall-prevention guidance: Vision impairment is associated with increased fall risk in older adults, which makes safe home and walking-route design important for fall prevention. :contentReference[oaicite:5]{index=5}
Safety and Medical Disclaimer
This guide is for lighting design and homeowner education. It is not medical advice and does not replace a fall-risk assessment from a medical professional or occupational therapist. For electrical installation, damaged wiring, GFCI problems, buried cable faults, or transformer replacement, consult a qualified electrician.
Recommended Lighting Resources: