
Quick Answer: What Should You Check Before Turning Portfolio Lights Back On in Spring?
Before using Portfolio lights for Easter or spring outdoor gatherings, check for winter moisture damage, loose stakes, ground-heaved cable, cloudy lenses, corroded connectors, transformer overload, and photocell shading from new plant growth. Then test pastel RGBW scenes at night because spring colors can change dramatically depending on whether they hit grass, mulch, siding, brick, fences, or wet surfaces.
- Inspect connectors and terminal blocks for green or white corrosion.
- Clean plastic lenses gently with distilled water and microfiber cloth.
- Check for cable lifted by frost heave, mulch movement, or spring edging work.
- Trim shrubs at least 12 inches away from photocells and sensors.
- Aim pastel light at light-colored surfaces when possible for cleaner Easter color.
Most Easter lighting articles talk about decorations. I treat Easter and spring lighting as a maintenance season. This is when outdoor lighting wakes up after cold weather, wet soil, corrosion, and shifting ground. If a Portfolio system is going to fail, spring is one of the most common times you will notice it.
This page combines the decorative side—soft RGBW pastel color mixing—with the real-world repair side: winter damage recovery, moisture diagnosis, timer recalibration, and low-voltage inspection. That is the difference between a cute lighting idea and a reliable spring-ready system.
For broader seasonal upkeep, my landscape lighting maintenance guide supports this page with the general cleaning, inspection, and repair habits that keep outdoor systems working through changing weather.
The Pastel Spectrum RGBW Table for Easter Outdoor Lighting
Cheap RGB scenes often look icy, neon, or muddy outdoors because RGB alone creates saturated color. Easter lighting needs pastel color, which means you intentionally dilute the RGB channels with the dedicated white channel. If your fixture has RGBW, the W channel is the secret.
| Scene Color | Visual Target | RGBW Starting Point | Best Outdoor Use | Specialist Tip |
|---|---|---|---|---|
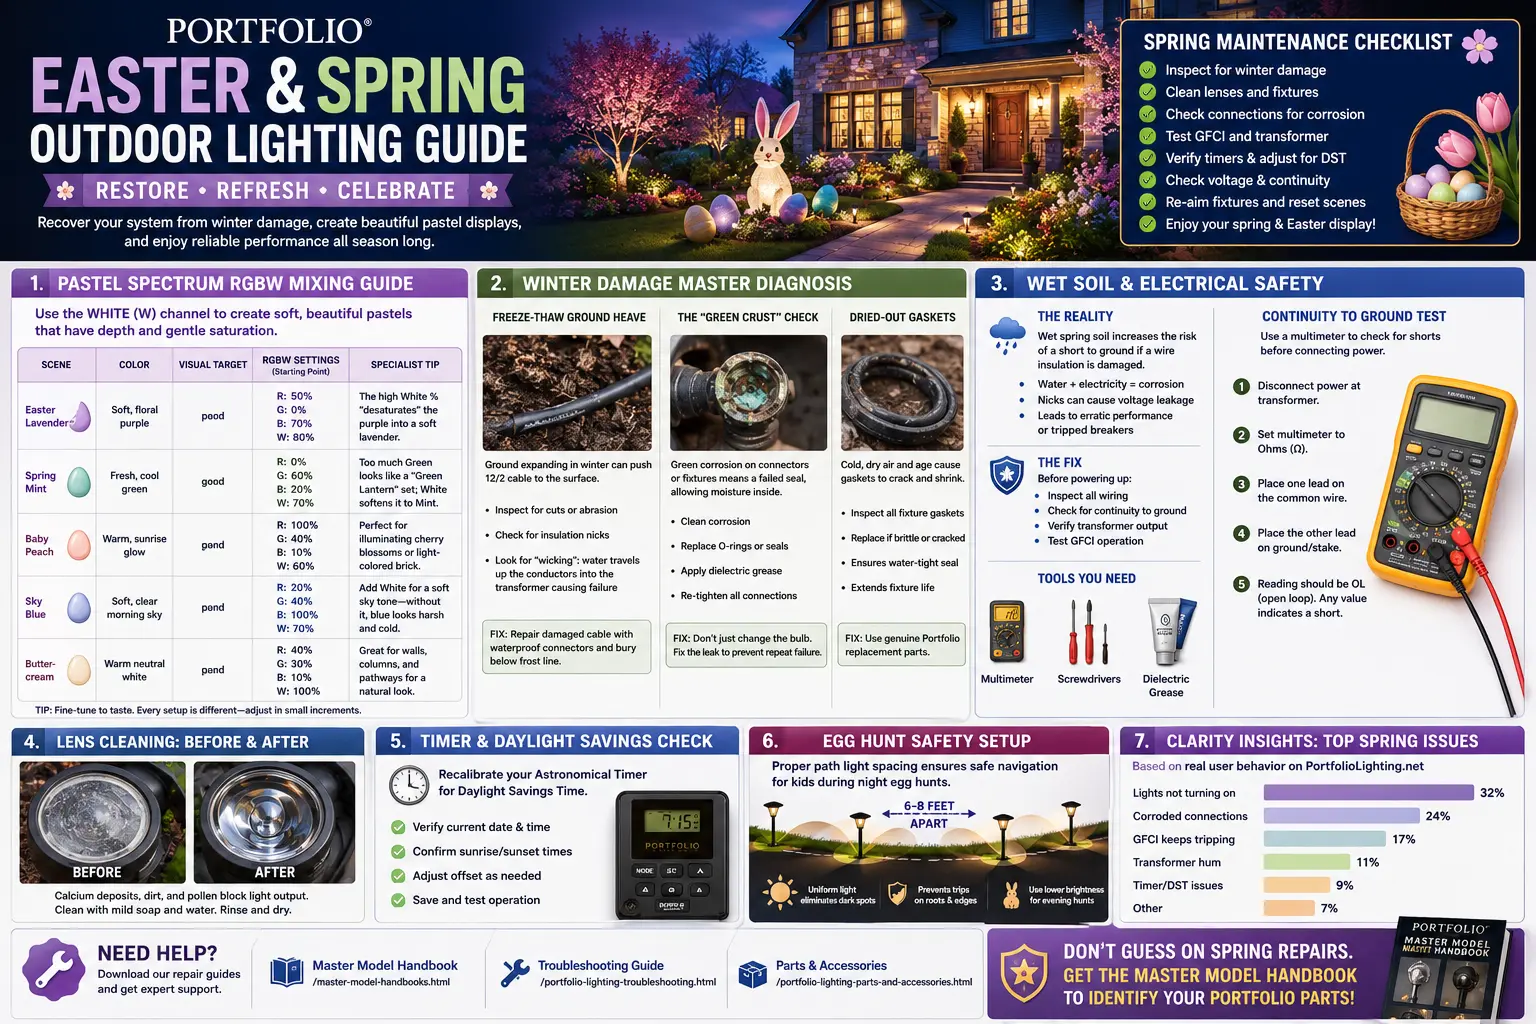
| Easter Lavender | Soft floral purple | R: 50%, G: 0%, B: 70%, W: 80% | Flower beds, porch columns, white siding, light stone | The high white percentage desaturates the purple so it feels floral instead of nightclub violet. |
| Spring Mint | Fresh cool green | R: 0%, G: 60%, B: 20%, W: 70% | Foundation shrubs, garden borders, low path accents | Too much green looks harsh. White turns it into a softer mint that works better near plants. |
| Baby Peach | Warm sunrise glow | R: 100%, G: 40%, B: 10%, W: 60% | Brick, cherry blossoms, entryways, porch seating | Peach is one of the best spring colors for homes with warm brick or tan stone. |
| Soft Pink | Light rose tint | R: 100%, G: 10%, B: 35%, W: 75% | Door wreaths, front steps, flower containers | Keep blue low. Too much blue shifts pink into magenta and makes the display look colder. |
| Warm Bunny White | Creamy white, not icy | R: 15%, G: 10%, B: 0%, W: 100% | Path lights, egg hunt zones, seating areas | Use true white as the base and add a little red/green warmth if the white channel looks too cold. |
Why Pastel Easter Lights Look Different on Grass, Mulch, Brick, and Siding
Pastel lighting is sensitive to the surface it hits. A color that looks perfect in the app can look dull outside because grass, mulch, brick, and wet stone absorb and reflect light differently.
| Pastel Color | Best Surface | Weak Surface | Field Fix |
|---|---|---|---|
| Mint Green | Green grass, shrubs, white siding | Dark mulch or brown beds | Use mint on living plants or light surfaces, not dark ground cover. |
| Lavender | White fence, light stone, pale siding | Brown mulch, red brick, wet soil | Aim lavender at the house, fence, or light hardscape for a cleaner pastel look. |
| Soft Pink | White trim, porch columns, light concrete | Orange brick or yellow-toned stone | Reduce red slightly and add white if the scene looks too saturated. |
| Pastel Blue | White siding, gray stone, silver fixtures | Dark mulch or warm brick | Use deeper blue on the ground and softer blue on house surfaces. |
Why Easter Pastel Lights Look Wrong Outdoors
Pastels are harder outdoors than they look. The same color that appears soft on a phone app can look gray, blue, or washed out on wet mulch, dark shrubs, brown brick, or cloudy lenses. The surface being illuminated changes the final result.
The three most common pastel failures
- Icy white: the fixture is using RGB-mixed white instead of a true white channel.
- Neon lavender: blue is too high and the white channel is too low.
- Dead-looking mint: the lens is dirty, the shrub is too dark, or voltage drop is lowering output.
If your LED colors flicker, shift, or fade across the run, review Portfolio LED lights flickering and landscape lighting voltage drop before assuming the app settings are wrong.
The Winter Damage Master Diagnosis
Winter does not damage every landscape lighting system the same way. The biggest spring failures usually come from movement, moisture, and connections. The system may have worked in December, but by Easter the ground has shifted, connectors have been soaked, and fixtures may have been pushed out of aim.
Freeze-thaw ground heave
When the soil freezes and expands, it can lift cable closer to the surface. If you see 12/2 low-voltage cable exposed near a path light, do not simply rebury it. First, check the insulation for shovel nicks, animal chew marks, flattened sections, and cracks. A tiny nick can allow water to wick inside the cable jacket and travel toward a connector, fixture lead, or transformer terminal.
For cable depth, wire choice, and run planning, use the landscape lighting cable guide and landscape lighting wire gauge guide.
The Green Crust Connector Check
Green corrosion on a Portfolio stake, connector, socket, or wire splice is not just cosmetic. It usually means moisture reached copper or brass. In spring, that moisture path can become an intermittent fault: the light works when dry, flickers when damp, and trips the GFCI after rain.
What green corrosion tells you
- Failed seal: the connector is no longer keeping water out.
- High resistance: corrosion increases resistance and can create heat.
- Voltage drop: weak connections can make one fixture or zone look dim.
- Future failure: the light may still work today but fail during the next wet week.
Replace cheap, open, or corroded splices with weather-rated connectors. The low-voltage wire connectors guide explains the connection styles that hold up better outdoors.
Lens Cleaning and Gasket Inspection: The Hidden Spring Brightness Fix
A dirty lens can make a good light look like a weak light. After winter, landscape fixtures often carry calcium deposits, dried sprinkler residue, mud splash, pollen, algae film, and mineral haze. That blocks output and changes the color of pastel scenes.
Lens Cleaning Test
Clean one fixture lens fully and compare it to the next fixture on the same run. If the cleaned fixture looks brighter or warmer, you have an optical maintenance problem, not only an electrical problem.
Gasket and O-Ring Check
Look for dried, flattened, cracked, or missing seals. A bad gasket lets moisture reach the socket, LED module, or driver cavity.
If the fixture has a damaged lens, globe, cover, or diffuser, compare replacement options in Portfolio replacement lenses, replacement globes and covers, and replacement diffusers.
The Wet-Soil Voltage Drop and Short-to-Ground Reality
Spring soil stays wet longer, and wet soil exposes weak parts of a low-voltage system. A nicked cable may not trip anything in dry weather, but when the ground is saturated, water can create a path that causes flicker, dimming, transformer shutdown, or GFCI trips.
How to screen for continuity to ground
- Turn off the transformer and unplug it if safe to do so.
- Disconnect the lighting run from the transformer output terminals.
- Set a multimeter to continuity or resistance mode.
- Test each conductor against any grounded metal or grounding reference available at the equipment area.
- Unexpected continuity can indicate damaged insulation, wet splices, or a fault path.
For deeper electrical symptoms, use Portfolio transformer tripping breaker, Portfolio landscape lights short circuit, and Portfolio lights not working after rain.
Most Common Spring Lighting Failures
A strong spring lighting guide should focus on the problems people actually run into after winter. These are the kinds of issues I would expect to see after heavy rain, freezing temperatures, daylight savings changes, and the first backyard gathering or Easter weekend of the season.
| Spring Visitor Problem | Likely Real Cause | First Fix | Supporting Guide |
|---|---|---|---|
| Lights worked last fall but not now | Transformer setting, GFCI trip, corroded connector, damaged cable | Test manual mode and transformer output | Portfolio landscape lights not working |
| Lights turn on then shut off | Overload, short, moisture fault, thermal shutdown | Disconnect zones and test one run at a time | Why landscape lights turn on then off |
| Timer is off by one hour | Daylight savings reset not performed | Reset current time and schedule | Landscape lighting timer settings |
| Pastel lights look uneven | Dirty lenses, voltage drop, mixed fixture types, weak white channel | Clean lenses and check voltage at far fixtures | Voltage drop calculator |
| Photocell turns lights on too late | Dirty sensor, new shade pattern, wrong placement | Clean and test photocell behavior | Portfolio replacement photocell |
The Spring Photocell Problem: New Leaves Can Fool the Sensor
A photocell that worked perfectly in winter can start acting wrong in May because the landscape changed around it. New leaves, blooming shrubs, taller perennials, mulch piles, or patio furniture can shade the sensor and make the transformer think it is darker than it really is.
If your Portfolio lights start turning on around 4:00 PM in spring, do not replace the transformer first. Check whether the photocell is shaded, dirty, blocked, or facing a darker area than it did during winter.
The Easter Egg Hunt Safety Layout: 100% Ground Coverage
If kids are walking through a yard at dusk for an egg hunt, the lighting goal changes. You are no longer just highlighting shrubs or the house. You need ground visibility so people can see roots, stones, edging, sprinkler heads, and low branches.
Practical spacing logic
- Path lights: overlap beam edges slightly so there are no black gaps on walkways.
- Fixture height: use low glare and shielded output so the light hits the ground, not children’s eyes.
- Tree zones: use uplights for atmosphere but do not rely on uplights for walking safety.
- Step zones: steps need dedicated lighting because pastel yard lights do not reliably reveal stair edges.
- Egg zones: keep the brightest coverage near uneven ground, garden beds, and transitions from patio to lawn.
For more layout help, use path light placement, landscape lighting spacing, and outdoor stair lighting.
Easter Egg Hunt Lighting Spacing: Safety vs Mood
Easter lighting needs different spacing than normal landscape mood lighting. Children are looking down, moving quickly, and crossing grass, beds, walkways, and porch edges, so visibility matters more than a dramatic shadow pattern.
| Area | Recommended Fixture Spacing | Best Light Style | Why It Works |
|---|---|---|---|
| Walkways and steps | Every 6–8 feet | Warm white or soft pastel white | Improves foot visibility and reduces trip risk. |
| Open lawn egg hunt area | Every 10–12 feet | Soft wide beam or low-glare path light | Creates enough visibility without overlighting the yard. |
| Garden beds and shrubs | Accent only | Mint, soft pink, or lavender uplight | Adds spring color without confusing the main walking path. |
| Porch and entry | Continuous usable light | Warm white | Keeps faces, steps, baskets, and door hardware visible. |
How to Recalibrate Your Astronomical Timer for Daylight Savings
Spring timer problems often look like equipment failure, but the control is simply running the wrong schedule. After daylight savings and longer evenings, a timer that was perfect in December may turn lights on too early, too late, or not at all if the program was overwritten during a power outage.
- Test manual mode: prove the transformer and lights work before adjusting the timer.
- Set current time: correct the hour after daylight savings.
- Check AM/PM: many outdoor timers fail because noon and midnight are reversed.
- Adjust dusk offset: move spring on-time later as sunset shifts.
- Set event mode: for Easter gatherings, use a fixed off-time so lights do not run all night.
- Clean photocell: pollen and dirt can block sensor accuracy.
If your timer still behaves incorrectly, compare symptoms with Portfolio light timer not working, landscape lighting timer not working, and Portfolio low-voltage lighting timer guide.
Spring Lighting Maintenance Checklist Before the First Outdoor Party
- Transformer powers on in manual mode: prove the system works before adjusting the schedule.
- GFCI does not trip: repeated spring trips usually mean moisture, damaged cable, or a ground fault path.
- Exposed wire inspected: do not rebury freeze-thaw cable until you check for nicks.
- Connectors opened and inspected: green corrosion means the seal failed or moisture reached metal.
- Lenses cleaned: remove calcium, pollen, algae, and mud film before judging brightness.
- Gaskets checked: replace cracked, dried, or flattened O-rings before spring storms.
- Far-end voltage tested: pastel scenes need stable voltage to stay consistent across the run.
- Timer reset: update daylight savings, dusk offset, and off-time.
- Path coverage checked: verify walkways, steps, and egg hunt areas have no dark gaps.
- Parts identified before buying: use model numbers before replacing fixtures, lenses, connectors, or transformers.
Your Spring Repair Action Plan: Identify the Part Before the Storm
Don't guess on spring repairs. Get the Portfolio Lighting Master Model & Replacement Handbook to identify your Portfolio parts before the first spring storm. Spring is when small winter damage turns into visible failures, and guessing at replacement parts can waste time right before Easter gatherings, graduation parties, and early summer cookouts.
If you need a broader parts starting point, use Portfolio lighting parts and accessories, Portfolio lighting replacement parts, and Portfolio model number lookup.
Print the Spring Lighting Checklist Before You Start
Spring repairs are easier when you do not have to keep scrolling while you are outside at the transformer, fixtures, and connectors. Print this checklist or save the page on your phone before checking lenses, stakes, wires, photocells, and pastel scene settings.
Spring Outdoor Lighting Support Resources
Transformer Spring Check
Use transformer troubleshooting when the system buzzes, shuts down, runs hot, or has no output after winter.
Open transformer guideRain and Moisture Failures
Diagnose spring moisture problems, wet connectors, failed seals, and fixtures that fail after storms.
Open rain failure guideVoltage Drop Planning
Use voltage-drop logic when pastel lights look dimmer at the end of a long run.
Open calculatorSmart Spring Scenes
Use smart hubs and automation only after the transformer, wire, and connectors are stable.
Open smart hub guidePortfolio Easter and Spring Outdoor Lighting FAQ
Why do my Portfolio landscape lights trip the GFCI in the spring?
Spring GFCI trips are usually moisture related. Check wet connectors, nicked cable insulation, water inside fixture leads, failed gaskets, and short-to-ground paths before replacing the transformer.
What RGBW settings make Easter outdoor lights look pastel?
Use more white channel than most people expect. Start lavender around R 50%, G 0%, B 70%, W 80%; mint around R 0%, G 60%, B 20%, W 70%; and peach around R 100%, G 40%, B 10%, W 60%.
Should I rebury exposed low-voltage wire after winter?
Inspect it first. Freeze-thaw ground heave can lift cable to the surface, but edging tools, animals, or foot traffic may have damaged the insulation. Repair damage before reburying.
Why do my pastel lights look dull after winter?
Dirty lenses, calcium deposits, wet diffusers, voltage drop, weak white channels, and corroded connectors can all make pastel scenes look weak or gray.
How do I reset a Portfolio outdoor lighting timer for spring?
Confirm manual mode works, set the current time, correct daylight savings, update the dusk offset or on-time, set the off-time, clean the photocell if used, and test the full cycle before the event.
Electrical and Safety Disclaimer
This guide is educational and intended for low-voltage landscape lighting maintenance awareness. Always turn off power before inspecting wiring, connectors, fixtures, timers, or transformer terminals. Do not work on energized equipment. If a breaker or GFCI repeatedly trips, if you find melted components, or if you are unsure how to test safely, consult a licensed electrician.
Recommended for You: