
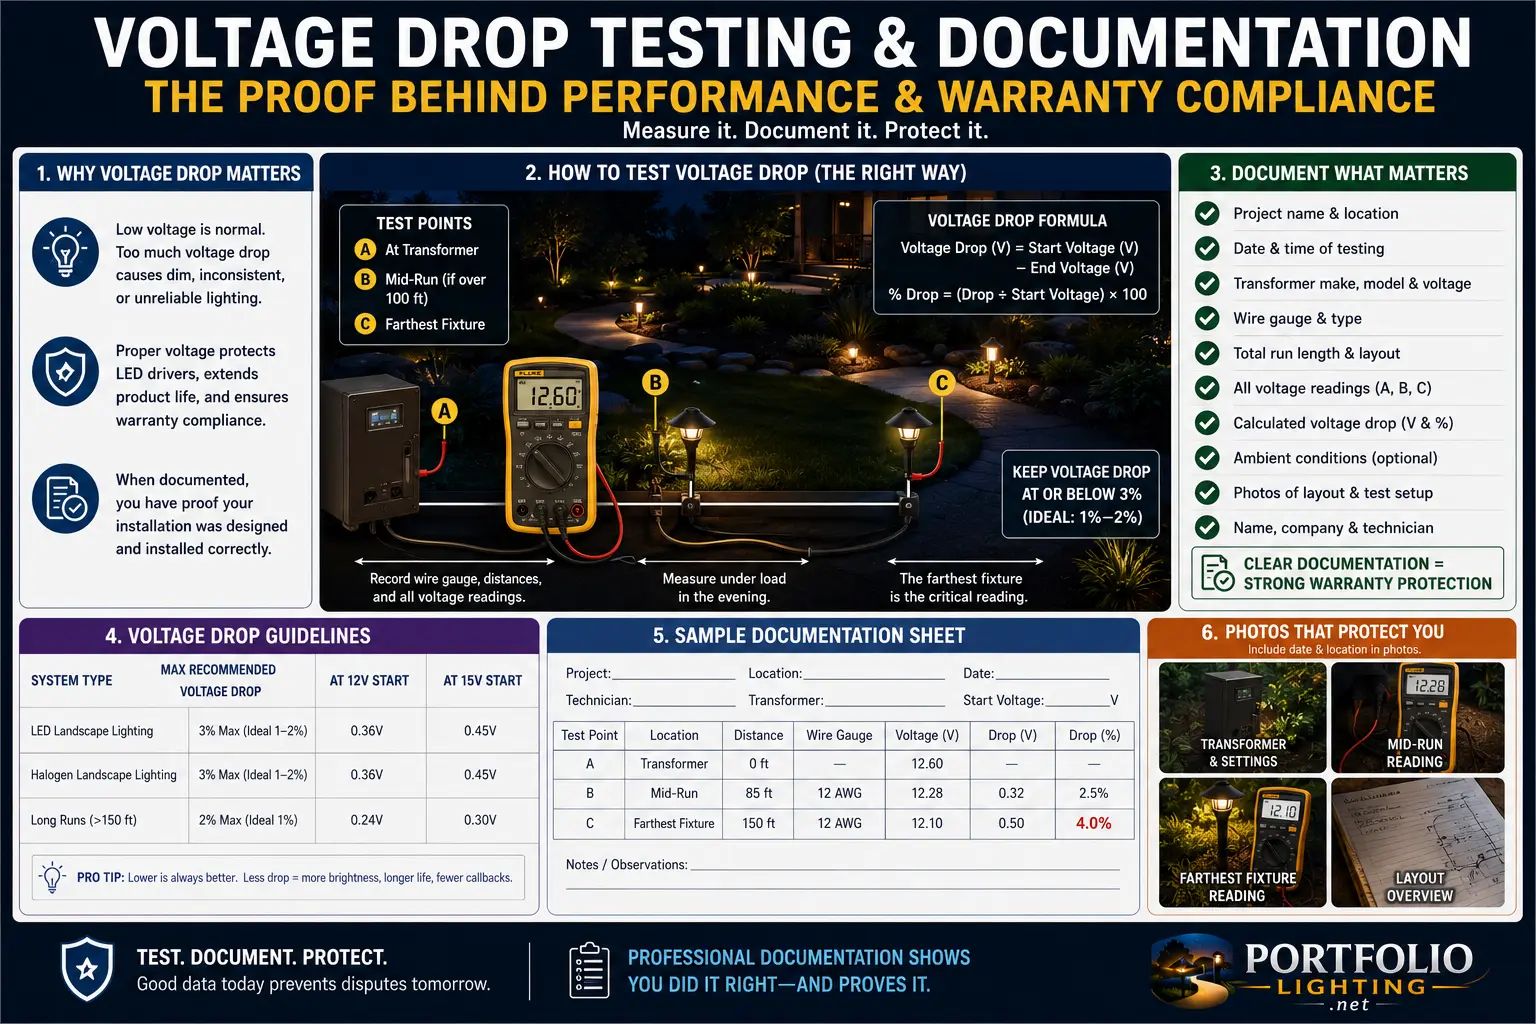
Quick Answer: What Warranty-Ready Voltage Drop Documentation Must Prove
Voltage drop documentation for warranty compliance must prove where power was good, where power was lost, and whether the failed product was operating inside a reasonable electrical environment. A single voltage reading at the transformer is not enough. You need readings under load at the transformer, first fixture, middle fixture, farthest fixture and suspect fixture, plus photos that show exactly where and how the meter readings were taken.
The strongest warranty file answers four questions before the manufacturer, retailer or contractor asks them: Was the transformer output correct? Was the wire run overloaded or too long? Was the fixture receiving acceptable voltage under real load? Did the failure follow the fixture when swapped to a known-good location, or did it stay with the cable run?
Logic Summary: Warranty Claims Fail When the Electrical Story Has Gaps
Most failed outdoor lighting warranty claims do not fail because the homeowner is wrong. They fail because the evidence is incomplete. A fixture may genuinely be defective, but if the documentation does not show voltage at the fixture, load on the transformer, wiring condition, and whether moisture or corrosion was present, the claim can be challenged as installation-related.
Voltage drop documentation turns a vague complaint into a testable electrical story. The story should read like this: power left the transformer at a measured value, traveled through a known wire route, reached each fixture at measured values, the suspect fixture behaved differently from the others, and the problem either followed the fixture or stayed with the run during a controlled swap test.
The most useful distinction is product failure versus system failure. Product failure means the fixture, driver, LED engine, socket or transformer fails even when supplied correctly. System failure means the product is reacting to under-voltage, overload, corrosion, water intrusion, wrong transformer sizing, bad connectors or excessive cable distance. Warranty documentation must separate those two before parts are blamed.
Jump to Section
The Warranty Documentation Map: Source, Path, Load, Failure
A strong voltage drop report is built around four zones. The source is the transformer, driver or power supply. The path is the wire, connectors, splices, cable distance and burial route. The load is the number of fixtures, total wattage and lamp/LED type. The failure is the specific fixture, zone, socket, driver or transformer symptom being claimed.
If you only document the failure, the claim is weak. If you document source, path and load, the failure becomes meaningful. A manufacturer can see that the fixture was not starved by a bad cable run. A contractor can see whether a splice issue is responsible. A homeowner can avoid replacing the wrong part.
For background calculations, pair this guide with the landscape lighting voltage drop guide, landscape lighting voltage drop calculator, landscape lighting transformer size calculator and Portfolio transformer wattage guide.
The Correct Voltage Test Sequence for Warranty Evidence
The order matters because each reading explains the next reading. Take every reading with the system in the same state unless you are intentionally comparing no-load to under-load results.
- Record transformer label: model, wattage, output voltage taps and manufacturer information.
- Record no-load transformer output: useful as a baseline, but not enough for a warranty claim.
- Record transformer output under load: system on, all normal fixtures connected.
- Record first fixture voltage: confirms power leaving the source reaches the first branch correctly.
- Record middle fixture voltage: shows slope of voltage drop across the run.
- Record farthest fixture voltage: proves whether the end of run is still within usable range.
- Record suspect fixture voltage: the most important number for a product warranty question.
- Perform a controlled swap test: move suspect fixture to known-good voltage or move known-good fixture to suspect location.
- Retest after repair: show that connector, transformer or wiring correction changed the reading.
Claim-Ready Voltage Drop Report Table
| Report Field | What to Record | Why It Matters | Photo Needed? |
|---|---|---|---|
| Transformer label | Model, wattage, voltage taps, input/output rating | Shows whether the power source is appropriate | Yes |
| System load | Number of fixtures, bulb/LED watts, total estimated watts | Shows whether transformer was overloaded | Optional but helpful |
| Wire gauge | 12/2, 14/2, 16/2 or visible cable marking | Explains voltage drop behavior over distance | Yes if visible |
| Run length | Estimated or measured distance to suspect fixture | Helps separate product failure from distance-related voltage loss | No |
| Under-load voltage | Transformer, first, middle, farthest and suspect fixture readings | Core warranty proof | Yes |
| Connector condition | Clean, wet, corroded, green dust, heat damage, loose pierce point | Corrosion can defeat a warranty claim if ignored | Yes |
| Swap test result | Failure followed fixture or stayed with wiring location | Best evidence for product vs system failure | Yes |
Photos That Actually Help a Warranty Claim
Warranty photos should not be pretty. They should be evidentiary. A photo of a dark fixture is less useful than a photo showing a meter probe at the fixture terminals while the rest of the system is energized. A photo of a transformer on the wall is less useful than a close-up of the transformer label, output tap and connected cable run.
Take photos in sets. First show the wide location so the reviewer understands where the reading was taken. Then show the close-up meter reading. Then show the connector or fixture label. Then show any defect: water, corrosion, cracked lens, burned socket, damaged cable, loose splice or green dust. This sequence creates a visual chain from system layout to failure evidence.
If moisture or corrosion is present, use how to fix green dust in lighting connectors, Portfolio corroded socket cleaning and repair, and Portfolio foggy lens condensation fix to document whether the failure may be environmental rather than purely electrical.
Voltage drop documentation is strongest when it is connected to a full installation review rather than stored as isolated meter readings. A warranty reviewer, contractor, or homeowner needs to know not only what voltage reached the fixture, but also whether the transformer was listed, the wire was properly routed, the connectors were rated for the environment, and the fixture was installed in the correct location. Add the NEC low-voltage lighting inspection checklist to the same project file so your voltage readings are supported by photos, equipment labels, connector checks, burial notes, and final operating results.
The Fixture Swap Test: The Strongest Proof in a Disputed Claim
The fixture swap test is simple but powerful. It answers whether the defect follows the product or stays with the installation location. If a fixture fails at location A, move it to location B where voltage is documented as good. Then move a known-good fixture from location B to location A. If the problem follows the suspect fixture, the product is more likely defective. If the problem stays at location A, the wiring, connector or voltage environment is the likely cause.
Document both positions with photos. Record voltage before the swap and after the swap. Note whether the fixture flickers, dims, fails to start, changes color, overheats or shuts down. If an integrated LED fixture is involved, compare this method with Portfolio integrated LED bypass testing and Portfolio LED lights flickering.
Why Under-Load Testing Matters More Than No-Load Voltage
No-load voltage can be misleading because a weak connection may show acceptable voltage when nothing is drawing current. The moment fixtures turn on, resistance in a connector, undersized wire, long run or overloaded transformer causes voltage to sag. That under-load behavior is what the fixture actually experiences.
Think of no-load testing as checking whether the pipe exists. Under-load testing checks whether water flows through it. A corroded pierce connector may pass enough voltage for a meter to read normally with no load, but fail when an LED driver starts drawing current. That is why warranty documentation should include both transformer output and fixture voltage with the system operating normally.
For failure-point logic, use low-voltage landscape lighting failure points, landscape lighting connectors, and low-voltage wire connectors for landscape lighting.
Contractor Documentation Format: What a Strong Report Should Say
A professional report should be short enough to read but detailed enough to defend. It should avoid vague phrases like “voltage seemed fine” or “fixture probably bad.” Instead, it should use repeatable observations: measured voltage, fixture count, transformer rating, wire gauge, run distance, connector condition and swap-test result.
This type of documentation is valuable because it gives a manufacturer, retailer, contractor or homeowner a complete technical trail without needing to revisit the site.
Voltage Records Also Help With Inspection Corrections
Voltage drop documentation is useful for warranty claims, but it also strengthens inspection corrections because it proves the lighting system performs correctly after repair. If the inspector identifies a performance or wiring defect, use the landscape lighting inspection failure code reference to label the issue before recording readings. If the defect is tied to unsafe wiring, concealed work, or repeated failure, compare it with the red tag landscape lighting violation guide. For written correction comments, the inspection correction notice guide explains what evidence should accompany the fix. Before the project is closed, confirm the system with the outdoor lighting final inspection checklist and review the permit rejection reasons guide for missing documentation problems.
Portfolio Lighting Warranty Evidence: Model Numbers, Transformers and Connectors
Portfolio Lighting systems often combine older transformers, replacement bulbs, discontinued fixtures, pierce connectors, long cable runs and mixed fixture ages. That makes documentation especially important. A failed fixture may be defective, but it may also be receiving unstable voltage because of an old connector, undersized wire, overloaded transformer or LED retrofit mismatch.
Start by documenting the exact model when possible. Use the Portfolio Lighting model number lookup, Portfolio model parts directory, Portfolio master model technical database, and Portfolio technical manuals and wiring diagrams. Then document power conditions with this page’s voltage testing method.
If the transformer is suspect, use bad landscape lighting transformer symptoms, Portfolio transformer troubleshooting, and Portfolio transformer master guide before assuming the fixture is the only defective part.
Voltage Drop Documentation Mistakes That Weaken Warranty Claims
| Mistake | Why It Weakens the Claim | Better Documentation |
|---|---|---|
| Only testing at the transformer | Does not prove voltage at the fixture | Test transformer plus fixture locations under load |
| Testing with lights off | Misses voltage sag under real load | Record no-load and under-load readings |
| No photo of meter location | Reviewer cannot verify where reading was taken | Take wide and close-up photos of each reading |
| Ignoring corrosion | Manufacturer may blame installation/environment | Photograph connectors and document repairs |
| No fixture swap test | Cannot separate product failure from wiring location | Move suspect fixture to known-good location |
| No model or date record | Claim may lack product identity and timeline | Capture labels, receipts, install date and failure date |
Voltage Drop Testing Documentation FAQ
Why document voltage drop for a lighting warranty claim?
Voltage drop documentation shows whether a fixture, transformer or driver failed under proper operating conditions or whether the system may have been under-voltage, overloaded, miswired, corroded or installed outside expected limits.
What voltage readings should I record?
Record transformer output with no load, transformer output under load, voltage at the first fixture, middle fixture and farthest fixture, plus readings after repairs or fixture replacements.
Should voltage drop be tested with lights on or off?
Warranty-relevant testing should usually include under-load readings with the lighting system operating because voltage drop only becomes meaningful when current is flowing.
Do photos matter for warranty compliance?
Yes. Photos of meter probes, transformer labels, cable routes, fixture labels, connectors, corrosion, moisture, wire gauge and reading locations can make a claim much easier to understand.
How do I prove a fixture failed and not the wiring?
Move the suspect fixture to a known-good connection, test the original connection under load, document both voltage readings, photograph the swap and record whether the problem follows the fixture or stays with the cable run.
What should a contractor include in a voltage drop report?
A strong report includes date, weather, transformer model, circuit map, load estimate, wire gauge, run length, voltage readings by location, photos, repair actions, retest readings and technician notes.
Expert-Verified Troubleshooting
This guide explains practical voltage documentation for low-voltage lighting claims. Warranty decisions depend on the manufacturer, retailer, installer, local conditions and product instructions.