

I treat a Portfolio HCL retrofit as a system conversion, not a bulb replacement. The old fixture body is only the shell. The real upgrade is the spectrum engine inside it: emitter choice, driver quality, heat path, lens behavior, dimming method, and the way power reaches the fixture under load.
This matters because many discontinued Portfolio fixtures were built with sturdy housings, glass lenses, serviceable wiring cavities, and low-voltage architecture. Those are exactly the traits that make a fixture worth rebuilding when a standard replacement part no longer exists. Before choosing parts, I would identify the fixture family through the Portfolio Lighting model number lookup, compare the chassis against the Portfolio model specs, and use the Portfolio Lighting Master Model & Replacement Handbook as the practical parts catalog for housing, lens, and module decisions.
If you want to understand the full system-level approach behind this retrofit strategy, start with the biological lighting infrastructure guide, which explains how spectrum, timing, voltage stability, and fixture design work together as a complete circadian lighting system.
The Portfolio Advantage: Why Retrofit Instead of Replace?
The usual recommendation is to replace old fixtures with a modern smart bulb or smart fixture. That may be fine for a basic lamp, but it is often a downgrade when the original Portfolio fixture has a solid metal body, glass shade, cast housing, serviceable bracket, or low-voltage wiring compartment.
I see the old Portfolio shell as valuable mechanical infrastructure. The body holds the optical path, protects the wiring, manages heat, and gives you a place to install a better LED engine. That is why a discontinued fixture can still be useful even after the original LED board, driver, lens, or connector has failed.
Build Quality Matters
Many older Portfolio fixtures used heavier housings than low-cost modern smart fixtures. Metal and glass are especially valuable because they can help with heat transfer, lens durability, optical diffusion, and long-term serviceability. If the original housing is corrosion-free and the wiring cavity is safe, the body may be worth more than the failed electronics inside it.
For outdoor systems, this connects directly to Portfolio low voltage lighting, Portfolio landscape lighting, and low voltage landscape lighting. A 12V architecture gives you a safer and more flexible retrofit platform than opening a 120V fixture without proper training.
Low Voltage Safety and Retrofit Flexibility
A 12V or 24V Portfolio-style system is usually easier to experiment with because the transformer, cable, fixture body, and LED module are separate pieces. You can inspect the load, measure terminal voltage, test a driver, and verify dimming without rebuilding an entire line-voltage branch circuit.
That does not remove the need for safe work. Outdoor circuits, wet locations, transformers, junctions, and GFCI protection still matter. Use the landscape lighting electrical code safety guide and low voltage lighting permit requirements before making permanent changes.
The HCL Spectrum Blueprint: Day, Evening, and Night Are Different Jobs
Human-centric lighting fails when one fixture tries to solve every biological condition with one generic warm-white LED. A real HCL retrofit has separate spectrum targets for daytime alerting, evening transition, and nighttime circadian darkness.
Daytime: High-Melanopic Stimulus and Color Quality
Daytime HCL is about helping the space feel awake, clear, and visually accurate. This is where higher output, cooler CCT, and high color quality make sense. A good daytime channel may use high-CRI 4000K to 5000K light, with enough short-wavelength content near the melanopsin-sensitive blue range to support daytime alertness.
The melanopsin system is commonly discussed around the 480nm blue range. That does not mean “blue light is bad.” It means blue-rich light is a tool. During the day, it can support wakefulness. At night, the same signal becomes the thing you are trying to avoid. For color-quality context, compare this with CRI 95 vs CRI 80 color rendering.
For higher-end retrofits, I would also look beyond CRI and ask for TM-30 data when available. TM-30 evaluates color rendition with fidelity and gamut information, which gives a more complete picture than a single CRI number when the goal is visual clarity, comfort, and task accuracy.
Evening: Warm-Dim Transition
Evening lighting should move the room away from visual stimulation. A 2200K to 2700K warm-dim transition can help reduce harshness, but I would not call it true circadian dark. Most warm-white LEDs are still phosphor-converted blue-pump sources, which means they can still leak blue energy even when they look visually warm.
Night: 0% Blue Circadian Dark
Nighttime HCL is where the retrofit becomes serious. If the goal is circadian-safe navigation, diaper changes, bedside movement, or late-night use, I want monochromatic amber around 590nm or red above 620nm with no meaningful energy below 500nm.
This is the same principle covered in the Nursery Lighting Safety 0% Blue Light guide and the broader biological lighting infrastructure guide. The fixture should not just appear warm. It should actually remove the short-wavelength energy that drives the nighttime alerting signal.
Warm, Shielded Light Is the Goal for Nighttime Retrofits
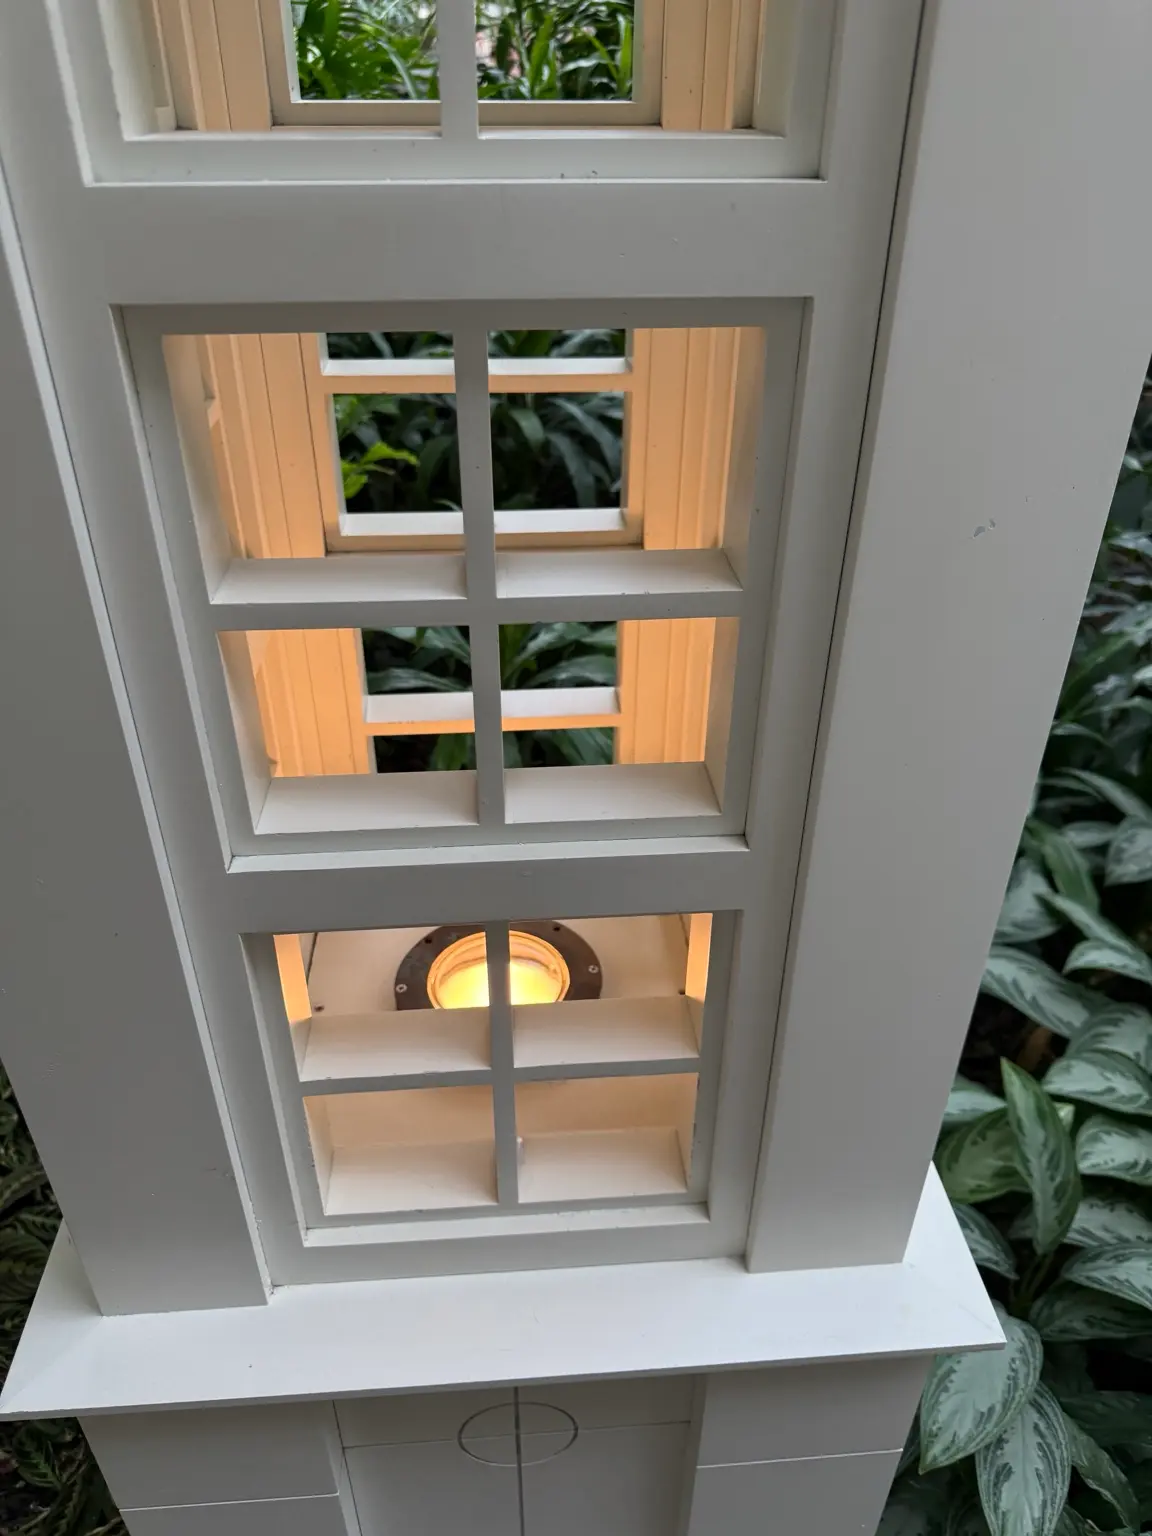
A good HCL retrofit is not just about changing the LED color. The fixture also needs to control glare, shield the light source, and place warm illumination where it is actually useful. This kind of soft architectural lighting is closer to the nighttime behavior I want than an exposed, bright, blue-rich fixture.
For Portfolio retrofits, the best result usually comes from combining warm or amber emitters with a housing, lens, and beam pattern that keep the light comfortable at eye level.
Technical Implementation: Drivers, Emitters, Controls, and Fixture Layout
The meat of the retrofit is matching the light engine to the old fixture body. You are deciding whether the fixture should become dual-channel CCT, warm-dim, amber-only, red-only, or a multi-mode HCL fixture with separate day and night circuits.
Emitter Choice: Do Not Start With the Controller
I would not begin with the app, hub, or smart control. I would begin with the emitter. The emitter determines whether the retrofit can actually produce the spectrum you want. A controller cannot remove a blue spike from a phosphor-converted white LED. It can only dim or tint what is already there.
If the retrofit uses an MR16-style lamp or replaceable LED module, start with Portfolio MR16 LED replacement bulbs and Portfolio LED landscape lighting before choosing a custom amber, red, or tunable-white emitter.
- Dual-channel CCT boards: useful for daytime and evening transitions.
- Warm-dim modules: useful for comfort but not automatically zero-blue.
- 590nm amber emitters: strong choice for nighttime visibility with low melanopic impact.
- 620nm+ red emitters: best for the lowest-disruption nighttime mode.
- RGB smart modules: acceptable only if spectral output and flicker are verified, not assumed.
Driver Swaps: Constant Current Beats Mystery Dimming
Many retail “smart” products hide the driver inside the bulb base. That makes the fixture easy to install but hard to verify. In a custom Portfolio HCL retrofit, the better approach is often an external or serviceable constant-current driver matched to the LED board.
I prefer drivers that support clean dimming through high-frequency PWM, 0-10V control, or a low-flicker constant-current method. IEEE 1789-2015 is the standard reference I would cite here because it discusses LED modulation frequency, dimming behavior, and health-risk considerations from flicker in LED lighting systems.
If the transformer buzzes, the new module pulses, or the fixture changes brightness after warming up, use Portfolio Lighting transformer troubleshooting, Portfolio transformer buzzing, and Portfolio LED lights flickering before blaming the LED board.
Control Logic: App Control Is Optional; Spectrum Control Is Not
Smart controls can be useful, especially if the HCL retrofit needs schedules or scene transitions. But the biological value comes from the light engine. Use circadian outdoor lighting automation and AI transformer voltage load balancing for deeper automation strategy, but do not let software hide weak electrical design.
If this retrofit is part of a smart upgrade, compare it with the Portfolio hybrid smart upgrade guide, smart landscape lighting bridge, and legacy transformer AI retrofitting before mixing old transformers with new controls.
The Panel-to-Fixture Chain Matters in an HCL Retrofit
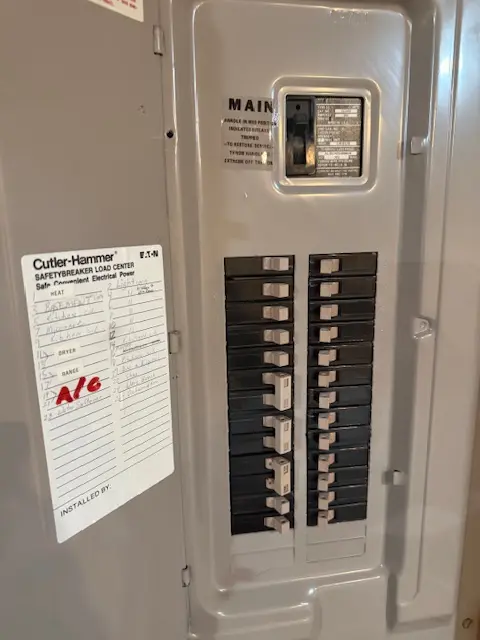
A Portfolio HCL retrofit can fail even when the emitter choice is correct if the power path is unstable. The panel circuit feeds the transformer, the transformer feeds the low-voltage cable, and the cable feeds the driver or LED module inside the fixture. Weakness anywhere in that chain can affect color mixing, dimming quality, flicker, and nighttime spectrum control.
This is why I treat voltage testing as part of the retrofit, not as a separate troubleshooting step. A true circadian retrofit needs stable power before it can deliver stable light.
Thermal Management and Voltage Stability: The Two Retrofit Killers
HCL retrofits can fail early when the retrofit focuses on color and ignores heat. High-output LEDs shift color as temperature rises, and excessive heat shortens the life of the LED board, lens, solder joints, and driver components.
Thermal Management
Before installing a higher-output board, inspect the Portfolio chassis. Is there a metal heat path? Does the LED board mount tightly to the housing? Is there trapped heat behind a sealed lens? Is the driver sitting in the hottest part of the fixture? A metal body is useful only if the retrofit actually transfers heat into it.
If the old body is cracked, corroded, or no longer seals correctly, a retrofit may be less reliable than a housing-level replacement. In that case, compare the fixture against Portfolio replacement hardware, Portfolio replacement lenses, and Portfolio replacement diffusers before rebuilding the LED engine.
Voltage Drop and Color Accuracy
HCL lighting is more sensitive to voltage instability than a simple static path light. If the controller or driver sees weak input voltage, the color channels may not mix correctly. Amber may look orange, white may drift green, and low-end dimming may become unstable.
This is why the retrofit should be checked with the same logic used in the landscape lighting voltage drop guide, the landscape lighting voltage drop calculator, and the Portfolio transformer sizing guide. Color accuracy starts with stable power.
For larger HCL zones, also check landscape lighting wire gauge, landscape lighting cable guide, and landscape lighting voltage tap calculator so the farthest fixtures do not lose color accuracy or dimming stability.
This is especially true when the fixture body is still structurally sound but the original light engine is outdated. Before replacing the whole fixture, compare the housing against Portfolio landscape light housings and the broader Portfolio lighting compatibility guide so you know whether the old shell is worth saving.
| Test Point | What to Check | Why It Matters for HCL | Correction |
|---|---|---|---|
| Transformer output | Voltage under actual load | Weak input causes driver instability and poor dimming | Resize transformer or rebalance zones |
| Fixture terminal | Voltage at the farthest fixture | Long runs can shift color and reduce channel consistency | Use heavier cable, shorten run, or split zones |
| Driver case | Heat after 30 minutes | Hot drivers flicker, whine, or fail early | Relocate driver or lower wattage |
| Lens output | Color mixing and glare | Clear glass can expose harsh individual channels | Use frosted lens, diffuser, or indirect aiming |
The Unfair Advantage: Smart Bulb Retrofit vs Portfolio HCL Custom Retrofit
| Feature | Standard “Smart” Bulb Retrofit | Portfolio HCL Custom Retrofit | Specialist Takeaway |
|---|---|---|---|
| Spectral Control | Limited to software-tinted white | True monochromatic and dual-channel emitters | The custom retrofit controls the actual light source, not just the app setting. |
| Flicker | Often high due to cheap internal drivers | Low or near-zero with high-quality external constant-current drivers | Driver choice is the difference between comfort lighting and pulsed lighting. |
| Lifespan | Often around 15,000 hours with heat trapped in the base | Potentially 50,000+ hours when heat-sinking is designed correctly | The old Portfolio metal body can become a thermal asset. |
| Blue Light Leak | Significant if based on blue-pump phosphor white LEDs | 0% possible with monochromatic amber/red bypass | Night mode must be verified by emitter type, not color appearance. |
| Repairability | Usually disposable | Driver, lens, module, connector, and controller can be serviced separately | Better for discontinued fixtures and long-term ownership. |
Specialist Science Notes: Why This Is More Than a Lighting Hack
The strongest HCL retrofits are grounded in physiology and electrical engineering. The human circadian system is especially sensitive to short-wavelength blue light, with melanopsin response commonly associated with the blue range near 480nm. That is the same range a nighttime retrofit must avoid and a daytime retrofit may intentionally use.
Infant and nursery applications deserve an even higher standard. Lens-transmission research has reported that infant eyes can transmit substantially more blue-light energy than adult eyes, which is why the 0% blue nursery lighting strategy treats spectral cutoff as a safety priority, not a luxury feature.
Flicker is the other hidden biological variable. IEEE 1789-2015 is commonly cited in technical flicker discussions because modulation depth and frequency matter. A light can look warm and still be a poor HCL fixture if the driver is pulsing hard at low brightness. For comfort-driven applications, also review clean power and flicker control and voltage stability and melatonin.
Outdoor HCL also has to respect ecology and glare. For exterior retrofits, cross-check the spectrum strategy against biological impact of outdoor light color, wildlife-friendly outdoor lighting, and BUG rating guidance.
The Banger Checklist: Is Your Portfolio Fixture HCL-Ready?
- Chassis Check: Does the fixture have enough internal volume for a secondary HCL driver, controller lead, or replacement LED board?
- Heat Path: Is the LED board mounted to metal, or is it trapped behind plastic with no thermal escape?
- Lens Type: Is the glass clear or frosted? Frosted glass is usually better for HCL color mixing because it blends channels and reduces diode glare.
- Voltage Stability: Have you tested terminal voltage under load, not just at the transformer with no fixtures connected?
- Driver Fit: Can the fixture accept a constant-current driver without cramming it into a hot or wet cavity?
- Spectral Validation: Does night mode use true amber/red emitters, or is it just a warm-white LED dimmed low?
- Flicker Test: Have you used the phone camera slow-motion test at the lowest dim level?
- Serviceability: Can the module, lens, connector, or driver be replaced later without destroying the housing?
Retrofit Workflow: My Practical Order of Operations
- Identify the fixture: Start with the identify Portfolio lighting guide and model lookup before buying retrofit parts.
- Check replacement ecosystem: Compare lenses, drivers, modules, and housings through Portfolio parts and accessories and Portfolio replacement LED modules and drivers.
- Inspect the transformer: Use how to test a landscape lighting transformer before adding HCL loads.
- Measure voltage under load: Use the farthest fixture, not the easiest fixture, as your worst-case voltage test point.
- Select the emitter: Choose daytime CCT, evening warm-dim, and nighttime amber/red channels based on the space, not on app features.
- Select the driver: Match voltage/current, dimming method, enclosure rating, thermal location, and flicker performance.
- Bench test first: Run the fixture for 30 minutes, check heat, listen for noise, test flicker, and compare channel color.
- Install as a system: Keep moisture protection, cable strain relief, grounding/bonding rules, and transformer capacity in mind.
If the retrofit is part of a larger outdoor lighting upgrade, compare the design with landscape lighting layout design, low voltage landscape lighting zones, and low voltage landscape lighting system diagrams so the HCL fixture is not added to an already overloaded zone.
Use the Handbook Before You Open the Fixture
The fastest way to ruin a good retrofit is to guess the housing, lens, driver, or model family. Use the Portfolio Lighting Master Model & Replacement Handbook as the chassis and parts starting point before choosing HCL boards, amber emitters, red emitters, drivers, or smart controls.
Portfolio HCL Retrofit FAQ
Can I just put a smart bulb in an old Portfolio fixture?
You can in some indoor fixtures, but that is not the same as a true HCL retrofit. A smart bulb may still use a blue-pump phosphor LED, may flicker at low output, and may trap heat in the base. A custom retrofit gives you better control over emitter type, driver quality, and thermal path.
What is the best nighttime emitter for a circadian-safe retrofit?
For the lowest blue-light risk, use monochromatic amber around 590nm or red above 620nm with no meaningful output below 500nm. A warm-white 2700K LED is more comfortable than cool white, but it is usually not true zero-blue.
Do I need 12V or 24V for HCL retrofits?
Either can work when the driver and emitters are matched correctly. Many Portfolio landscape systems are 12V, while some LED tape and architectural retrofit systems use 24V for better voltage stability over longer runs.
Why does my retrofit flicker after installation?
The most common causes are weak transformer output, voltage drop, overloaded zones, mismatched dimmers, low-quality drivers, or poor connections. Start with transformer testing, then check terminal voltage at the fixture under load.
Electrical and Health Disclaimer
This guide is educational and focuses on lighting quality, spectrum, fixture retrofitting, low-voltage design, driver behavior, and comfort-oriented human-centric lighting. It is not medical advice and does not diagnose, treat, or prevent sleep disorders, eye conditions, migraines, infant sleep issues, or health conditions. For medical concerns, consult a qualified healthcare professional.
Retrofitting fixtures can create electrical, heat, moisture, fire, shock, and code-compliance risks. For permanent wiring, 120V fixtures, wet-location work, transformer changes, dimmers, drivers, or any installation you are not qualified to perform, consult a licensed electrician and follow local code.
Technical References and Standards Used
- CIE S 026/E:2018: Used as the circadian metrology reference for melanopic EDI and ipRGC-influenced light responses.
- IEEE 1789-2015: Used as the flicker reference for LED modulation, dimming, and low-frequency pulsing concerns.
- ANSI/IES TM-30-18: Used as the color-rendition reference for evaluating light quality beyond basic CRI.
- Portfolio Lighting Master Model & Replacement Handbook: Used as the internal chassis, housing, and replacement-part reference before retrofit decisions.
Recommended for You: