
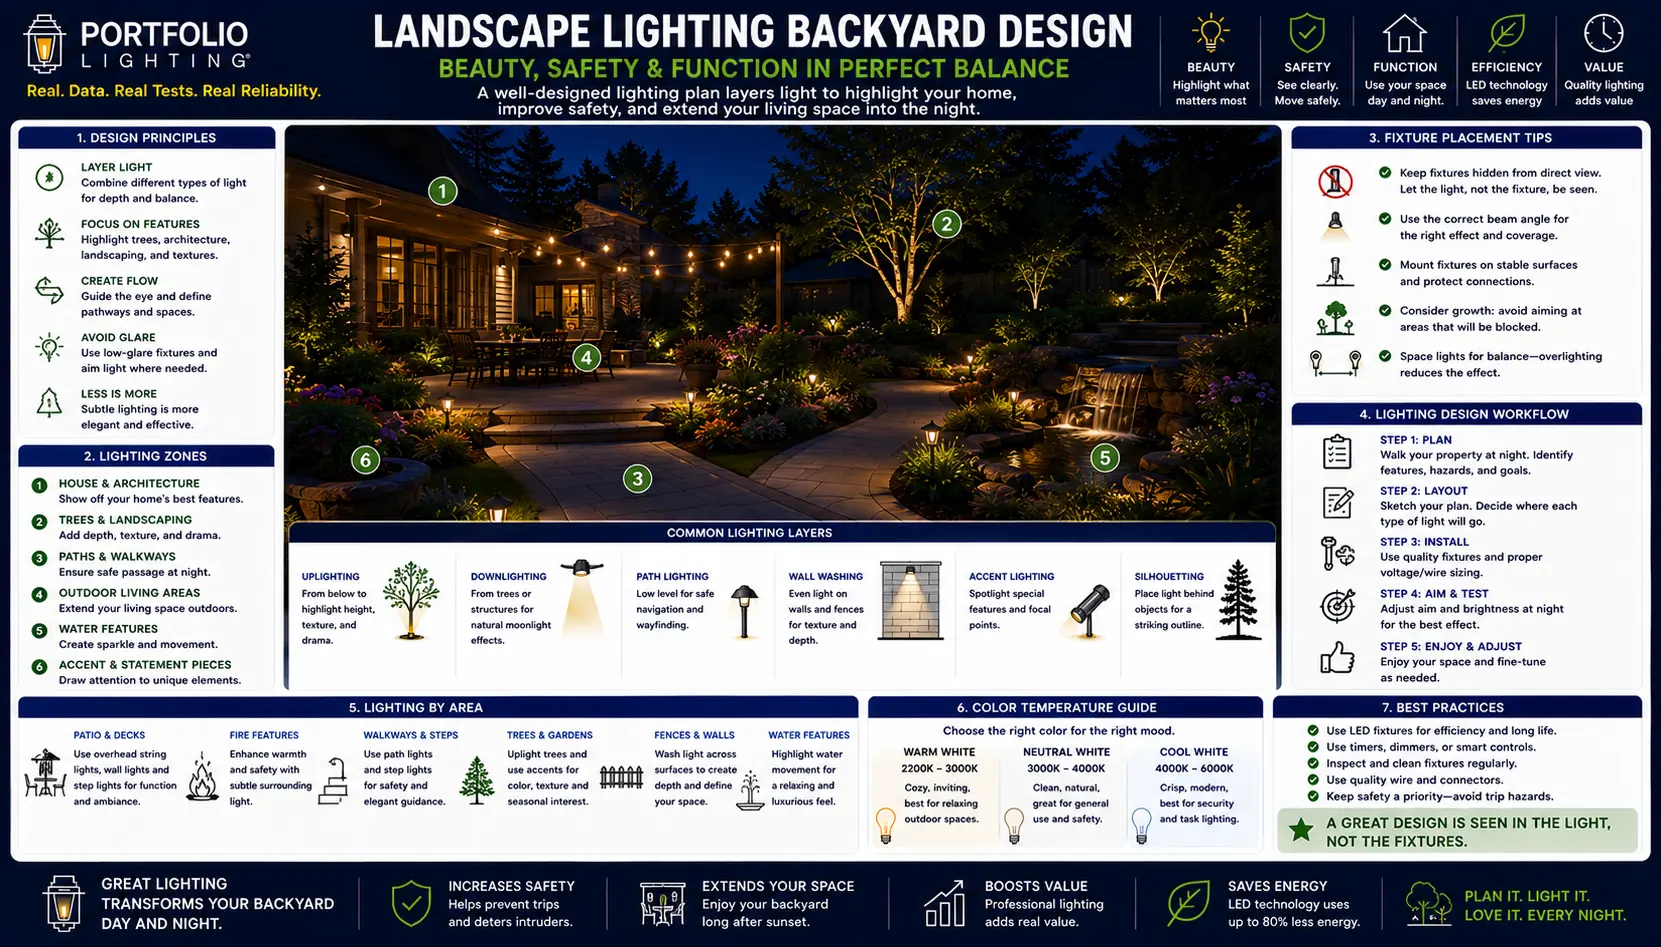
Backyard vs Front Yard: Why They Require Completely Different Design Approaches
Most landscape lighting guides treat front yard and backyard as variations of the same problem. They are not. The design priorities, fixture types, lumen levels, and zone structures are fundamentally different because the two spaces serve fundamentally different purposes.
| Design Dimension | Front Yard | Backyard |
|---|---|---|
| Primary viewer | Passersby, arriving guests, street view | Occupants, seated guests, indoor observers through windows |
| Primary purpose | Curb appeal, security, address identification, first impression | Entertainment atmosphere, relaxation, activity support, aesthetic enjoyment |
| Viewing distance | 20–100+ feet from the street | 5–30 feet from seating areas and windows |
| Dominant fixture type | Path lights, uplights for curb appeal, security floods | Area/ambient lights, string lights, uplights for drama, path lights for navigation |
| Lumen level priority | Visibility and definition from distance | Atmosphere and comfort at close range — typically lower overall output |
| Security role | Primary — deters approach, illuminates entry | Secondary — motion-activated perimeter, not constant-on |
| Entertainment function | None or minimal | Central — lighting must support dining, socializing, cooking, recreation |
| Color temperature priority | 2700K standard, 3000K acceptable for some applications | 2700K essential — intimate evening atmosphere requires warm white throughout |
| Circadian consideration | Lower — less time spent outdoors in front yard evening hours | Higher — occupants are present for extended periods during high-sensitivity evening hours |
| Pool / water feature | Rare | Common — dedicated zone with specific code requirements |
The practical implication of these differences is that backyard lighting design starts from a different set of questions. Instead of asking "how do I make this look good from the street," you ask "what do we do back here and what does each activity need from the lighting." Entertainment, dining, relaxing, swimming, cooking, gardening — each generates different lighting requirements, and a backyard that serves all of these activities needs a zone structure that addresses each one rather than a uniform approach applied across the whole space.
The Four-Layer Lighting Method: How Professional Backyard Lighting Works
Professional landscape lighting designers do not think in terms of individual fixtures — they think in terms of layers. Each layer serves a distinct visual and functional purpose. Each operates at a different height and lumen level. The combination of all four layers simultaneously produces the dimensionality and atmosphere that distinguishes quality outdoor lighting from a collection of bright fixtures.
Ambient
Task
Accent
Safety
The question I ask every client before designing a backyard lighting plan is: "can you describe what you want to feel like when you are sitting on the patio at 9 PM?" Almost nobody says "I want it to be bright." They say things like: cozy, like a restaurant patio, like the garden is glowing, like a candlelit dinner but outside. Every one of those descriptions is achieved by the layering approach — not by adding more fixtures or choosing higher-lumen ones. The feeling comes from contrast, from light and shadow working together, from the ambient layer being warm and low enough that the accent lights have darkness to work against.
Zone-by-Zone Design: Every Backyard Element Covered
Each zone in a backyard has a specific lighting purpose, fixture type, lumen level, and placement strategy. These are not interchangeable — the approach that works for a patio does not work for a garden path, and the approach for a specimen tree does not work for a pool surround. Here is every common backyard zone with the specific design information for each.
The patio or deck is the most important zone in most backyards — it is where people spend the most time, where the most varied activities happen, and where lighting quality has the most direct impact on the experience of being outside. It also has the most demanding lighting requirement because it needs to serve both relaxation (lower light, warm atmosphere) and dining or entertainment (higher functional light for visual clarity).
- String lights overhead: 2200K warm Edison-style LED, 8–12 feet above deck level. The single most effective patio lighting choice for atmosphere. Distribute across entire patio area — overlapping strings at 2–3 foot intervals produce even, glare-free ambient fill.
- Post-mounted area fixtures: 400–600 lm at 5–6 ft height for medium patio. Position at corners and entry points. Downward-aimed wide-beam fixtures prevent direct glare to seated guests.
- Dining area pendant or overhead: 700–900 lm directly over the table. This is the task layer — brighter than the ambient to focus attention on the social center of the space.
- Step lights on deck stairs: 60–100 lm per step, recessed into the riser face. See the spacing guide for step light positioning.
Backyard garden paths are typically narrower, more winding, and more intimate than front yard approaches. The lighting should feel like it is part of the garden rather than imposed on it — path lights that nestle into plantings, low-profile bollards that delineate edges without demanding visual attention. The goal is safe navigation with a sense of discovery, not a brightly lit runway.
- Alternating vs same-side placement: Alternate path lights on opposite sides of the path rather than lining both sides uniformly. Alternating creates a more natural, garden-like rhythm and prevents the "runway" appearance.
- Use the canopy: Position path lights under plantings where possible so the fixture disappears into the garden during the day and the light emerges from the planting edge at night. This is the difference between path lights that look like they belong and ones that look like they were stuck in the ground.
- Match fixture height to path width: A 12-inch tall path light with a 90-degree beam illuminates a 2-foot radius circle. A 6-foot wide garden path needs either taller fixtures, more fixtures per unit length, or fixtures on both sides. See our full path light placement guide for the geometry.
Trees and specimen plants are the drama zone of a backyard — they provide the vertical dimension and the focal points that give the space visual hierarchy. Uplighting a well-shaped tree is one of the highest-impact lighting investments in any backyard because it creates a naturally beautiful focal point that is visible from inside the house, from the patio, and from anywhere in the yard.
- Uplight placement distance: Position the uplight fixture 12 to 24 inches from the trunk base, aimed upward at 45 to 60 degrees. Too close and the beam misses the canopy; too far and the beam angle spreads past the canopy edges and wastes light on the sky.
- Two-fixture uplighting for large trees: Large trees with wide, spreading canopies benefit from two uplights positioned 180 degrees apart around the trunk, each aimed to illuminate half the canopy. This eliminates the shadow that a single uplight creates on the far side of the canopy.
- Moon lighting for large trees: For very large specimen trees, consider placing a fixture up in the tree aimed downward to simulate moonlight filtering through the canopy — this creates a dappled light effect on the ground below that cannot be achieved with any uplight configuration. Requires waterproof fixtures rated for the position.
- Garden bed grazing: For low garden beds with interesting texture — groundcover, mulch, or border plants — a fixture aimed at a low angle across the bed surface creates shadow and texture that makes a simple planting look designed. Output 100 to 200 lumens with a narrow 15 to 20 degree beam.
See the complete tree uplighting guide for beam angle calculations by tree size and mounting distance.
Pool and water feature lighting is the most technically demanding zone in a backyard because it involves the intersection of water and electricity, NEC Article 680 special requirements, and the aesthetic goal of creating beautiful illumination that makes the water glow rather than just illuminate the area around it. The pool surround, the pool water itself, and any associated water features are distinct sub-zones within this area.
- Pool deck lighting: Fixtures aimed strictly downward toward the deck surface — not toward the water or toward the house. Pool deck is a wet surface; fixtures must be rated for wet location (IP65 minimum for fixtures near but not in the water). Space fixtures 8 to 12 feet apart around the perimeter.
- GFCI protection is mandatory: Every circuit serving pool area lighting must be GFCI protected under NEC Article 680, regardless of whether the lighting is 12V or 120V. See the GFCI requirements guide for pool-specific requirements.
- Landscape uplights near pool: Uplights on trees or plants near the pool create dramatic reflections in the water — one of the most effective backyard lighting effects available. Position the uplight to aim toward the pool side of the tree so light reflects off the water surface.
- Fountain and water feature accents: Low-output fixtures (100 to 200 lumens) aimed at the water surface or at the water source create shimmer and movement effects. Submersible fixtures inside the feature require IP68 rating and must comply with NEC 680 requirements.
The outdoor kitchen and grill zone is the one place in the backyard where task lighting takes priority over atmosphere. You need adequate illuminance on food preparation surfaces, the grill cooking surface, and any work counters to cook safely and accurately judge doneness. This zone can tolerate — and may benefit from — slightly higher color temperature than the rest of the backyard because food color rendering is important here.
- Under-counter lighting: LED strip or puck lights mounted under overhead cabinets or the hood of a covered outdoor kitchen illuminate the prep surface without requiring overhead fixtures. Keeps light exactly where work happens without adding sky-directed light.
- Grill-specific lighting: A dedicated fixture aimed directly at the grill surface eliminates the shadow that overhead ambient lighting creates when the cook is standing at the grill. Position at a 30 to 45 degree angle from one side — not directly overhead where the cook's body blocks it.
- Zone separately from patio ambient: Wire the outdoor kitchen lighting on a separate zone from the patio ambient lighting so cooking can happen at full brightness while the dining area remains at atmospheric levels.
The perimeter of the backyard — fencing, privacy screens, hedge lines, and property boundaries — is the background layer of the lighting design. Lighting it correctly frames the space and defines its edges. Lighting it incorrectly produces a bright wall that makes the backyard feel smaller and more enclosed, or dark boundary zones that make it feel incomplete. The goal is to define the perimeter without dominating it.
- Fence and wall lighting: Low-output wall wash fixtures at 150 to 300 lumens aimed upward along a fence or wall define the boundary without overwhelming it. The fence becomes a softly glowing backdrop rather than a dark void or a bright wall.
- Hedge and privacy screen uplighting: A row of low-output uplights along the base of a tall hedge or bamboo privacy screen creates a beautiful green glow that softens the boundary and adds texture to what is otherwise a plain green wall.
- Security lighting at perimeter: Motion-activated security fixtures at corners and gate entries — separate zone from decorative perimeter lighting. 800 to 1200 lumens, motion-only, 2700K. Continuous bright perimeter lighting all night is not necessary for security and significantly degrades the backyard atmosphere.
- Keep perimeter dimmer than the center: The visual hierarchy should draw attention toward the center of the backyard — the patio, the specimen tree, the water feature — not toward the boundary. Perimeter lighting that is brighter than the central zones inverts this hierarchy and makes the space feel oppressive.
Garden sculpture, fire pits, birdbaths, pergola columns, architectural elements — any element that has a distinctive form benefits from dedicated accent lighting. These are the punctuation marks of the backyard lighting composition. The fire pit zone in particular has unique lighting considerations because the fire itself is a light source, and the surrounding landscape lighting needs to work with it rather than against it.
- Sculpture lighting: A narrow-beam spot at 75 to 150 lumens aimed at a garden sculpture creates a dramatic focal point that draws the eye across the backyard. Aim from two angles at 45 degrees each to eliminate flat shadows.
- Fire pit zone lighting: Turn the landscape lighting off or to minimum in the immediate fire pit area when the fire is lit. The fire produces warm, flickering amber light at approximately 1800K — the most biologically perfect and visually beautiful light source available. Competing landscape lighting destroys the effect. Use the fire as the light source and let the landscape lighting frame the edges of the space.
- Pergola and arbor lighting: Fixtures mounted inside the pergola structure or in the overhead lattice create a ceiling of light that defines the outdoor room. String lights woven through the pergola overhead produce the most atmospheric result; recessed fixtures in solid pergola roofs provide cleaner architectural lighting.
Fire pits are one of the most popular focal points in backyard landscape lighting designs because they naturally create gathering spaces, pathway intersections and nighttime entertainment zones. However, placing fixtures too close to gas lines, burners, hot masonry surfaces or propane components can create long-term safety and maintenance problems that many homeowners overlook during the design phase. Before positioning path lights, hardscape lighting or accent fixtures around a fire feature, review this fire pit lighting clearance and gas-line safety guide for practical spacing considerations, heat exposure awareness and smarter outdoor lighting placement strategies.
Backyard landscape lighting systems perform best when both the electrical design and physical fixture stability are planned together because damaged stakes and unstable mounts can eventually create wiring faults and transformer overload conditions. This Portfolio landscape lighting broken stake repair guide explains how to stabilize leaning fixtures and extend fixture life, while the landscape transformer error code troubleshooting guide explains how modern systems report overloads, thermal faults and electrical protection events.
Backyard Lighting Master Reference Table
This table consolidates every backyard zone into a single reference — fixture type, lumen range, color temperature, layer, and the most important design note for each. Use it as a checklist when planning your installation.
| Zone / Element | Fixture Type | Lumens | CCT | Key Design Note |
|---|---|---|---|---|
| Patio / deck — ambient | String lights, post fixtures, wall sconces | 300–600 lm/fixture | 2200–2700K | Distribute evenly across entire space. String lights at 8–12 ft height produce the best atmosphere of any ambient source. |
| Patio / deck — dining area | Overhead pendant, recessed, focused area fixture | 700–1000 lm | 2700K | Position directly over the table. Brighter than ambient to focus the social center. Should be on a dimmable circuit. |
| Deck stair steps | Step / riser recessed lights | 60–100 lm/step | 2700K | Recessed into the riser face, not the tread. Illuminates the tread from below. Do not exceed 100 lm — creates glare for descending occupants. |
| Garden path — casual | Low-profile path lights | 100–150 lm | 2700K | Alternate sides, 6–8 ft spacing. Nestle into plantings where possible. Wide 90–120° beam covers path width at modest output. |
| Garden path — main walk | Path lights, bollards | 150–250 lm | 2700K | Primary backyard circulation route. Slightly higher output than casual paths. Bollards appropriate for wider paths where path lights would require very close spacing. |
| Small shrub / ornamental uplight | Ground stake spot, in-grade uplight | 75–200 lm | 2700K | 15–20° narrow beam. 12–18 in from base. Match beam width to plant canopy width at the mounting height. |
| Medium tree uplight (8–20 ft) | Ground stake spot | 250–500 lm | 2700K | 20–40° beam. Position 18–36 in from trunk. Two fixtures for canopies wider than 12 ft. Aim at 45–60° from horizontal. |
| Large tree uplight (20+ ft) | Ground stake spot, in-grade uplight | 600–1200 lm | 2700K | Wide 40–60° beam or two fixtures 180° apart. For very large trees consider moon lighting from up in the canopy. |
| Garden bed / groundcover | Low stake, in-grade well light | 50–150 lm | 2700K | Grazing angle across bed surface reveals texture. Much lower output than plant uplighting — you are lighting the texture, not the height. |
| Outdoor kitchen work surface | Under-counter LED strip, puck lights | 700–1000 lm total | 2700–3000K | Mount under overhead structure aimed at prep surface. Separate zone from patio ambient. 3000K acceptable here for better food color rendering. |
| Grill area | Directional spot, task fixture | 800–1200 lm | 2700–3000K | Aim at 30–45° angle from the side — not overhead where the cook's body creates shadow. Verify wet-location rating. |
| Pool deck surround | Downward path/area lights | 400–700 lm/fixture | 2700K | Aimed strictly downward. IP65 minimum. 8–12 ft spacing around perimeter. GFCI required — NEC Article 680 applies to all pool area circuits. |
| Pool water feature accent | Submersible or near-water spotlight | 100–300 lm | 2700K | Aimed at water surface for reflection or at feature structure. IP68 for submersible. NEC 680 compliance required for all pool lighting regardless of voltage. |
| Fence / wall wash | Low stake, ground-mounted wall wash | 150–300 lm | 2700K | Keep dimmer than central zones — perimeter should frame, not dominate. Spacing 6–10 ft along fence run for even coverage. |
| Hedge / privacy screen uplight | Ground stake spot | 200–350 lm | 2700K | Wide beam to cover hedge height and width. Evenly spaced along hedge base. Creates beautiful green glow that softens the boundary. |
| Security perimeter | Motion-activated floodlight | 800–1200 lm | 2700K max | Motion only — never continuous all-night at this output level. Separate zone. Corner and gate positions. Brief 60-second duration per activation. |
| Sculpture / garden ornament | Narrow spot | 75–200 lm | 2700K | Two fixtures at 45° from different angles eliminates flat shadows. Output depends on object size — small ornament needs much less than listed maximum. |
| Pergola / arbor structure | String lights, recessed ceiling, post tops | 200–500 lm/fixture | 2200–2700K | String lights woven overhead produce the best result. Recessed fixtures in solid roof provide cleaner look. Post-top fixtures define the corners of the structure. |
| Fire pit surround | Off or minimum path safety | 50–100 lm max | N/A — fire is the light source | Turn landscape lighting to minimum or off near active fire pit. The fire itself is the feature. Competing light destroys the effect and the atmosphere. |
The Right Planning Sequence: How to Design Your Backyard Lighting Before You Buy Anything
Most backyard lighting projects start in the wrong place — at the fixture selection stage. The right starting point is the zone map. Designing zones before selecting fixtures ensures that every fixture purchase serves a defined purpose within a coherent design, rather than accumulating a collection of individually attractive fixtures that do not work together.
Step 1: Map Your Zones on Paper
Draw a rough overhead sketch of your backyard — it does not need to be precise, just proportional. Mark every distinct functional area: patio, dining zone, garden paths, specimen trees, garden beds, pool, outdoor kitchen, gate and entry points, fence lines. Label each zone with its primary purpose (ambient, task, accent, safety). This map becomes your fixture placement guide.
Step 2: Assign Layer and Lumen Targets to Each Zone
Using the master table above, assign a target lumen output and fixture type to each zone on your map. Note the total fixture count per zone and the per-fixture lumen specification. This gives you a preliminary fixture inventory before you have selected any specific product.
Step 3: Calculate Total Wattage and Size the Transformer
Convert your fixture inventory to total wattage. Modern LED landscape fixtures typically produce 60 to 100 lumens per watt — a 300-lumen path light draws approximately 3 to 5 watts; a 600-lumen area fixture draws approximately 6 to 10 watts. Total all zone wattages to get system wattage. Size your transformer to no more than 80% of rated capacity. Use the transformer size calculator for this step — it accounts for inrush current and voltage tap selection based on run length.
Step 4: Plan Wire Runs and Check Voltage Drop
Sketch wire runs from the transformer location to each zone. Measure run lengths. For runs exceeding 50 feet at significant load, verify that your planned wire gauge maintains adequate voltage at the most distant fixture. The wire gauge and ampacity database gives exact voltage drop by gauge, run length, and load for every common residential landscape lighting configuration. Identify any runs that require upgrading from 16AWG kit wire to 14AWG or 12AWG before installation.
Step 5: Select Fixtures Last
With zones defined, lumen targets set, transformer sized, and wire runs planned, you now know exactly what each fixture needs to do. Select fixtures that meet the lumen specification for each zone at 2700K, with IP ratings appropriate to the installation location. This sequence — plan first, select second — is what produces installations where every fixture is right for its location rather than installations where some fixtures are right and others are compromises.
Effective backyard lighting uses controlled contrast and targeted illumination instead of flooding the entire property with brightness. The landscape lumen pollution guide explains how over-lighting can reduce depth, comfort, and nighttime atmosphere.
The Six Most Common Backyard Landscape Lighting Mistakes
These mistakes come up in almost every backyard lighting consultation. Each one is specific and fixable — and recognizing them in your own installation or plan before installation is significantly easier than correcting them after the wire is buried.
Transformer and Wiring for Backyard Landscape Lighting Systems
A backyard lighting system is almost always larger and more complex than a front yard system — more zones, more fixture types, longer wire runs, and frequently a pool or outdoor kitchen that adds load and code requirements. Transformer sizing and wire gauge selection for a backyard system require more careful calculation than a simple front yard installation.
Backyard System Wattage: Realistic Estimates by Backyard Size
| Backyard Size | Typical Zone Count | Estimated Total Load | Recommended Transformer |
|---|---|---|---|
| Small (under 500 sq ft usable) | 2–3 zones | 40–80W | 150W transformer at 80% max load. Single unit adequate. |
| Medium (500–1200 sq ft) | 3–5 zones | 80–150W | 200W transformer or two 150W units for better zone isolation. Multi-tap preferred. |
| Large (1200–2500 sq ft) | 5–8 zones | 150–280W | 300W+ transformer or two separate units positioned at different property locations to reduce run lengths. |
| Large with pool and outdoor kitchen | 6–10 zones | 200–350W+ | Two transformers — one for pool surround and kitchen circuits (shorter runs), one for garden and perimeter zones. Reduces voltage drop across all zones. |
Two-Transformer Strategy for Large Backyards
Large backyards — particularly those with pools, outdoor kitchens, and significant garden areas — benefit from two smaller transformers positioned at different locations rather than one large transformer at a single location. A transformer near the house serves the patio, kitchen, and adjacent garden zones. A second transformer at the back of the property serves the pool surround, distant garden zones, and perimeter. This strategy reduces wire run lengths across all zones, minimizes voltage drop without requiring large-gauge wire throughout, and allows each transformer to be independently timed and controlled.
The tradeoff is two 120V outdoor outlets — one for each transformer — each requiring GFCI protection under NEC 210.8. If a second outdoor outlet is not already available at the rear of the property, the two-transformer strategy requires adding one, which involves a permit and potentially a licensed electrician. See the insurance and liability guide for permit requirements by work type before planning the electrical side of the installation.
Voltage Drop on Backyard Runs
Backyard wire runs are typically longer than front yard runs — a transformer near the house may need to reach garden zones 80 to 150 feet away. At these distances, voltage drop on 16AWG wire becomes significant. The general rule for backyard installations: use 12AWG for any run exceeding 75 feet at loads above 24 watts. Use 10AWG for runs exceeding 125 feet or loads above 48 watts. The wire gauge database provides exact drop values for every combination of gauge, length, and load — run this calculation before purchasing wire, not after the fixtures are already installed and dim.
Smart Control for Backyard Landscape Lighting: What It Actually Adds
Smart landscape lighting control adds the most value in backyard installations — more than any other lighting application — because the backyard has more distinct zones, more varied usage patterns, and more timing requirements than the front yard. Manual timer-based control can handle a simple front yard system. A backyard with five to eight zones, a pool, an outdoor kitchen, and seasonal entertainment needs is where smart control delivers genuine functional advantage.
What Smart Control Adds to a Backyard System
A smart landscape lighting controller — whether a smart transformer with app control or a smart hub integration — enables: individual zone scheduling (patio ambient off at 10:30 PM, path safety on until dawn, security motion only overnight), dimming by zone and by time (patio dims to 40% after 9 PM), scene programming (entertainment scene at full brightness, relaxation scene at 30%, movie-on-the-patio scene with pool uplights only), and seasonal adjustment without manual timer reprogramming.
The circadian benefit is particularly significant in backyard installations. A smart controller that automatically dims all decorative zones at 9 PM and switches off everything except path safety and security motion at 10:30 PM provides the consistent timing protocol that protects melatonin onset and sleep quality — consistently, every night, without requiring anyone to remember to do it manually. See the circadian landscape lighting guide for the scheduling protocol that maximizes both atmosphere and sleep health.
For the smart controller options that work with low-voltage landscape lighting transformers, the AI smart landscape lighting guide covers current platform compatibility, hub integration, and the specific transformer models that support smart control out of the box versus requiring a retrofit adapter.
Related Guides and Resources
- Complete Landscape Lighting Guide
- Landscape Lighting Design Guide
- Front Yard Lighting Design Guide
- Landscape Lighting Layout Guide
- Fixture Spacing Guide
- Path Light Placement Guide
- Tree Uplighting Guide
- Landscape Lighting Lumen Guide
- Beam Spread Selection Guide
- Color Temperature Guide
- Transformer Size Calculator
- Transformer Selection Guide
- Voltage Drop Guide
- Wire Gauge Guide
- Wire Gauge and Ampacity Database
- Low Voltage System Diagram
- How to Wire Landscape Lighting
- Outdoor GFCI Requirements NEC 2026
- Insurance and Liability Guide
- Circadian Lighting and Sleep Guide
- AI Smart Landscape Lighting
- Landscape Lighting Maintenance Guide
- Common Landscape Lighting Mistakes
- Dark Sky Compliance Guide
Backyard lighting designs become more reliable when the technical details are handled before installation, especially around buried wiring, water features, docks, wildlife-sensitive zones and engineered light levels. For deeper planning, review this NEC 300.5 underground conduit fill calculator guide, the dock and pier lighting safety standards guide, the turtle-safe and wildlife-friendly lighting code guide, and the photometric lighting plan code guide.
Backyard Landscape Lighting Design — FAQ
How do I plan backyard landscape lighting?
Start with a zone map, not a fixture list. Sketch your backyard and mark every distinct functional area — patio, dining zone, garden paths, trees, pool, outdoor kitchen, fence line. Assign each zone a lighting purpose from the four layers: ambient, task, accent, or safety. Set lumen targets for each zone using the master table in this guide. Then calculate total wattage and size your transformer. Select fixtures last — once you know exactly what each one needs to do. This sequence produces installations where every fixture is right for its location. Starting with fixture selection and working backward produces installations full of compromises.
What type of lighting is best for a backyard patio?
The best patio lighting combines multiple fixture types at different heights. String lights or overhead fixtures at 8 to 12 feet provide warm ambient fill across the entire patio. A brighter overhead or pendant fixture over the dining area provides task lighting for eating. Low post-mounted or wall fixtures add mid-level dimension. Step lights on deck stairs handle safety. All at 2700K warm white. No single fixture type at any height produces the atmospheric quality that the layered combination creates — the layers working together is what makes a patio feel like a designed outdoor room rather than a yard with lights in it.
How many lights do I need for a backyard?
Most residential backyards of 500 to 1500 square feet are well-served by 15 to 35 fixtures across all zones. Calculate by zone: a 200 square foot patio needs 4 to 6 area fixtures; a 40-foot garden path needs 6 to 8 path lights; each specimen tree needs 1 to 2 uplights; a pool surround needs one fixture every 8 to 12 feet of perimeter. Total these across your zones. Then verify total wattage fits within 80% of your transformer's rated capacity. The fixture count follows from the zone plan — never from a rule of thumb about property size.
Should backyard landscape lighting be on a timer or photocell?
Both. Photocell activation ensures the system turns on automatically at dusk regardless of season without requiring manual adjustment as sunset times change through the year. Timer shutoff prevents all-night operation of decorative zones — a typical schedule has decorative and accent zones switching off at 10 to 10:30 PM while path safety lighting remains at low output and security lighting stays on motion-activation until dawn. Smart landscape lighting controllers handle this automatically with programmable zone-specific scheduling that adjusts seasonally.
What is the best color temperature for backyard landscape lighting?
2700K warm white for every zone except the outdoor kitchen, where 3000K is acceptable for better food color rendering. 2700K produces the warm, amber evening light that makes outdoor spaces feel inviting and intimate. It renders plant greens accurately, complements wood and stone surfaces, and has the lowest biological impact on melatonin of any LED color temperature available in landscape fixtures. 4000K and above produces a commercial, institutional quality of light that is inappropriate for private residential outdoor living spaces regardless of other design choices.
How do I light a backyard without it looking over-lit?
Three principles prevent over-lighting. First, keep the ambient layer low — 300 to 500 lumens per area fixture is usually enough; the goal is atmosphere, not brightness. Second, let accent lighting create the drama — a well-uplighted tree at 400 lumens does more for the visual quality of a backyard than ten additional path lights. Third, preserve shadow — good landscape lighting illuminates specific elements and leaves others in shadow. The contrast between light and dark is what creates dimension. A uniformly bright backyard has no contrast, no dimension, and no atmosphere regardless of how much thought went into fixture selection.