
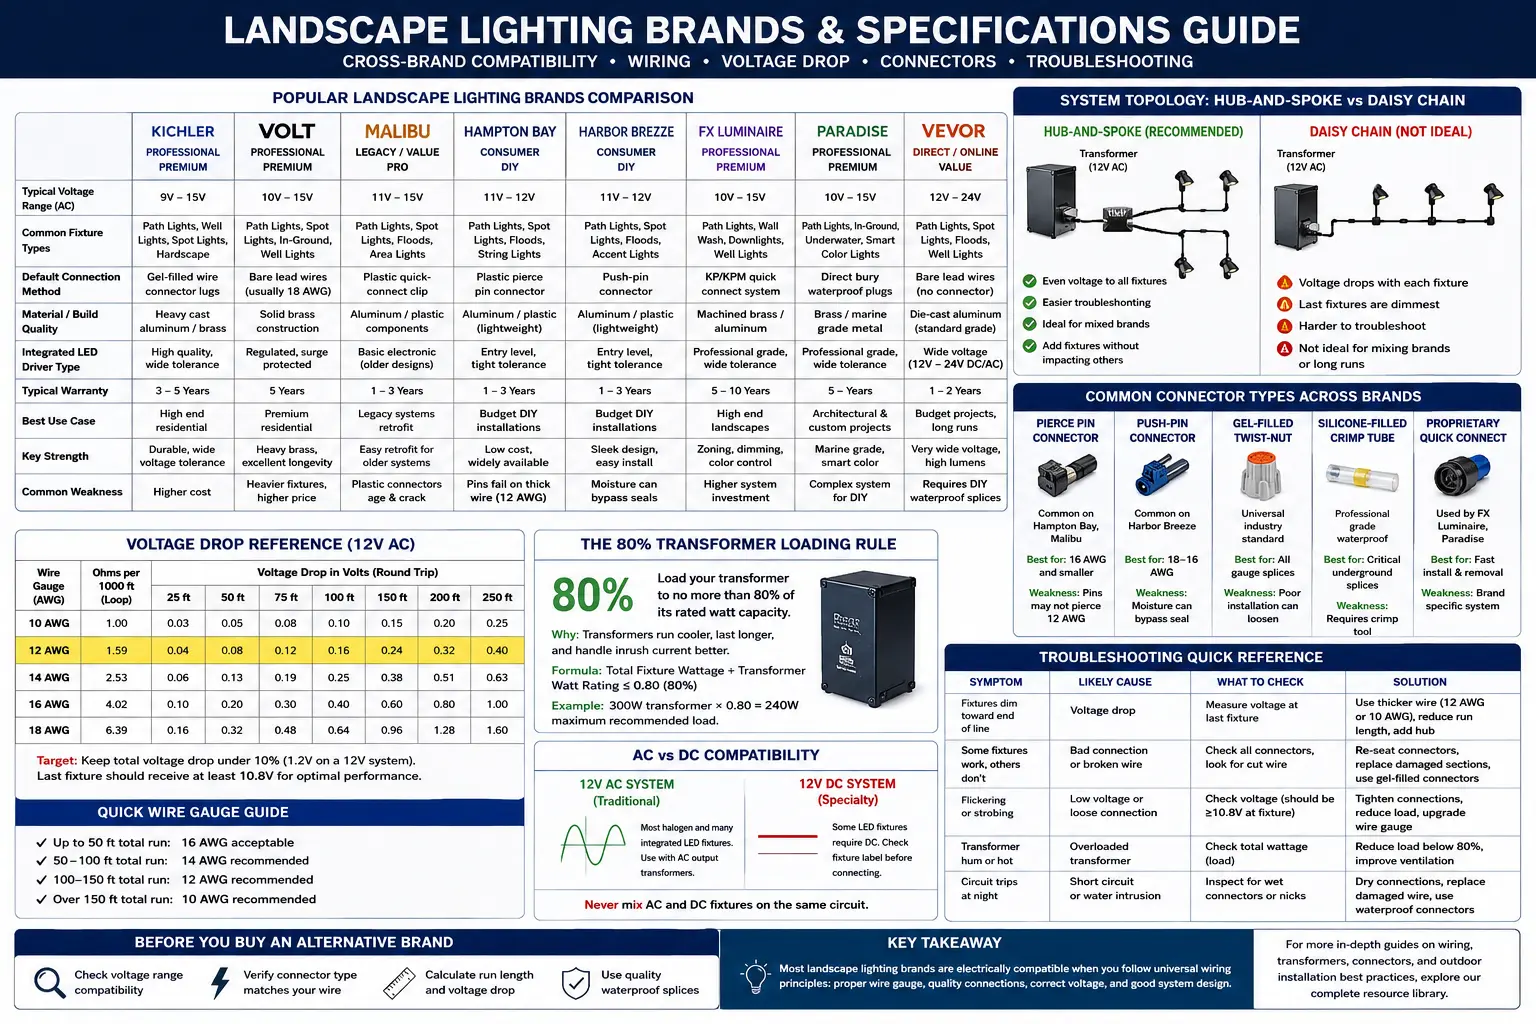
Trying to mix landscape lighting brands without creating a mess? Start with voltage, wattage, wire, and connectors—not the logo printed on the box. Most low-voltage lighting failures after a brand swap happen because the installer assumed every 12V fixture connects the same way.
A Kichler path light, a Volt spotlight, a Hampton Bay fixture, a Malibu replacement head, and a VEVOR bare-wire fixture may all run from the same properly sized low-voltage transformer. But they may not tolerate the same voltage drop, use the same connector, seal the same way underground, or behave the same at the end of a long cable run.
This guide compares the practical details that decide whether cross-brand landscape lighting works in the real yard: transformer load, operating voltage, cable gauge, connector design, splice quality, fixture lead size, LED driver behavior, color temperature, repairability, and failure signature.
The Core Philosophy of Low-Voltage Interoperability
Low-voltage landscape lighting is not usually brand-locked. A 12V fixture from one manufacturer can often run on a transformer from another manufacturer because the electrical system is built around shared principles: a transformer steps household power down to low voltage, cable carries that power across the yard, and each fixture uses part of the available wattage.
The confusion starts because “12V landscape lighting” describes the general system, not every detail that matters. One fixture may use an MR16 replaceable lamp that gradually dims as voltage drops. Another may use an integrated LED driver that shuts off or strobes when voltage falls below its operating threshold. One brand may ship fixtures with bare 18AWG leads. Another may ship plastic pierce connectors that barely bite into thick 12AWG direct-burial cable. Both can be marketed as low-voltage fixtures, but they fail differently when installed on the same run.
Think of a landscape lighting system as four linked parts: the transformer, the cable layout, the connector or splice, and the fixture. Mixing brands changes the last two pieces most often. The transformer may be universal, but the connector method and fixture driver behavior are where cross-brand problems usually appear.
For broader replacement strategy, compare this guide with the Portfolio Lighting alternatives guide, the low-voltage landscape lighting brand comparison, and the universal lighting compatibility source.
Universal Low-Voltage Specification Matrix
| Specification | What It Means | Safe Compatibility Range | Common Mistake | Best Check Before Buying |
|---|---|---|---|---|
| Fixture voltage | Input voltage the fixture or LED driver expects | Usually 12V AC; some tolerate 9V–15V or 12V–24V | Assuming every LED driver works at low end-of-run voltage | Read the fixture label or spec sheet for AC/DC and voltage range |
| Transformer capacity | Total wattage the transformer can safely supply | Use no more than about 80% of rated capacity | Loading a 100W transformer to exactly 100W | Add all fixture watts and leave margin for startup and expansion |
| Wire gauge | Copper size carrying power across the yard | 12/2 for many main runs; 10/2 for long or heavy runs; 14/2 or 16/2 for shorter zones | Using thin kit wire for a long mixed-brand system | Check distance, load, and farthest-fixture voltage under full load |
| Connector type | How each fixture lead joins the main cable | Gel-filled caps, crimp tubes, hubs, direct-burial splices, or brand connectors | Clamping a plastic pierce connector onto cable too thick for its pins | Match connector to main cable gauge and fixture lead gauge |
| LED type | Replaceable lamp or sealed integrated LED | MR16/wedge/bi-pin replaceable lamps are easier to service; sealed modules often require fixture replacement | Buying bulbs for a sealed integrated LED fixture | Confirm whether the lens opens and whether a lamp base exists |
| Color temperature | Warmth or coolness of light output | 2700K–3000K is common for residential landscape lighting | Mixing 2700K warm fixtures with 4000K cool replacements | Choose replacements by Kelvin rating, not just wattage |
Hub-and-Spoke vs Daisy Chain: Why Layout Changes Cross-Brand Behavior
A mixed-brand system can work beautifully on a hub layout and fail badly on a daisy-chain layout. In a daisy chain, power leaves the transformer and passes fixture after fixture along one cable path. Every foot of wire and every connector adds resistance before the last fixture receives power. Consumer integrated LED fixtures at the far end of that run are the most likely to flicker because their drivers see the lowest voltage.
In a hub-and-spoke layout, the main trunk cable feeds a central junction point, and each fixture or small fixture group branches from that hub. This helps equalize voltage because each fixture path is shorter. Professional fixtures with wire leads and waterproof splices tend to behave better in hub layouts because the installer controls the connection quality instead of relying on thin pierce pins.
Daisy chain works best for short, low-load runs
Use it when fixtures are close together, wattage is low, and the last fixture still receives enough voltage under full load.
Hub-and-spoke works best for mixed brands
Use it when fixtures have different wattages, different driver tolerances, or different connector styles.
Loop layouts can help long perimeter runs
A loop can feed power from both directions, reducing the voltage difference between the first and last fixture.
For more layout planning, see the landscape lighting layout design guide, the low-voltage landscape lighting system diagram, and the landscape lighting system diagram.
Voltage Drop Reference by Wire Gauge
| Wire Gauge | Best Use | Typical Mixed-Brand Risk | 25–50 ft | 75–100 ft | 150–250 ft |
|---|---|---|---|---|---|
| 16/2 | Very short, light-load kits | High risk with integrated LEDs at end of run | Acceptable for light loads | Often dim or unstable | Not recommended |
| 14/2 | Short to moderate residential branches | Moderate risk when many fixtures are added | Good for small zones | Check voltage under load | Usually undersized |
| 12/2 | Standard main trunk for many systems | Low to moderate risk if connections are clean | Strong choice | Good with proper load planning | May need multi-tap or split zones |
| 10/2 | Long runs, heavy zones, hub feeds | Low electrical risk but connector compatibility becomes harder | Excellent | Excellent | Best option for long primary feeds |
The 80% Transformer Rule for Mixed Brands
Transformer sizing becomes more important when different brands are mixed because fixture wattages, driver startup behavior, and future replacement paths may not be identical. A 100-watt transformer should not be treated as a 100-watt working budget. A safer design target is about 80% of the transformer rating, which gives the transformer room to run cooler and leaves margin for small label differences, driver startup behavior, and future expansion.
For example, ten 6-watt fixtures equal 60 watts. On a 100-watt transformer, that load is comfortable. Add four older 10-watt halogen or high-output replacement lamps and the system jumps to 100 watts. It may still turn on, but the transformer has no practical margin. Heat increases, voltage sag becomes more noticeable, and the farthest integrated LED fixtures may begin to flicker.
The cleanest approach is to calculate total fixture load first, then check voltage at the farthest fixture under full load. Use the landscape lighting transformer size calculator, the Portfolio Lighting transformer sizing guide, and the transformer wattage guide before adding alternative fixtures to an existing transformer.
Cross-Brand Specs Profiles: What Each Brand Tends to Do Differently
The most useful brand comparison is not “which brand is best.” The better question is: what design assumptions does each brand make? Some brands assume the installer will use waterproof splices and heavy trunk cable. Some assume a homeowner will clip a plastic connector onto kit wire. Some integrated LED fixtures expect a tight voltage range, while professional fixtures tolerate a wider operating window.
Malibu Lighting
Malibu is common in older residential systems. Many legacy Malibu layouts used 12V halogen fixtures, plastic quick-connectors, and entry-level cable. When upgrading Malibu systems with modern LED fixtures, the transformer may still work, but the old connectors and cable often become the weak point. A dim or dead Malibu zone should be checked for connector corrosion before replacing every fixture.
If the system is mostly Malibu, see the Malibu lighting replacement parts guide, the Malibu 8100-9120-01 transformer manual and troubleshooting guide, and the Malibu lighting model library.
Volt Lighting
Volt is usually stronger mechanically than many retail kit brands. Heavy brass fixtures, substantial housings, and replaceable lamp options are common strengths. The installation still depends on wire gauge and splice quality. A professional fixture connected with a poor splice can fail faster than a budget fixture connected correctly.
Volt-style replacements usually make sense when the existing transformer and cable are good but the original fixture housings are worn out. Compare replacement direction in the Volt landscape lighting review, Volt landscape lighting fixtures guide, and Volt vs Portfolio landscape lighting guide.
Kichler Landscape Lighting
Kichler sits closer to the premium residential and light commercial side of the market. Many fixtures are built around better housings, more predictable optical performance, and tighter specification control. Kichler systems may be more tolerant of professional layouts, multi-tap transformers, and longer planned runs, but fixture selection still needs to match voltage range, lamp type, and color temperature.
Kichler is a good comparison point when a homeowner wants to move away from discontinued retail fixtures without rebuilding the whole transformer system. See the Kichler lighting replacement parts guide for brand-specific replacement direction.
Hampton Bay
Hampton Bay is a common Home Depot alternative for budget and mid-range outdoor lighting. Many fixtures use integrated LED modules and quick-connector systems meant for fast installation. Those connectors can work on lighter cable, but they may struggle on thick 12AWG or 10AWG main lines. If the pins do not pierce cleanly, the fixture may be dead, intermittent, or dim even though the transformer is fine.
For brand crossover and transformer help, see the Hampton Bay lighting replacement parts guide, the Hampton Bay landscape lighting transformer replacement guide, and the Hampton Bay 200-watt transformer error codes manual.
Harbor Breeze
Harbor Breeze outdoor and landscape fixtures usually fall into the consumer retail category. The main compatibility concern is physical connection quality. If a fixture is designed around a push-pin connector, the installer must confirm the connector is actually biting into the cable. If not, replacing the connector with a waterproof splice is often more reliable than repeatedly reclamping the factory clip.
VEVOR and Direct E-Commerce Fixtures
Direct-value fixtures often provide high lumen output and wide voltage ranges at a low price. Many use bare wire leads instead of brand-specific connectors. That can be an advantage because the installer can make a better splice, but it also means the installer is responsible for doing it correctly. Bare-wire systems are only as durable as the waterproof splice.
FX Luminaire and Paradise
FX Luminaire represents a more advanced end of the market, especially where zoning, dimming, color, and control integration matter. Paradise is more commonly encountered in consumer replacement searches. When moving between these categories, watch control compatibility carefully. A simple 12V fixture may light on a smart or multi-zone system, but advanced zoning features may not carry over.
For related comparison pages, see FX Luminaire vs Portfolio landscape lighting, Paradise lighting replacement parts, and Paradise lighting transformer troubleshooting.
Representative Cross-Brand Specification Matrix
| Example Brand / Fixture Type | Target Tier | Construction | Voltage Behavior | Bulb / LED Style | Default Connection | Common Failure Point | Interoperability Insight |
|---|---|---|---|---|---|---|---|
| Kichler path light style | Professional premium | Cast metal / brass or aluminum families | Often more tolerant of planned voltage variation | Replaceable lamp or engineered LED depending model | Wire leads / gel connectors / professional splices | Socket oxidation or lens/gasket aging | Good candidate for mixed systems when wire and transformer are sound |
| Hampton Bay spot light style | Consumer DIY retail | Powder-coated aluminum or mixed materials | Integrated LED drivers may prefer tighter voltage | Integrated LED module common | Plastic pierce-pin connector | Pins fail to pierce thick cable or corrode | Best on shorter runs or with upgraded waterproof splices |
| Harbor Breeze path light style | Consumer DIY retail | Matte metal or composite housings | Usually best near nominal 12V | Integrated LED array common | Push-pin connector clip | Moisture bypass or loose connector contact | Keep on localized branches and test voltage at the last fixture |
| VEVOR LED landscape light style | Direct / e-commerce value | Die-cast aluminum housing common | Some models tolerate wider 12V–24V ranges | COB or integrated LED panel common | Bare wire leads | Unsealed DIY splice corrosion | Can work well on long runs if splice quality is professional |
The Master Cross-Brand Connector and Wiring Guide
The connector is where many mixed-brand systems fail. Homeowners usually focus on whether the fixture is 12V, but the physical joint between fixture lead and trunk cable decides whether the fixture receives stable power in wet soil for years.
Pierce-style pin connectors
Fast to install, but risky on thick cable. If the pins do not penetrate cleanly, the fixture may work intermittently or fail after rain.
Silicone-filled wire nuts
Useful for many 12AWG-to-16AWG or 12AWG-to-18AWG fixture connections when the wire is stripped, pre-twisted, and fully seated.
Closed-end crimps and gel pods
Better for permanent underground splices when matched to the correct conductor size and protected from strain.
Set-screw hubs
Strong for hub-and-spoke layouts because the connection is serviceable and cable routing stays organized.
For deeper connector repair, use the low-voltage wire connectors guide, the landscape lighting connectors guide, and the green dust connector corrosion guide.
Multi-Gauge Splicing Specification Matrix
| Main Trunk Line | Fixture Lead Wire | Approved Connection Methods | Waterproofing Specification | Failure Risk | Primary Failure Mode |
|---|---|---|---|---|---|
| 10 AWG heavy run | 18 AWG thin LED | Direct-burial lug connectors; split-bolt splices; properly sized hub terminals | Dual-wall adhesive heat-shrink or silicone gel-filled enclosure | Critical | Piercing pins miss, bend, or fail to contact the smaller conductor |
| 12 AWG standard trunk | 18 AWG thin LED | Silicone-filled wire nuts; closed-end crimps; gel pod splices | Factory-sealed silicone or self-fusing rubber tape over approved connector | High | Poor mechanical twist creates high resistance and flicker |
| 12 AWG standard trunk | 16 AWG heavy LED | Set-screw hubs; silicone-filled wire nuts; direct-burial crimps | Integrated rubber gasket or gel encapsulation | Medium | Over-stripping or clipped strands reduce contact area |
| 14 AWG light run | 16 AWG heavy LED | Standard landscape snap-locks where compatible; wire nuts; gel caps | Silicone grease injection or gel-filled cap | Low to medium | Jacket thickness variation causes loose fit |
Step-by-Step Technical Splicing Instructions for Mixed Brands
A cross-brand splice has to do two jobs at the same time: hold the wires together mechanically and isolate the copper from moisture chemically. A splice that only does one of those jobs will eventually cause flicker, dimming, green corrosion, or a dead downstream branch.
1. Strip the wires without damaging the copper
On the main trunk line, carefully expose enough conductor to make a secure connection without cutting into the copper strands. On smaller 18AWG or 16AWG fixture leads, twist the fine copper strands gently before inserting them into the connector. If the thin lead frays, clips, or folds backward, the connection area shrinks and resistance rises.
2. Pre-twist mismatched gauges before using the connector
Do not rely on the wire nut to twist a thick 12AWG trunk and a thin 18AWG lead together for you. The heavy wire resists turning and the small wire can wrap loosely around the outside. Align the stripped sections, let the smaller wire extend slightly past the larger conductor, twist with pliers, then trim the end flush before applying the waterproof connector.
3. Seal the connection against groundwater
Low-voltage splices live in soil, mulch, irrigation splash, freeze-thaw movement, fertilizer salts, and insects. Use a direct-burial gel-filled connector, a sealed crimp system, or adhesive-lined heat shrink where appropriate. If copper is visible after the splice is complete, the joint is not ready to bury.
4. Add strain relief before burial
Leave a small S-loop near the splice so soil movement or fixture adjustment does not pull directly on the joint. A perfect electrical splice can still fail if the cable is buried under tension.
For cable sizing and burial depth, use the landscape lighting wire gauge guide, the landscape lighting cable guide, and the wire burial depth code guide.
Cross-Brand Connector Selector
Use this quick tool before connecting an alternative-brand fixture to an existing low-voltage landscape lighting run.
Main Line Gauge
Recommended Connection
Method: Silicone-filled wire nut or closed-end direct-burial crimp.
Waterproofing: Factory gel fill or adhesive-lined heat shrink.
Watch for: Poor mechanical twist causing flicker or voltage loss.
Universal Cross-Brand Troubleshooting Hub
When mixed-brand systems fail, the symptom usually tells you where to look first. Do not replace the transformer until you test the run under load and inspect the connectors.
Half the line works, then the rest is dead or dim
The likely cause is a failed connector, hidden splice, severed cable, or sharp voltage drop after the last working fixture. Test voltage at the last good fixture, then the first bad fixture. If voltage falls suddenly between those points, inspect that connector or buried splice first.
Alternative fixtures flicker rapidly
Rapid flicker often points to an integrated LED driver resetting. The fixture may be under-voltage, the connector may be loose, or the transformer may be underloaded for that driver type. Replace pierce connectors with waterproof splices before blaming the transformer.
One brand looks warmer or cooler than the rest
The fixtures may have different Kelvin ratings or different optics. A 2700K lamp beside a 3000K or 4000K integrated LED will not visually match even if both are the same wattage.
Photocell or timer override behaves strangely
Mixed LED loads can expose weaknesses in older timers, photocells, and digital controls. If the lights turn on manually but not automatically, test the photocell and timer separately before replacing fixtures.
Fixtures work dry but fail after rain
This usually points to a connector, lens seal, fixture body, or buried splice problem. Water intrusion can create temporary leakage paths that disappear when the system dries out.
For symptom-specific help, see landscape lighting troubleshooting, landscape lights flickering, landscape lights dim, landscape lights not working after rain, and landscape lighting keeps tripping GFCI.
Technical Safety Note: Underground Contact Resistance
If voltage is strong at the transformer but weak at one fixture, do not assume the transformer is bad. A single poor splice, loose pierce connector, or corroded wire joint can create enough resistance to starve every light downstream. Always test voltage at the fixture under full load before replacing expensive components.
Replacement Decision Matrix for Mixed Brands
| Situation | Most Likely Cause | Test First | Best Next Step | Related Guide |
|---|---|---|---|---|
| New fixture dead immediately | Connector did not pierce cable or splice is poor | Voltage at fixture leads | Redo connection with waterproof splice | Low-voltage connectors |
| Fixture flickers at far end | Voltage drop or LED driver threshold | Voltage under full load at last fixture | Split zone, use heavier cable, or move fixture closer to hub | Voltage drop guide |
| Color does not match old system | Different Kelvin or beam style | Fixture label and spec sheet | Match Kelvin, beam angle, and lumen output | Color temperature guide |
| Old transformer gets hot | Overload, poor terminals, or high resistance wiring | Total wattage and terminal voltage | Reduce load, clean terminals, or replace transformer | Transformer getting hot |
| One fixture fills with water | Gasket, lens, housing, or wire entry failure | Lens seal and fixture orientation | Replace gasket/lens/head or fixture | Foggy lens condensation fix |
When Mixing Brands Makes Sense—and When It Does Not
Mixing brands makes sense when the existing transformer is healthy, the cable is properly sized, and the new fixture solves a real problem: better housing, better beam control, a replaceable lamp, improved finish, or an available replacement for a discontinued fixture.
Mixing brands is risky when the system already has dim end-of-run lights, unknown cable splices, a transformer near full capacity, corroded connectors, or a timer that behaves unpredictably. In that case, a new fixture may make the weakness more visible without being the true cause.
Before buying, use the replacement for Portfolio landscape lighting guide, the best replacement for Portfolio landscape lighting guide, and the other brands with Portfolio connectors guide.
Outdoor Code, Safety, and Wet-Location Checks
Brand compatibility does not override outdoor electrical safety. If a mixed-brand system uses outdoor receptacles, junction boxes, buried wire, in-grade fixtures, pool-adjacent fixtures, or transformer mounting near wet locations, confirm the installation requirements before expanding the system.
Use the landscape lighting electrical code safety guide, outdoor lighting receptacle code requirements, wet-location listing requirements, outdoor transformer mounting code requirements, and splice connection code requirements before burying, mounting, or expanding outdoor wiring.
Landscape Lighting Brand Compatibility FAQ
Can I run Malibu fixtures on a different transformer?
Usually yes, if the fixtures are low-voltage and the transformer supplies the correct voltage with enough wattage capacity. Inspect old Malibu connectors carefully because connector corrosion is often the real failure.
Can Hampton Bay or Harbor Breeze fixtures connect to 12AWG landscape wire?
Sometimes, but factory pierce connectors may not reliably puncture thicker cable jackets. If the fixture is dead or intermittent, replace the connector with a properly sealed waterproof splice.
Are bare-wire fixtures better than quick-connect fixtures?
Bare-wire fixtures can be better when installed with a professional waterproof splice. They can also be worse if the splice is unsealed, loose, or buried under tension.
Why does one brand flicker while the others stay on?
Integrated LED drivers have different low-voltage thresholds. One brand may continue operating while another resets repeatedly at the end of the same run.
Should I replace the transformer when mixing brands?
Not automatically. Test voltage under load, calculate total wattage, inspect terminals, and verify connector quality first. Replace the transformer only if it is overloaded, failing, undersized, or lacks the taps needed for the run.
Affiliate and Safety Disclosure
PortfolioLighting.net is an independent reference site. Always verify product specifications, electrical ratings, and local code requirements before purchasing or installing outdoor lighting equipment. When working near household voltage, hardwired boxes, or damaged outdoor circuits, use a qualified electrician.